- Good print quality
- Rapid heating times
- Large print volume
- Direct drive extruder
- Excellent wire management
- Deals well with flexible filaments
- Quiet operation
- Reliable automatic bed leveling
- Quick to assemble
- Wobbly gantry at higher print speeds
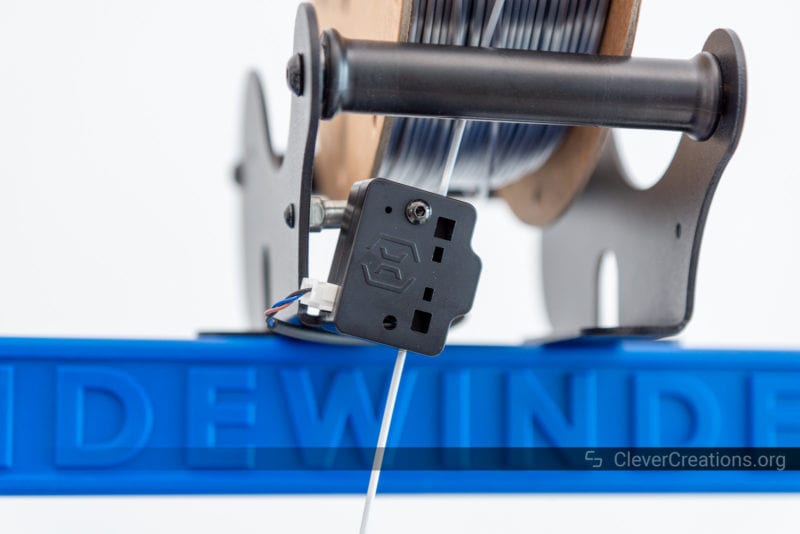
- Flimsy spool holder
- Non-intuitive UI
- Slippery feet
- Bad print bed temperature uniformity
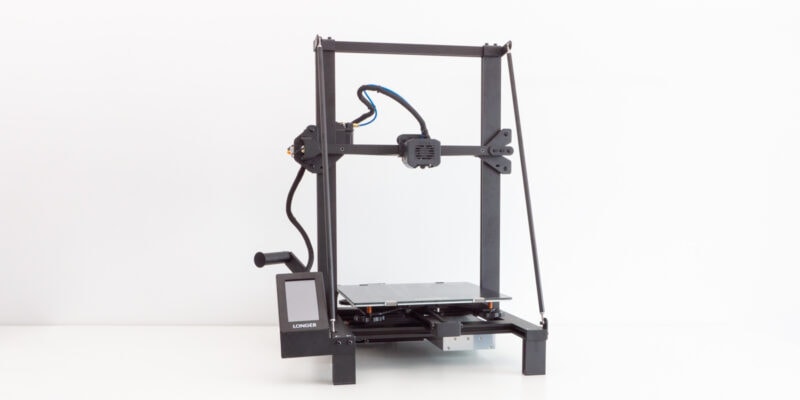
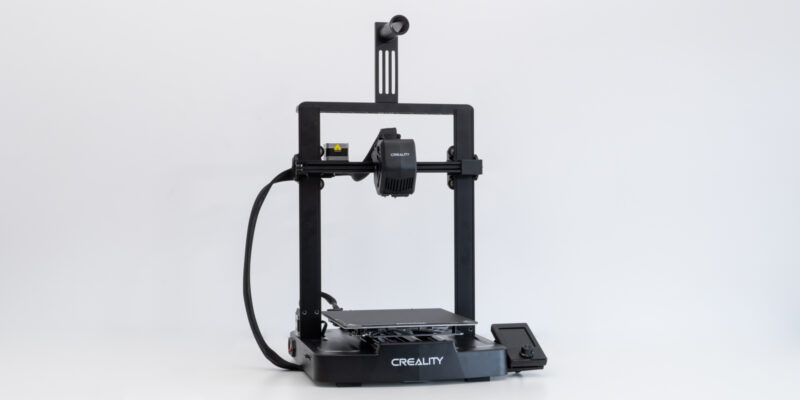
The original Sidewinder X1 has been out in the wild for a while now. Over the years, Artillery iterated its design, continuously releasing new versions based on user feedback.
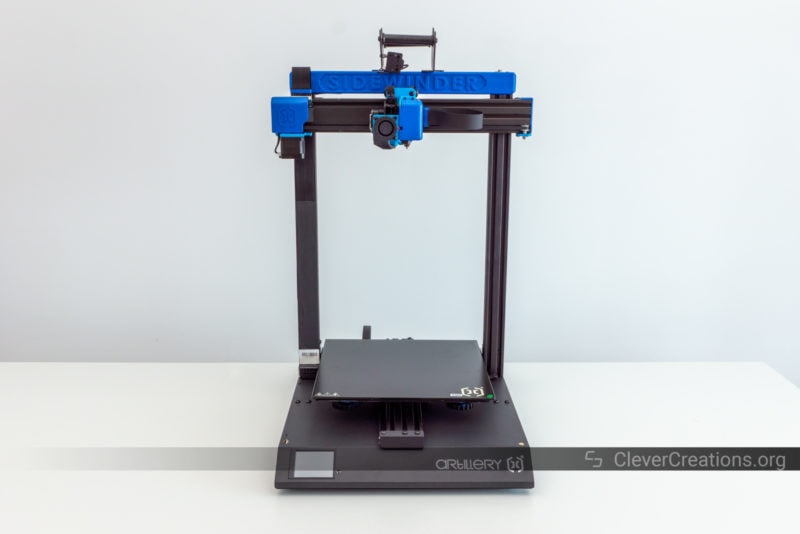
Instead of following up with a new Artillery Sidewinder X1 V5, the company decided to release the Sidewinder X2 instead. Despite its new designation it is a natural extension of the X1 series, with many features that were carried over from the previous model.
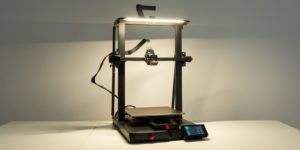
The Artillery Sidewinder X2 also comes with several new additions that promise to improve your 3D printing, so it is time that we put it to the test and see if it is one of the best 3D printers under $500 right now.
Let’s see what the Sidewinder X2 3D printer has to offer!
Artillery Sidewinder X2 Specs
| Artillery Sidewinder X2 Specifications | |
|---|---|
| Price | GeekBuying | Amazon | MatterHackers | AliExpress |
| Assembly | Semi-assembled |
| Bed leveling | Manual |
| Built-in camera for monitoring | No |
| Closed print chamber | No, an open structure |
| Connectivity | USB, TF card, USB drive |
| Display | Full-Color Touch Screen |
| Extruder type | Single direct drive |
| Filament runout detection | Yes |
| Input | .STL, .OBJ, .DAE, .AMF |
| Manufacturer | Artillery3D |
| Manufacturer country | China |
| Max extruder temperature | 240℃ |
| Max heated bed temperature | 130℃ |
| Mechanical arrangement | Cartesian |
| Nozzle size, mm | 0.4 |
| Operating system(s) | Windows, Mac OSX, Linux |
| Outer dimensions millimeters (xyz) | 550 x 405 x 640 mm (550 x 405 x 870 with spool holder) |
| Print recovery | Yes |
| Print speed | 150 mm/s |
| Printable material(s) | PLA, ABS, TPU, flexibles, wood composites |
| Printer type | Material extrusion |
| Slicing | Cura, Simplify3D, Slic3r |
| Weight |
12.9 kg |
| Build volume | 300 x 300 x 400 mm |
| Min layer height | 100 Microns |
| Technology | FDM |
| Frame |
Aluminum |
Technology
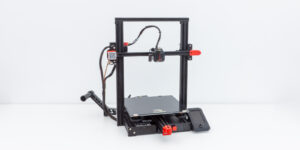
With its 300x300x400 mm print volume, the Artillery Sidewinder X2 can be labeled as a large 3D printer. Because it uses filament to produce prints, it’s a FDM (fused deposition modeling) machine.
This makes it especially useful for people who need to produce large parts or prints, for example, if you need to 3D print helmets, create 3D printed cosplay armor, or other pieces that are too big to fit on a regular FDM 3D printer. Those typically have a build volume of ~220x220x250 mm and are incapable of producing such large prints in one piece.
The Sidewinder X2 can also be used to produce multiple small prints at once, which can be useful if you need to make money with your 3D printer and produce a lot of parts simultaneously.
If you are only interested in 3D printing small-to-medium parts, then you might want to consider other 3D printers under $500, like the Artillery Genius Pro, since the Sidewinder X2 is overkill for that purpose. The X2 takes up a lot of space and you can get better value for your money by opting for a smaller printer if it suits your needs.
Still interested in the Sidewinder X2? Let’s take a closer look at what this large-scale 3D printer has to offer.
Unboxing
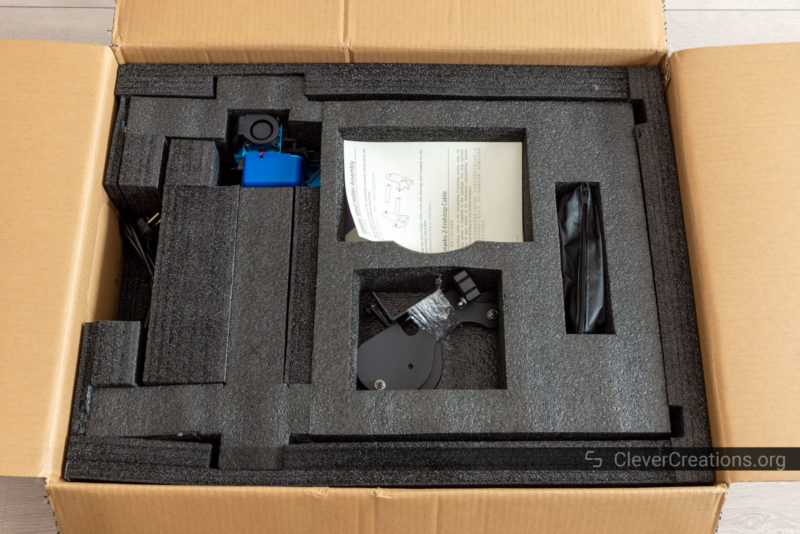
Despite its size, the Artillery Sidewinder X2 comes in a surprisingly small box. Its components are densely packed in foam, which helps protect them during transport.
We are not sure if they are packed optimally, as our Sidewinder X2 came with some damage that you will learn about more later.
For now, let’s take a look at what’s included in the box:
- Sidewinder X2 base
- Sidewinder X2 XZ gantry
- Spool holder components
- Pouch with a collection of 3D printer tools
- Power cable
- USB stick
- Manual
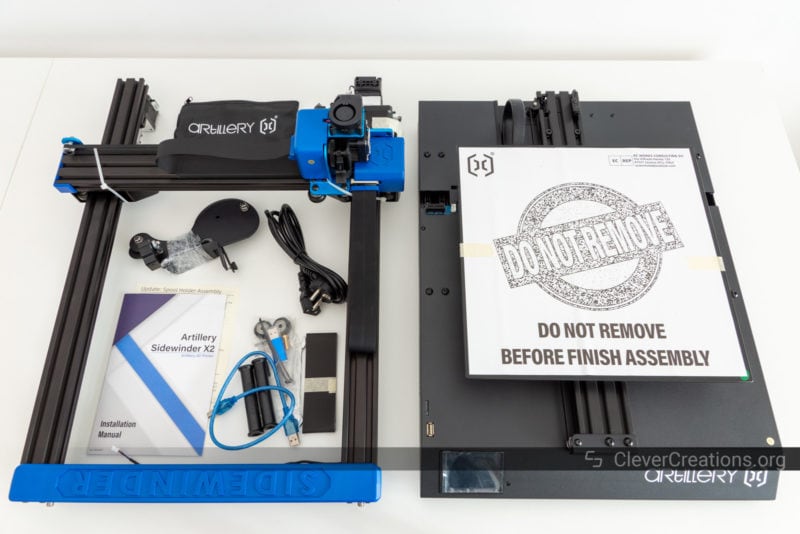
This is fewer components than we typically see from 3D printers at this price point. Part of this is because the Sidewinder X2 comes almost completely assembled. For example, where other 3D printers come with their touch screen module separately, that of the Artillery Sidewinder X2 is embedded and pre-installed in the base.
However, what is also lacking are a lot of the extras that you need to get started. For example, there is no filament included. Instead, you will need to supply your own. Also missing are common 3D printing tools, like a bed scraper for print removal, or side cutters for cutting filament.
In addition, you will likely need to get some kind of bed adhesion product, like Magigoo, before you can actually get started with 3D printing. Depending on the filament material you go with, the glass bed of the Sidewinder X2 will need something to help the filament stick.
The lack of these extras is a bit disappointing, as these are things that you can even find included with 3D printers under $300. If you spend close to $500 on your first 3D printer, you probably want to start 3D printing right away.
Getting Started
The assembly process of the Artillery Sidewinder X2 is painless. Many 3D printer manufacturers pre-assemble their machines for the most part before shipping, but Artillery has gone the extra mile and made sure that you need to do even less than usual. It’s 10-15 minutes from unboxing to being ready to print, assuming you have filament ready.
Assembly
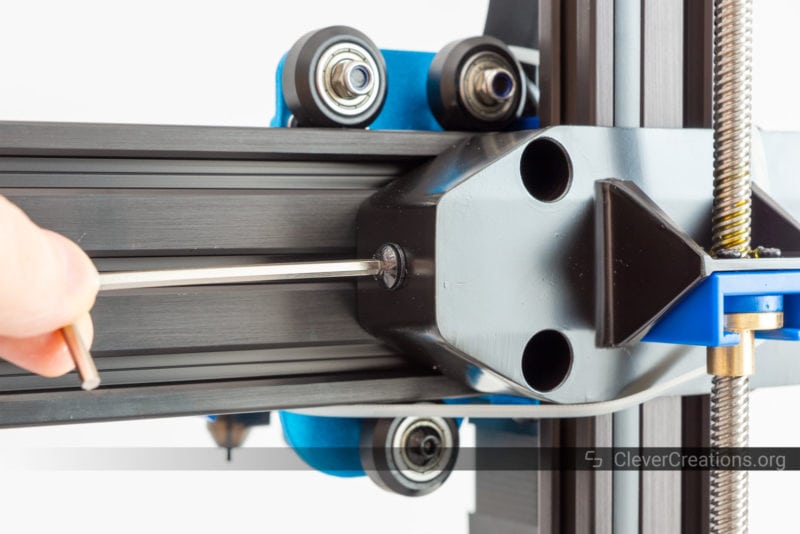
The first thing you need to assemble the Sidewinder X2 is to align the XZ gantry in its correct position on the base. What particularly stands out during this step is the built-in connector that automatically connects everything X-axis-related to the electronics compartment. This is a great system that removes the need for connecting one or two cables manually.
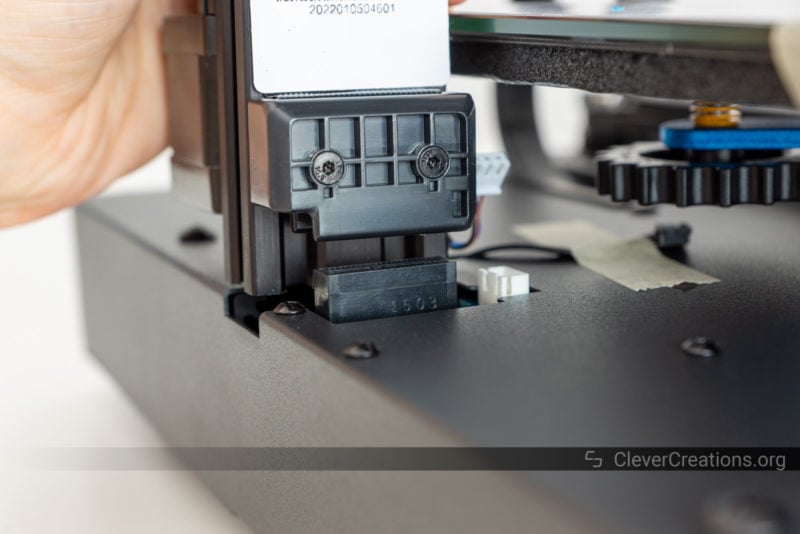
Next is to screw in the M5 bolts to secure the gantry. Again, Artillery has chosen to save you some time by pre-inserting these bolts in the base. In most other 3D printers, these are included in a separate bag with screws that you have to locate them in.
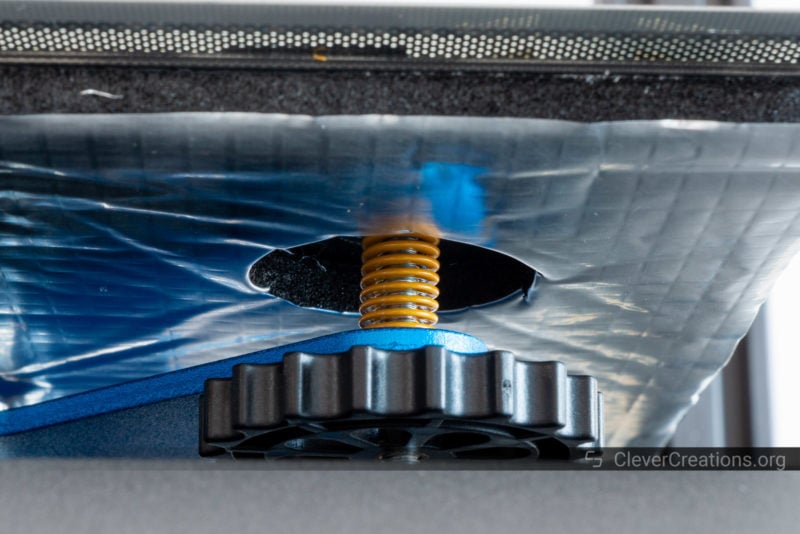
Following up is assembling and attaching the spool holder. This is a step that left us a bit confused, as our spool holder was clearly different from that in the manual. Whereas the one in the manual has two metal bars that get sandwiched in between the large plates, ours did not.
This led to us having to press-fit the plastic rollers onto the pre-installed bearings, which did not fit together very well. As a result, the final spool holder ended up quite misaligned. There just isn’t much that holds it straight.
To be fair, this problem does mostly correct itself when a full spool is placed on the rollers, but it doesn’t exactly give the feeling of a quality product.
After this, you only have to plug in the cables. This is well-documented in the included manual and you won’t have any trouble with it.
One thing we like about the wiring of the Sidewinder X2 is that there is enough clearance under the print bed for the wiring. In our CR-10 Smart Pro review, we caught a potential issue where the Z-axis stepper wiring could get caught in the aluminum print bed wheels. No such issues here.
Setup
Your Artillery Sidewinder X2 is now fully assembled, but you still want to make sure that it is set up correctly before diving into any serious prints. This is something that we always recommend, as it can save you a lot of headache later on.
Many 3D printers omit these steps from their manual (we are not sure why), but Artillery provides clear instructions on how to set up your Sidewinder X2 3D printer correctly before your first print.
It’s only a three-step process, starting with adjusting the tension on the Z-carriages with the included Allen key.
Then adjust all the eccentric nuts on the X and Y axes. This ensures that your axes are moving smoothly without any binding or excess play.
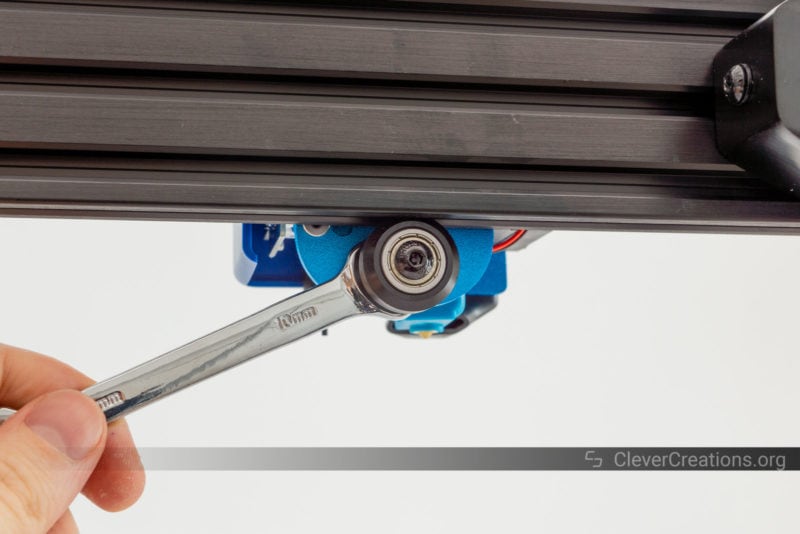
Lastly, follow the manual’s instructions to level the bed and set the Z-offset. We won’t bore you with the details here, as the manual explains it in detail.
After that, just set the power supply voltage switch, plug in the power cable, and… oh no!
Problem
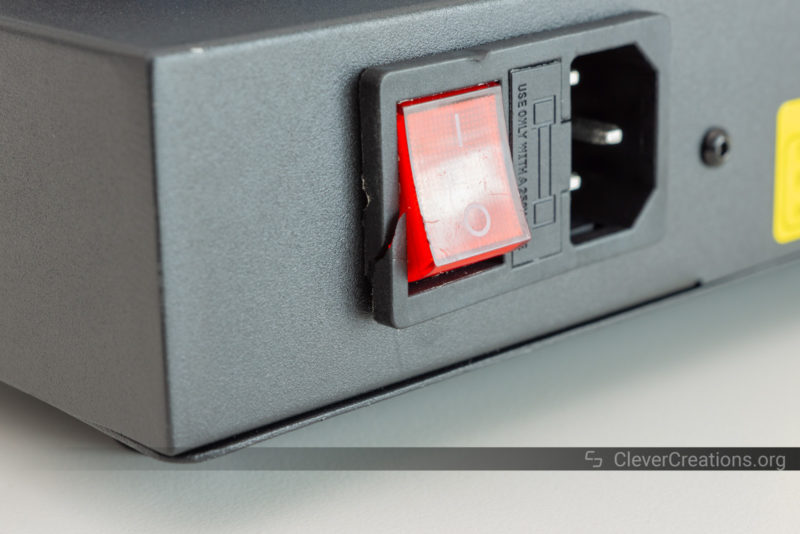
So at this point, we found out that our Artillery Sidewinder X2 came with a cracked power switch. This is not something you want to discover on your new 3D printer.
In our case, we were about 95% sure that we did not cause this. We did not place our Sidewinder X2 3D printer on its back, nor did we bump anything into it.
The most logical explanation we can think of is that the connector was cracked from the start, but since we didn’t closely inspect this part of the printer during the unboxing, we can’t say for sure.
What we can say for sure is that this is a big issue, as it is a component that directly affects the safety of the Sidewinder X2 3D printer.
If you run into this, we highly recommend reaching out to Artillery support and asking for a replacement.
In our case, since we had a review to write, we opened the machine, made sure the switch still worked, and quadruple-checked the wiring and grounding. Everything tested okay, and that was enough for us to continue.
This issue did not affect the rest of our testing, but it was still a serious problem that we were not happy to find.
Sidewinder X2 Features
Build Volume
The 300x300x400 mm build volume of the Sidewinder X2 3D printer is the same as that of the Sidewinder X1. It is not the only feature that was directly lifted from its predecessor, which is why the X2 can also be considered the Sidewinder X1 V5 (with the V4 being the actual latest version of the X1).
This print volume is also similar to some of the other large 3D printers you can currently find on the market, like the Vivedino Troodon coreXY 3D printer (300x300x400 mm), and the Ender 5 Plus (350x350x400 mm).
It has a large enough build volume to print large objects, but if you want something bigger than you can always go with the Kobra Max (400x400x450 mm). Keep in mind that as you move to these 3D bigger printers, you need to make sure that you have enough space on your 3D printer table. It is an easy thing to overlook.
Extruder
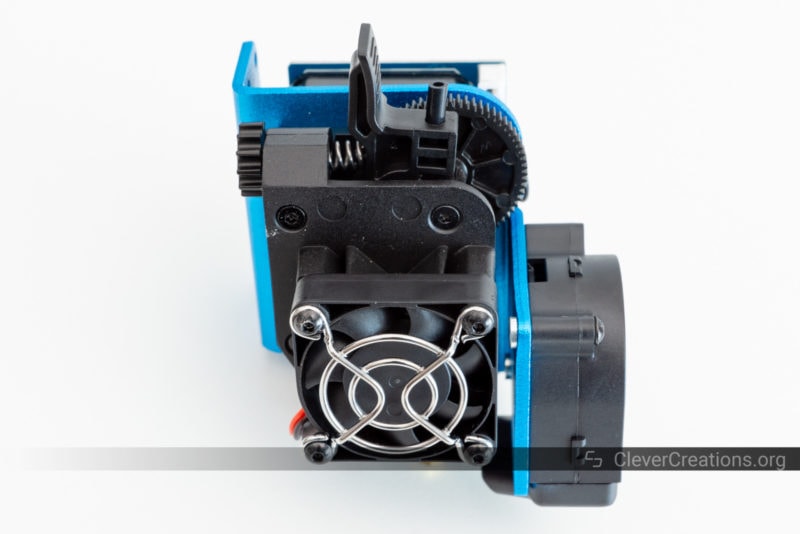
The Artillery Sidewinder X2 carries over the same extruder and hot end from the Sidewinder X1. The extruder is a direct-drive extruder that reminds us of an E3D Titan. It is definitely not representative of an actual Titan direct drive extruder, but it is more similar to the knock-off version that we found on the Anycubic Kobra.
In our testing, the extruder did a good job of pushing filament, with very little filament grinding. It also had no problem holding onto the filament during its very rapid movements and retraction.
These are good properties to have on a large 3D printer like the Sidewinder X2, because you need to be able to push a lot of filament through the hot end quickly during large 3D prints.
Hot End
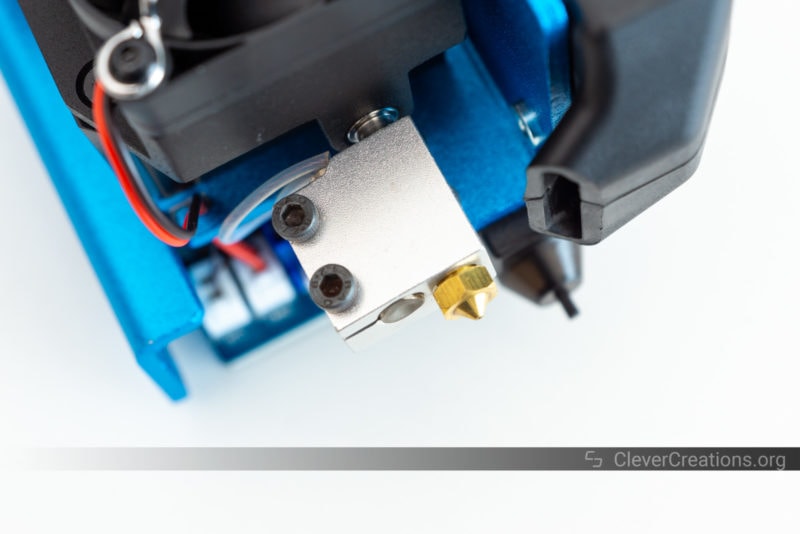
That brings us to the hot end of the Artillery Sidewinder X2 3D printer. Unfortunately, it is a PTFE-lined hot end, which restricts your maximum extrusion temperature to around 240°C. This is because the PTFE liner will start to degrade at temperatures above this.
This limits your material choices to PLA, PETG, TPU, and low-temperature ABS filament. If you want to be able to print with materials like nylon or polycarbonate, you will need to upgrade to an all-metal 3D printer hot end at some point.
For most 3D printing purposes, however, the PTFE-lined hot end is more than enough. If you are unsure if you need the higher temperatures, then you probably don’t.
The Sidewinder X2 hotend is reminiscent of an E3D Volcano hot end. Again, this is also designed to let you put a lot of filament through quickly, forming an excellent combination with the direct-drive extruder on the print head.
Print Bed
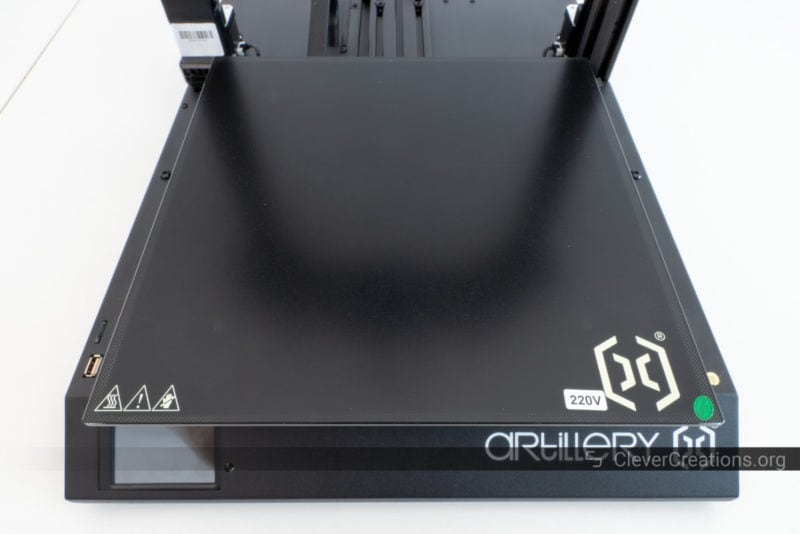
Another feature that makes us label the X2 as the Artillery Sidewinder X1 V5 is the print bed. It is the exact same print bed as the X1 V4 uses, albeit with minor upgrades to cable management.
The great thing about the print bed is that it is A/C (220V/110V) powered. Compared to more typical direct current (D/C) powered beds, it heats up significantly faster.
If you are familiar with 3D printing, then you know that waiting for the print bed to get up to temperature can get frustrating, especially with larger print beds like the one found on the Sidewinder X2 3D printer. Luckily, that is not something you need to worry about with this machine.
The print surface is able to reach a maximum temperature of 130°C. This means that you can use it with materials like ABS without any issues.
Because the print bed is A/C-powered, it is safer to use safety too, even though that might be counter-intuitive. The wires don’t need to carry as many Amps as with a D/C print bed, so there is less of a chance that they will overheat and cause a fire. Even with the higher voltage.
In combination with the improved cable management and wiring of the Sidewinder X2 3D printer, the machine is a lot safer during operation than most of its competitors.
A downside to the Sidewinder X2’s print bed is that it is not removable. The glass bed is fused to the heating element, which means that you need to be very careful when removing prints.
If you ever damage the glass bed, you will need to replace the entire print bed along with its heater, which can be quite pricey.
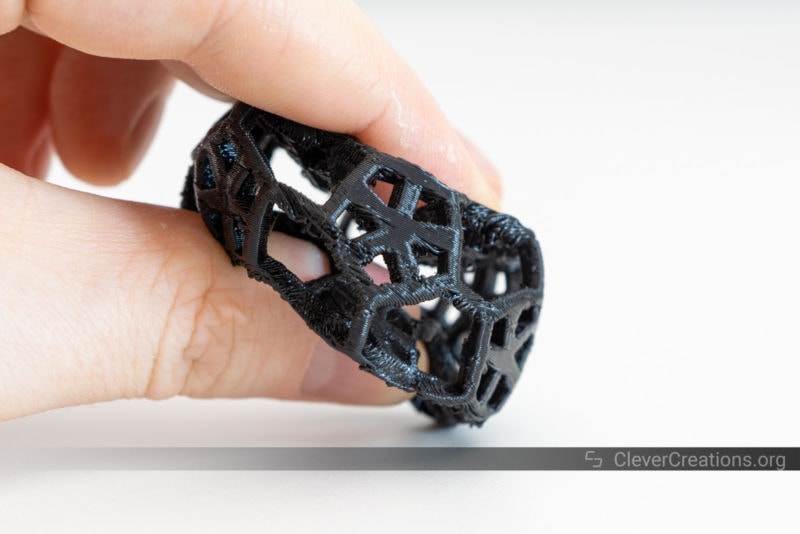
What we really like about the glass bed of the Sidewinder X2 is that it works exceptionally well with flexible filaments like TPU. With PEI or otherwise coated print beds, these flexible materials can sometimes be impossible to remove, leading to a ruined bed.
As long as you take care of the glass print plate properly, you can expect it to last practically forever.
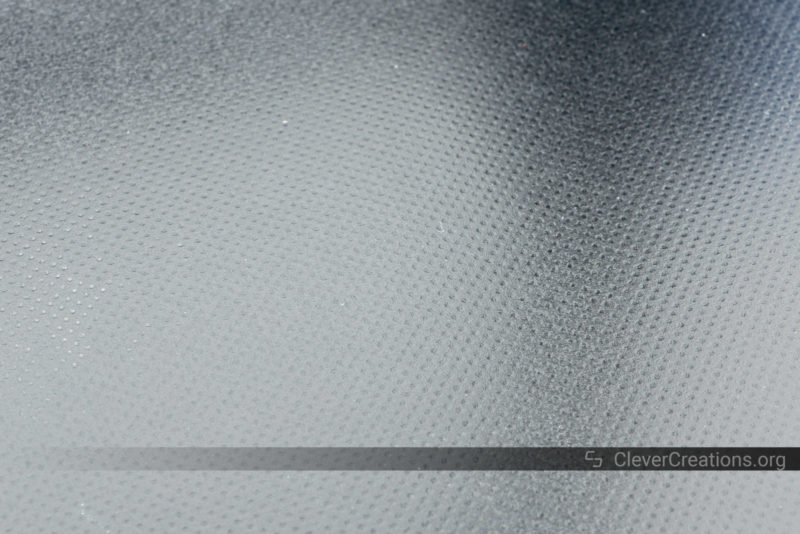
Temperature Uniformity
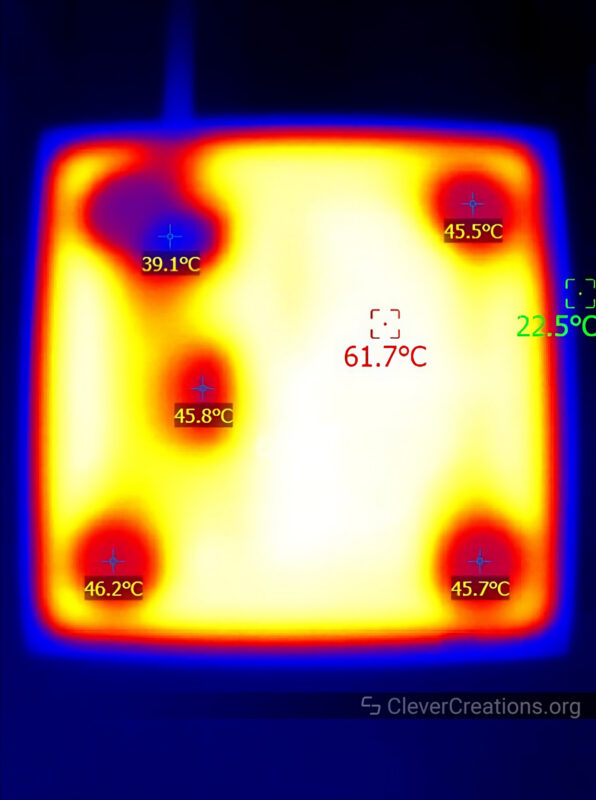
The Artillery Sidewinder X2 print bed has big problems with its temperature uniformity. In fact, it is the worst we have seen on any 3D printer so far.
The reason for this is the mounting of the print surface. Around the mounting screws, there are no heating traces present. This causes the temperature near these screws to be much lower than the rest of the print bed.
It’s a bit disappointing that Artillery has not addressed this issue on the Sidewinder X2 3D printer, as it is something that they must have been aware of from the previous generation Sidewinder.
This will lead to warping and delamination issues on bigger prints. So despite the fast heating times, the uneven surface temperature means we cannot recommend the Artillery Sidewinder X2 for larger prints in materials like ABS.
Heating Times
With its A/C-powered print bed, the Artillery Sidewinder X2 3D printer heats up extremely quickly. With other 3D printers, you have to wait a long time for the heated bed to get up to temperature. Here, it only takes a minute or so.
The same goes for the hot end. Despite it being a Volcano-style hot end that is known to take longer to heat up, the Sidewinder X2 gets it up to temperature in under a minute. Judging by that time, there is at least a 50W heater cartridge in there.
| Hot End Temperature | Time |
|---|---|
| 27 °C | – |
| 200 °C | 48 seconds |
| 240 °C | 1 minute 3 seconds |
| Print Bed Temperature | Time |
|---|---|
| 27 °C | – |
| 60 °C | 44 seconds |
| 90 °C | 1 minute 37 seconds |
| 130 °C | 3 minutes 2 seconds |
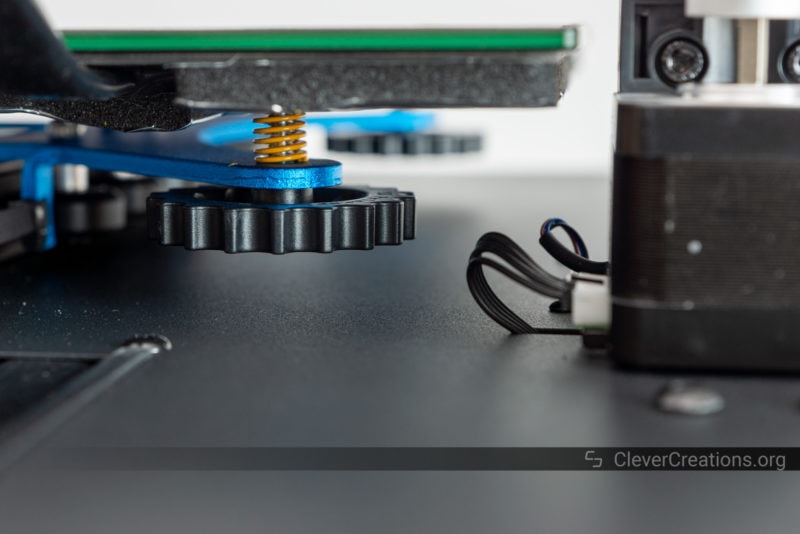
Automatic Bed Leveling
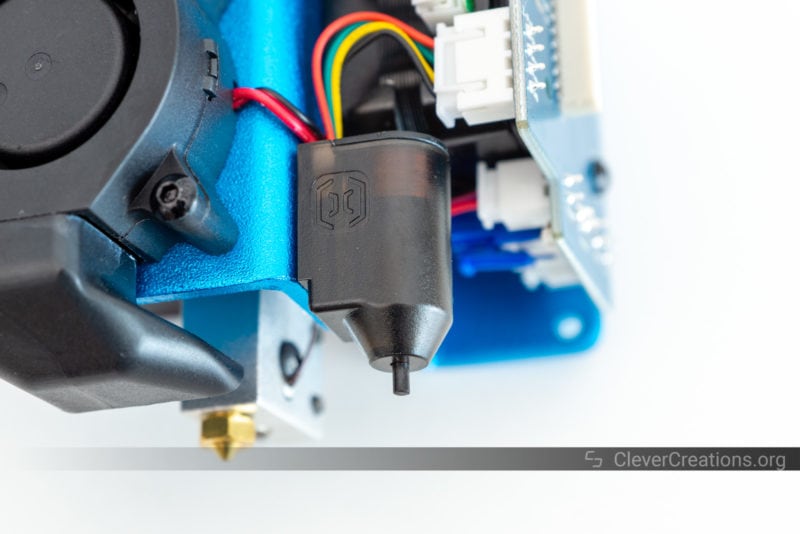
Automatic bed leveling is a function that is starting to become standard nowadays, and we are happy to see that it is now included on the Artillery Sidewinder X2 3D printer as well.
Through the use of a touch probe, the Sidewinder X2 can probe the print bed at various points and then automatically adjust the Z-axis offset to ensure that the nozzle is always the correct distance away from the bed.
This means that you won’t have to spend your time manually leveling the bed, which is a common frustration on 3D printers that do not have this feature.
You might still have to manual the print bed once, if your Sidewinder X2 happens to be shipped with a large unevenness in the bed. But after that, you can rely on the auto bed leveling forever.
Artillery seems to have chosen for their own developed sensor. It is a probe touch sensor, similar to a BLTouch or Creality’s CRTouch. This is different from what you would find on the Anycubic Kobra Max, for example, which uses a strain gauge sensor on the hotend itself.
We found the bed leveling sensor on the Sidewinder X2 to work very well. It is responsive, snappy, and we did not have any issues with the probe not extending or retracting. This is something that we do occasionally run into with the BLTouch, so we are glad to see that the sensor on the Sidewinder X2 is more reliable.
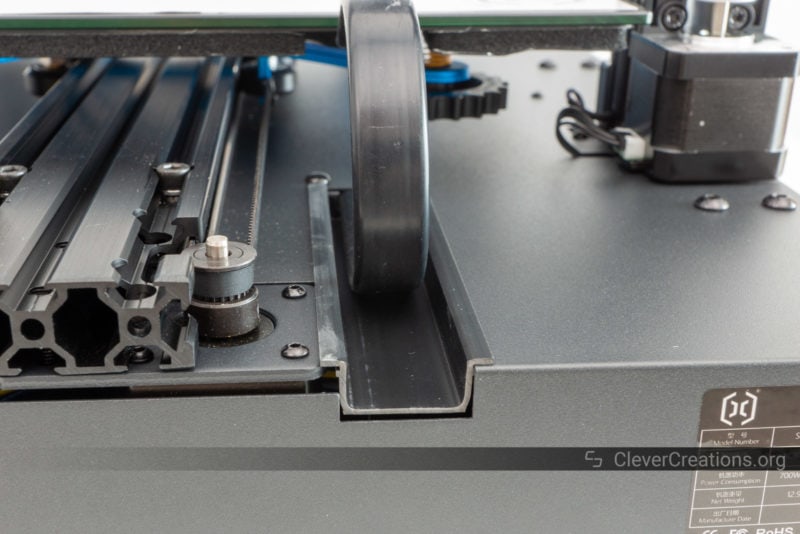
Dual Z-axis Design
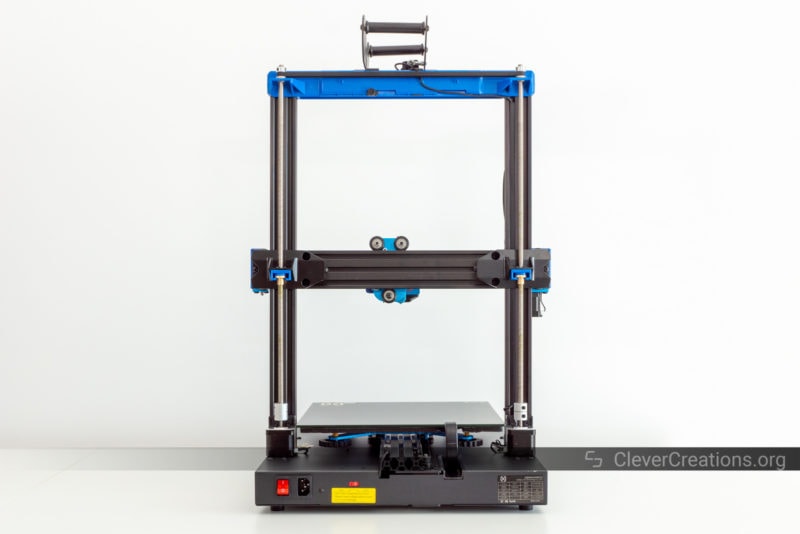
A necessity on 3D printers with this print volume is a dual axis Z-motor and lead screw setup. This creates more stability on the Z-axis, which in turn leads to better print quality.
We were happy to find that Artillery has included this feature on the Sidewinder X2 3D printer as well. With a towering 400 mm print height, they really did not have any other choice. Besides, it is something that was already included on the X1 too.
At the top of the Z axis, the lead screws and stepper motors are connected through a set of pulleys and a timing belt. This helps prevent the stepper motors from missing steps and going out of sync.
This is a common feature on dual Z-axis design 3D printers. You can also find it on smaller models, like the Ender 3 S1 and Ender 3 S1 Pro.
Unfortunately, on the Artillery Sidewinder X2, this is not something that eliminates all issues with stability and Z-banding. There are still a number of issues in that area, which we will get to shortly.
Other Features
Some of the other useful features that you can find on the Artillery Sidewinder X2 are a filament sensor and power loss detection.
The filament sensor does what its name suggests. It is a sensor that is mounted on the spool holder that detects when the 3D printer runs out of filament.
If the filament is brittle and breaks (tip: keep your filament in a filament dry box), or the spool simply runs dry, the printer will automatically pause the print. Once you have replaced the filament or spool, you can simply resume the print from where it left off.
The power loss detection is a similar feature. When the power to the Sidewinder X2 3D printer inadvertently gets interrupted, the 3D printer can resume the print from where it stopped. After the power has been restored, that is.
Both features are a necessity on large 3D printers, since you want to be sure that your big print will not be ruined during power loss or when you run out of filament.
Build Quality and Construction
Just like with any other 3D printer, there are things we like and things we don’t like about the build quality and construction of the Artillery Sidewinder X2.
Frame

The Artillery Sidewinder X2 uses an inverted T-style frame. This is a very popular frame design that is used on many 3D printers.
The advantage of this frame style is that it is simple, cheap, and easy to assemble. The disadvantage is that it is not as strong or stiff as a boxy frame, like that of an enclosed 3D printer.
And that’s exactly the problem that the Sidewinder X2 faces. With its massive print volume, the frame is just not stiff enough. It is not uncommon for the XZ gantry to wobble at medium-to-fast print speeds. Especially because it uses a heavier direct drive extruder (as opposed to a Bowden-style one where the heavy stepper motor is mounted on the frame).
This results in prints that are not as accurate as they could be, and it also causes your prints to have artifacts when you 3D print taller or faster (or both).
Other 3D printers, like the CR-10 Smart, CR-10 Smart Pro, and Kobra Max use reinforcing pull-rods that help increase the stiffness of the frame. The Sidewinder X2 unfortunately does not have these.
The original Sidewinder X1 had the same issue, and we were surprised that Artillery has not done anything to address this in the X2.
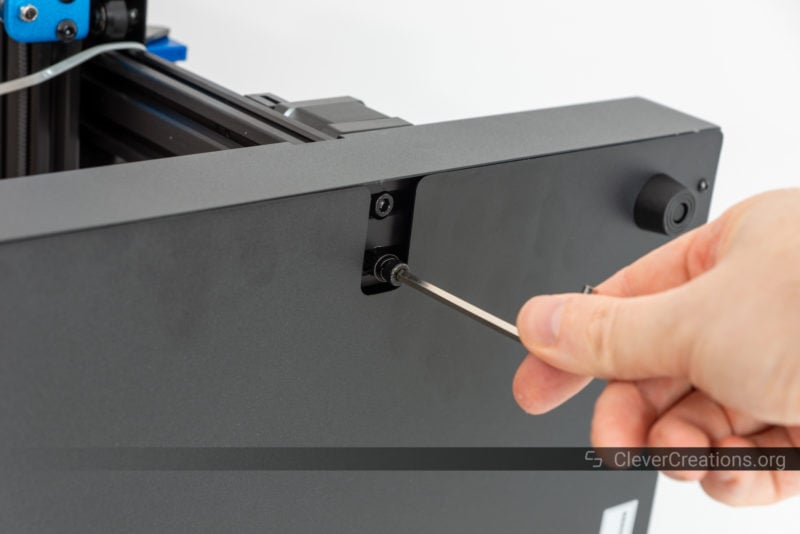
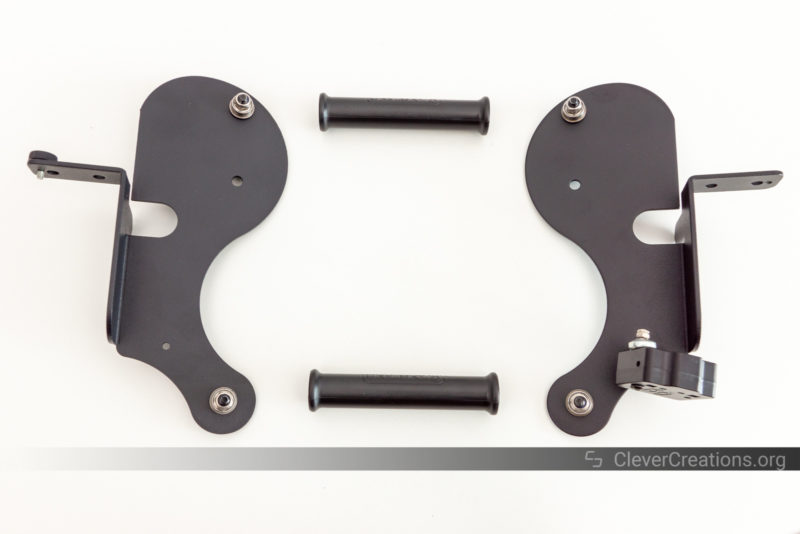
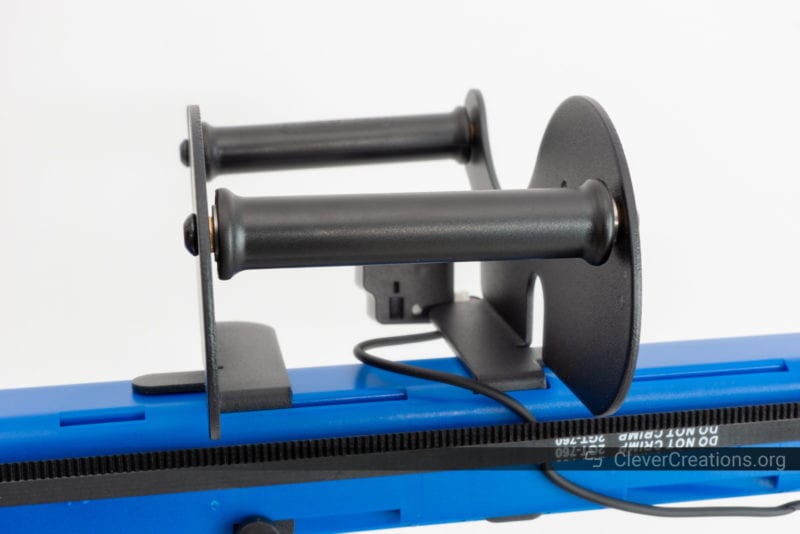
Luckily, because we are talking about 3D printers, several users have found ways to 3D print solutions for this. For example, these DIY stabilizer brackets let you reinforce the frame the exact same way as the CR-10 Smart and Kobra Max do.
Electronics
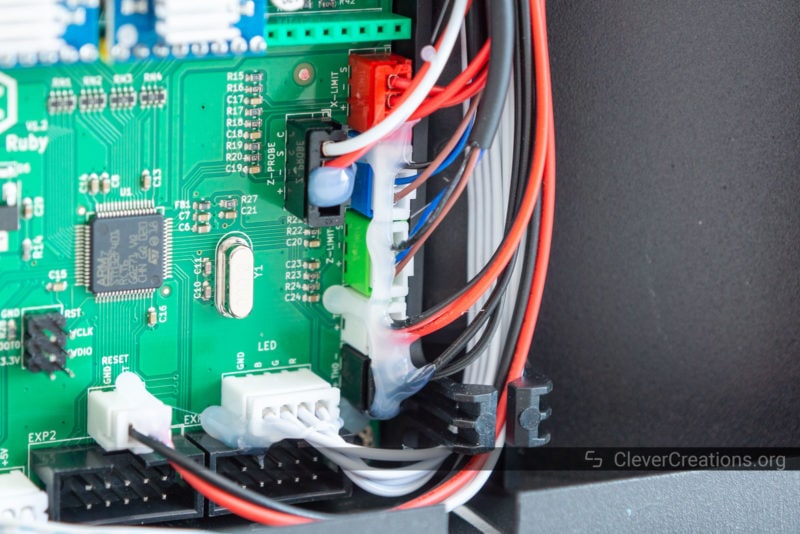
Controller Board
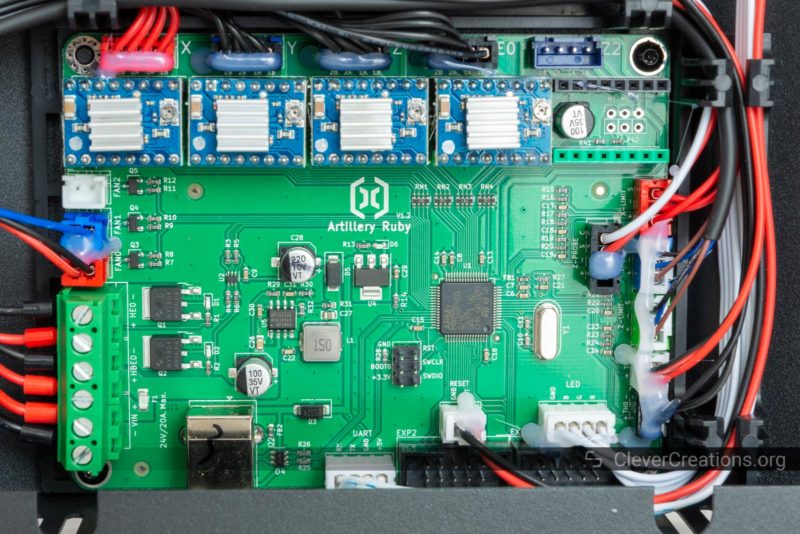
While the Sidewinder X1 used an 8-bit ATMEGA2560-based controller board, the Artillery Sidewinder X2 comes with a more modern board with a 32-bit processor. This is a big upgrade, as 32-bit boards offer much better performance than 8-bit boards.
The 3D printer controller board that the Sidewinder X2 3D printer uses is an Artillery Ruby v1.2. It comes with a powerful ARM STM32F401 CPU, which is the exact same chip as we found on the Ender 3 S1 Pro. It’s more than enough power for a 3D printer with these features.
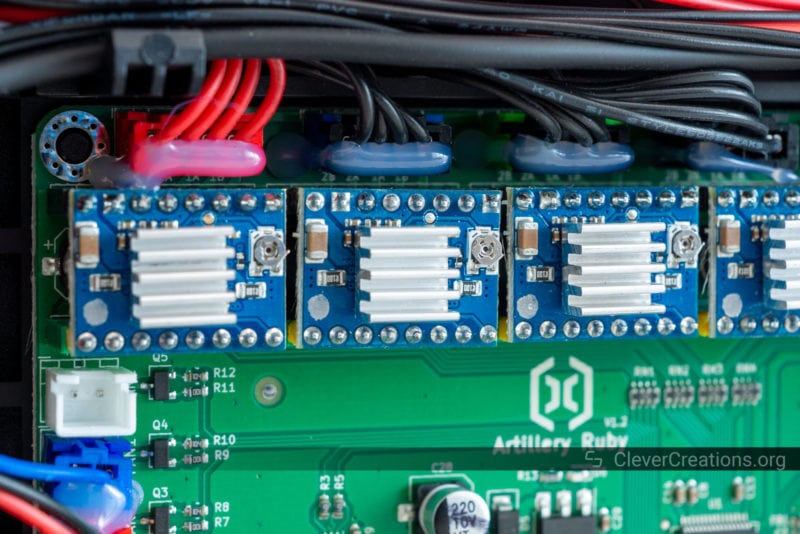
For the stepper drivers, the 3D printer uses removable StepStick-style modules. The advantage of these is that they can be swapped out if they ever go bad.
The disadvantage is that its stepper drivers are not as advanced as the typical on-board Trinamic TMC2209/TMC2208 drivers that are commonly used nowadays.
For example, the stepper motor output current on the drivers is set through a potentiometer, instead of being software-configurable. This means that if you ever want to change the current, you have to physically open up the electronics compartment and adjust the potentiometer.
The most important thing, however, is that the stepper drivers are silent. And the ones on the Sidewinder X2 are exactly that. You won’t be bothered by bothersome vibrations and noises from the stepper motors while your 3D printer is printing.
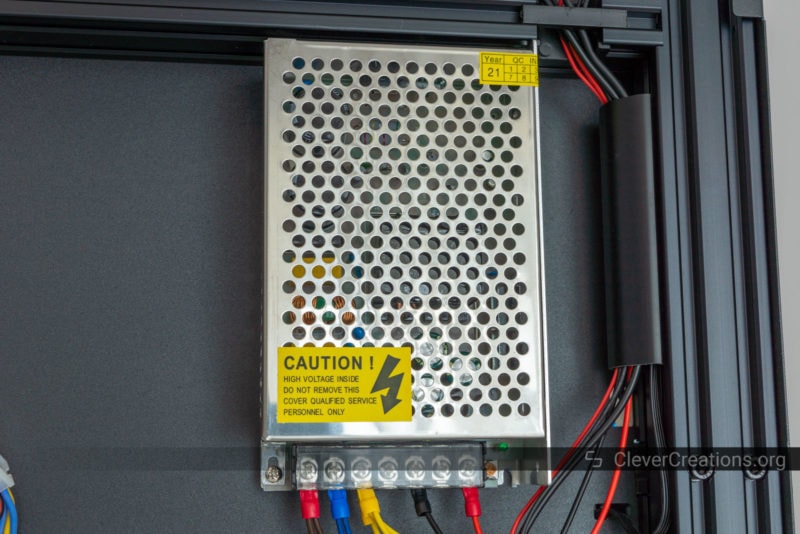
Wire Management
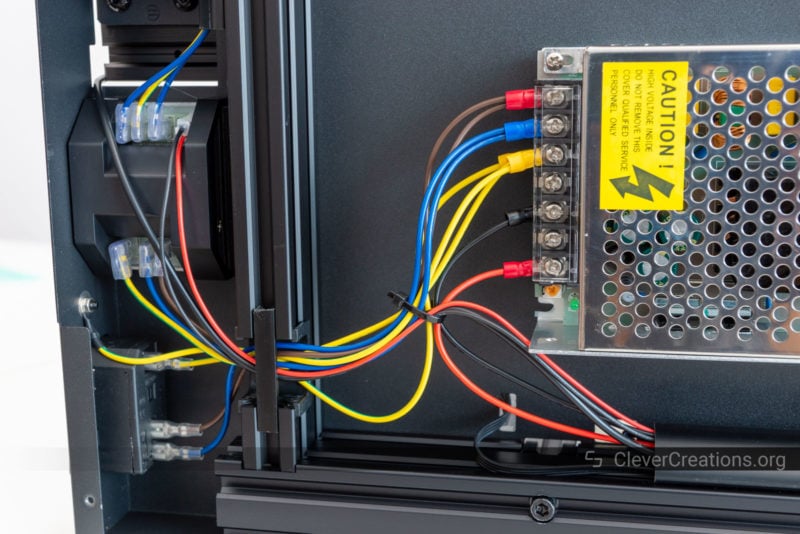
Another thing that the Artillery Sidewinder X2 does well is its wire management. Because it is a 3D printer with an A/C-powered print bed, this is important. You don’t want to be exposed to this kind of voltage if there is a short circuit somewhere.
One way in which the wires are managed properly is the strain relief solutions throughout the 3D printer. In all important places, like around the print bed, the wires are secured in place so that their connections don’t wear out from all the movement.
In addition, in the frame itself, you can now find a cutout slot for the flat rubber sleeved alternative to the less durable X1 print bed cable. This cutout slot increases the cable’s bend radius, along with its lifespan.
At the same time, all wire connectors are hot-glued to their ports on the controller board. Sometimes these can come loose due to the continuous vibrations of the 3D printer when it is in use. On the Sidewinder X2, this is not an issue.
Even more importantly, the entire frame is properly grounded. It is an absolute no-no to have a 3D printer with an A/C-powered print bed that is not properly grounded, so we are glad to see that Artillery has taken this seriously.
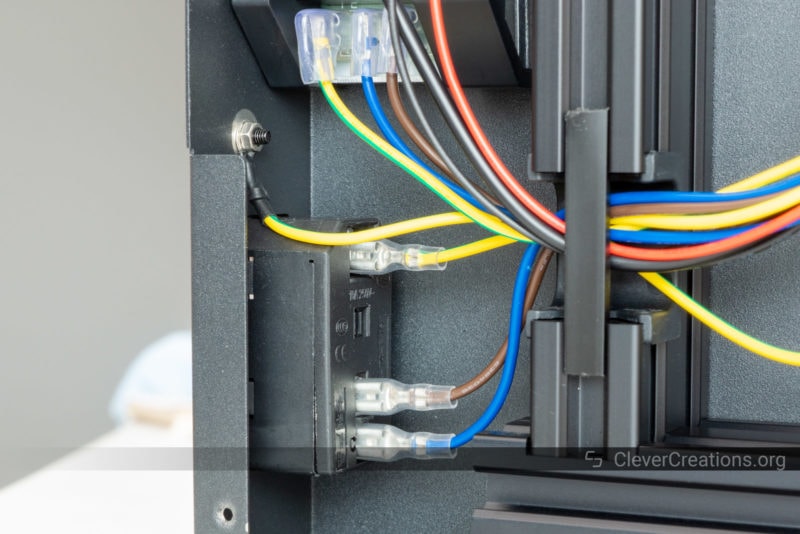
Lastly, the high-current D/C wires are correctly crimped. Sometimes, even the biggest 3D printer manufacturers only tin these with solder. This can cause them to wear out over time, make improper contact, overheat, and potentially create dangerous situations.
In short, Artillery did a great job with the wire management on the Sidewinder X2 3D printer. This is an improvement over the Sidewinder X1, which had several issues in this regard. The X2’s more robust cable support for the print head and better strain relief are welcome additions.
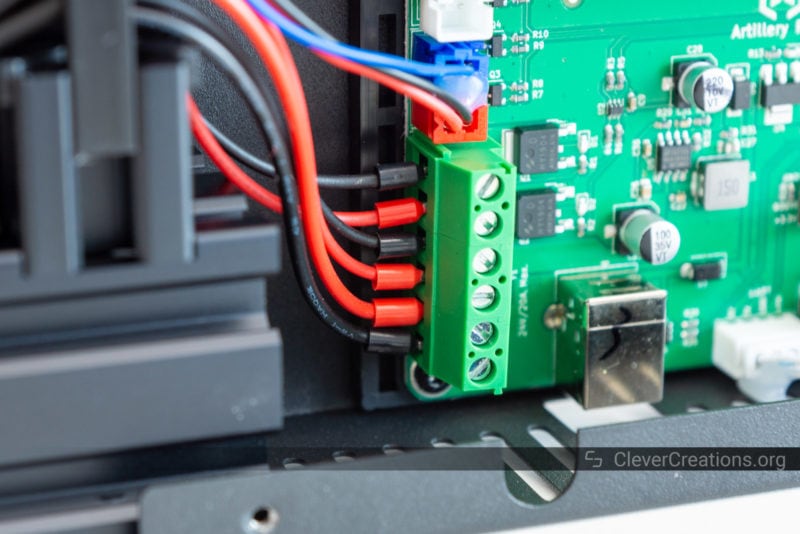
Power Supply
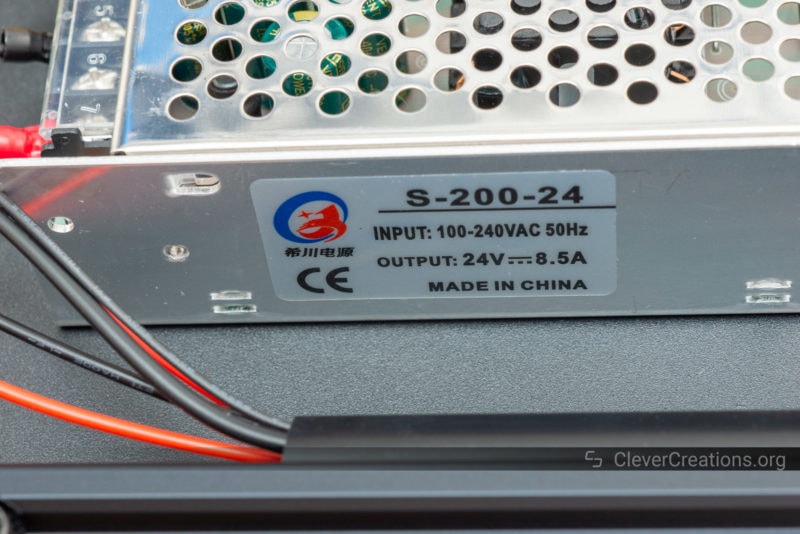
The PSU that the Artillery Sidewinder X2 uses is a no-name 200W 24V power supply. While it does the job, we would have liked to see a branded MeanWell unit instead.
The 200 Watt capacity is less than what you typically see on a 3D printer this size, for example, the Longer LK5 Pro uses a 360W PSU. The Sidewinder X2 gets away with using a smaller PSU because it does not need to supply D/C power to the print bed.
In that regard, 200 Watts is more than enough for all the other electronics on the Sidewinder X2. The power supply will probably never come close to running at its maximum capacity, so there is no need for a more powerful one.
This also means that Artillery was able to use a fanless model, which further helps keep the noise of the Sidewinder X2 at a minimum.
Things We Don’t Like
There are a couple of things about the build quality of the Artillery Sidewinder X2 that we don’t like. They are all relatively minor things, so we’ll group them together here.
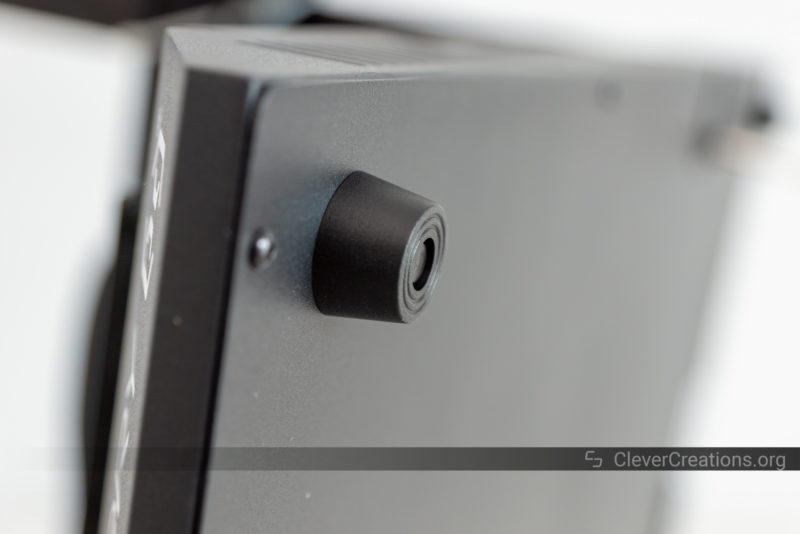
The first thing is the feet of the 3D printer. They are more like hard plastic than grippy rubber feet. As a result, the 3D printer can slide around on your workbench if you push it from the sides.
The hard feet also result in less noise isolation. Even though the Sidewinder X2 is super silent to begin with, the solid feet do not help much to reduce the vibrations that are there.
Secondly, the printer does not have any kind of tool drawer on the front. This is a feature that is fairly common nowadays in 3D printers at this price point, and we are surprised that Artillery left it out.
Since the Sidewinder X2 does not come with any print tools anyway, this is not the end of the world. But it would still have been nice to have. Because the base is relatively low-profile, it might have been hard for Artillery to implement a tool drawer.
Lastly, the plastic reinforcement at the top of the frame would have been more effective if it would have been a section of aluminum extrusion. Especially for a 3D printer this size (that also lacks reinforcing pull rods), the extra bit of reinforcement would have been welcome.
Noise Levels
On the other hand, the Sidewinder X2 is extremely silent. We never bore you with abstract decibel numbers, especially since they can be notoriously inaccurate without calibrated equipment. So we will say that the noise levels of the X2 are similar to a conversation in the next room.
It’s really that quiet. The machine has no noisy stepper motors, loud fans, or coil whine that could bother you.
Ease of Use
A 3D printer is no fun to use if it is not easy to use. So let’s take a look if there are any hurdles to jump through when using the Artillery Sidewinder X2 3D printer.
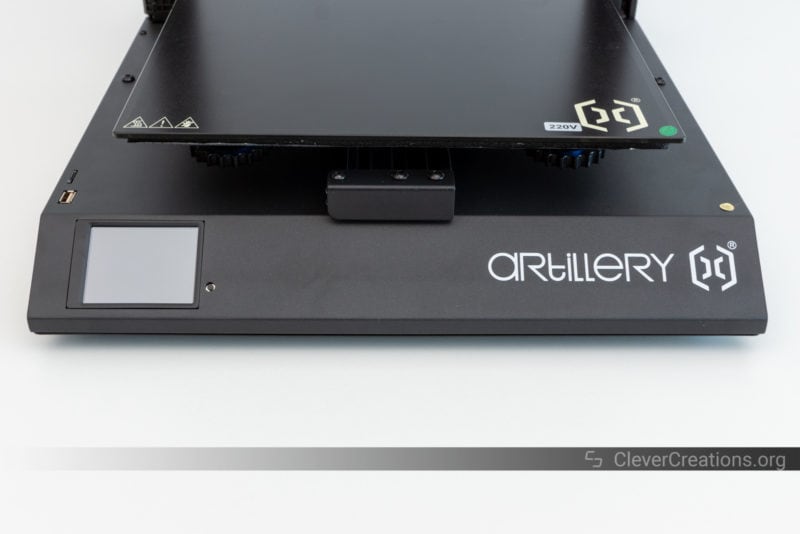
Touch Screen
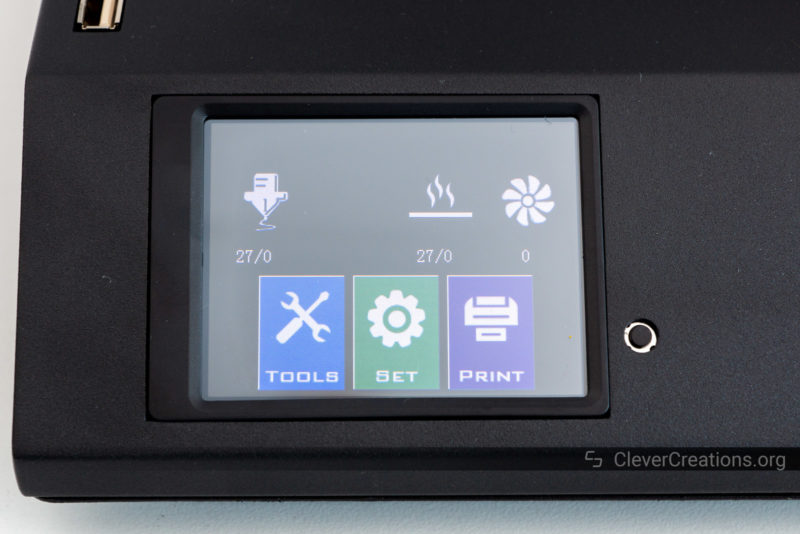
In contrast to its competitors, but similar to its predecessor, the Artillery Sidewinder X2 3D printer has a built-in touch screen. This saves you effort during assembly, but it does come with downsides.
Most notably, the touch screen is rather small. At only 2.9″ / 7.4 cm across, it measures significantly smaller than the touch screens of similar 3D printers.
This is largely because the base of the Sidewinder X2 is so flat. There just isn’t any space to put a larger screen in.
As a positive, the screen is very responsive. We have found it easier to use than the touch screens of most other 3D printers, which typically require a harder press for a click to register. Given the slippery feet of the Sidewinder X2, that is probably a good thing.
User Interface
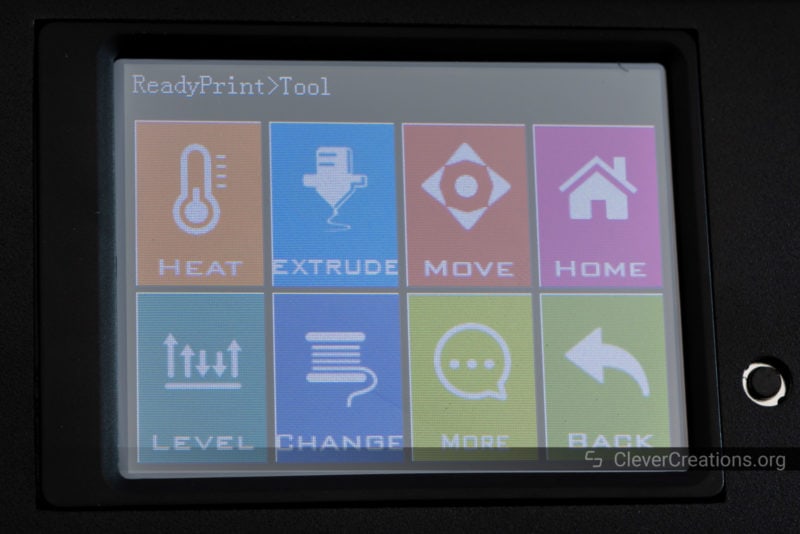
The user interface on the touch screen of the Artillery Sidewinder X2 3D printer leaves a lot to be desired.
For example, in the beginning, it can be overwhelming to work with. Not everything is laid out intuitively, and it can be hard to find your way around.
The good news is that you will get used to it over time. After a couple of 3D prints, you will get the hang of it and you will know where to find everything you frequently use.
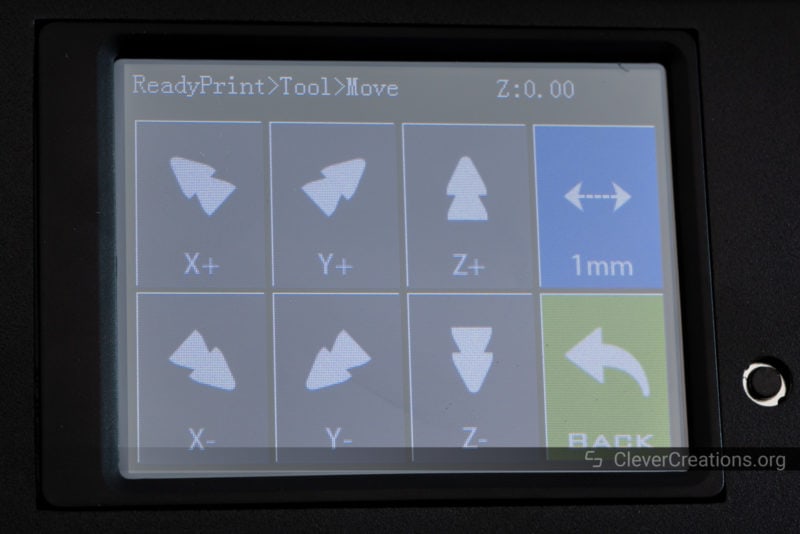
There are also other things in the interface that don’t seem to be thought out well. For instance, the buttons for manually moving the X- and Y-axes use diagonal arrow icons. Given that these axes are by definition straight in a Cartesian coordinate system (and in the 3D printer itself), this often means an extra second to double-check which one to press.
Other limitations are the need to manually click a button to save new Z-offset or bed leveling results in the EEPROM (which is done automatically on other 3D printers), and the fact that there are no other language options for you to select.
Everything that you can access through the user interface does work properly. It’s just that the whole process is not designed with user-friendliness in mind.
Connectivity
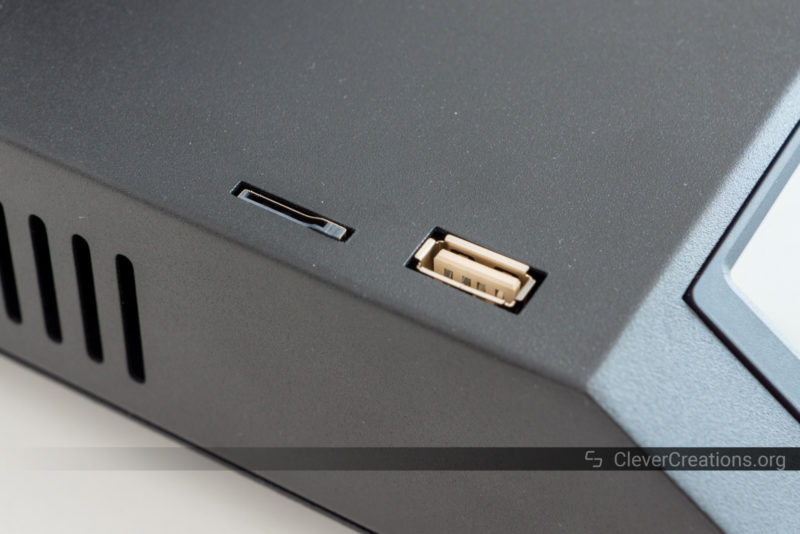
The Artillery Sidewinder X2 3D printer comes with two main ways of connecting to it: USB and microSD. It’s limited, but for most users, it is enough.
Both ports are located on the front left of the device, near the touch screen. On the one hand, this makes them easy to access. On the other hand, if you use a USB cable to connect to your 3D printer, it can get in the way.
We did not run into any issues with either port, and everything worked fine. There’s not much more to say about it, except that for the Sidewinder X3, we would love to see a Wi-Fi connectivity option included. This would make it just a bit easier to use.
Repairability & Maintenance
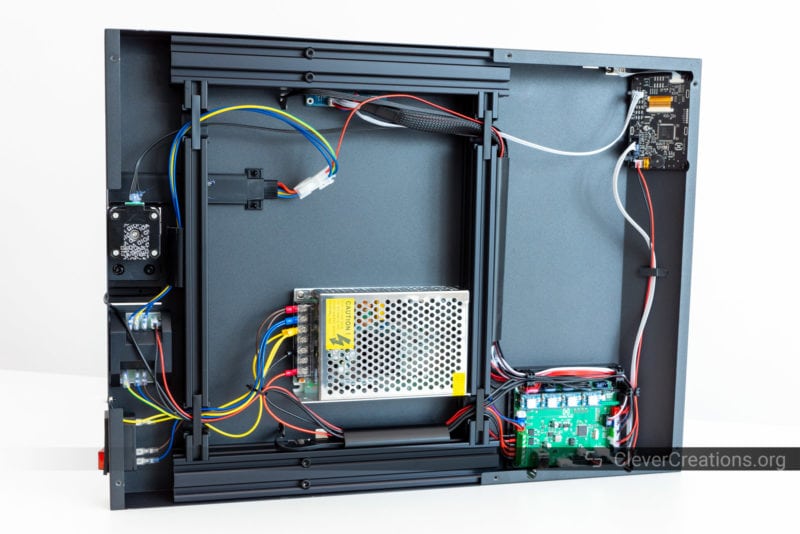
You’ll find that it is pretty easy to work on the Artillery Sidewinder X2. The electronics area is easily accessible, so you can upgrade or troubleshoot parts without any issues.
Accessing the extruder, hotend, and touch probe on the inside of the print head is just as easy. Removing the plastic cover of the print head is enough to give access to all of these components.
One thing we do believe is that the electronics area is a bit too easy to access. The electronics area panel is only held in place with 6 bolts. For a 3D printer this large, that is not enough.
For comparison, the similarly-sized panel of the CR-10 Smart Pro uses 14 bolts to keep it secured to the base.
The result of this is that the underside of the Sidewinder X2 3D printer feels loose and flimsy. It is also possible that it could start to vibrate and resonate at certain print speeds. This is not something we have encountered, however, and is also not something that would affect your 3D prints. It would just be annoying to hear.
Sidewinder X2 Print Quality
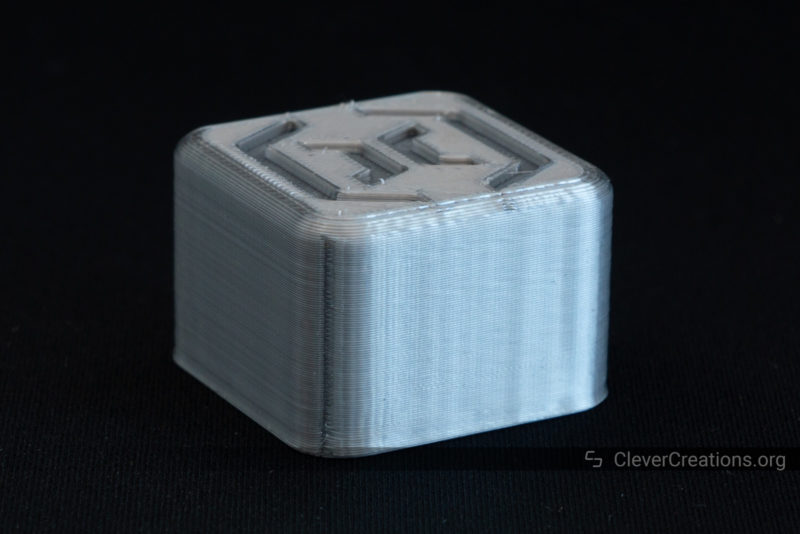
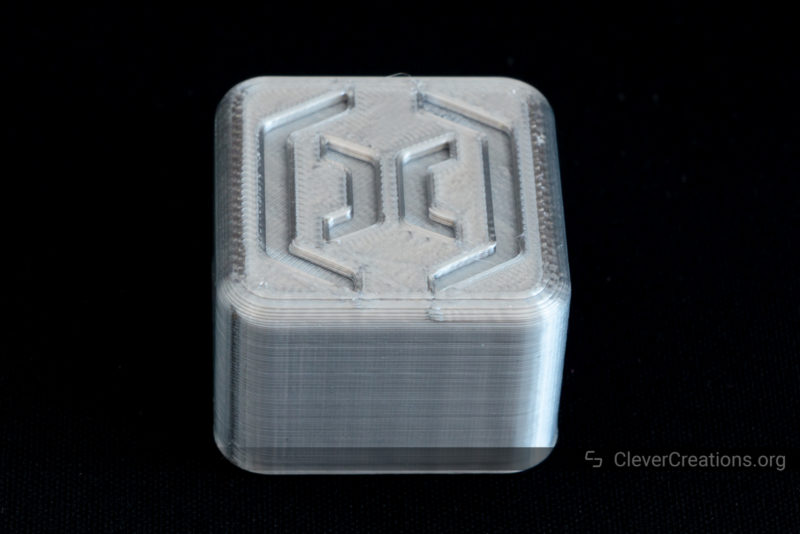
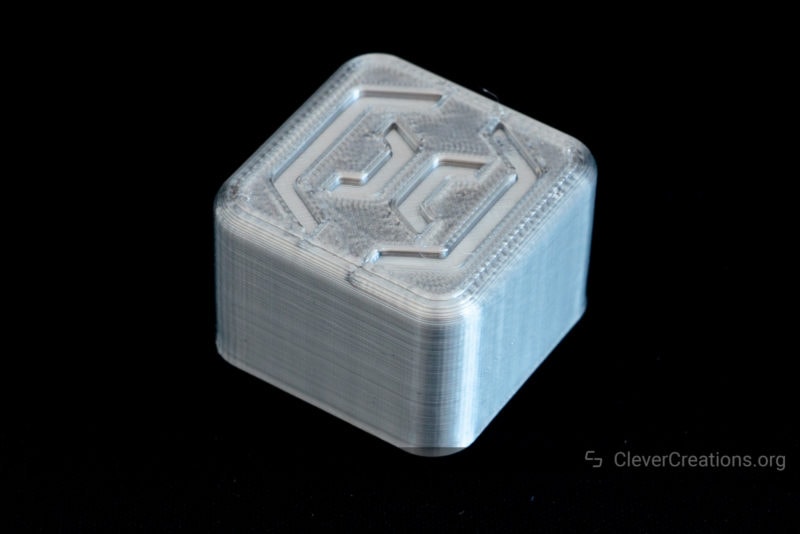
Cube
This is the cube GCode that is included on the USB stick of the Sidewinder X2. It’s nothing special as far as test prints go, and it was no surprise that it printed well. What stood out was that the print speed and acceleration were set quite high. Despite that, only a minor bit of ringing is visible when light reflects onto the cube. In normal circumstances, it is not noticeable.
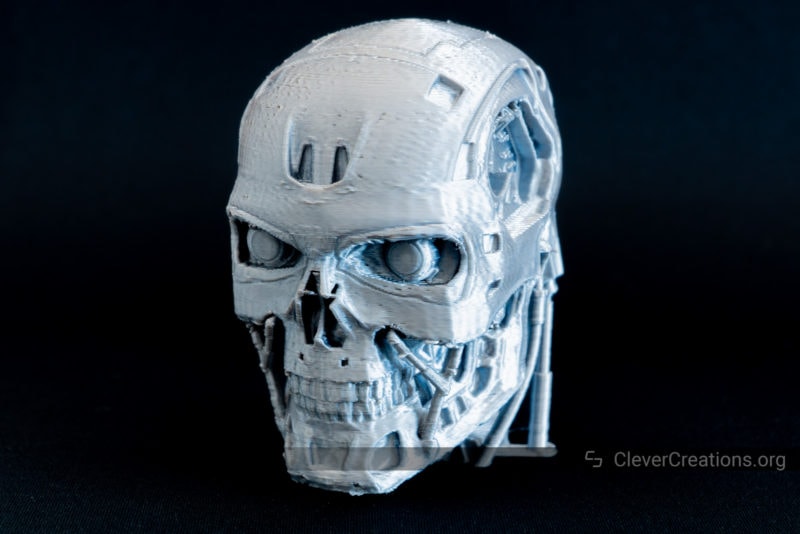
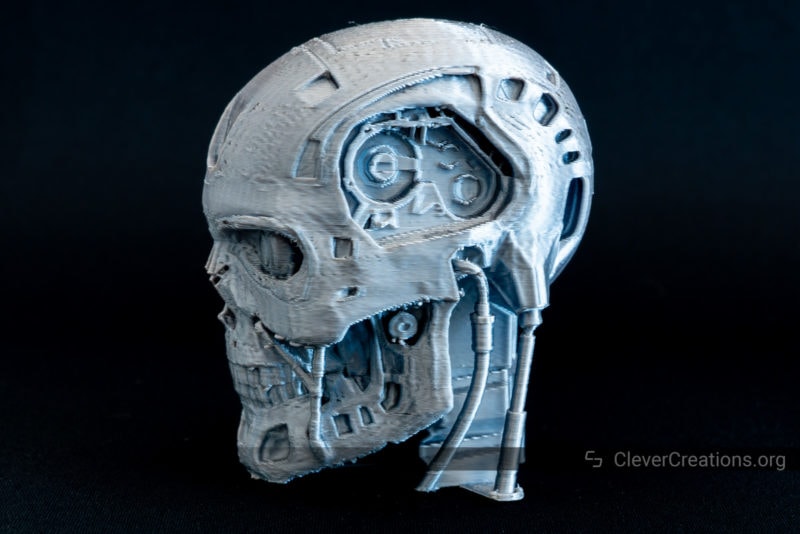
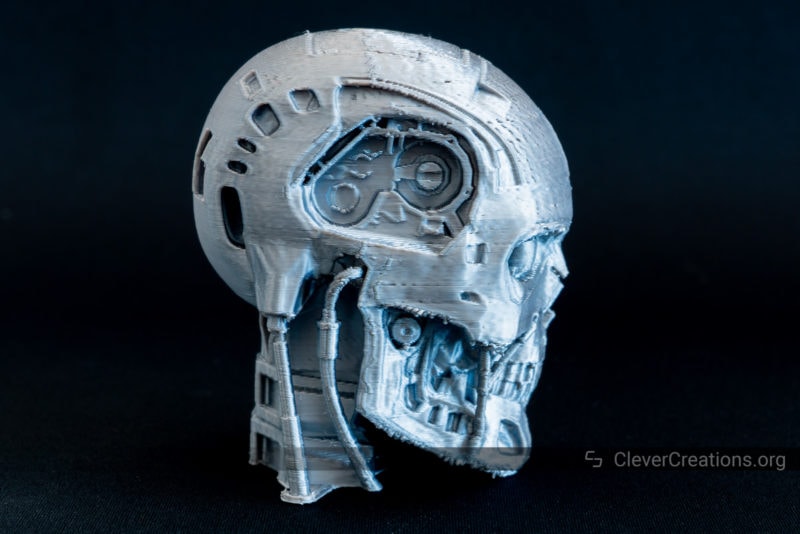
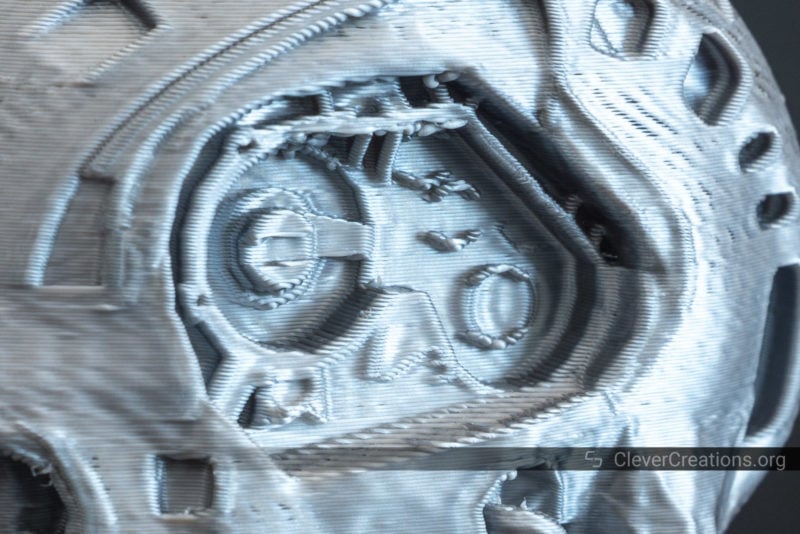
T-800 Terminator Exoskull
Time for a more serious test. This Terminator Exoskull is great for testing overhangs and small details, especially when printed without support as we did.
To our surprise, there were no issues with the overhangs whatsoever. This is not what we expected, because the print cooling duct on the Sidewinder X2 looks sub-optimal in design. But on all sides of the 3D print, the overhangs printed without significant issues, like drooping.
In some locations, it does look like the print head under-extruded a bit. This is probably because we cranked up the print speed, but neglected to increase the hot end temperature to increase heat transfer.
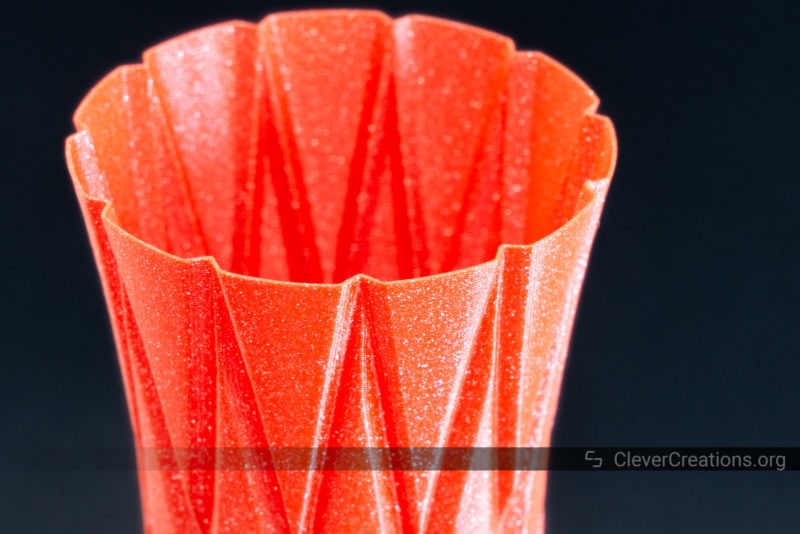
Diamond Vase
To see how the Artillery Sidewinder X2 would perform with taller objects, we stretched out this vase model to about 270 mm high before 3D printing it. In hindsight, it wasn’t the best way to test the wobbliness of the printer gantry. When printing in vase mode, there aren’t as many rapid movement changes as with a ‘regular’ 3D print.
That said, you now do know that the Sidewinder X2 can print beautiful tall objects when it does not have to perform rapid accelerations and decellerations in the higher section of the print. If you do try this, you will have issues with the stability of the unsupported gantry.


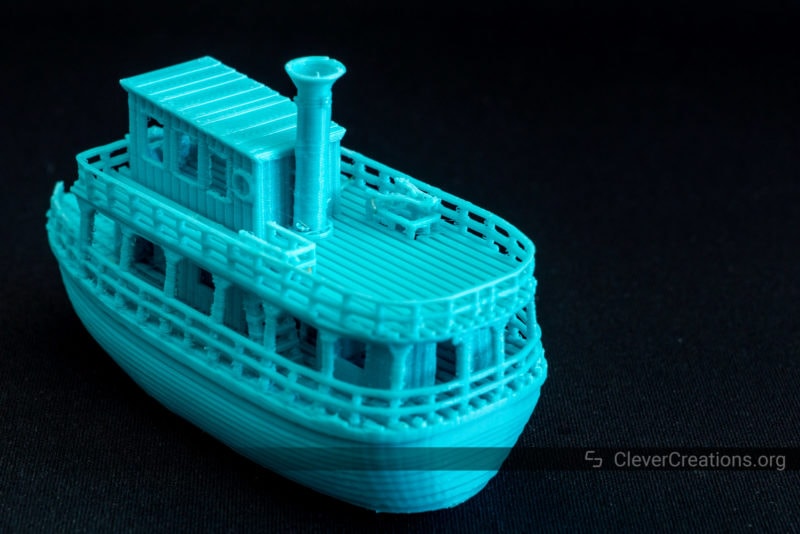
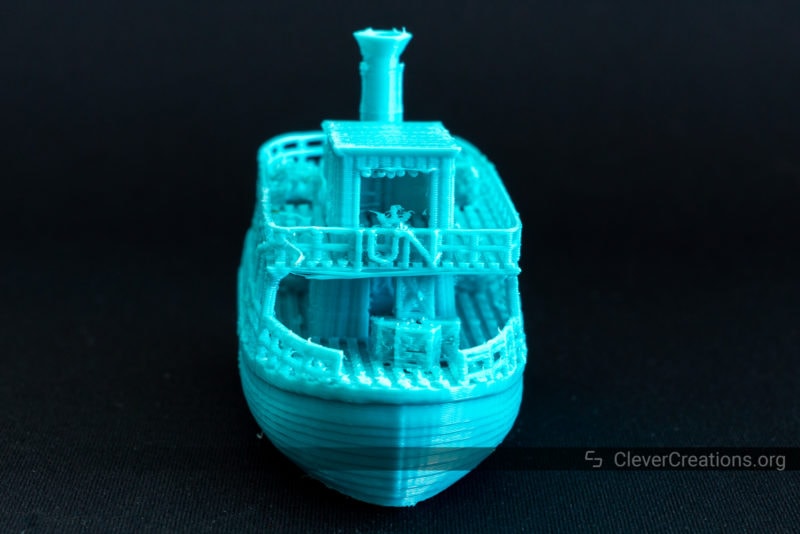
Jun: The Jungle Queen
One of our favorite torture tests: the Jungle Queen. This time with PETG to see how the Sidewinder X2 would deal with that.
There is a bit of PETG stringing going on. Also, some of the smaller details, such as one of the stair railings on the top platform, did not come out well. The latter might be because we scaled the model down 75% to save print time. To deal with the stringing, we could increase the retraction with this PETG in the future.
Overall, we are happy with the results of this 3D print.
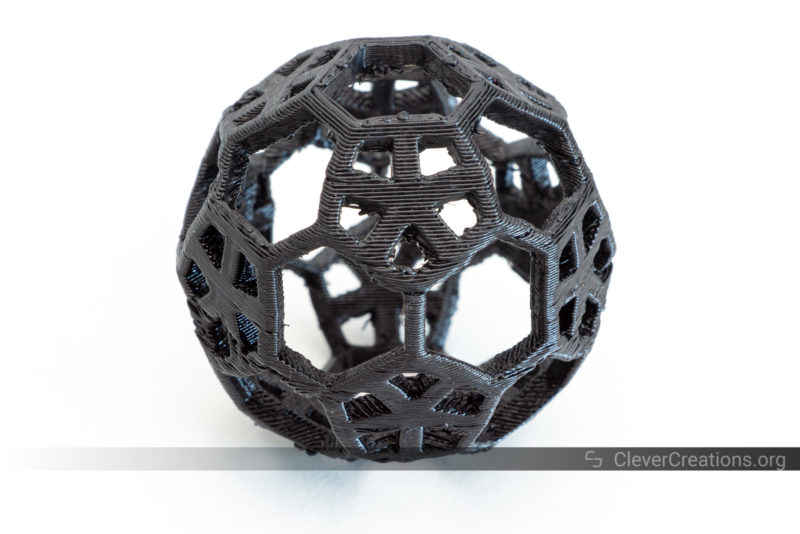
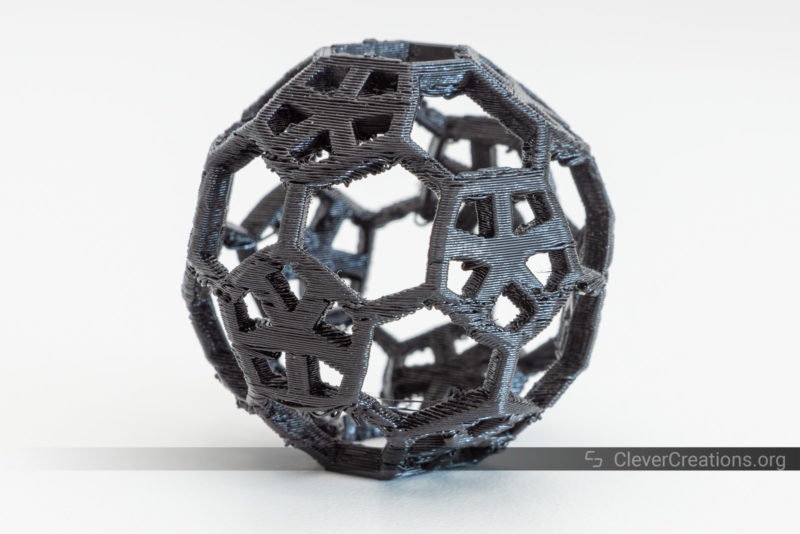
Squishball
Some of you have been asking for more test prints with exotic materials, so let’s see how the Sidewinder X2 is able to 3D print flexible materials.
This squishball is arguably one of the most difficult things to print with TPU. Not only does it have a lot of overhangs, but the thin structures also have a tendency to bend away when the nozzle touches them.
Again, we were impressed with the performance of the 3D printer. The direct drive extruder had no issues whatsoever with the flexible filament, the layer adhesion is great, and none of the thin structures broke off.
Because of the nature of the 3D model and the flexible filament, the print isn’t the most visually attractive in some areas. But that is not something we can hold against the Sidewinder X2. It did a great job.
Similar 3D Printers
There are several other 3D printers that you might be interested in if you are looking at the Artillery Sidewinder X2. They all differ in some way, but all offer either a similar print volume, similar features, or cost the same.
Anycubic Kobra Max
The Anycubic Kobra Max is one of the newest 3D printers on the market. It is bigger than the Sidewinder X2, with a massive print volume of 400x400x450 mm. Despite that, it is similarly priced.
The most notable advantages of the Kobra Max are its reinforcing pull rods and dual Y-axis arrangement. These make it a lot more stable and give better results with its large print volume.
The Kobra Max comes with a Bowden extruder, which lets you print a lot faster, but also causes issues with flexible filaments and is more difficult to dial retraction in for.
If you have the space, can use the larger build volume, and don’t mind 3D printing a lot faster (who would?), then the Kobra Max is a great choice.

Creality CR-10 Smart (Pro)
The Creality CR-10 Smart and CR-10 Smart Pro are two 3D printers with an identical 300x300x400 mm print volume as the Artillery Sidewinder X2.
Just like the Kobra Max, they sport one reinforcing pull bar on each side to make them more stable. Both also come with a variety of smart features, such as support for the Creality Cloud app, an HD camera for time-lapse purposes, and a better dual-gear extruder.
The CR-10 Smart comes with a glass print bed, like the Sidewinder X2 3D printer, whereas the Smart Pro version has a PEI spring steel coated bed. Also different are the hot ends, with the Smart Pro having an all-metal hot end that can reach up to 300 °C.
If you are looking for a 3D printer with a similar build volume and want to be able to take advantage of some of the latest smart features, then either is a great choice, depending on your budget.
One notable advantage of the Sidewinder X2 over these two is its ability to heat up really quickly. Slow heating was an issue we ran into when reviewing the Smart Pro.
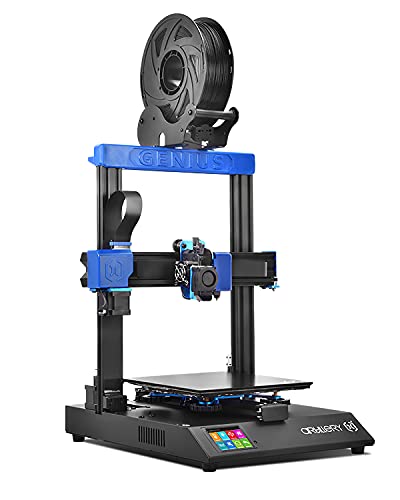
Artillery Genius Pro
The Artillery Genius Pro is essentially the same 3D printer as the Sidewinder X2, but with a smaller print volume. Both 3D printers were released in the same period, and have the same AC heat bed, dual Z-axis setup, touch screen, and so on.
At about $100 less, you are losing out on 150 mm of build height and 80 mm in both the X and Y direction. If you don’t need that extra space, then the Artillery Genius Pro is a great choice.
Creality Ender 3 Max Neo
The Ender 3 Max Neo is Creality’s refresh of the Ender 3 Max. With a build volume of 300x300x320 mm, it comes very close to that of the Artillery Genius Pro.
Because it costs about $130 less, that does sound like a good deal. One potential limitation is the Max Neo comes with a Bowden extruder, which as we mentioned before, can make retraction settings more difficult and generally gives slightly worse print quality.
That said, if you are looking for a 3D printer with a large build volume and don’t mind sacrificing some print quality, then the Ender 3 Max Neo can be a great choice.
Verdict: Is the Sidewinder X2 worth it?
To summarize this Artillery Sidewinder X2 review, the machine is a decent large 3D printer, but it is not for everyone.
Its most notable limitations are its potentially wobbly frame that limits your print speed, and the sometimes confusing user interface. Especially if you are a novice user, the latter is something that you will have to spend extra time on.
That said, if you can look past its shortcomings and don’t mind tinkering with the machine, the Artillery Sidewinder X2 3D printer can be an excellent solution for your voluminous 3D printing needs. It is without a doubt the best of the Artillery printers at the moment.
Its quick heating and ultra quiet stepper driver modules are two features that we really like and that you don’t often see in this price range. The durable print surface and Titan direct drive extruder are also great if you are interested in 3D printing with flexible materials.
For the best results, however, you will need to be willing to make some upgrades, like installing a DIY solution to reinforce the frame. If you are willing to do that, you will have a great time with the Sidewinder X2.