

- Awesome print quality
- High-temperature 3D printing
- Built-in LED lighting
- Automatic bed leveling
- Quick assembly
- PEI-coated print bed
- Touch screen interface
- Poor instructions
- A bit noisy
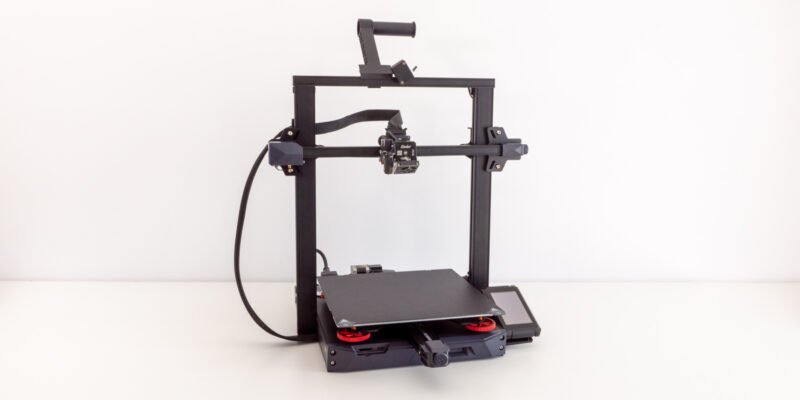
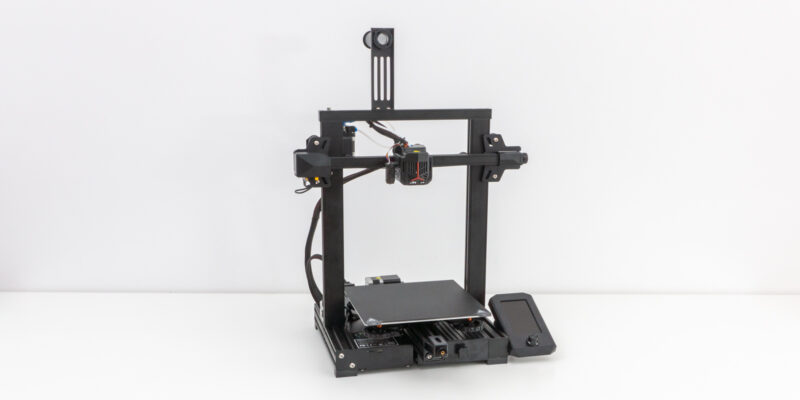
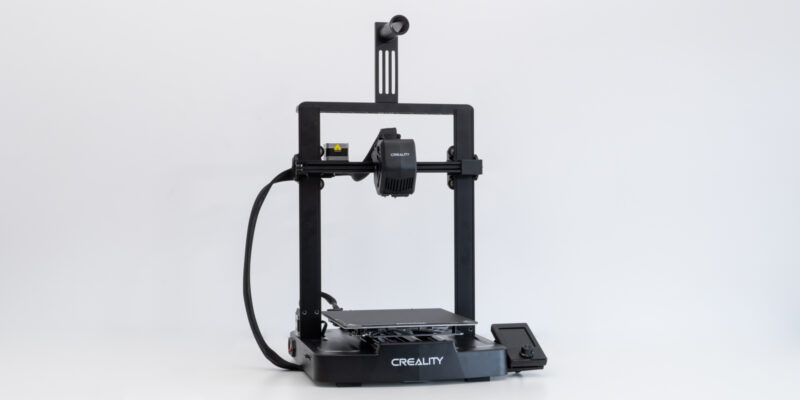
With its new Ender 3 S1 series, Creality has taken the Ender 3 range of 3D printers to the next level. With its upgraded features, the recently released Ender 3 S1 is now one of the best-value 3D printers on the market.
The Ender 3 S1 Pro is an upgraded version of the standard model, with a few new features that make it even better. In this review, we’ll take a look at what this new printer has to offer, and see if it’s worth the extra money.
Because the S1 and S1 Pro have many similarities, this review will mention things we also covered in our Ender 3 S1 review. However, we will also go into more detail about the new features of the Ender 3 S1 Pro, and how they compare to the regular S1.
Let’s dive in!
Creality Ender 3 S1 Pro Specifications
| Ender 3 S1 Pro Specs | |
|---|---|
| Price | Creality | Creality3DOfficial | Amazon | MatterHackers |
| Printing Technology | FDM |
| Print Size | 220 x 220 x 270 mm 8.66 x 8.66 x 10.63 inch |
| Machine Size | 490 x 455 x 625 mm 19.29 x 17.91 x 24.60 inch |
| Print Precision | ±0.1mm |
| Printing Speed | 150mm/s maximum |
| Max Nozzle Temperature | 300°C |
| Max Heat Bed Temperature | 110°C |
| Bed Surface | Spring steel PEI magnetic build plate |
| Layer Thickness | 0.1-0.4mm |
| Nozzle Diameter | 0.4mm |
| Supported Filaments | PLA, ABS, PVA, Wood, TPU90-95, PETG, PA |
| Extruder Count | 1 |
| Extruder Type | Sprite Pro Direct Extruder |
| Filament Diameter | 1.75mm |
| Bed Leveling | CR Touch |
| Filament Sensor | Yes |
| Resume Printing | Yes |
| Screen Type | Touch screen |
| Product Weight | 8.6KG / 19lb |
| Slicer Software | Creality/Cura/Repetier-Host/Simplify3D |
| Supported File Format | STL/OBJ/AMF |
| Printing Method | Type-C USB/ SD card |
| Rated Voltage | 115/230v 50/60Hz 4.5/2.5A |
| Rated Power | 350W |
| Languages | Chinese, English, German, Spanish, French, Italian, Portuguese, Russian, and Turkish |
Printing Method
The Ender 3 S1 Pro is an FDM 3D printer. This means that it uses a filament, which is melted and extruded through a nozzle to create the 3D object.
This technology has been around for a long time and is the most common type of 3D printing technology. It’s also the most affordable.
You can use the S1 Pro for printing in materials such as PLA, ABS, PETG, TPU, and other common filament types. You can also use more exotic materials, like wood filament and metal-filled filament.
FDM printing is excellent for creating strong and large 3D prints. For maximum detail, however, you’ll want to look into resin 3D printers instead.
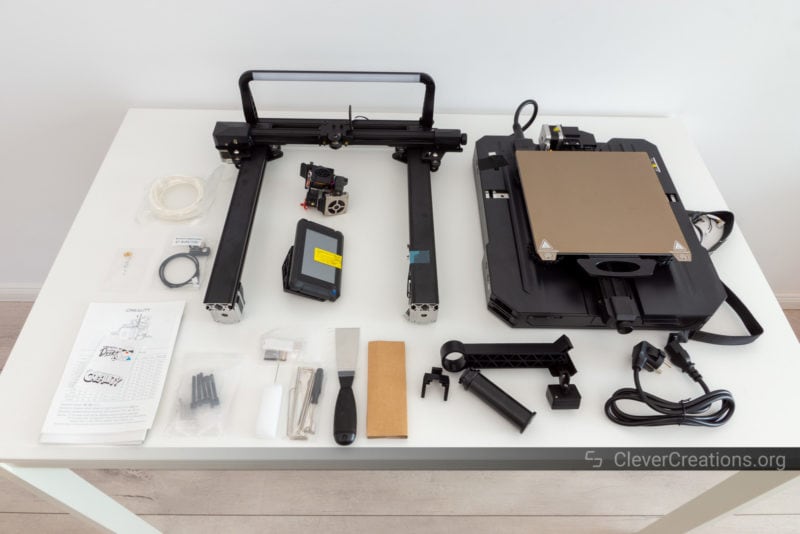
Unboxing
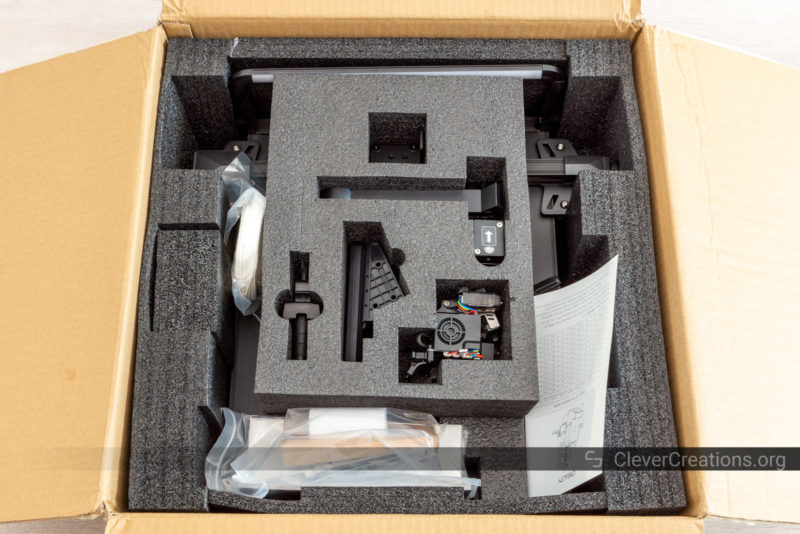
If you are familiar with the latest FDM 3D printer releases, you won’t be surprised to find the S1 Pro is shipped partially assembled. This is a common way to send 3D printers nowadays, as it saves assembly time for the end-user.
The box contents are well protected with dense foam, so there is little risk of damage during shipping.
After opening the box and unpacking its content, you’ll find the following items:
- Ender 3 S1 Pro main base
- Z axis gantry
- Sprite Pro extruder assembly
- Touch screen
- Spool holder with pre-attached filament sensor
- Plastic cable management clip
- Z end-stop and wiring (use is optional)
- Bolts for assembly
- Hex keys and wrenches for assembly
- A range of 3D printer tools (print removal tool, nozzle cleaner tool, snipper)
- SD card with USB adapter
- Spare nozzle
- Small roll of white PLA
- Manuals and other documentation
- Power cable
As is usual for a 3D printer at this price point, the Creality Ender 3 S1 Pro comes with everything you need to start printing right away.
Initial Setup
Even though you have everything to get started, you do need to assemble the Ender 1 S1 Pro’s main parts before you can start using it.
The process is relatively straightforward and took us around 15 minutes. As long as you are patient and follow the instructions, you shouldn’t have any problems.
The assembly steps are fairly similar to that of the regular Ender 3 S1. Just like with that 3D printer, there are a couple of important setup steps missing from the manual. We’ve included those steps here to ensure that your machine is set up correctly.
Assembly
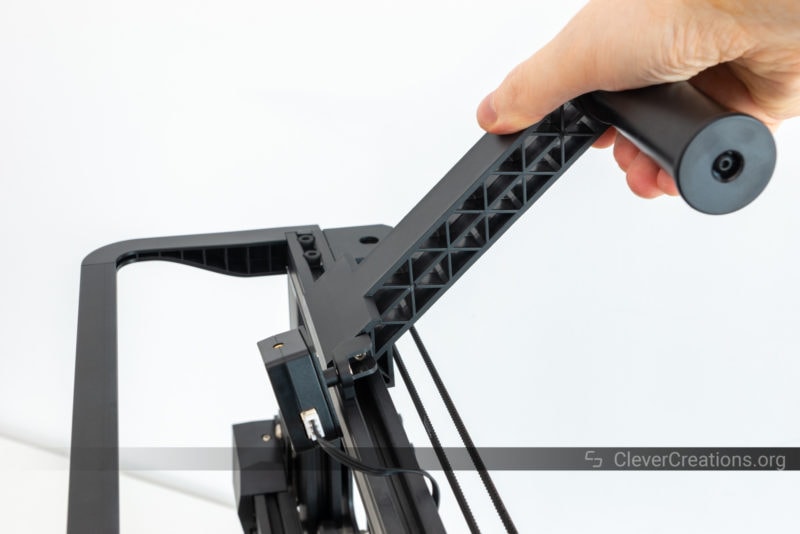
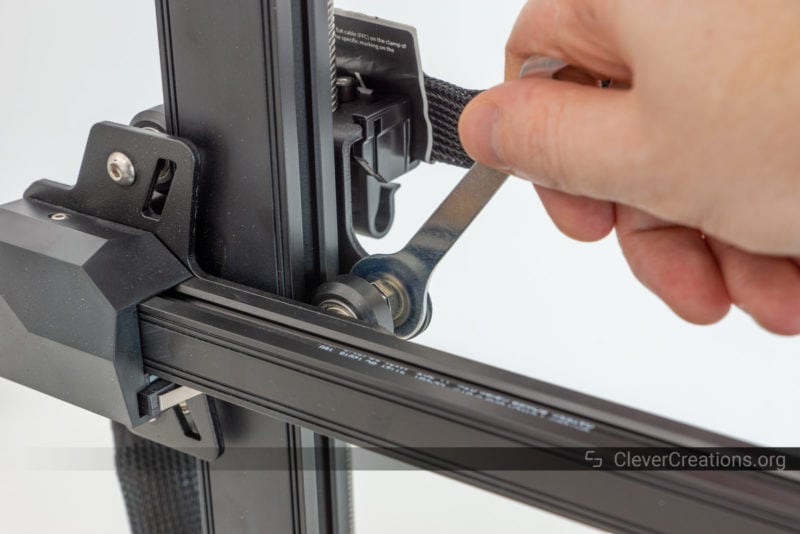
The first thing you need to do is attach the Z-axis gantry to the main base. You’ll need to use the included black M5x45 socket head cap screws for this. Be careful not to over-tighten them, as you might strip the thread.
Following that, you need to mount the Sprite Pro extruder to the X-axis carriage. Simply clamp it on by hand and use four of the included M3x6 bolts to secure it in place.
We should point out that the manual suggests doing these first two steps in the opposite order. Either order is fine, but we find it more practical to attach the Z-axis gantry first.
Once that’s done, you can attach the touch screen to the base. Unlike with the non-Pro version, here the screen is already pre-attached to its mount. This saves you a small amount of work.
To attach the touch screen, simply use three of the long M3x40 bolts and a corresponding Allen key to drive them in.
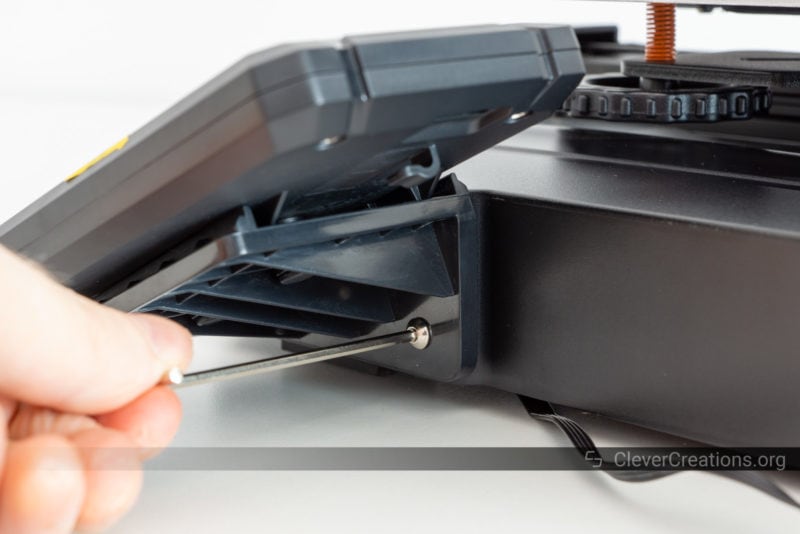
Next up is the spool holder with the included filament sensor. This one simply clamps onto the horizontal frame bar. No bolts are required.
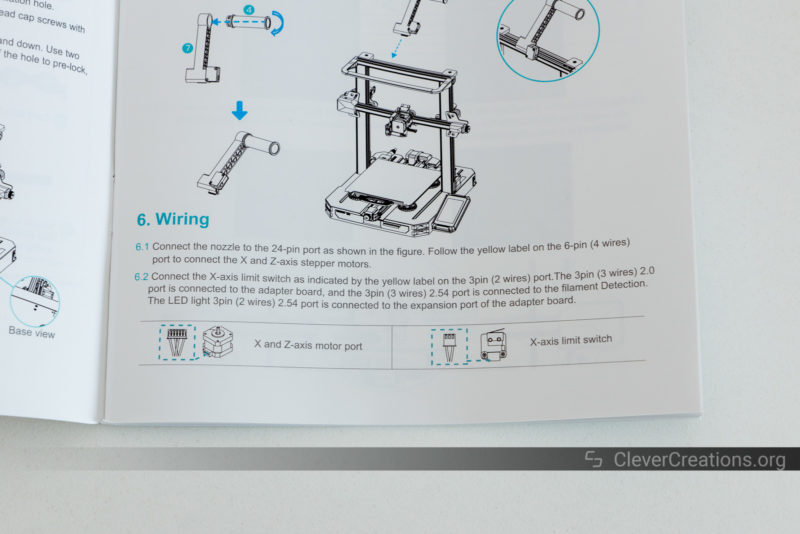
Once you’ve done that, it is time to attach all the wiring of the Ender 3 S1 Pro. All wiring harnesses are already pre-routed and come with labels, so you can’t really go wrong here.
One of the criticisms we had of the manual of the S1 was the unclear instructions for the wiring portion of the assembly. In the manual for the Pro version, this has been improved. The instructions are more clear and easier to follow.
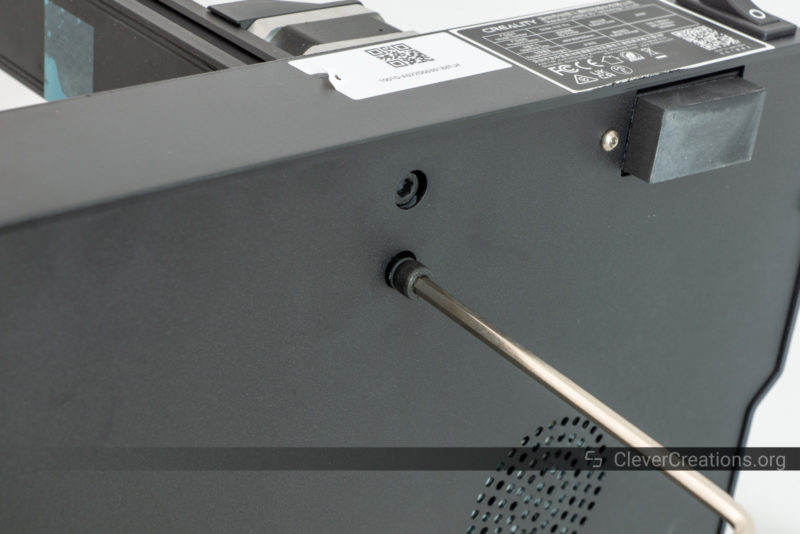
The final thing to do is to check that the voltage input selector on the power supply is set to the correct voltage. If you live in a country with 110V power, make sure it is set to 115V. If you have 220-240V power, make sure it is set to 230V.
Setup
Unfortunately, just like on the S1, the manual omits some important steps for the initial setup of the machine. Most notably, it doesn’t mention tightening the X- and Y-axis belts and skips the tightening of the eccentric nuts on the X-/Y-/Z-gantries.
Let’s go over them really quick so that your S1 Pro is set up correctly.
Tightening the X- and Y-Axis Belts
Tightening 3D printer belts is important to ensure proper print quality and layer alignment. If your belts are too loose, your prints will likely be misaligned or suffer from artifacts.
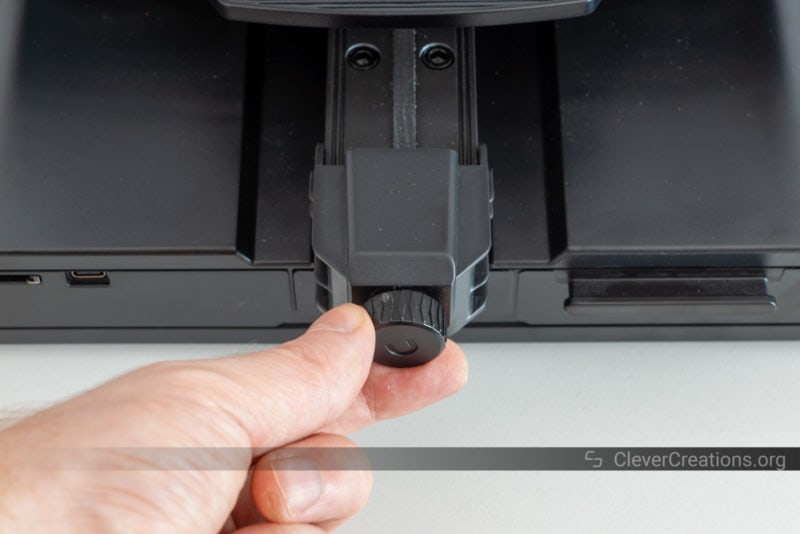
To tighten the X- and Y-axis belts on the Ender 3 S1 Pro, you can simply use the wheels on the pre-installed belt tensioners. Rotate them clockwise until the belts are tight, but make sure not to over-tighten them. The belts should be tight enough that you can’t push them down easily with your finger, but not more than that.
Adjusting the Eccentric Nuts
Adjusting the eccentric nuts on the moving gantries needs to be done to remove any play in the motion of those gantries. Just like with loose timing belts, not doing this will lead to poor print quality and layer artifacts.
The eccentric nuts can be found on the X-, Y-, and Z-axes. They are recognized as hexagonally shaped cylinders near the black Delrin V-wheels.
There is one eccentric nut on each side of the Z-gantry, two on the bottom of the Y-axis print bed carriage, and one on the underside of the X-axis carriage.
To adjust them, simply use the included wrench to rotate them until they provide resistance. There is not much more to it. After they are properly tightened, the play in the motion of the gantries should be gone.
That’s it for most of the assembly and setup of the Ender 3 S1 Pro. The last steps are leveling the bed and setting the Z offset. Both of these are covered in the manual and in our S1 review, so we will let you find those instructions there if you need them.
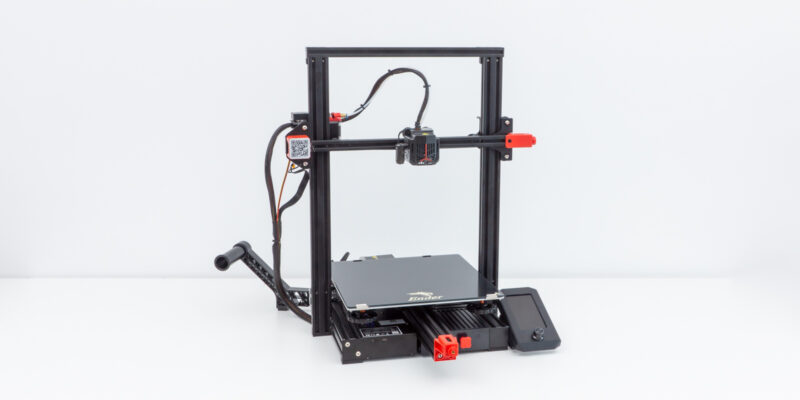
Ender 3 S1 Pro Features
Because the S1-series 3D printers have a number of features in common, we’ll start by looking at the ones that are specifically found on the S1 Pro. After that, we’ll move on to a more general overview of the standout features of these series.
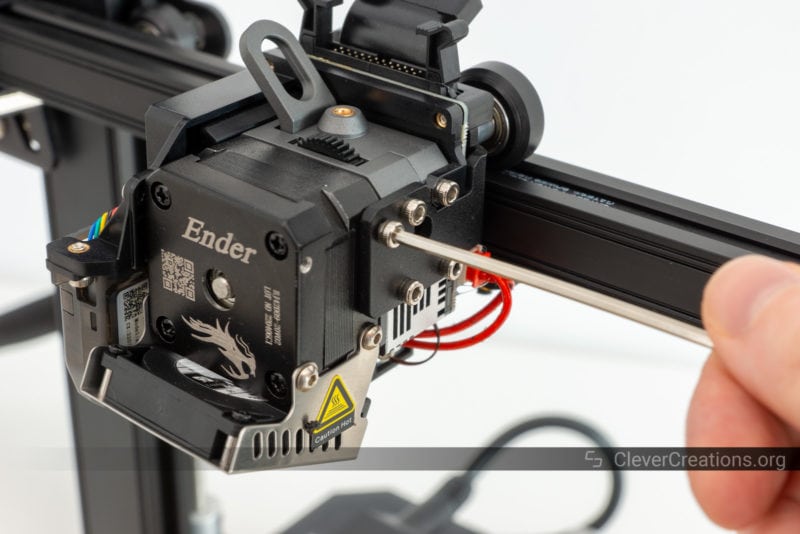
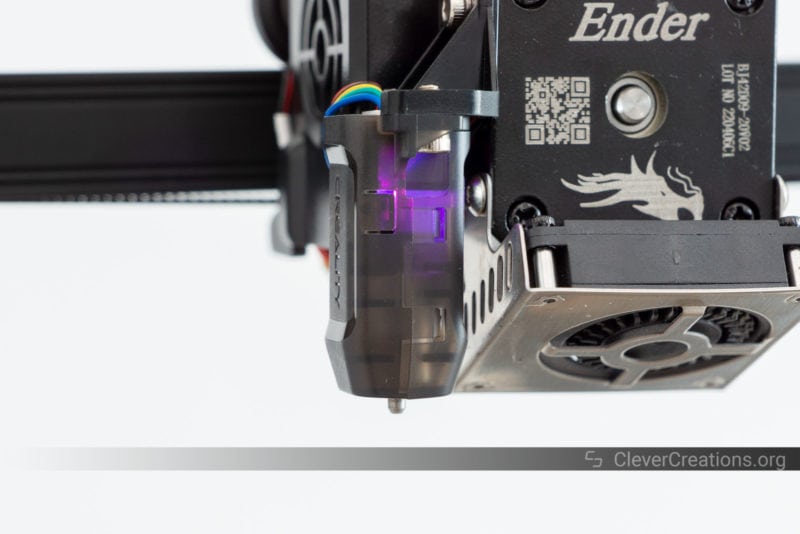
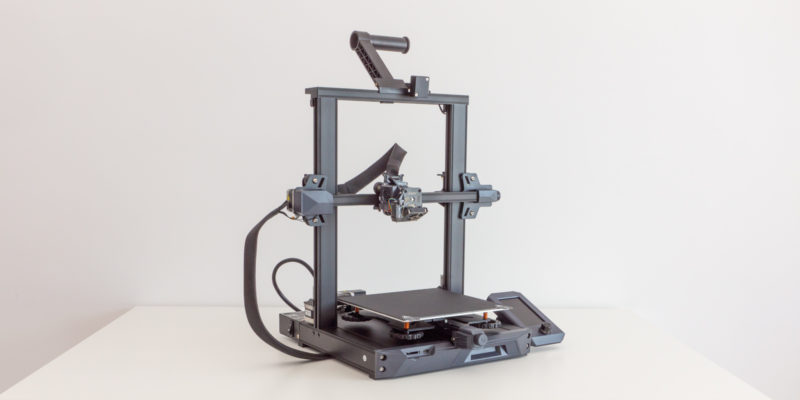
“Sprite Pro” Direct Extruder
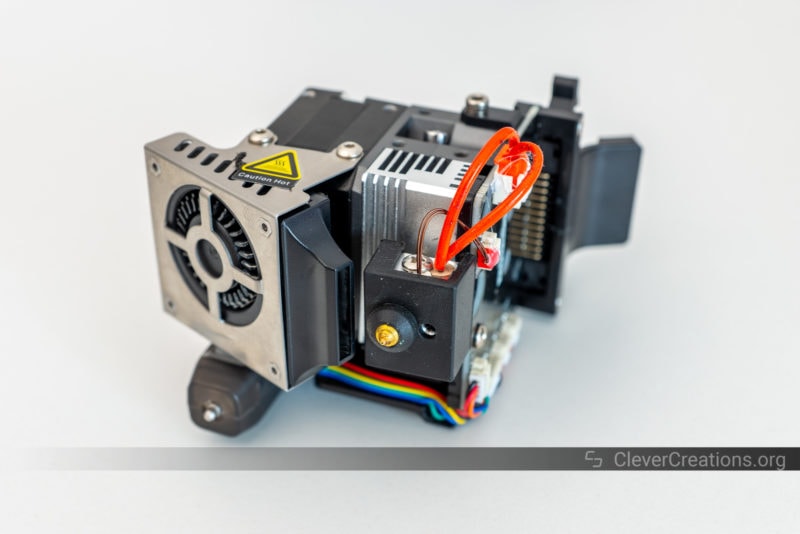
Unlike the regular S1, which comes with the PTFE-lined “Sprite” hot end, the S1 Pro comes with an all-metal “Sprite Pro” hot end. This hot end is an improvement over the regular version and probably one of the main reasons you’d want to consider the S1 Pro over the S1.
PTFE-lined hot ends are limited to temperatures below 250 °C because higher temperatures degrade the internal PTFE tube in the heat break.
On the other hand, typical all-metal 3D printer hot ends like the Sprite Pro can reach temperatures up to 300 °C. This means that you’ll be able to print with a wider range of materials, including Nylon, high-temperature ABS, and other engineering plastics.
Combine this with low-temperature plastics, like PLA and PETG, and you have a printer that can handle just about any common 3D printing filament.
Also, because the Sprite Pro is a direct extruder and not a Bowden extruder, the filament path is very short. This means that there is very little room for the filament to deform, which reduces the risk of clogging and jams. It also lets you 3D print with flexible filaments like TPU on the Ender 3 S1 Pro.
In our use of both the Sprite and Sprite Pro extruders, we have found that they both work very well. With a 1:3.5 gear ratio and 80N of extrusion force, they have plenty of strength to deal with all common filaments.
The Sprite Pro is a definite improvement when working with high-temperature materials, but both extruders have been equally reliable in our testing.
The only downside to the Sprite Pro is that, because it is a direct extruder, it is a bit heavier than a Bowden. The frame of the Ender 3 S1 Pro is more than adequate to handle that extra weight, however.
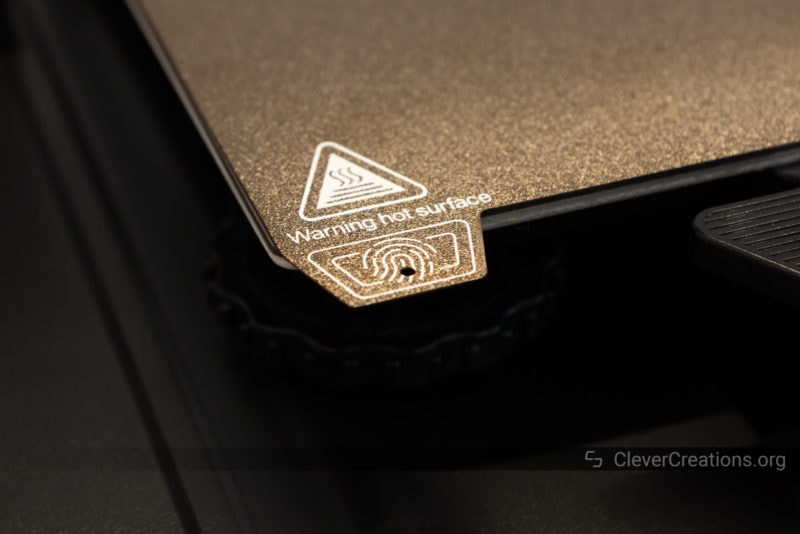
PEI Coated Print Bed
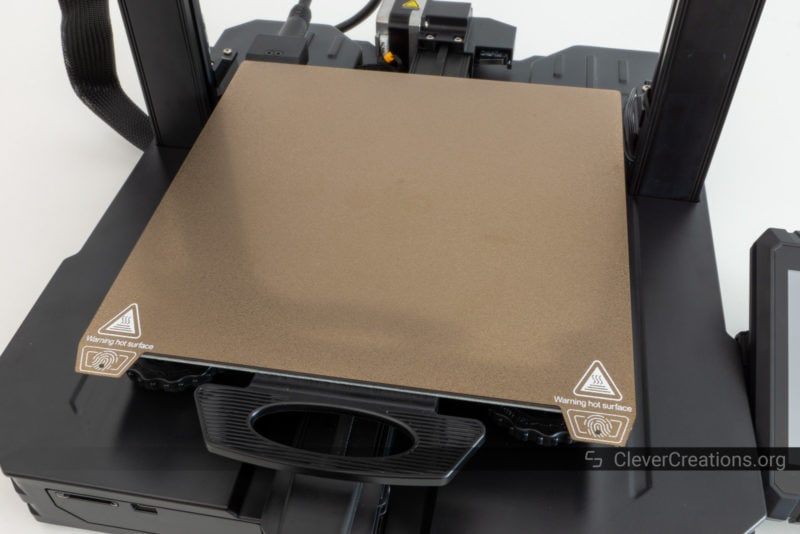
Another upgrade of the S1 Pro over the S1 is its PEI-coated print bed. PEI, or polyethyleneimine, is a material that is frequently used as a build surface on 3D printers. It provides excellent adhesion for most filaments and can be reused many times without significantly degrading.
Probably the best thing about flexible PEI coated beds is that, once your print is done, it can simply be popped off the print bed. There is no need for any kind of bed adhesive or other preparation of the build surface.
The original S1 comes with a PC-coated bed. While prints stick to that even better, it is more difficult to remove the prints once they are done. This is not a huge problem, but it can lead to premature wear of the build surface.
We prefer to work with PEI-coated beds, as they provide a happy middle ground between adhesion, ease of use, and durability.
It is important to mention that the PEI print bed on the S1 Pro is single-sided. You won’t be able to use the smoother back side of the bed for your prints.
All beds on the Ender 3 S1 series are flexible and can be removed for easy cleaning and replacement. They also all have the same 220×220 mm dimension, currently the most common print area size for this type of 3D printer.
Temperature Uniformity
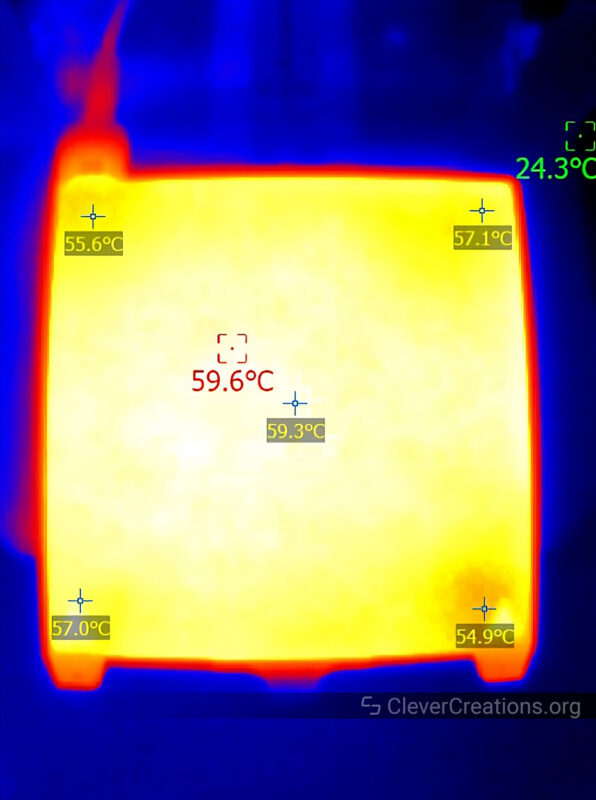
The print surface of the Ender 3 S1 Pro has excellent temperature uniformity. Near the corners the temperature is off from the setpoint by a couple of degrees Celcius, but overall it is very consistent. This is as good as it gets for an open-frame 3D printer.
As a result, you’ll experience less warping and curling. This is a big plus if you are interested in printing in ABS or PC.
Heating Times
The print bed takes about 1 minute 33 seconds to get up to 60 °C, and 5 minutes 40 seconds to reach the maximum 110 °C. It’s not a long wait compared to some other 3D printers in this class.
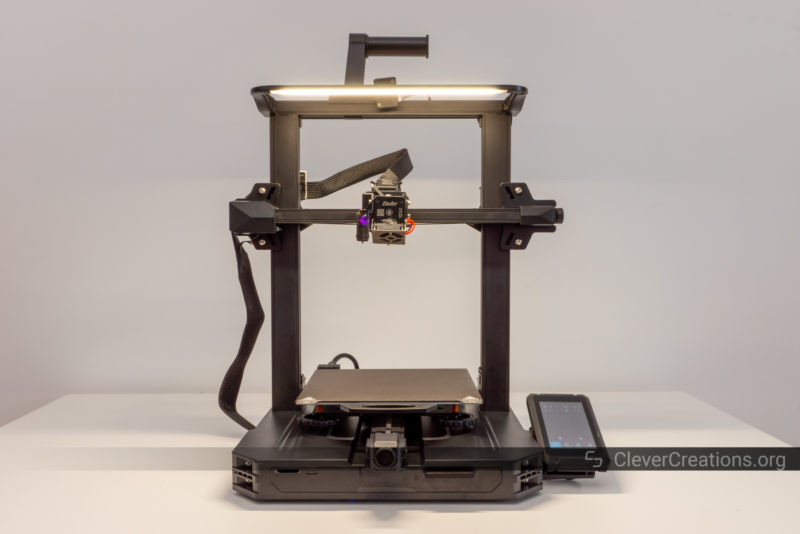
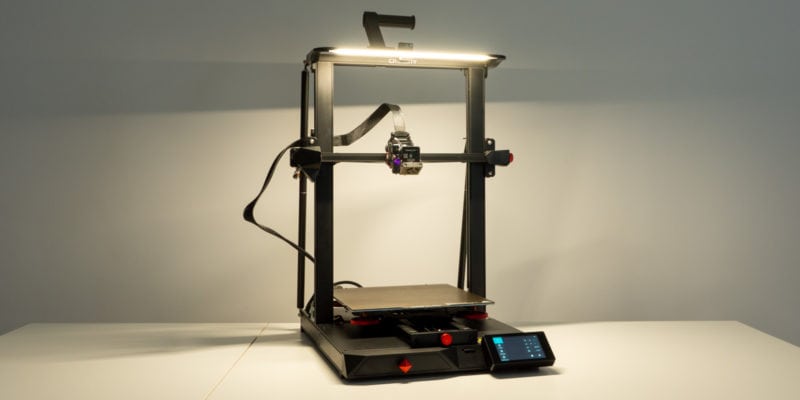
LED Light Bar
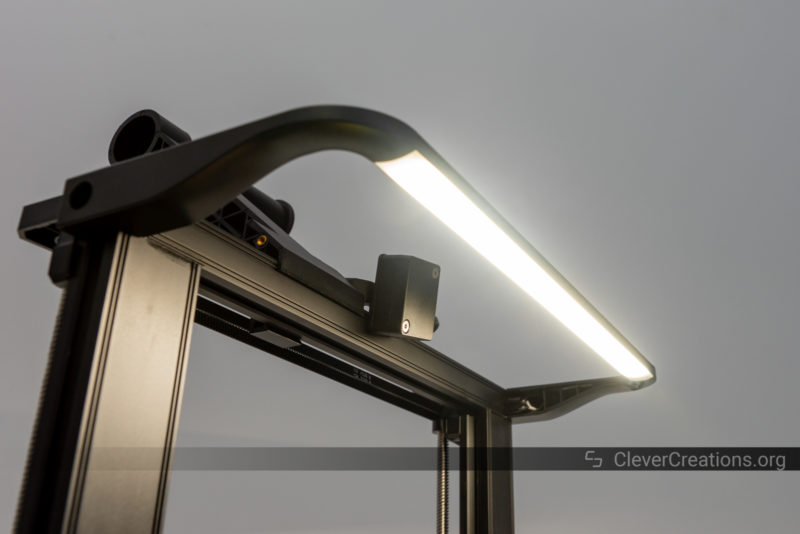
You’ll also find that the Ender 3 S1 Pro comes with a pre-installed LED light bar at the top of the 3D printer. This feature allows you to see your 3D prints better, especially in low-light conditions.
The brightness of the LED bar is more than acceptable. There is no brightness control, however, only a simple on/off switch.
Because the LED light is hooked up to the 3D printer’s expansion port, which supports PWM, it might be possible to control the brightness through software. We did not see a way to do it through the printer’s user interface, but perhaps it is possible through GCode commands.
The LED lighting itself has a fairly warm color temperature. We haven’t measured the CRI (Color Rendering Index) of the LEDs to see how accurately they are able to reproduce colors, but judging by eye they are fairly average in that regard. Not bad, but also not great.
The LED light bar is a welcome addition to the Ender 3 S1 Pro. It is not a necessity, but it is a nice feature to have. It doesn’t only provide better lighting for when you are working with your 3D printer, but it also works well if you need LED light for making 3D print time-lapses.
Filament Runout Sensor
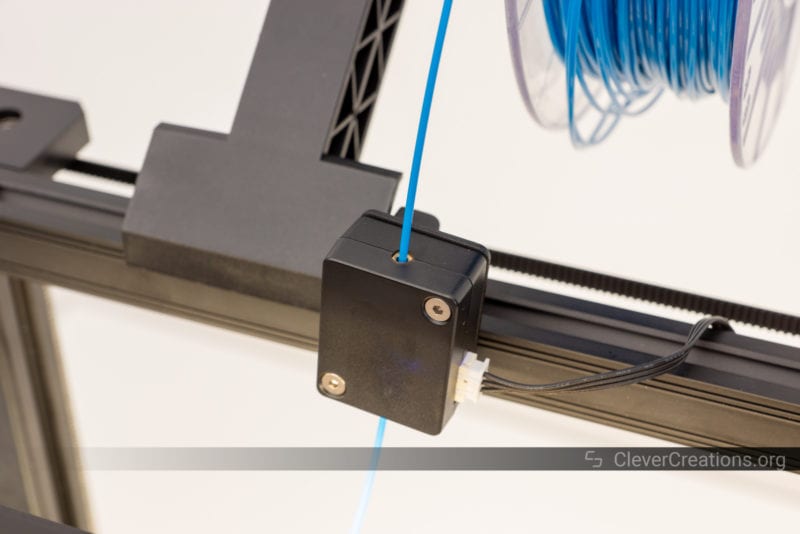
One of the best additions to the Ender 3 S1 series is its filament sensor. This is a simple but useful addition that can save you a lot of headaches.
You can find the sensor at the top of the 3D printer, at the base of the spool holder. When your filament runs out or is broken, it sends a signal to the 3D printer controller board.
After that, the 3D printer pauses the print and notifies you through the LCD screen. You can then change the filament and resume the print from where it left off.
This is an extremely useful feature, especially if you are printing large or complex prints. It is typically reserved for larger 3D printers with an increased print volume, but we are glad to see it on the Ender 3 S1 Pro as well.
Automatic Bed Leveling
Another feature that is typically found on larger and more expensive 3D printers is automatic bed leveling. The Ender 3 S1 Pro comes with this feature as well, through the use of a CR-Touch probe.
CR-Touch and BLTouch sensors are popular Ender 3 upgrades, so it is good to see that they are now included in the stock configuration of the S1 and S1 Pro.
For those unfamiliar with automatic bed leveling, it is a process in which the 3D printer uses a probing sensor to determine the level of multiple points on the build plate. It then adjusts the Z-axis offset accordingly, ensuring that the first layer of your print is always perfect.
Sensors like these take away a lot of the hassle that used to come with 3D printing and remove the need to manually level your print bed. We have found the CR-Touch on the Ender 3 S1 Pro to work accurately and without problems.
Dual Z-Axis
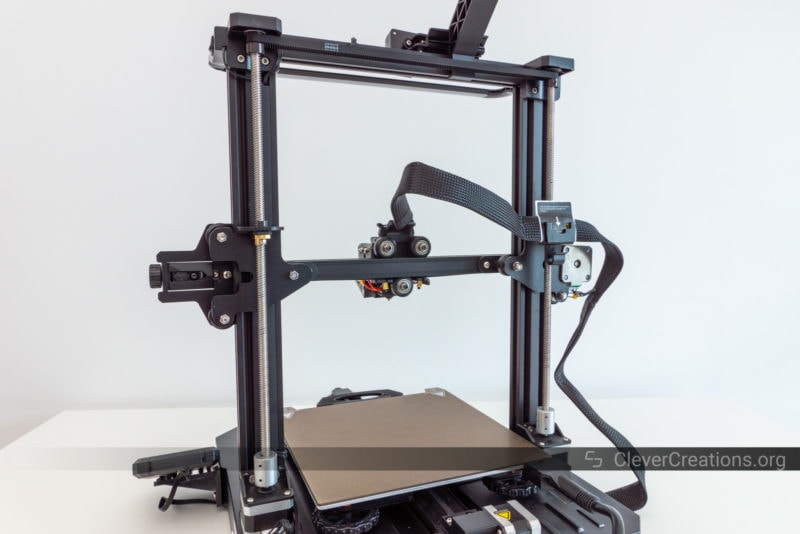
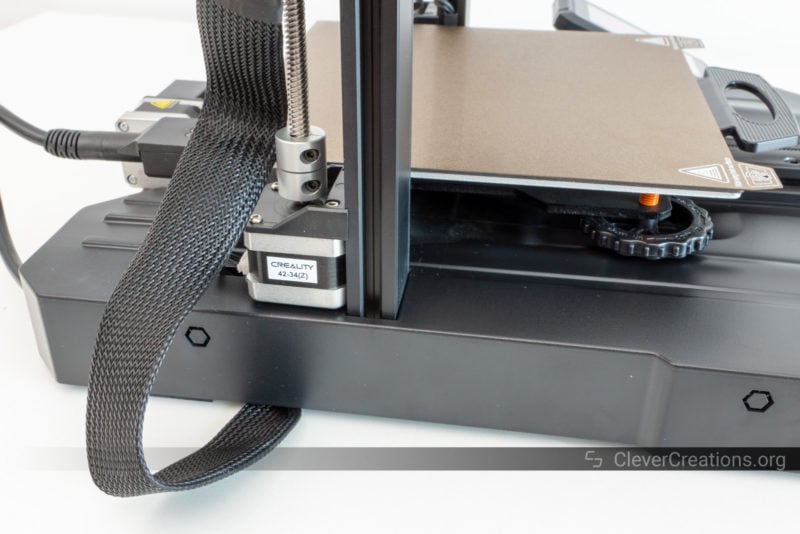
Just like the S1, the S1 Pro has a dual Z-axis configuration. This means that it has two stepper motors and corresponding lead screws that are responsible for the movement of the Z-axis.
The main benefit of this setup is that it provides greater stability when 3D printing. The S1 Pro’s direct extruder can put a lot of strain on the Z-axis when printing at higher speeds, so this extra stability is a welcome addition.
To avoid missing steps, the two lead screws are synchronized at the top with a timing belt. This prevents the stepper motors from going out of sync with each other, which can lead to position errors. No such problems on this machine.
32-bit Motherboard
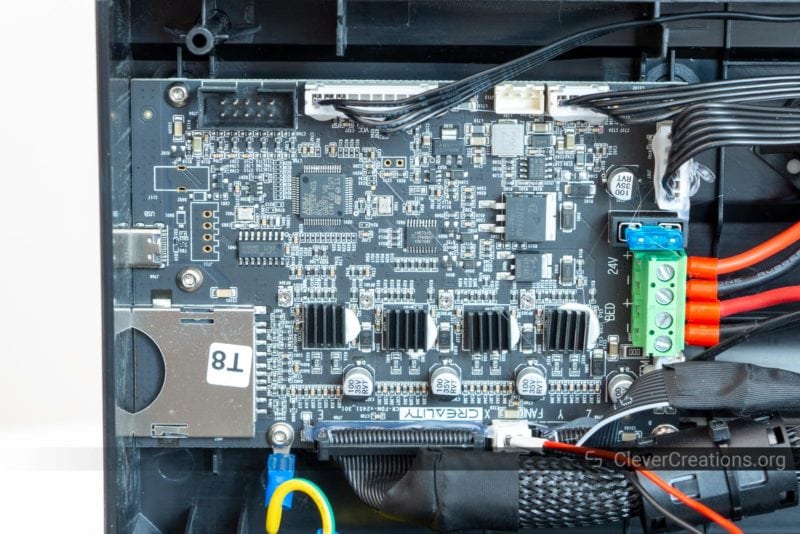
The Ender 3 S1 Pro uses the exact same 3D printer controller as the S1 does. It is the 32-bit CR-FDM-v2.4.S1_v301 board with an STM32F401 as the main chip. Plenty powerful and you likely won’t need to upgrade it to something faster during the printer’s lifetime.
It is possible that Creality will switch to a different chip depending on how the current chip shortage develops, but that one is likely to have similar capacity and functionality.
As stepper motor drivers, the board uses four Trinamic TMC2209 chips. These drive the stepper motors very silently, resulting in a very silent 3D printer during operation. We did notice an annoying coil whine from the stepper motors when they were idling, however. More on that in the sound level section of this Ender 3 S1 Pro review.
Future Upgrades
It isn’t available yet at the moment of writing, but Creality has announced a liquid cooling heatsink upgrade for more effective heat dissipation of the hot end. This sounds like an exciting addition that can be used for a >300°C 3D printer hot end. With such a hot end, fancy engineering materials will be a 3D printing option.
Along with the announced laser module upgrade that lets you use the machine as a laser engraver, the Ender 3 S1 Pro has plenty of upgrade options that let you extend the functionality of the machine.
Build Quality and Construction of the Ender 3 S1 Pro
The build quality of the S1 Pro is very similar to that of the S1. We will quickly cover the main points here.
Frame Rigidity
Like many open-frame 3D printers, the Ender 3 S1 Pro uses aluminum extrusions with joint and member construction for its frame. This results in a 3D printer that is rigid and easy to assemble.
The frame is less rigid than that of an enclosed 3D printer, but it is sufficient for dealing with the loads that the S1 Pro sustains. Its build volume is relatively small and its direct extruder is significantly lighter than that of other 3D printers, like the Anycubic Kobra. Even at higher print speeds, the frame holds up well and does not flex significantly.
Build Volume
The print volume on the S1 Pro is 220x220x270mm. A typical size for printers in the Ender 3 series, even though the new Ender 3 S1 models have an extra 20 mm print height.
This is an appropriate size for most applications, but if you expect to do a lot of huge 3D prints, you’ll have to look at large 3D printers, like the CR-10 Smart Pro.
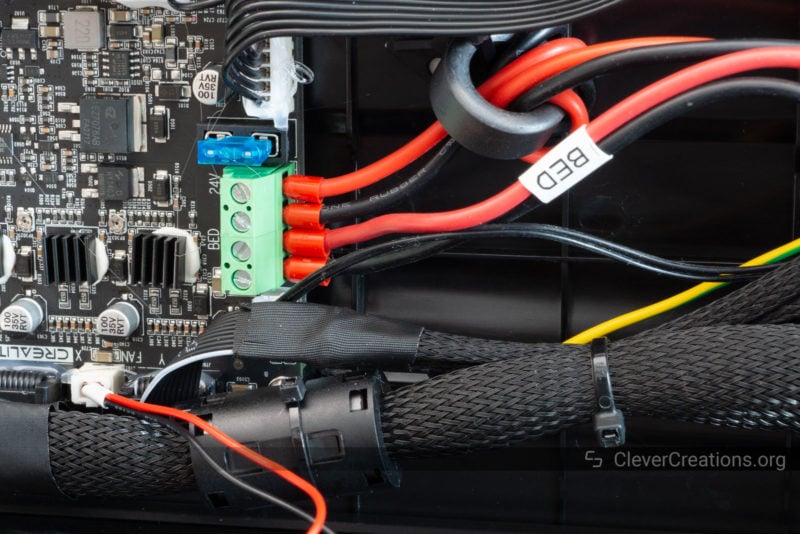
Power Supply and Wiring
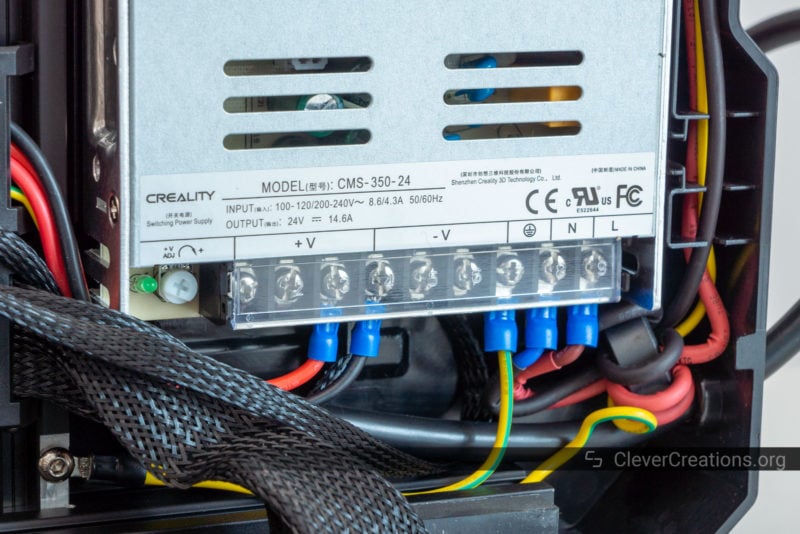
We’ve covered the power supply and wiring in a lot of detail in our S1 review, but the main takeaway is that they are both of good quality.
The PSU is a 350W 24V rebranded unit. It seems to be a quality unit that is more than sufficient for the S1 Pro. We have not experienced any problems with it in our testing and it produces less noise than other 3D printer PSUs we have worked with.
The wiring is also of good quality, the right wire gauges are used and most of the cables are sleeved. This helps to improve durability and gives the S1 Pro a more polished look.
Creality has also been liberal in its use of both wire crimping ferrules and ferrite cores. The first helps to prevent loose connections and the latter helps to reduce electromagnetic interference (EMI).
It’s a step above what many other budget 3D printer manufacturers are doing in this area, and it’s good to see Creality paying attention to these details.
Parts Drawer
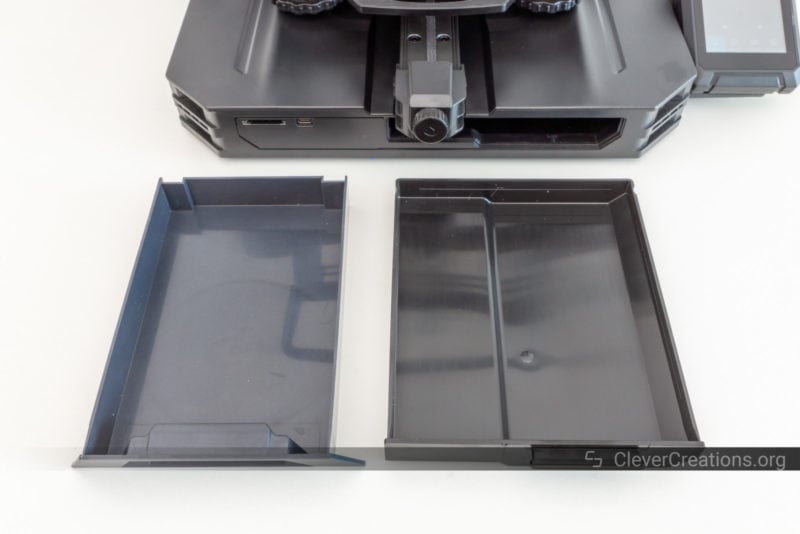
As with the S1 model and even the older Ender 3 V2, the S1 Pro comes with a parts drawer in the front. You can use this to keep your work area clean and organized.
The dimensions of the Ender 3 S1 Pro drawer are a bit larger than that of the S1. We found ourselves stuffing the S1 drawer with all of the printer’s accessories, so the extra space on the Pro version is appreciated.
Noise Levels
To our surprise, the S1 Pro makes more noise than the S1 does. This sound comes from two sources:
The most notable sound is from the hot end heatsink fan. It produces a high-pitched sound that can get annoying for some users over time.
Because we only tested one unit, we can’t say if this is just a natural variation in fan quality or a structural difference that is present in each model of the S1 Pro.
The second source is the stepper motors. When they idle, they produce an audible coil whine. You are unlikely to notice this much during 3D printing, as the motors will be moving (i.e. not idle) most of the time. If you run into this, it might also be possible for you to address this by flashing custom firmware that sets a different idle current for the steppers.
Ease of Use
User Interface
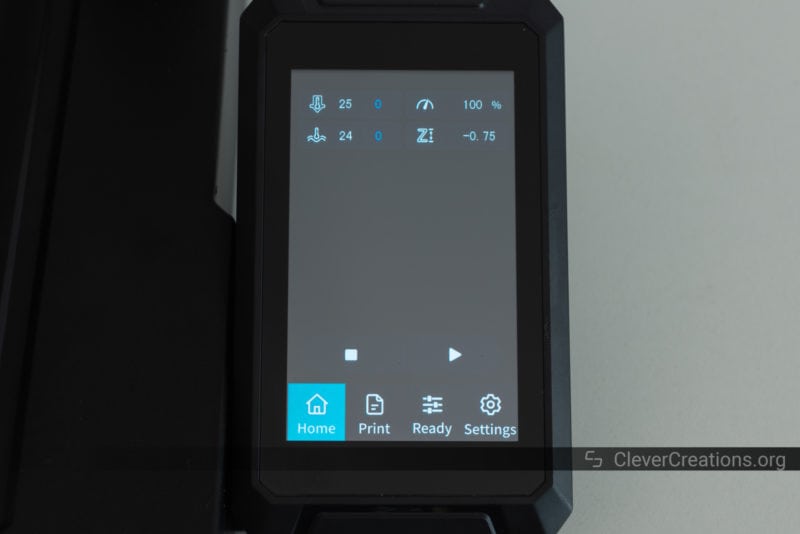
One of the biggest upgrades of the S1 Pro over the S1 is its LCD touchscreen. The S1 has an LCD screen with a control knob and while it works well, the Pro version’s touch screen is a step up in terms of both convenience and aesthetics.
On the touchscreen, all the standard printer controls are present and easy to find. There are a couple of notable additions to the firmware options that were not available on the V3.0.3 firmware of the S1.
For starters, the S1 Pro has nine different languages to choose from. If you’re not a native English or Chinese speaker (the only language options on the S1), this might be a reason to go with the Pro model instead.

Another addition is the inclusion of 5 quick-selectable positions for manual leveling of the bed. While you won’t be manually leveling the bed much (or at all) because of the CR Touch probe, if for some reason you do need to, it’s now a lot easier.

The automatic leveling sequence now also shows a progress bar on the LCD screen. This gives you a better idea of how far along the S1 Pro is in the process, and how much time you still have to wait.

Lastly, the user interface now has a section for configuring the PID control settings of both the hot end and the heated bed. If you plan on experimenting with a glass print bed or adding the liquid-cooled heatsink upgrade to the hot end, it can be very useful to have direct access to these settings.
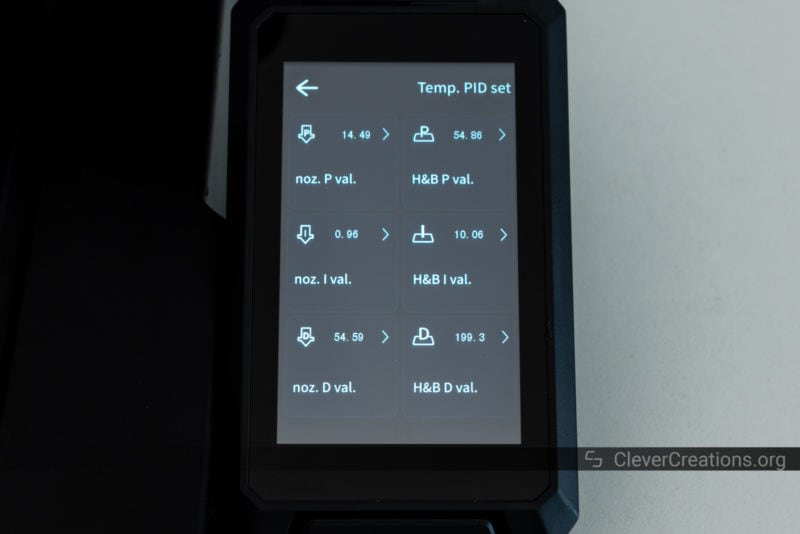
Keep in mind that all the comparison of these settings was done with the V2.0.8.15F4 firmware on the S1 Pro and V3.0.3 on the S1. It is possible that the newest versions of the firmware have more available functions, so you want to make sure to keep your 3D printer’s firmware up to date.
Maintenance and Repairability
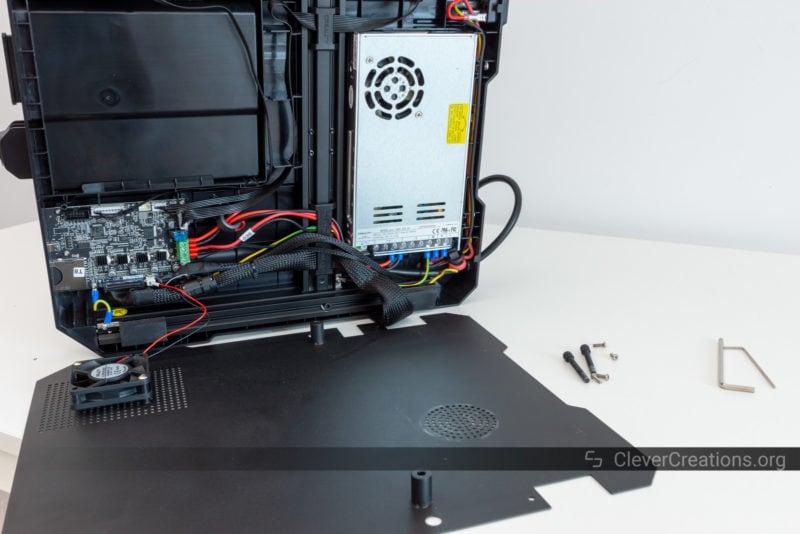
We reported that the S1 is relatively easy to repair and work on, and the S1 Pro is no different. In fact, it might even be a bit easier since the Pro only requires you to remove six bolts to access the electronics compartment. On the S1, this number was nine.
The compact construction of the Sprite Pro extruder is more difficult to disassemble than other direct extruders. This can come into play if you ever have to solve a clog or other issue. Because you won’t be doing this very often, this is not a deal-breaker.
Print Bed Handle
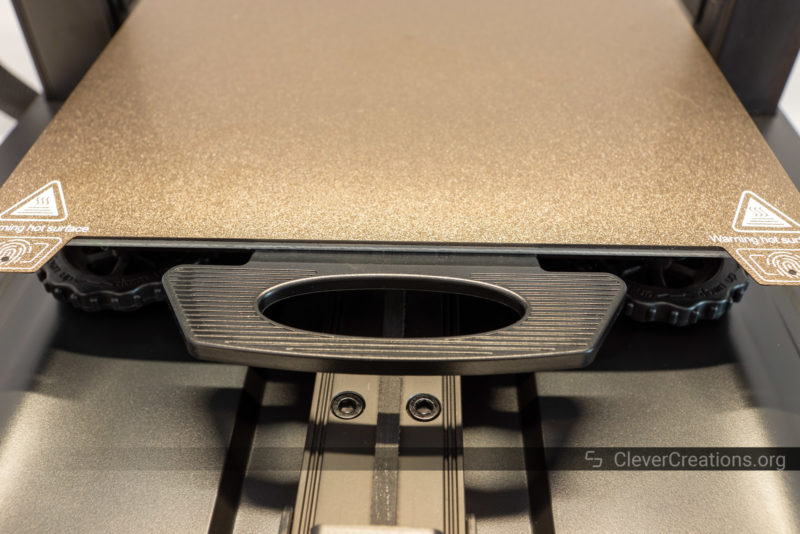
The Creality Ender 3 S1 Pro comes with a pre-installed handle on the front of the print bed. It’s a practical addition for moving the heated bed around when it is up to temperature.
We don’t find ourselves using the handle very often as the tabs on the PEI-coated print surface work just as well for bed temperatures of up to 60-70 °C. However, given that the S1 Pro is well-equipped for dealing with high-temperature filaments, the handle is a safer solution when the bed is heated to around its maximum temperature of 110 °C.
Ender 3 S1 Pro Print Quality
The print quality of the Ender 3 S1 Pro is more than acceptable. It is practically identical to that of the Ender 3 S1. Here are a couple of example 3D prints so you can judge for yourself.
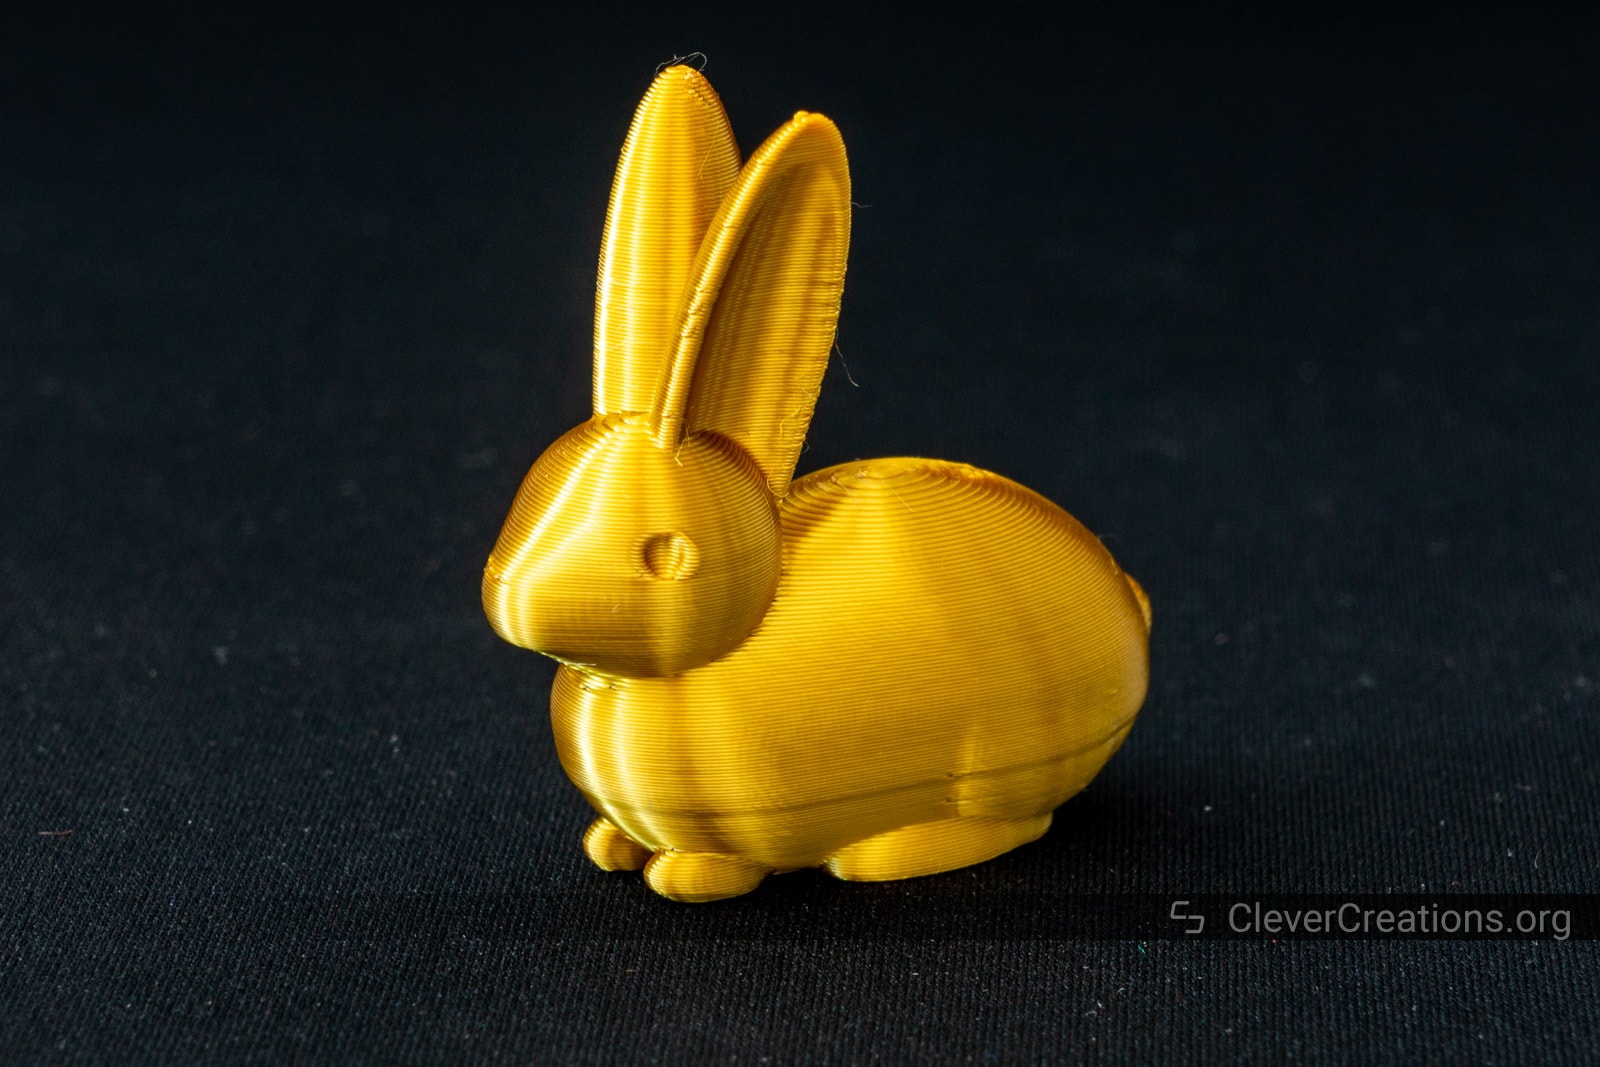
Bunny
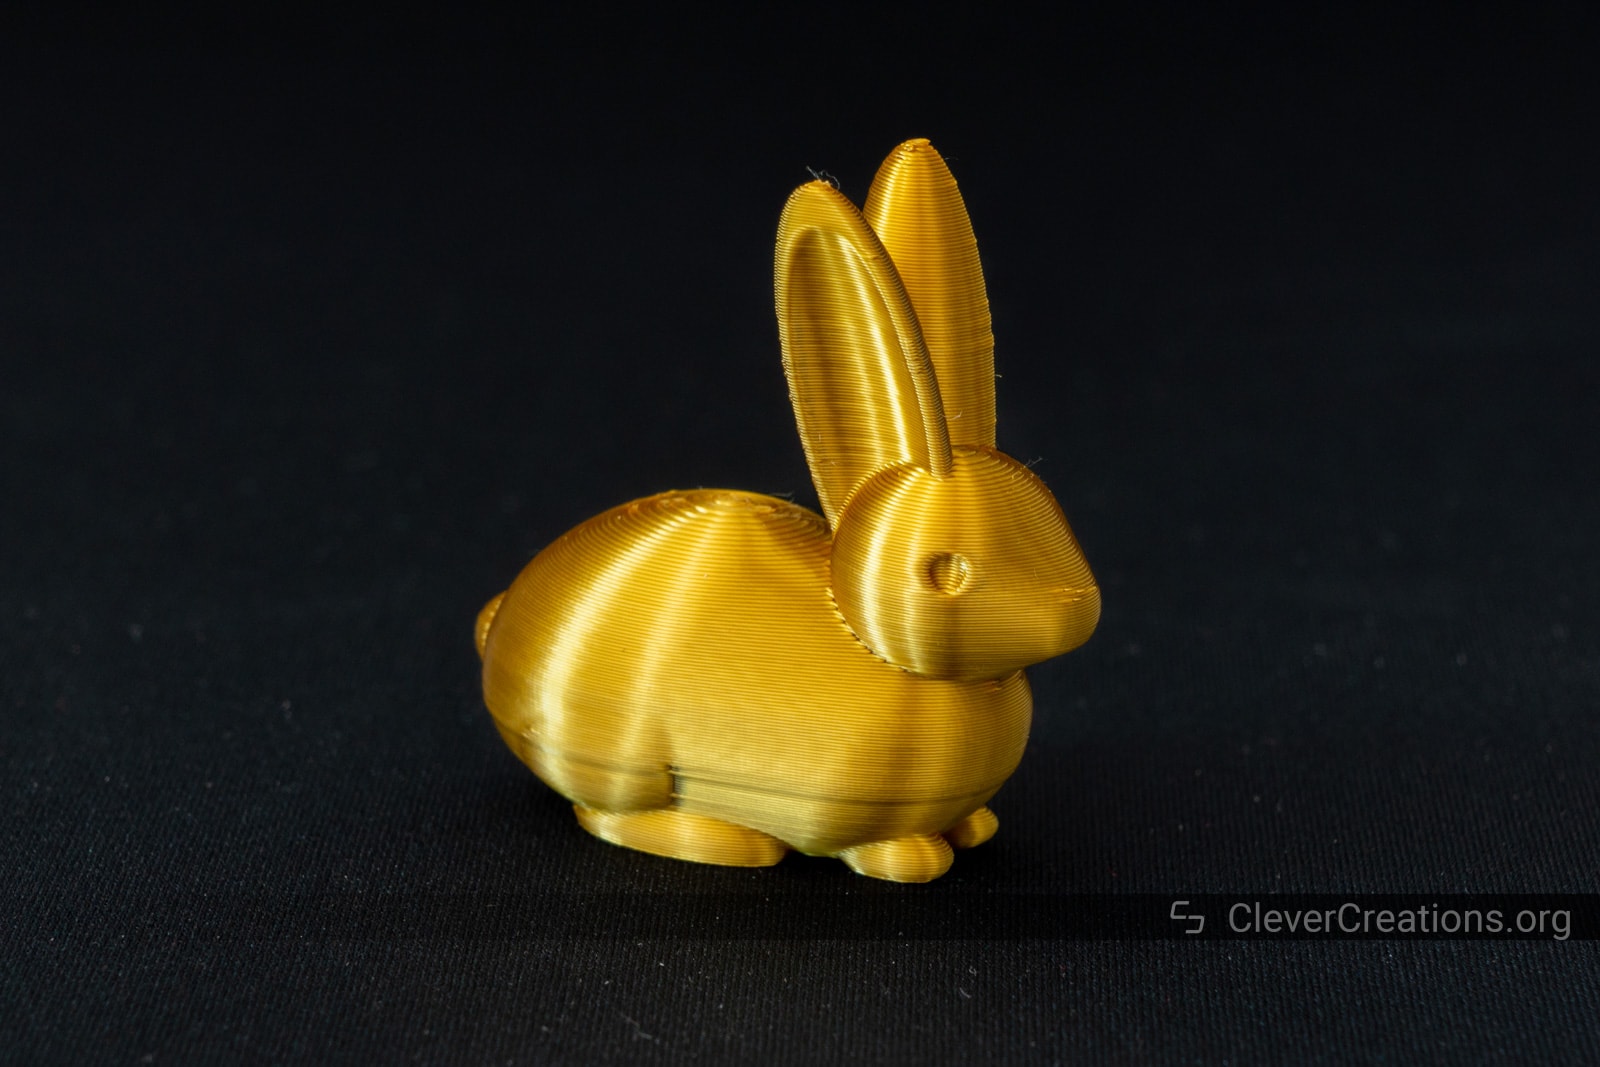
This is the bunny GCode that comes included on the SD card. The results are excellent. Interestingly, there are a couple of minor artifacts on the print that we also saw during the review of the Ender 3 S1. This leads us to believe that it is the exact same GCode file.
PolyPearl Tower Torture Test

The PolyPearl tower is an excellent test for overhangs, bridging, and small print areas. The Ender 3 S1 Pro handled it surprisingly well. The only noticeable defect is some sagging in the triangle sections of the helix, but that is hard to prevent on any 3D printer.
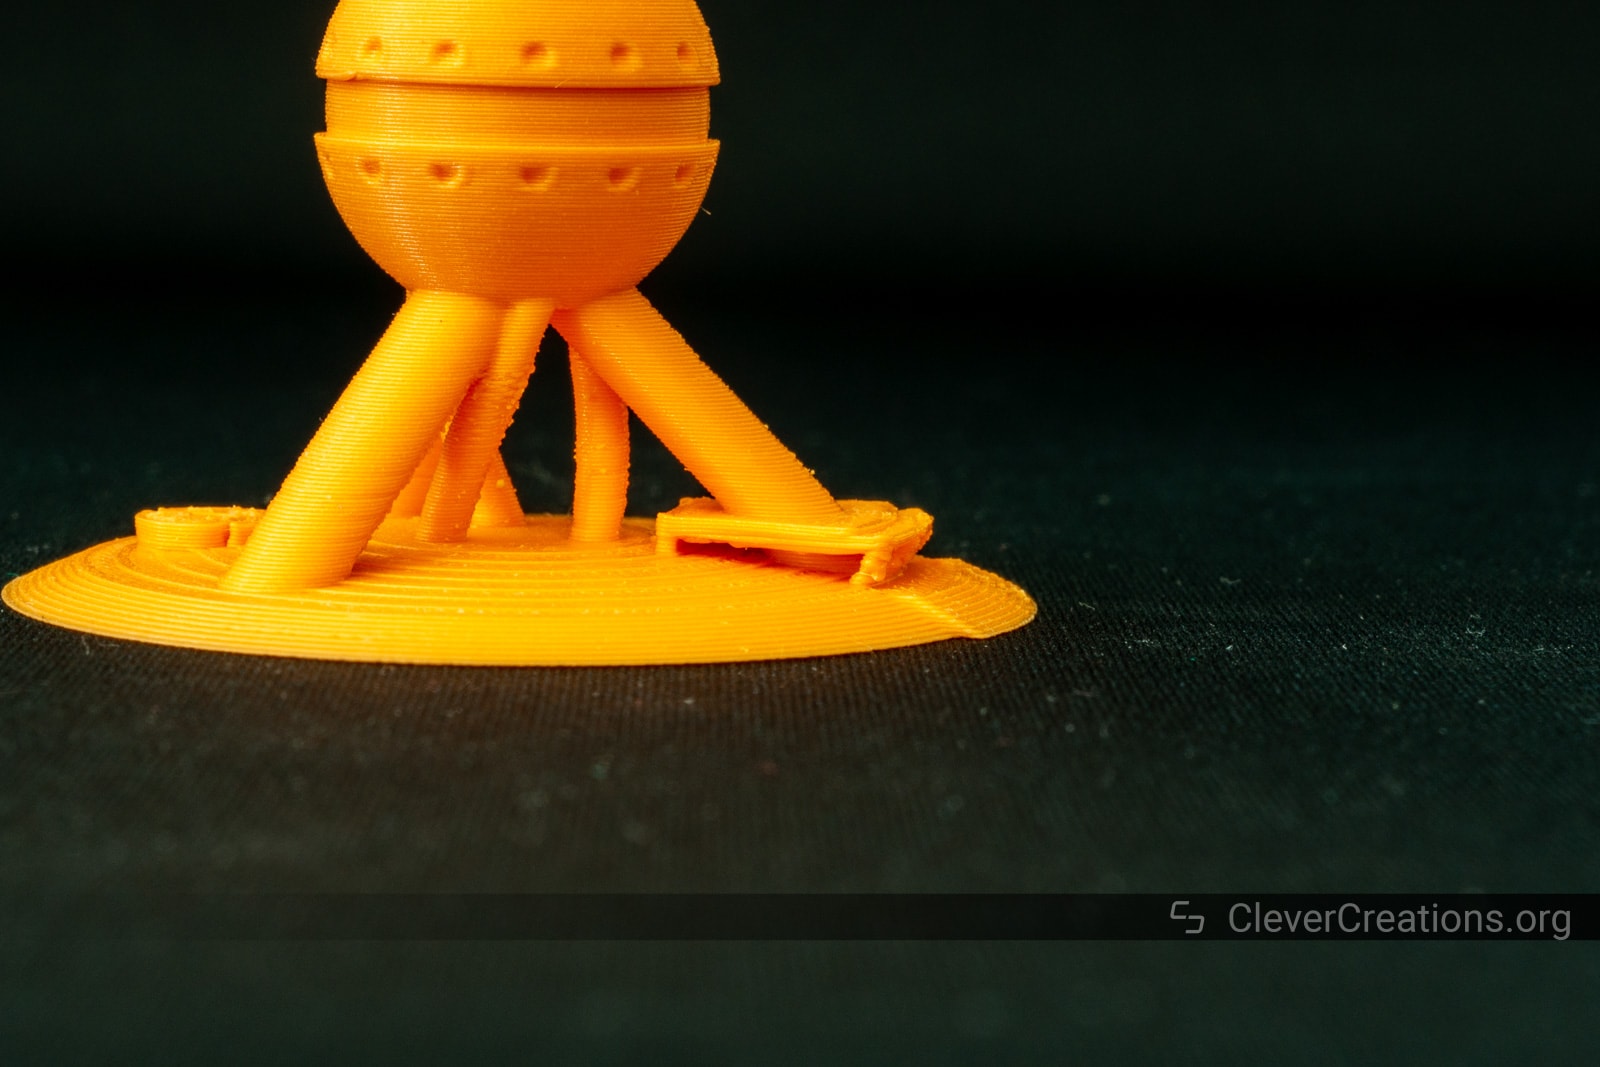
This close-up of the pillars show more detail. The print cooling fan of the S1 Pro cooled the filament properly in this section. There are a couple of imperfections caused by the print seam being set to the rear of the 3D print.
Planetary Compartment Container
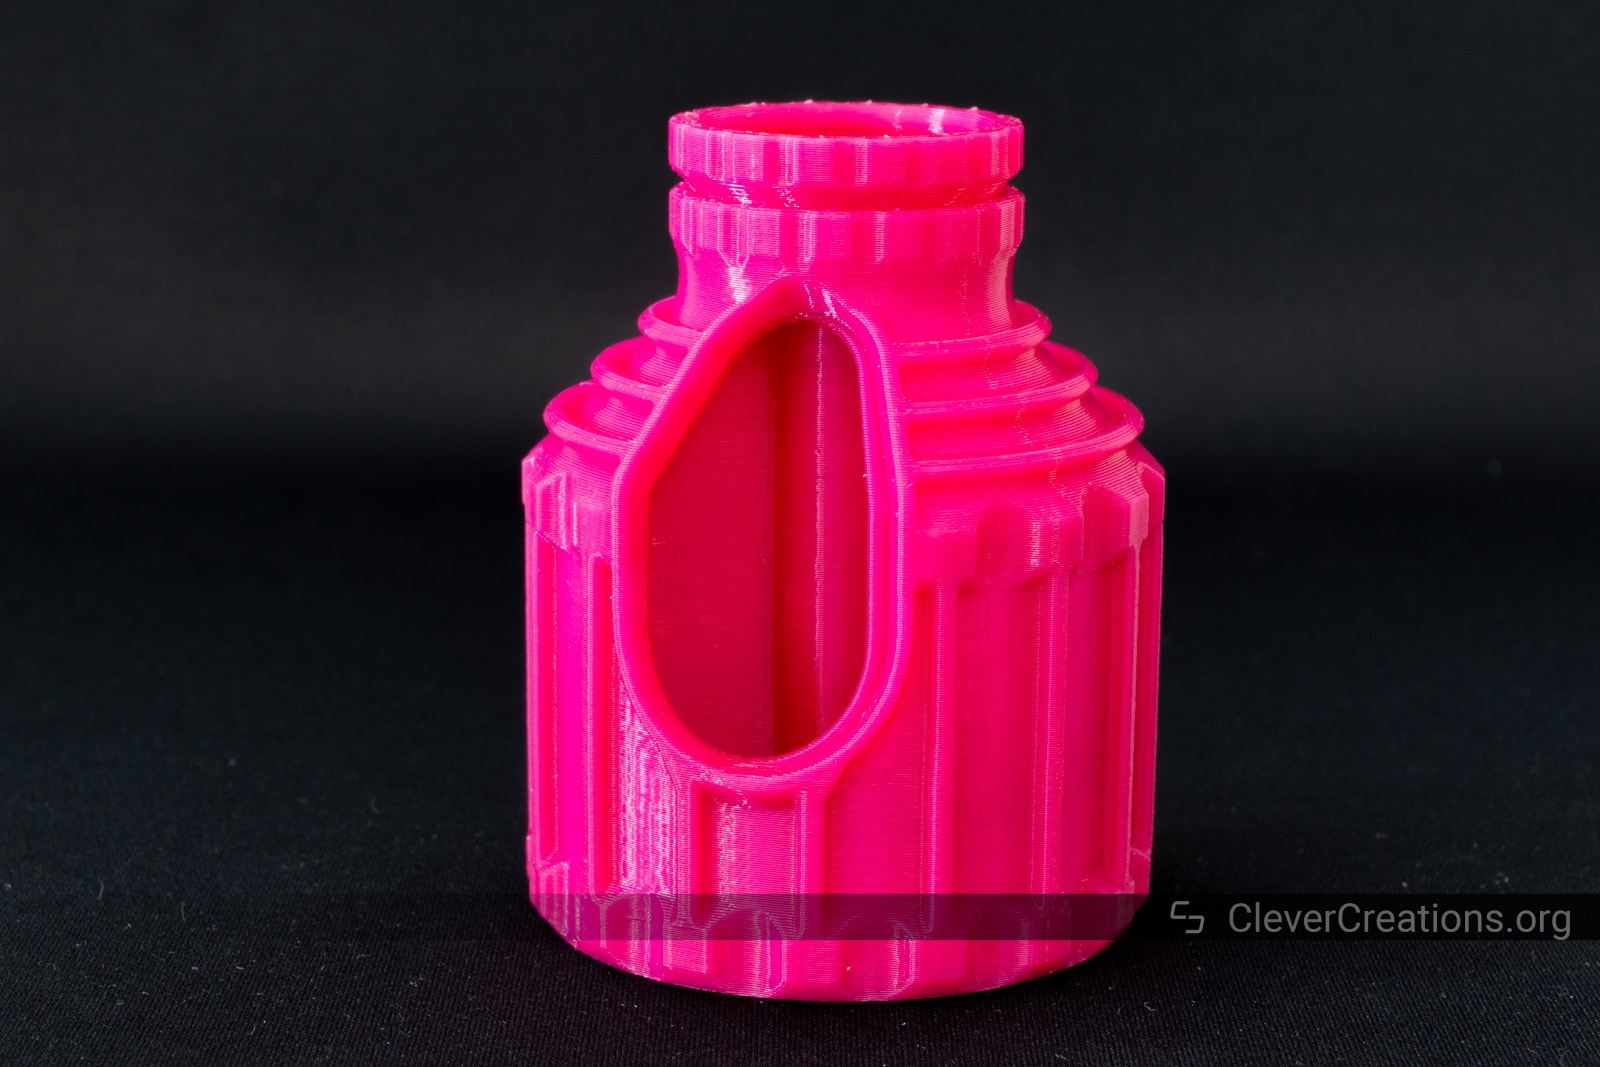
This print is one of our favorites for testing a 3D printer’s dimensional accuracy. If the 3D printer is dialed in correctly, the internal print-in-place mechanism should work after the print is taken off the build plate.

The print came out very well, but we did find that the Z-offset was set too low. As a result, the gears were squished together a bit. Using an Allen key in the center hex hole allowed us to free up the mechanism, after which we could open and close the container as intended.
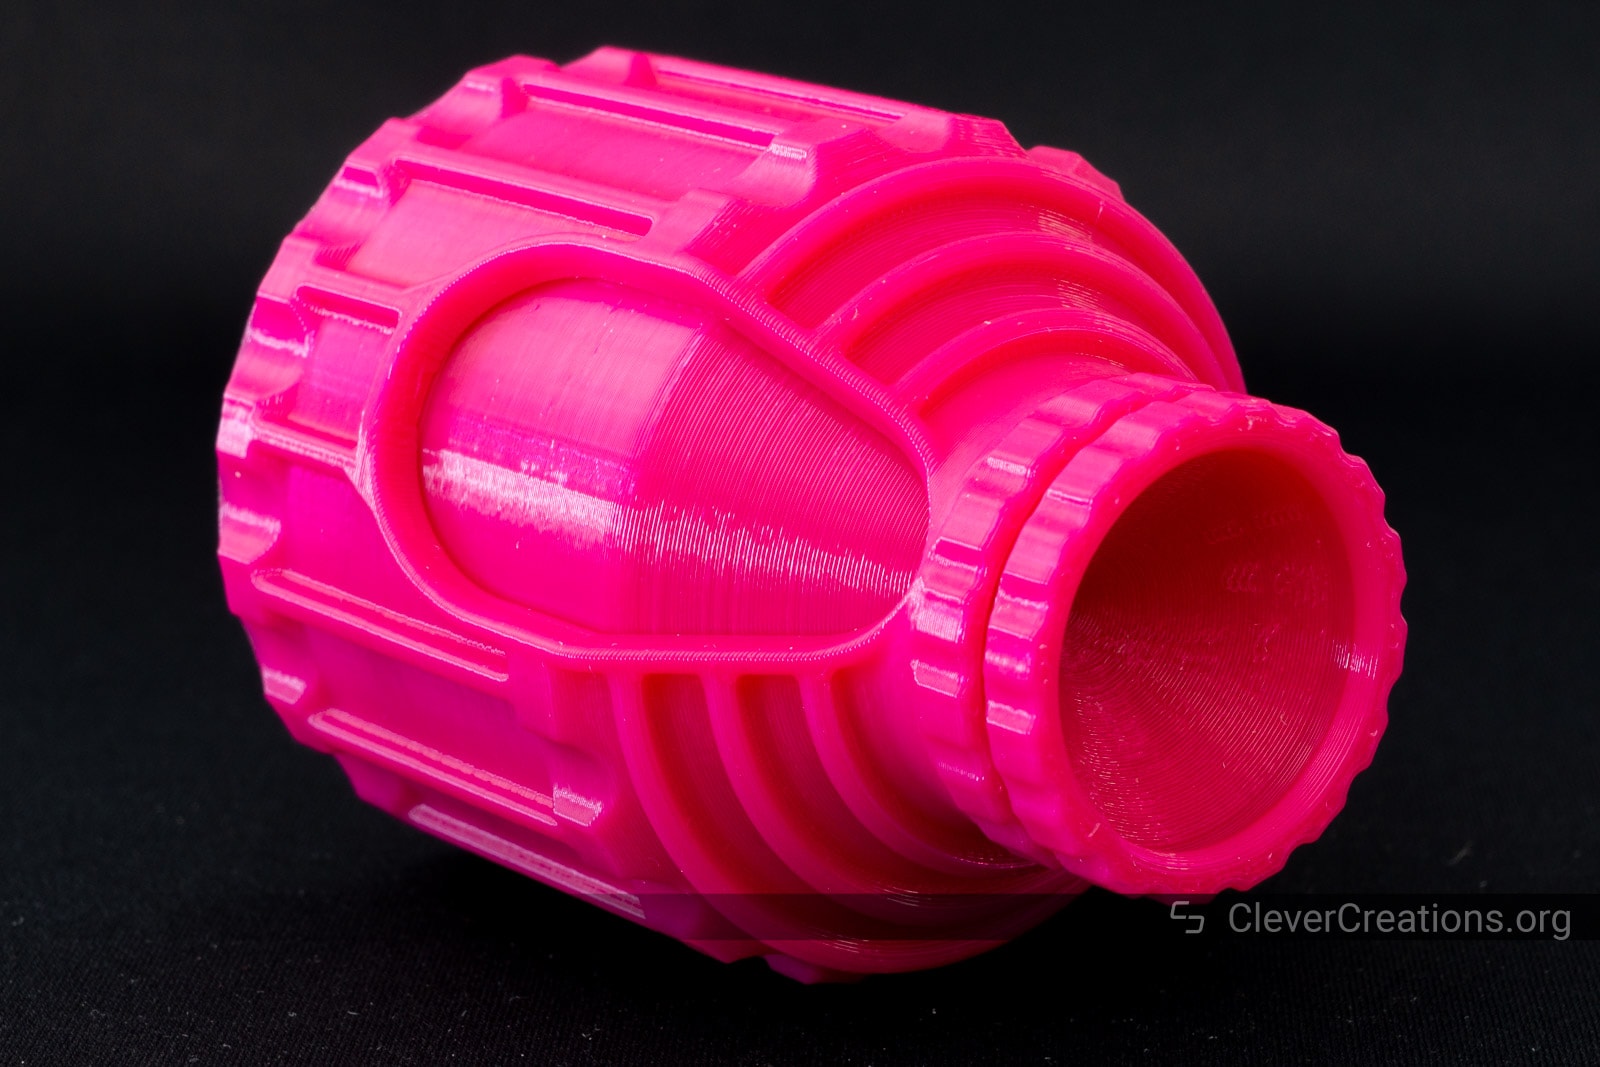
Here is the container in a closed position. We are very impressed by how even the layer lines look throughout the print, despite printing with a 100 mm/s print speed.
Articulated Chameleon

Another print that tests the accuracy of the 3D printer. This articulated chameleon was printed superbly by the S1 Pro. All the parts were movable straight from the build plate, including the eyes.
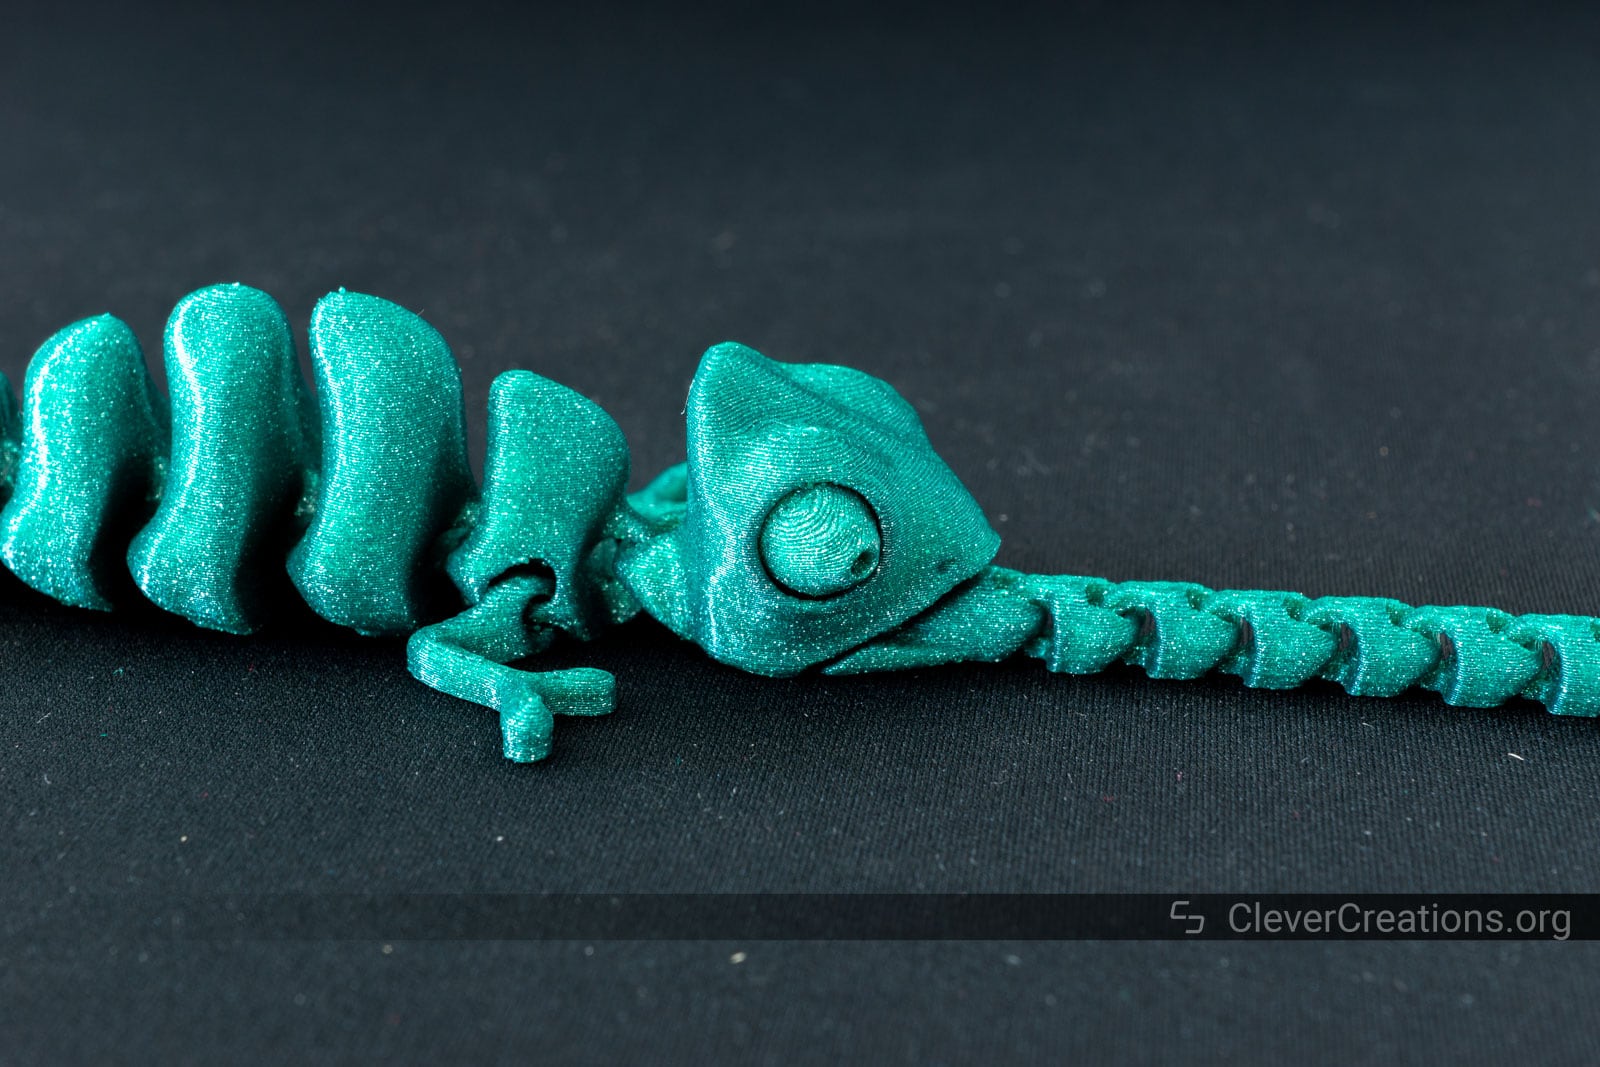
A close-up reveals near perfect results. There really isn’t much we could ask the S1 Pro to improve upon. Altogether a very impressive display with just the out of the box settings!

Conclusion: Is the S1 Pro Worth the Money?
After reading this Creality Ender 3 S1 Pro review, you have seen that the Ender 3 S1 Pro is a capable 3D printer. It offers several features that make the machine a breeze to use, like its all-metal hot end, LCD touch screen, and CR Touch auto-leveling sensor.
Compared to the Ender 3 S1, the S1 Pro brings a number of upgrades. Its Sprite Pro hot end, touch screen, LED lighting, and PEI-coated heated bed are the most notable. They give you wider filament material compatibility and easier use of the 3D printer.
At an $80 higher cost, it is worth asking whether these additions are worth the price. We think they are, which is part of the reason why we recommend the Ender 3 S1 Pro as one of the best 3D printers under $500.
This is similar to all the other reviews I ave seen on this Printer and with all of them I am disappointed that they do not cover the exotic filaments in more detail and whether the printer should be enclosed when doing so.
People look to these reviews for advice especially new printer owners in this case who would want a printer that they do not want to upgrade at all and it covers nearly all the printing materials that you can buy.
What I want to see are prints from these filaments. Yet all we see are constant PLA prints. this printer was developed to print these high temperature filaments so lets see some prints!
Hi Neil,
Thank you, that is great feedback! We will make sure to keep that in mind for our future 3D printer reviews.
Comprehensive review, good to compare with the more basic model. Thank you. Ed
There lots of criticisms on many forums for the QA/QC of all Creailty products and very slow response form their customer support, many people reported receiving defected units out of the box, not sure if this true but there is a lot, is this true?
Hi Khaled,
Based on our hands-on experience, the QA/QC of Creality products is better than the average 3D printer manufacturer. That said, there are undoubtably going to be plenty of users with issues. Part of that is because the general nature of budget 3D printers, and part because Creality is the brand with the highest number of sales in this niche. So it can be expected that the total number of complaints is also high.
In terms of the percentage of products that come with issues, however, we think that Creality’s printers do quite well compared to other companies. But that is purely anecdotal and don’t have any supporting data.
We don’t have experience with their customer support, so we can’t speak for that.
Do i need to relocate the powerr’ supply on a ender 3 s1 pro if the printer is in a enclosure?
Hi Mathieu,
That’s a good question! We aren’t aware of anyone doing that, and we don’t think it is necessary either. These power supplies are actively cooled and generally capable of handling elevated temperatures for long periods of time.
If you want to be sure, you could look up the part number on the sticker of the power supply to find its datasheet online. That should tell you exactly what temperatures it is rated for.
Hello Tim, I really do appreciate Your profound review. As a new owner and beginner I asked Creality and others for the exact brand name of the provided little sample PLA filament without sufficient answers. I ordered several creality spools since with no match so far. Do You know what and where to order it? Thanks in advance! Holger
Hey Holger,
That’s a good question. We’re not entirely sure, because the small PLA sample is not the same for each Creality printer. We’ve got a large stack of them here and their shade of white varies. Their labels aren’t clear either.
Lately, the samples have been more of an arctic white. It could be the white filament from their HP-PLA line, but that’s just a guess.
Let us know if that is of any help.