

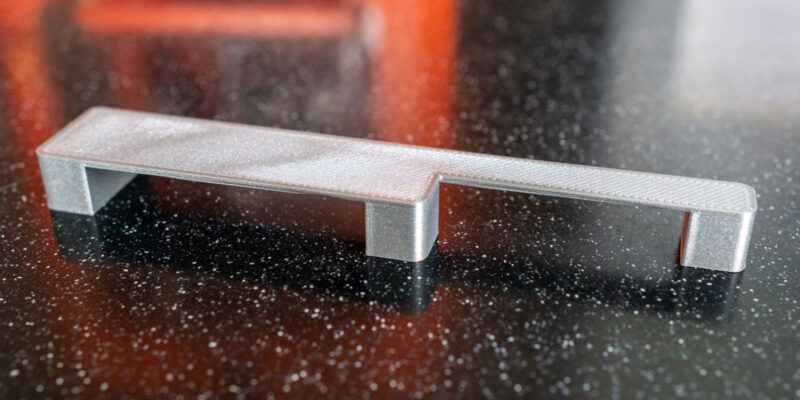
By lifting the nozzle during retractions, Z-Hop helps to reduce the chances of your prints getting knocked over from the bed and scarring on your prints. With a Z-hop height of 0.2 mm, you can get smoother 3D prints and reduce print failure.
Z-Hop is one of those important but often ignored slicing aspects that play a big role in how well your 3D-printed parts turn out. A well-tuned Z-hop setting makes it less likely that the printer’s nozzle will knock over or scratch your prints.
It might seem a minor setting, but often if you’re having stringing or Z-banding issues, the Z-Hop settings are likely to be one of the culprits. So, in this article, we’ll try to shed some light on this feature and help you improve the quality of your prints.
The goal of the piece is to help you understand the Z-hop parameter in detail and walk you through its various settings. By the end, you should know everything there is to know about this topic and be able to help yourself, and others fix their Z-Hop problems.
Read on and Z-Hop your way to better 3D prints!
What Is Z-Hop?
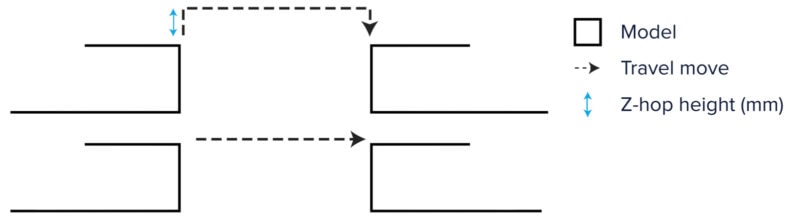
Z-Hop is a slicer setting that lifts the print head up by a few millimeters as the printer performs a retraction move. When you turn this setting on, the nozzle will “hop” a certain distance upwards before it travels over the printed part(s) on the build plate.
The Z-Hop move is a multi-step process. First, the printer retracts the filament back into the nozzle. The print head then moves up a small amount—typically the height of one layer and goes to the next point. Finally, the nozzle is lowered back to the previous Z height, and printing continues as usual.
In the case of CoreXY and non-bed-slinging 3D printers, instead of the nozzle going up, the print surface moves down. The principle remains the same—maintaining a vertical gap between the nozzle and the printed parts as the print head moves around.
This clearance between the nozzle and printed part reduces several risks that can affect your print quality. However, this clearance can also lead to other issues, like stringing and Z-banding, if you don’t fine-tune the Z-hop parameter. We’ll explain to you how to do this below.
Why Should You Use Z-Hop?
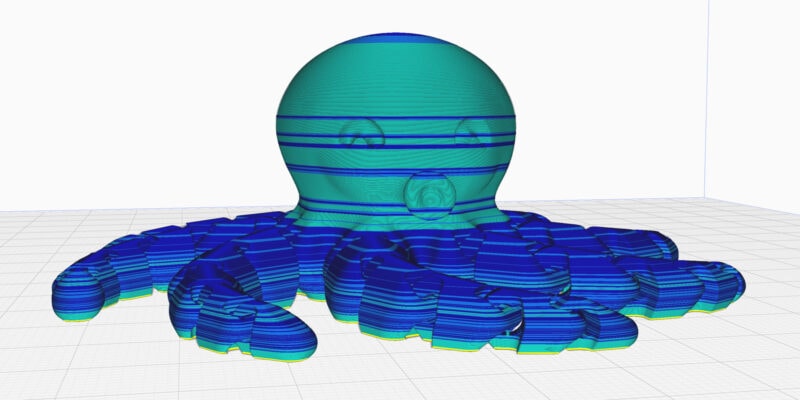
Z-Hop has strong benefits for 3D prints that have a lot of retraction movements in them. Intricate jewelry pieces, Voronoi patterns, chainmail, and other complex mesh patterns are some of the models where it comes in especially handy. It’s also useful when you want to print many small models at once.
Here are the main three reasons to use Z-Hop in your 3D prints:
Reduces The Risk Of Collisions
Let’s say the Z-Hop setting in the slicer is turned off. During your print, the nozzle of your 3D printer retracts the filament and then moves to the next spot on your print.
In that case, it is possible that the nozzle needs to traverse through parts of the print that are not at the same Z-height as the nozzle. For example, if an overhang has slightly curled up, the nozzle will have to go through this part of the print.
When this happens, your nozzle will hit your 3D printed part and potentially damage it or knock it over. By introducing a small vertical clearance between the nozzle and your print using Z-hop, you can considerably reduce this risk.
By enabling the Z-Hop setting, the nozzle is free to move as it travels from point A to point B. Z-Hop simply raises the nozzle by a certain amount, usually half the nozzle size, while it is moving around. This way the nozzle will nearly always be able to move freely and avoid collisions.
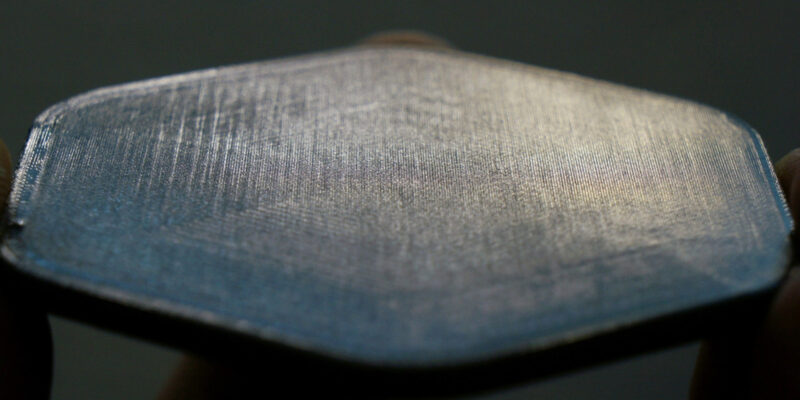
Avoid Scars on Top Layers
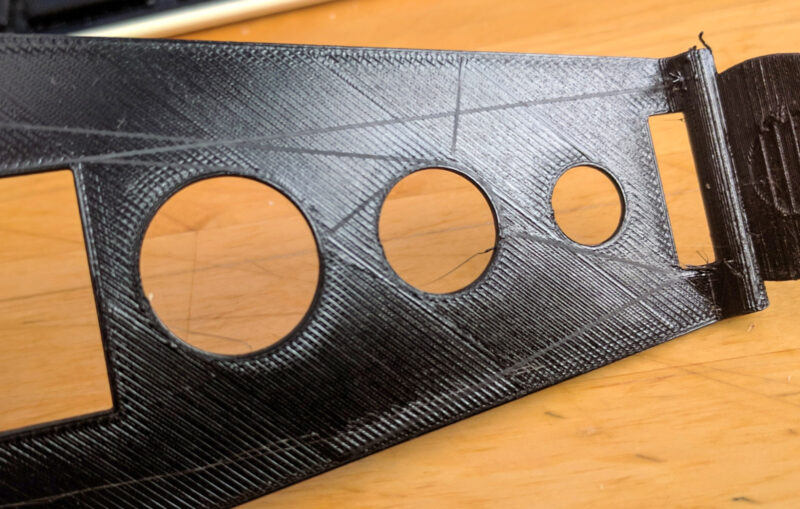
If there is little space between the nozzle and the top layer of the print, the tip of the nozzle is likely to touch the surface of the top layer as it moves between points. This causes scratches or scars on the top layers, which have a considerable impact on the final appearance of the part.
When creating things to 3D print and sell, this is one of the things to avoid. It becomes a lot harder to make money with a 3D printer when you have to explain to the buyer that their parts have scratches on them.
The Z-Hop setting prevents these scars on the top surface layer. Since the nozzle is raised above the current layer height, it can’t scratch the top of the print. The result is a top layer that is smooth and free of nozzle marks.
3D Printed Inlays
3D printed inlays are a popular technique that involves creating a recessed area in a 3D print and then filling it with a different colored or textured material. When using Z-Hop in this process, you can keep the nozzle from hitting the part being printed.
It’s similar to when preventing scars on the top layer, only in this case you’re making sure that the nozzle doesn’t touch the part of the print that needs to remain a different color or texture.
By temporarily moving the nozzle up when it reaches a part of the print it has already made, you can avoid damaging it and achieve cleaner, more accurate inlays. It takes more skill and testing than regular 3D printing, but if you get it down, you can use this method to make impressive 3D prints with many different colors.
Chuck from the YouTube channel CHEP does a great job of showing it in action in this video.
Drawbacks
Of course, everyone would use Z-hop in 3D printing if it didn’t come with any drawbacks. There are several reasons why you might want to leave the Z-hop setting disabled for certain 3D prints or sections of a 3D print.
Increased Print Time
The Z-Hop movement adds two extra vertical travel moves to many of the horizontal travel moves, which can significantly increase how long it takes to 3D print. When a retraction happens, the Z-axis will now both move up and down again.
This doesn’t make much of a difference for small, straightforward prints, but the Z-Hop can add a few hours to the 3D printing time for parts with lots of retractions.
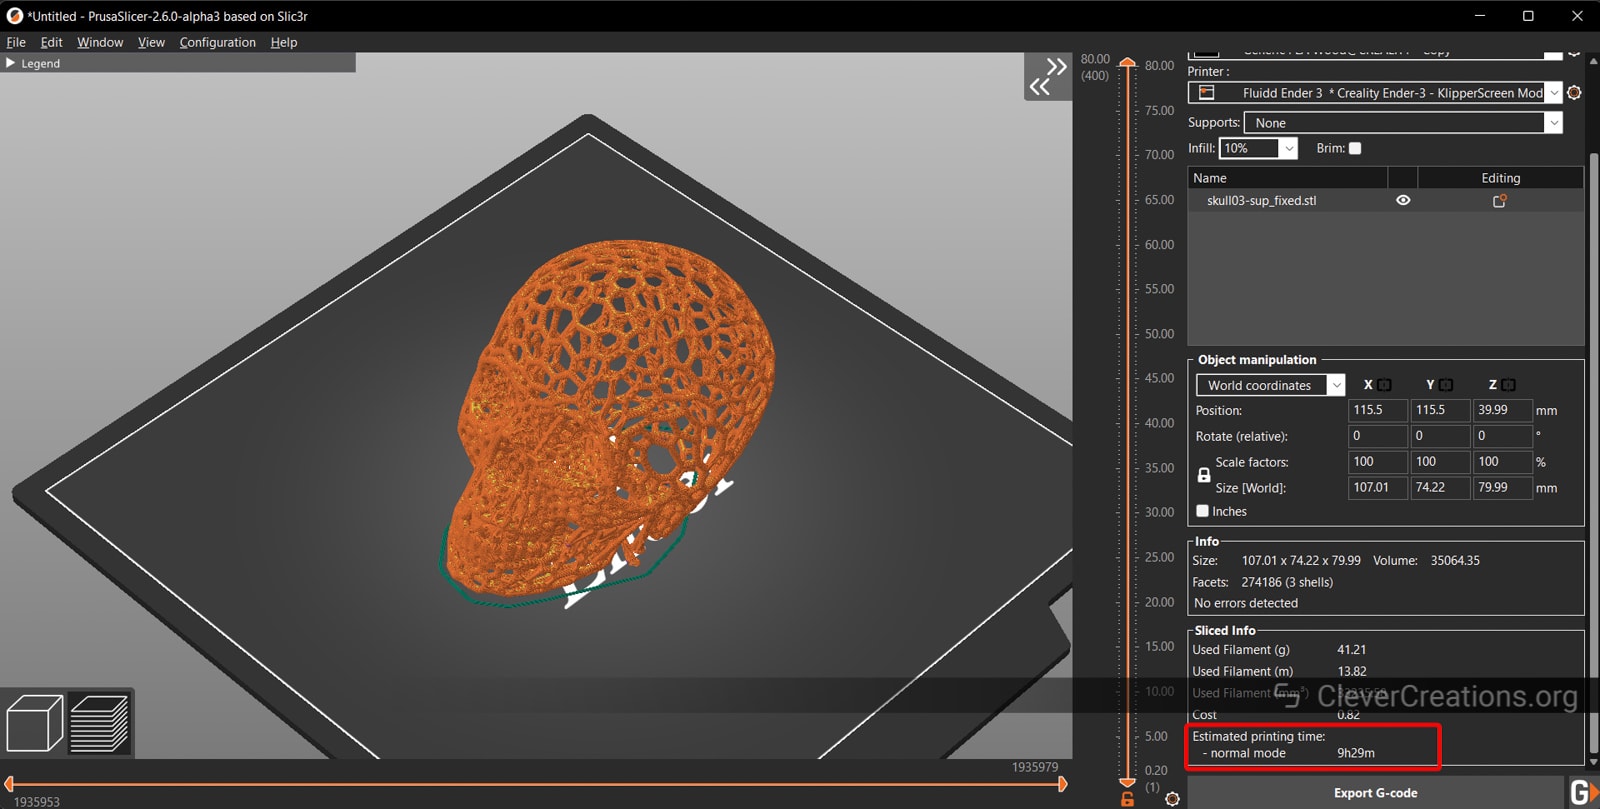
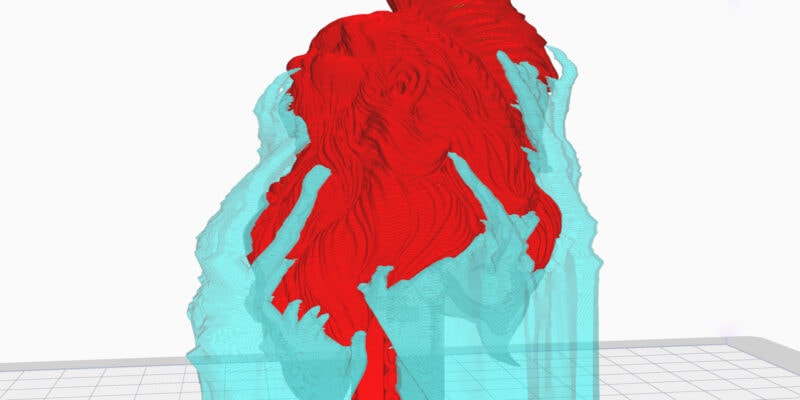
For example, it took about 8 hours and 45 minutes to slice the Skull Voronoi model from the image above in PrusaSlicer without the Z-Hop feature. When the feature is enabled in the Z-Hop settings, the expected printing time is 9 hours and 30 minutes.
That’s an almost 45-minute (or 9%) difference. If you print large models or perform batch printing (many small objects) on a large 3D printer, this small setting can make hours of difference to your 3D print times.
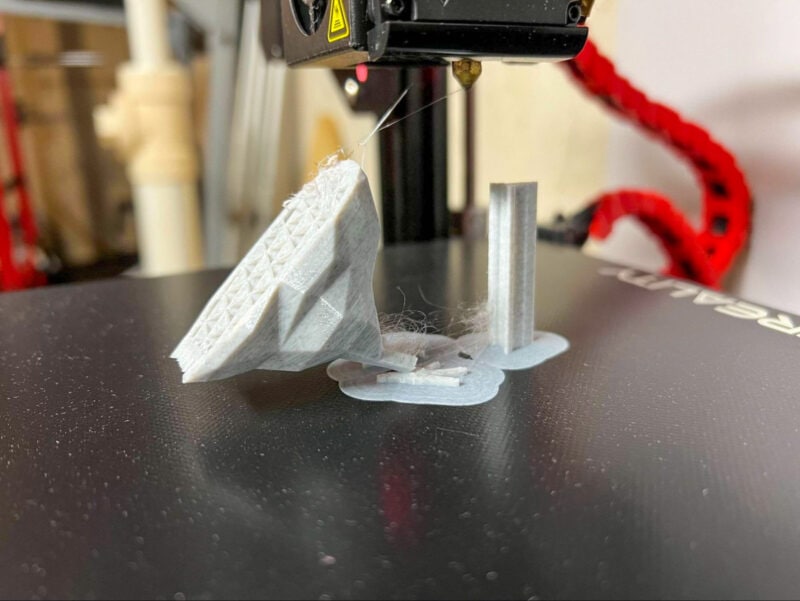
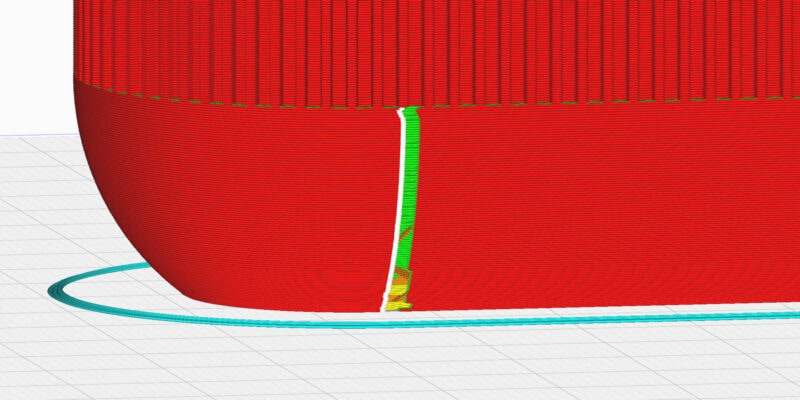
Stringing Issues
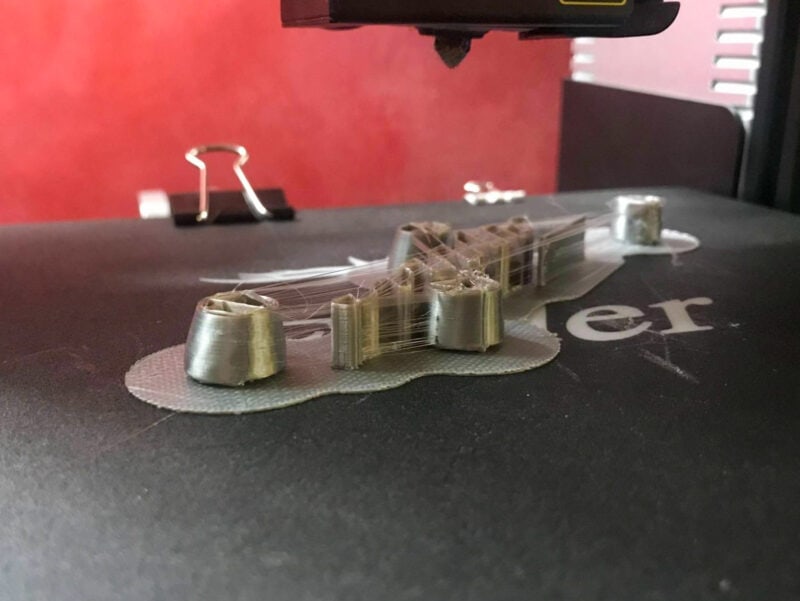
Even though stringing is mainly a result of incorrect retraction settings, the Z-Hop option can make the problem worse. It is a common complaint among 3D printer users that oozing filament becomes more visible when Z-Hop is enabled.
During a Z-Hop, the nozzle lifts up and retracts the filament before moving to the next point. Some material may ooze out of the nozzle as it makes vertical movement if your retraction settings aren’t dialed in correctly. This excess material leads to fine hair-like strings in your 3D prints.
If the Z-Hop in Cura is turned off, this vertical movement is stopped. There’s less time for the material to ooze out of the nozzle and make unwanted strings on your print. As a result, after turning off the Z-Hop, you might see a decrease in stringing effects.
We must emphasize that the Z-Hop doesn’t directly affect stringing but increases the chances of it occurring in your parts. If your machine keeps stringing even after you turn off the Z-Hop, you may need to adjust the retraction speed and retraction distance.
When your retraction settings are dialed in correctly, you’ll be able to use Z-Hop without any issues.
Inconsistent Layer Heights

The Z-hop movement causes the lead screw to frequently make extra vertical movements during printing. This increases the chance of inconsistency in layer heights, possibly leading to Z-axis artifacts in your 3D prints.
These artifacts can be hard to troubleshoot, as they are easily confused for Z-wobble or Z-banding. On a budget 3D printer that doesn’t have the best build quality, the Z-Hop may cause more issues than it solves.
During the Z-Hop, whenever the Z-axis moves up, it must move back down to the same height at the next point. If you have any inaccuracies or faults in your Z lead screw assembly, the nozzle might not lower to the exact same level.
At the next point, it can be a fraction of a millimeter too high or too low. When this happens, your 3D prints can have bumps or odd layer lines that don’t look nice.
This issue is more evident in printers with a single lead screw on the Z-axis. Cheap printers, like the Ender 3, without a backlash nut on the lead screw, especially struggle with inconsistencies due to the Z-Hop moves.
To solve this, you either need to make some improvements to the Z-axis assembly, disable Z-hop, or use a 3D printer that is less prone to these sorts of issues.

How To Set Z-Hop in Cura
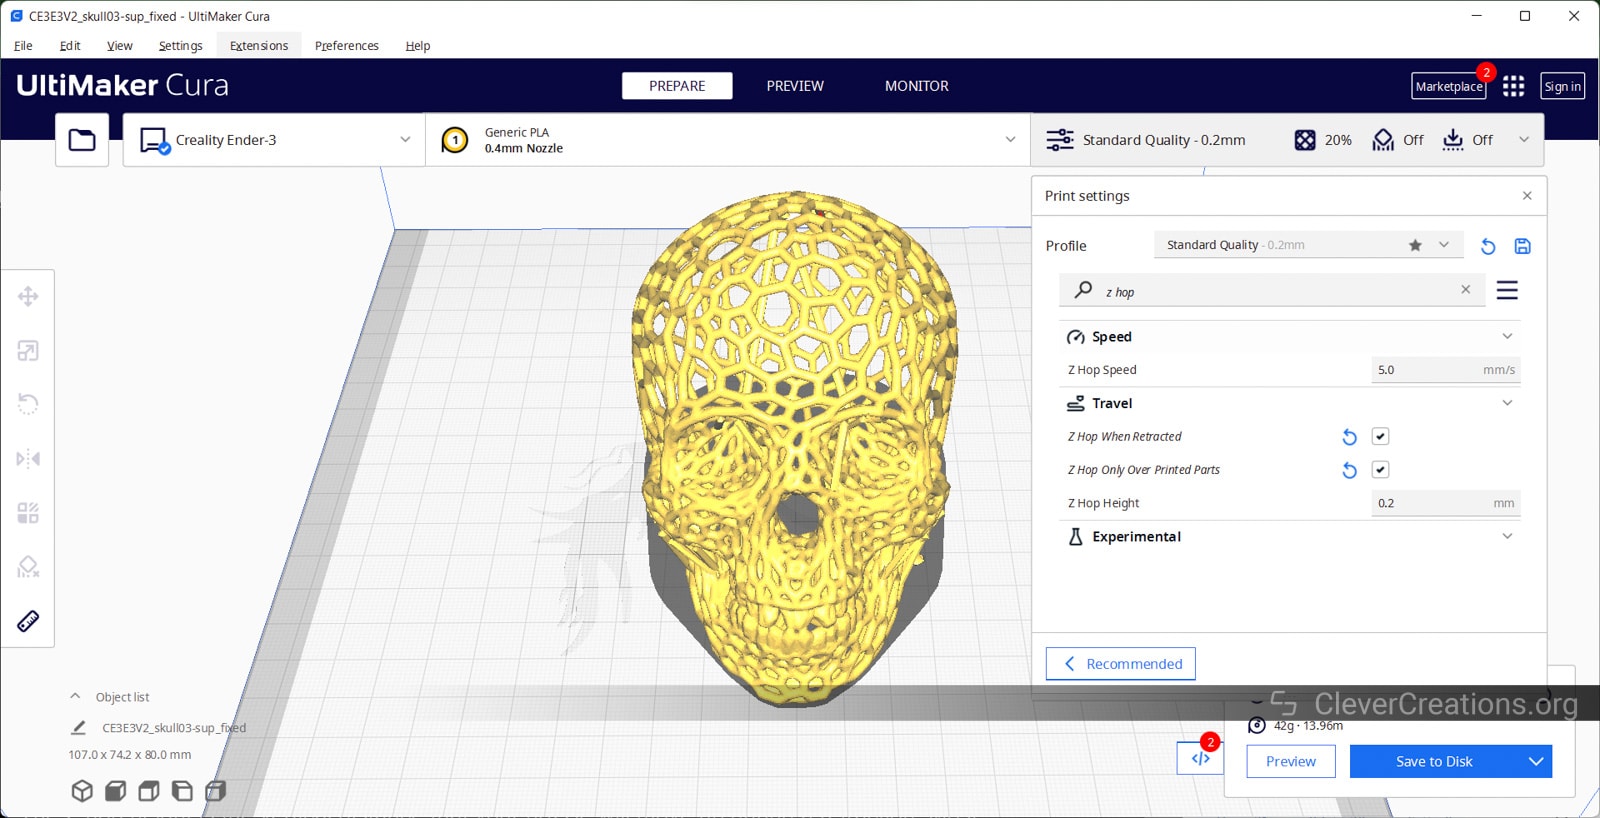
Setting up Z-Hop in Cura is a quick 5 step process:
- Open Ultimaker Cura.
- Go to the Print Settings Tab on the right side and click Show Custom Settings.
- Next to the Search Settings bar, you’ll find three dashes. Click on them and enable the ALL Settings option.
- Go to the Travel section, and scroll to the bottom.
- Check the Z-Hop when retracted, and Voila! You’ve now enabled the Z-Hop for your 3D prints.
Enabling Z-Hop when retracted is the easy part. Now onto fine-tuning the Z-Hop settings part. There are around 3 to 4 Cura settings you need to dial in regarding Z-Hop in Cura.
Z-Hop Height
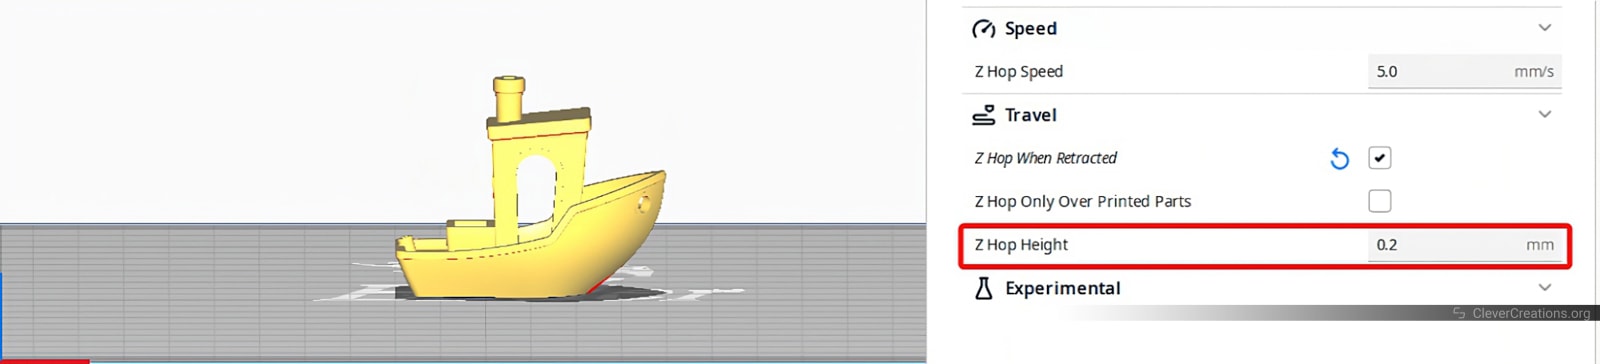
The Z-Hop height is the vertical distance that your nozzle will move up during a retraction. Most of the time, this height is the same as the layer height in your 3D-printed model.
For example, 3D printers with a 0.4 mm nozzle typically print in 0.2 mm layers. So as the Z-hop height, you should set 0.2 mm.
Obviously, you can change this number based on your preferences. The higher the Z-hop height, the less likely you are to have your nozzle bump into things. But it will also take longer to print, as there is extra vertical distance to traverse.
Vice versa, a lower Z-hop height will shorten printing time, or at least reduce the Z-hop impact on print times. But it might not be enough to prevent the nozzle from bumping into some parts of your 3D model.
As a general rule, however, it’s a good idea to make the Z-Hop height the same as the layer height. It’s a good approach for lessening the chances of artifacts and stringing.
Z-Hop Only Over Printed Parts
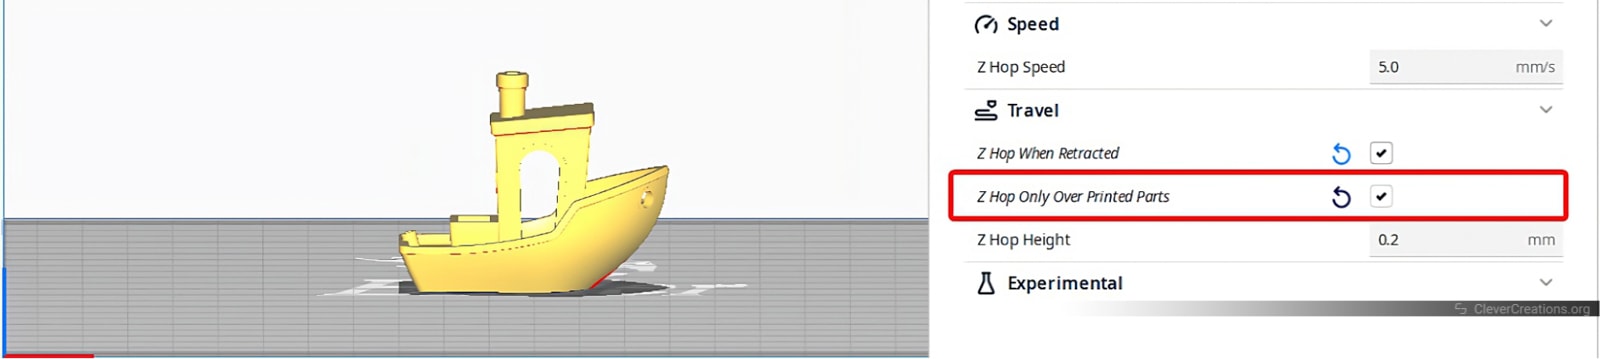
Cura has an option called “Z-Hop over printed parts” that lets you decide when the Z-Hop happens. If you enable this setting, the printer will only Z-Hop when it goes over parts that have already been printed.
This prevents the Z-hop from taking place on every retraction move. The result is less stringing and a reduction in 3D printing time. There often is no reason to Z-Hop all the time.
This setting goes hand in hand with Cura’s combing mode. The combing mode keeps the nozzle inside the print area to reduce blobs and strings on the external perimeters of your print.
If you have combing enabled in your 3D prints, the nozzle will always do a Z-Hop, even if you have the Z-Hop Only Over Printed Parts box checked.
Z-Hop Speed
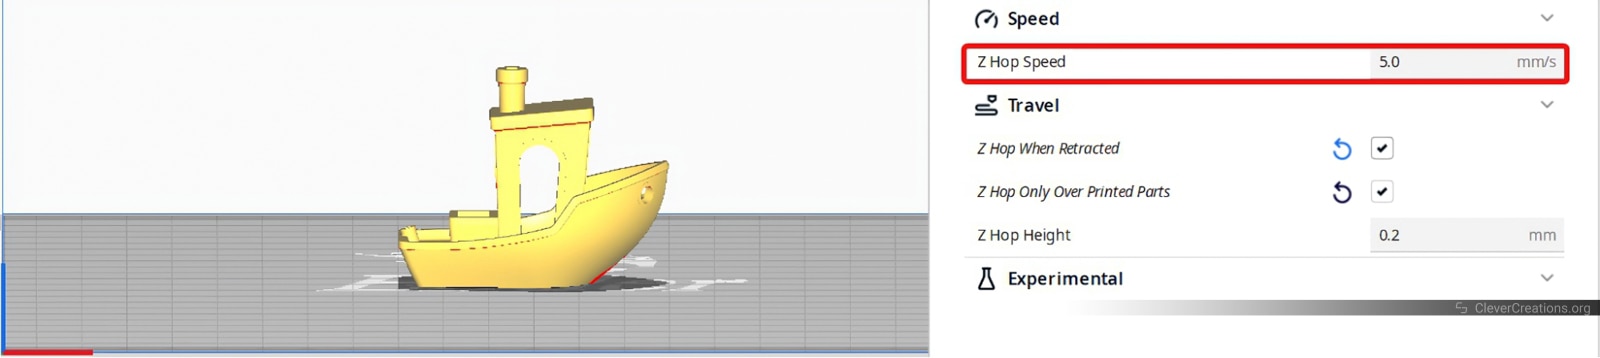
The Z-hop speed can be found in Cura’s speed area. The Z-Hop speed controls how fast the Z axis moves up or down during a Z-Hop.
For most 3D printers, it is best to leave this setting at its usual set value of 5 to 10 mm/s. The Z axis is typically not made to handle high-speed vertical moves.
If you set a higher Z-hop speed than the 3D printer can handle, it is likely that the Z-axis will miss steps or run into other problems. So it’s best to not change the Z-Hop speed setting in the slicer unless you have intimate knowledge of your machine.
A notable exception is Delta 3D printers, which can usually handle a faster Z-Hop speed due to their design. If you own a Delta 3D printer, spending a bit of time optimizing the Z-hop speed can save a lot of time during 3D printing.
Z-Hop After Switching the Extruder
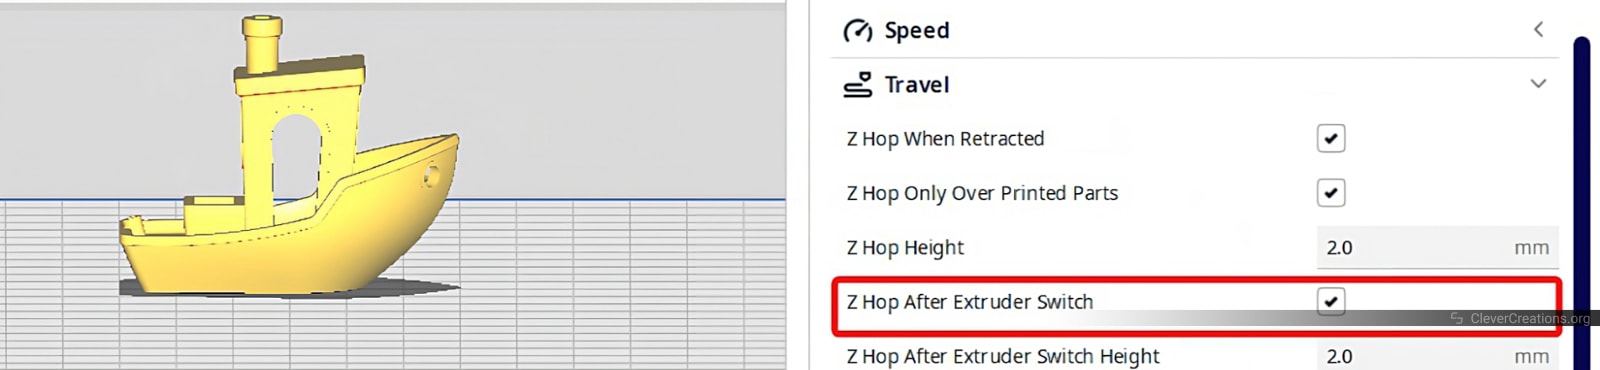
The Z-Hop after the extruder switch in Cura lets the printer lift the nozzle slightly when shifting between different extruders. This feature is designed for 3D printers with multiple extruders and comes in handy during multi-material, multi-color 3D printing.
It helps prevent the nozzle from dragging through the previously printed material and causing strings or defects on the current print.
Enabling this option can help improve the quality of multi-color 3D prints by reducing the risk of nozzle collisions and stringing and minimizing surface defects.
Troubleshooting
As we mentioned above, the Z-hop feature can sometimes cause problems. For that reason, it can be useful to go over the items below for troubleshooting known issues with Z-hop.
Stringing
Z-Hop can introduce fine stringing in your 3D prints. If your parts are stringing or have thin filament threads, try lowering the Z-Hop height or increasing the Z-hop speed.
Always calibrate your retraction settings first. A retraction tower can be useful for this. It uses different levels of retraction distance and 3D printing temperature so you can see which one works best for your specific combination of 3D printer and filament.
Excessive Print Times
If the Z-Hop in Cura greatly extends your print times, it’s better to use it only when necessary. Extended print time can increase the risk of print failure, increase 3D printer power consumption, and ultimately increase the cost of your 3D prints.
If you must use Z-hop and want to shorten print times, try adjusting other settings, like the layer height, 3D printing speed, and infill percentage. These have the most impact on 3D printing times and adjusting them can free up time for the Z-hop feature instead.
Surface Defects
As the nozzle moves from Point A to Point B, it might ooze out some extra material or leave nasty blobs on the surface. These blobs are linked to Z-Hop stringing, but they are also a separate issue.
If you see bumps, zits, or other flaws on your skin, try adjusting the height and speed of your Z-Hop. Tuning the retraction settings should also be on your list of things to do here.
Layer Shifting
In rare cases, a wrong Z-Hop can cause your 3D prints’ layers to shift. Single-axis lead screw 3D printers like the Ender 3 are more likely to have this issue. The heavy weight of the print carriage and continuous movement of the Z-axis could cause the layers to not line up correctly.
When this happens, make sure the Z-Hop height isn’t set too high. It should be close to the same height as your layer, or you can set it a little bit lower. Check the tightness of the printer belts and the straightness Z-axis lead screw to see if there are any identifiable problems that could be impacting layer shifting.
Conclusion
Z-Hop can do wonders for your 3D prints. You can use it to avoid unnecessary collisions and scars on your printed parts and even use it to successfully 3D print inlays.
It’s a fun and easy feature to use. If done right, it will help improve your print quality and experience.
In the rare cases where it doesn’t work, make sure to fine-tune your Z-Hop and retraction settings. You can reduce the print times by refining your print settings and minimize stringing by dialing in retraction.
Use this post as a guide for your Z-Hop settings and “Hop” your way to better 3D printing results. If you feel we’ve missed anything or would like to add something, feel free to comment below and let us know.
Keep hopping and see you next time!

Thank you so much for the very useful information!