
Bridges and overhangs are some of the most challenging 3D printing techniques you can do. Add ABS to the equation and it’s even more challenging to pull off successfully.
Why? Because ABS is extremely sensitive to fluctuations in temperature, it doesn’t work well with a lot of the usual bridging settings, like using a part cooling fan. Even so, it’s possible to achieve quality results using ABS with bridging and overhangs with a few changes to your print settings.
So, let’s dive into the best ABS overhang and bridging settings to use, some common reasons why your ABS bridges fail, and a few last-resort alternative filaments that may work better.
Why Are Bridges and Overhangs Difficult With ABS?
ABS is a 3D printer filament that is difficult to work with in many ways. It requires a high print temperature and is prone to shrinkage as it cools. That means the whole print needs to stay at an even temperature during the printing process, or it will cool unevenly and start to shrink and warp.
Overhangs and bridges don’t perform well in these conditions. The 3D printer essentially builds up new material mid-air to create a new structure, so they need to cool quickly so they don’t collapse.
Bridging connects two parts of a print that were previously separate. Think of a basic doorway—the two sides are disconnected to make a gap. This is the opening that allows people to pass through the door. At the top, the wall stretches across the whole length of the doorway to close it.
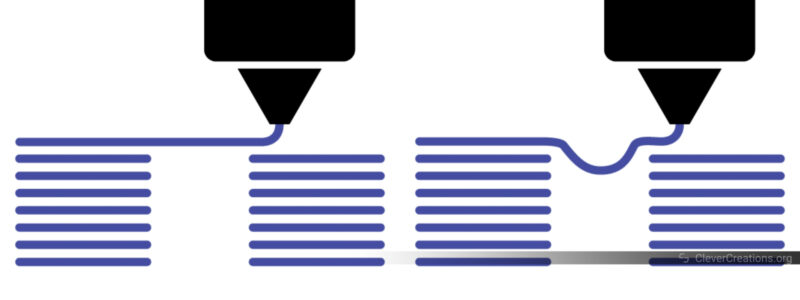
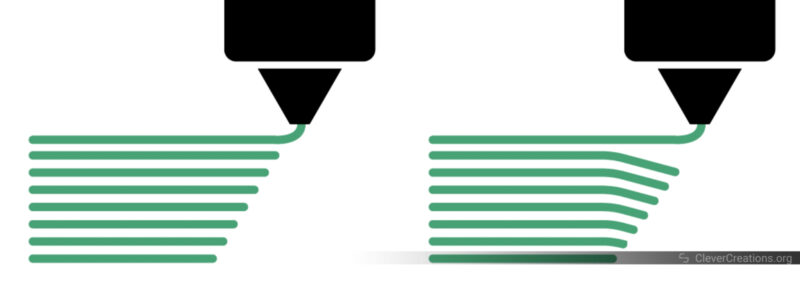
In 3D printing, the top part of the doorway can only be created by running a strand of extruded material from one side of the doorway to the other. Because the material is soft and malleable and has nothing below it to support it, gravity will start to pull it down in the middle. The faster the material cools down and loses its malleability, the less time your first bridge layer has to sag.
Overhangs slowly expand the size of the model by building outward layer by layer. Each new layer deposits material slightly farther out than the previous layer. If we go back to our earlier example, an overhang would be an arched doorway. Instead of meeting at the top in a straight line, the two sides curve into each other and gradually meet.
Since each layer builds on the last, the previous layer needs to be somewhat cooled and hardened so that it can support the new layer. If everything stays too soft, the overhang will start to droop or fail.
Tips to Improve ABS Bridging and Overhangs
Print settings are extremely important when attempting bridges and overhangs with ABS. These are the ones we think are important to dial in for the best results.
Fan Speed
While you typically don’t use your part cooling fan when 3D printing ABS, you need some cooling for your bridge or overhang. The ideal setting is to keep your fan off until you reach your bridge or overhang, and then set your fan speed to about 10-20%.
This is easy to do with custom g-code, but you can set this up in your slicer software as well. Most popular slicer programs have a special setting that allows you to change your bridges fan speed without affecting the rest of the print.
Print Speed
When printing a bridge, you may need to experiment with your print speed. If you move too quickly over the gap, the filament may not have time to extrude fully. If your speed is set too low, your bridge may sag from over-extrusion.
You can change your print speed at a bridge using a custom g-code or change your bridging speed in your slicer. Try out a few different speeds to see what works best.
Layer Height
If you typically print your models at a 0.2 mm layer height, try reducing it to 0.12-0.15 mm. Thinner layers cool more quickly and are affected less by gravity, which results in less sagging on your ABS bridge. One downside is that your parts will take longer to print, but the improved quality is often worth it.
Supports
Using support material around your ABS bridge or overhang can help with stability. Since you aren’t building the bridge or overhang over open air, it is less likely to fail. With the bridge fully or partially supported, the filament has to cover a much smaller gap.
Bridge Detection
Though we’ve covered each individual setting you may need to adjust in your slicer, some programs have a feature called ‘detect bridging perimeters’ or ‘detect bridging’ that auto-generates the best settings for bridges. It changes the speed, flow rate, layer height, etc., and turns on supports for areas with bridging or overhangs.
It’s a useful feature and we recommend enabling it to save some of the hassle that comes with 3D printing bridges in ABS and other materials.
Enclosure
It’s also possible that your 3D prints experience issues from printing ABS without enclosure. If that is the case, an enclosure (permanent or improvised) can help improve your results.
Post-Processing
Even with the best settings (and intentions), your ABS bridges and overhangs may not turn out perfectly. Depending on the severity of the issue, you may be able to fix it during post-processing.
If the first few layers of your bridge sagged or failed, you may be able to cut away the excess strands and use a 3D pen to reinforce the area. You can also heat your print with a heat gun or a soldering iron to reshape your bridging or overhangs as well.
Keep in mind that your results may vary. From an efficiency perspective, it’s also better to configure the best printing settings than it is to fix your 3D prints afterwards.
Are Long ABS Bridges Possible?
If you follow the above tips, you can get good results with ABS bridging and overhangs. However, even the best settings can’t perform miracles with this 3D printing material.
Temper your expectations when 3D printing ABS, because it has very clear limitations in these scenarios. If you want to achieve long bridges on your 3D prints, you might want to consider using one of the many ABS alternatives.
Alternatives to ABS for Better Bridges and Overhangs
While ABS isn’t the best material for bridging and overhangs, there are plenty of other materials that produce much better results.
- ABS+: a type of ABS that is formulated to improve specific characteristics of regular ABS, such as its shrinkage rate (and therefore bridging).
- PLA+: an improved version of basic PLA that exhibits less brittleness and greater tensile and impact strength.
- ASA: another high-temp filament that is similar to ABS but with less shrinkage and noticeable fumes.
- PETG: a low-temperature filament with excellent chemical, abrasion, and UV resistance.
- PC: a durable high-temperature filament with excellent tensile strength and impact resistance.
You can learn more about other 3D printer materials and how they compare to ABS in our guide to ABS alternatives.
Final Thoughts
While bridging and overhangs can be difficult to pull off with ABS, it isn’t impossible. Because ABS has issues with layer adhesion and warping when it cools down too quickly, you usually have to print it with your fan speed at 0%. However, your bridges and overhangs need at least some cooling fan % so they don’t collapse. It’s all about finding a good balance.
Using the right printer settings, bridges fan speed, understanding the limitations of ABS, and using support when possible will give you the highest rates for success. When that is not possible, there are other 3D printer materials out there with the same benefits, but much fewer shortcomings.
Have you tried printing a bridge or overhang with ABS? What settings worked best for you? Let us know in the comments!