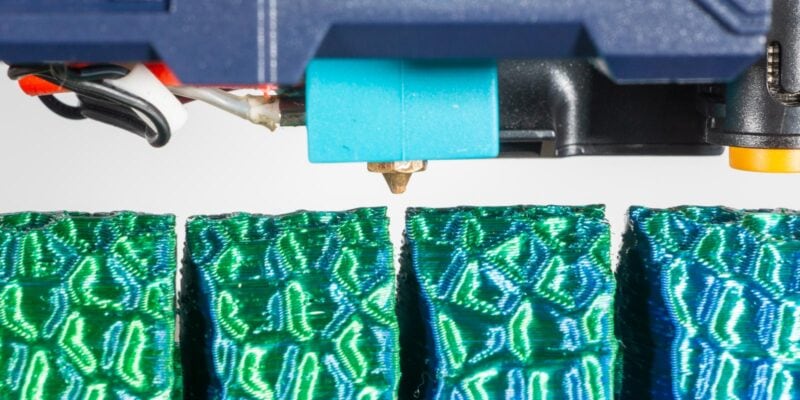

Whether you like it or not, every plastic part you 3D print will have a Z-seam. It’s just how Fused Deposition Modeling (FDM) works. The seam occurs when the nozzle starts and stops at each layer.
Even though the Z-seam might not affect the part’s structural stability, it does change how it looks. The visible seam reduces the smoothness and attractiveness of these parts. If you want to print aesthetically pleasing models, you’ll find it to be a problem.
In this article, we’ve put together several quick and easy ways to fix Z-seam alignment so that it doesn’t affect your 3D prints too much. It won’t go away totally, but the solution will surely make it less obvious than it was before.
So, without further ado, let’s get down to business and see how you can get a mostly seam-free 3D printing experience!
What is the Z-seam in 3D Printing?
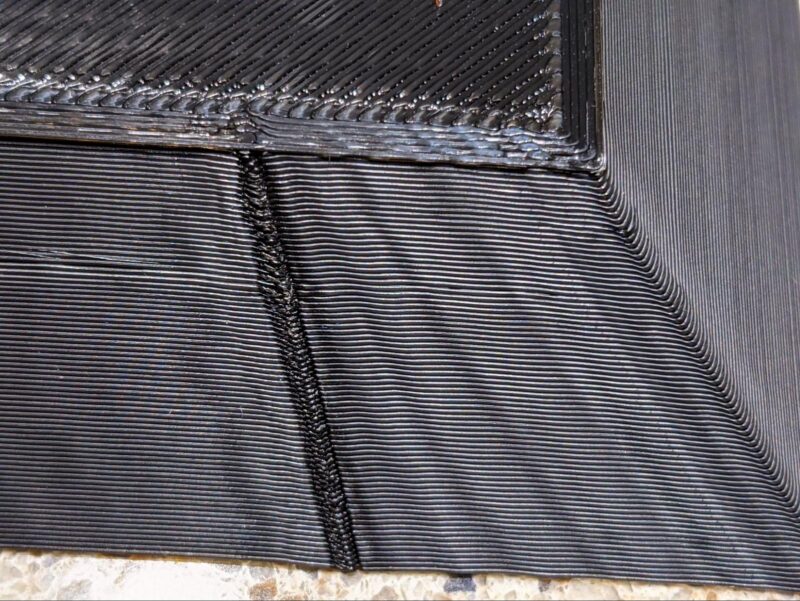
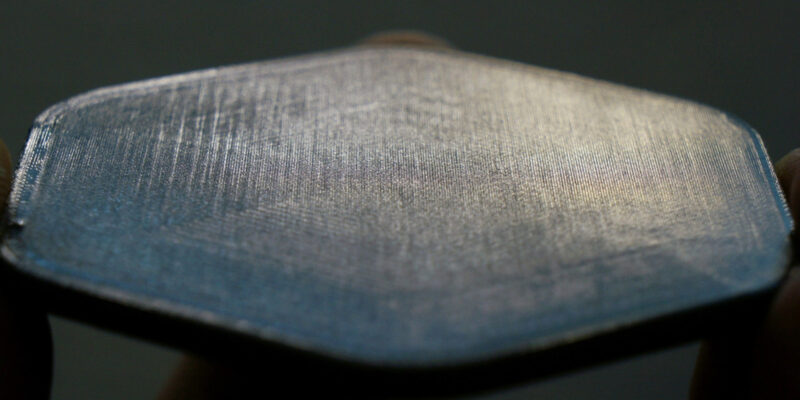
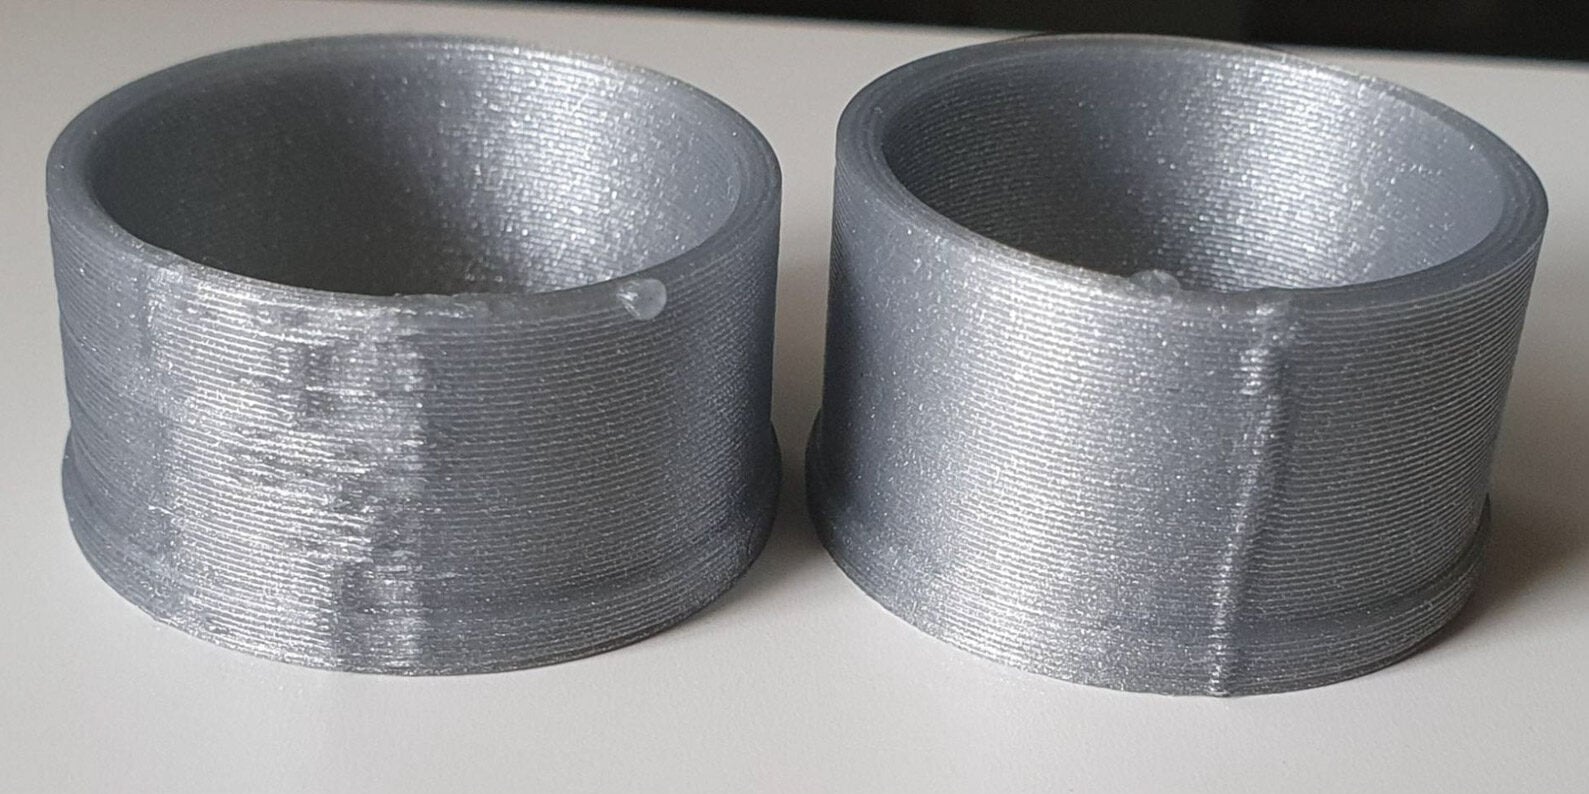
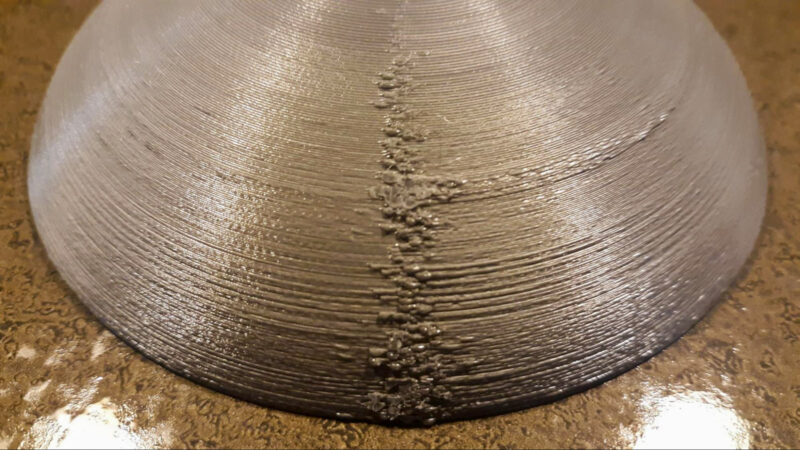
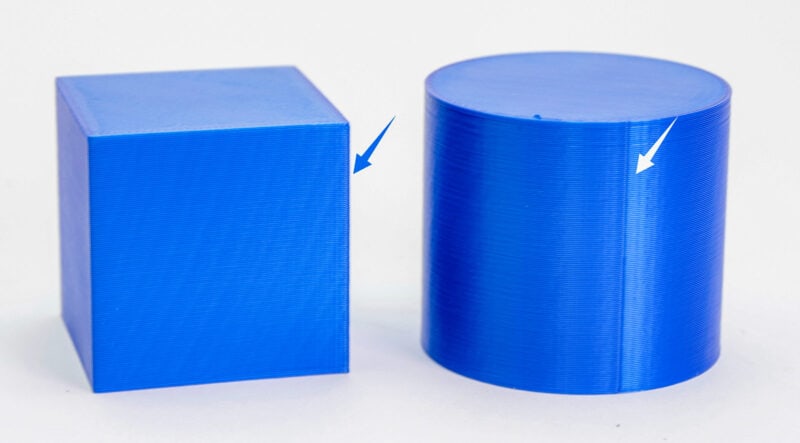
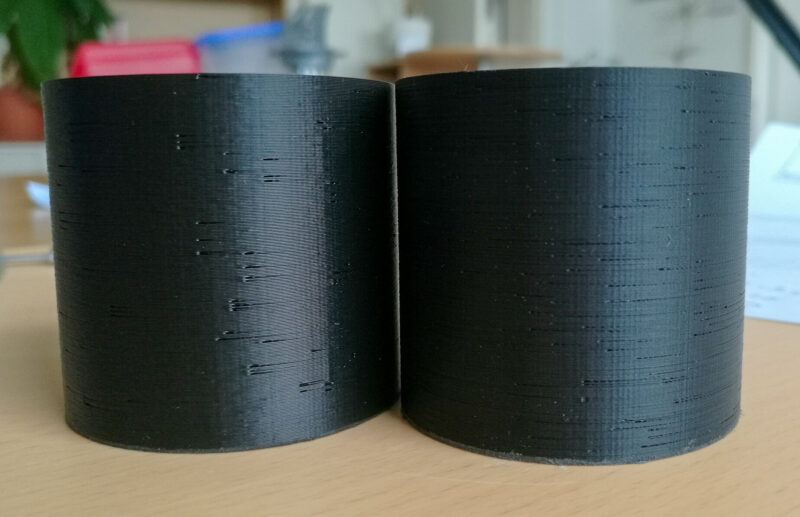
The Z-seam is a single line of bumps, zits, or tiny gaps that run vertically on the outside of your part. It shows where the printing of each layer ended, and every FDM 3D-printed part has one.
Still, the Z-seam is visible in different ways depending on the shape of your part and how you set up your print. In some types, the continuous line of blobs is more pronounced and looks like a noticeable defect. In other cases, you can hardly see the seam line.
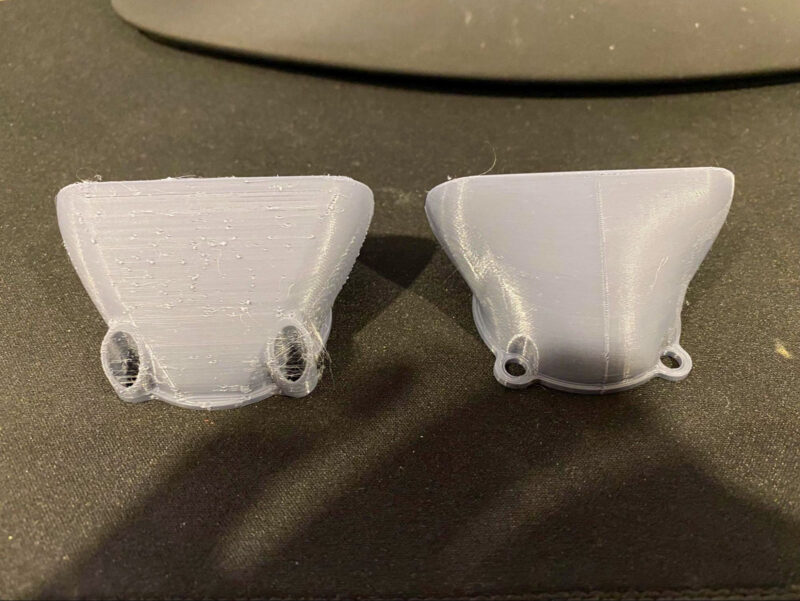
The Z-seam doesn’t change the strength or other qualities of your part. But a very visible Z-seam line is the last thing anyone needs for models like figurines, decorative pieces, or cosplay masks. It makes the part less smooth and requires additional post-processing for perfect results.
Okay. The Z-seam is a line of blobs or gaps. Got it! But what makes your parts have this straight line of unwanted flaws? Let’s explore the answer in detail.
What Causes the Z-seam?
You can blame the Z-seam on the way FDM printing works. The nozzle pushes out material and prints out each layer one at a time. At the end of each layer, the printer stops pushing out the filament for a short time before going on to the next layer.
At the tip of the nozzle, there is still some excess material, which oozes out and makes a blob. When these blobs form at each layer, at the same point, you get a visible line called the Z-seam.
There are a lot of reasons why the nozzle is leaking excess material. Incorrect settings for retraction, high nozzle temperature, fast printing speeds, too much pressure in the nozzle, or a flow rate that isn’t regulated.
A visible Z-seam is also caused by the fact that each layer starts at the same point. So the easiest way to fix this problem is to change where the layers start, right? Unfortunately, it’s not that simple.
Changing the beginning and end points of each layer in the same place increases both printing time and stringing. So, while this seems like a good idea, it’s not THE way to fix Z-seam issues. You’d also still have small blobs on various random spots in your 3D print.
Fortunately, there are alternative options for ensuring that your 3D prints don’t have a Z-seam. Some are quick fixes in the slicer, while others are more complicated. Regardless, we’ll help you hide Z-seam appearance and improve the quality of your prints. Let’s dive into the solutions!
How to Fix or Hide the Z-seam
Tune Retraction Settings
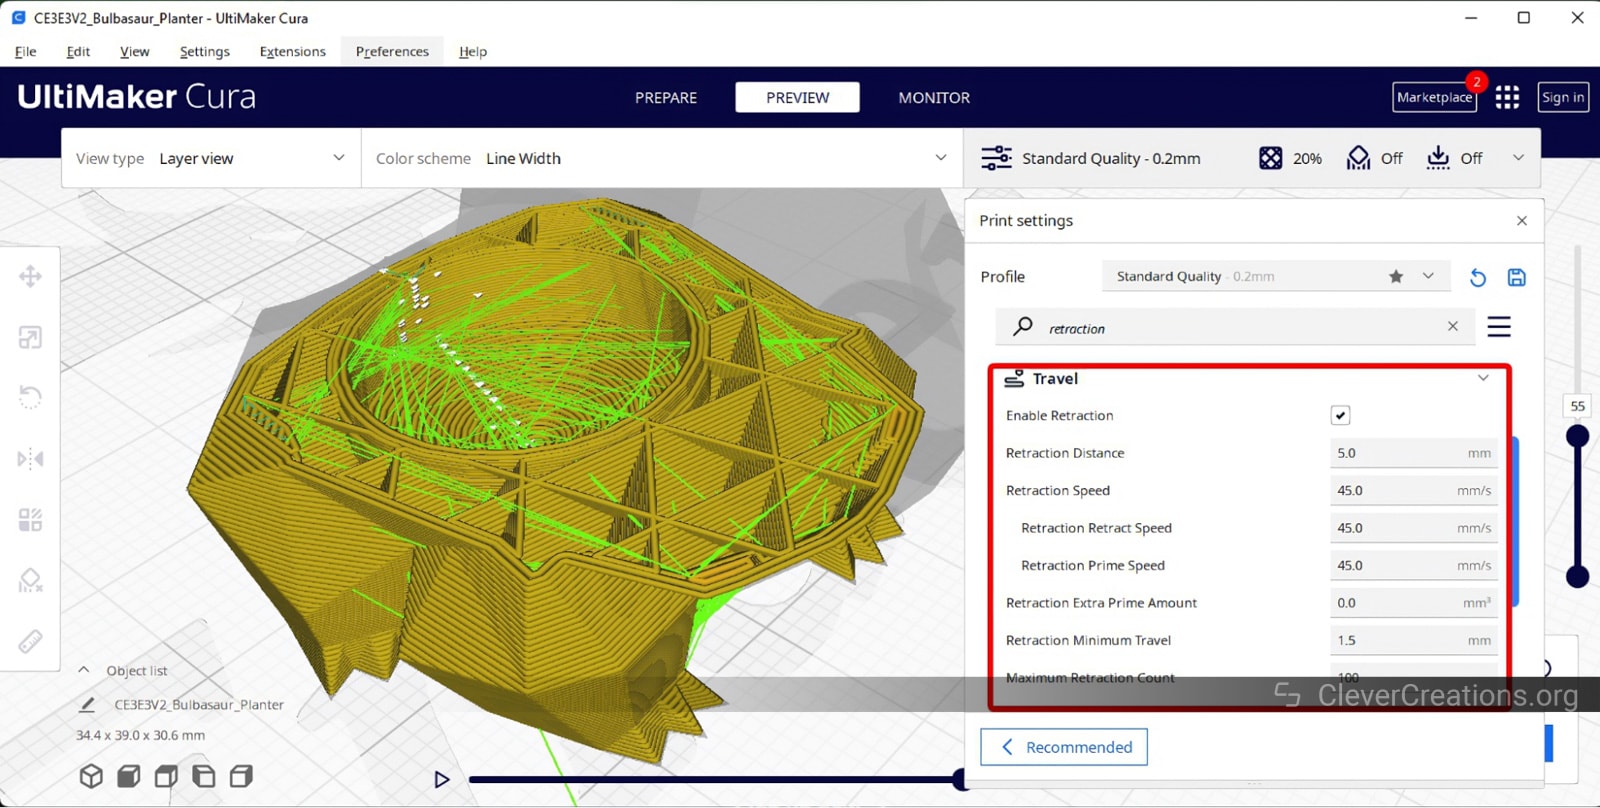
Improper retraction settings are the number one culprit of a visible Z-seam. If the retraction settings aren’t set up correctly, too much material drips from the nozzle, making these pesky blobs on your 3D prints.
To fix the Z-seam, you must first set your retraction speed and distance and turn on the Retract at Layer Change option in your slicer.
The “Retract at Layer Change” option tells the printer to pull back the filament at the end of each layer. This retraction move helps reduce any extra filament on the nozzle and reduces the likelihood of blobs and a Z-seam at the end of each layer.
The distance and speed settings rely on the extruder system of your 3D printer and the filament you use. If your printer has a direct drive extruder, typical retraction distance values should be between 0.5-3 mm, with a speed between 45-60 mm/s. Bowden extruders have distance settings up to 4–8 mm, but the speed stays pretty much the same.
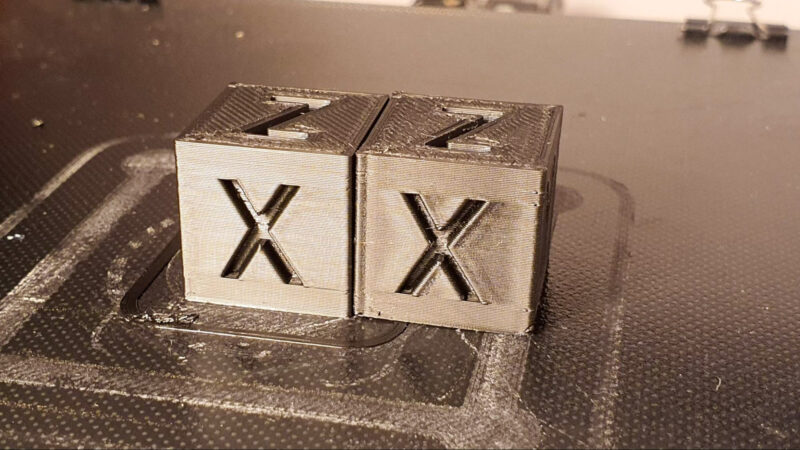
The best way to test your retraction settings is to 3D print a retraction tower and experiment with the settings. No lines, few blobs, and clear structures should be your goal.
Set the Right Nozzle Temperature
If a 3D printer’s nozzle temperature is too high for the filament, the material melts more than it needs to. When the printer is about to change layers, the melted plastic keeps running and accumulates at the tip of the nozzle.
The result is that this material gets deposited in small blobs when the 3D printer moves to the next layer. Even if you have retraction turned on at a layer change, this issue will still happen. Simply because the plastic material is too liquidy.
Fine-tuning your print temperatures is a key element to minimizing the Z-seam. If the printing temperature is set right, the material will move quickly, yet won’t be excessively thin.
Temperature towers are your best friend for this calibration. You can use these towers to print the same model at different temperatures and determine the best temperature for your combination of 3D printer, print settings, and material.
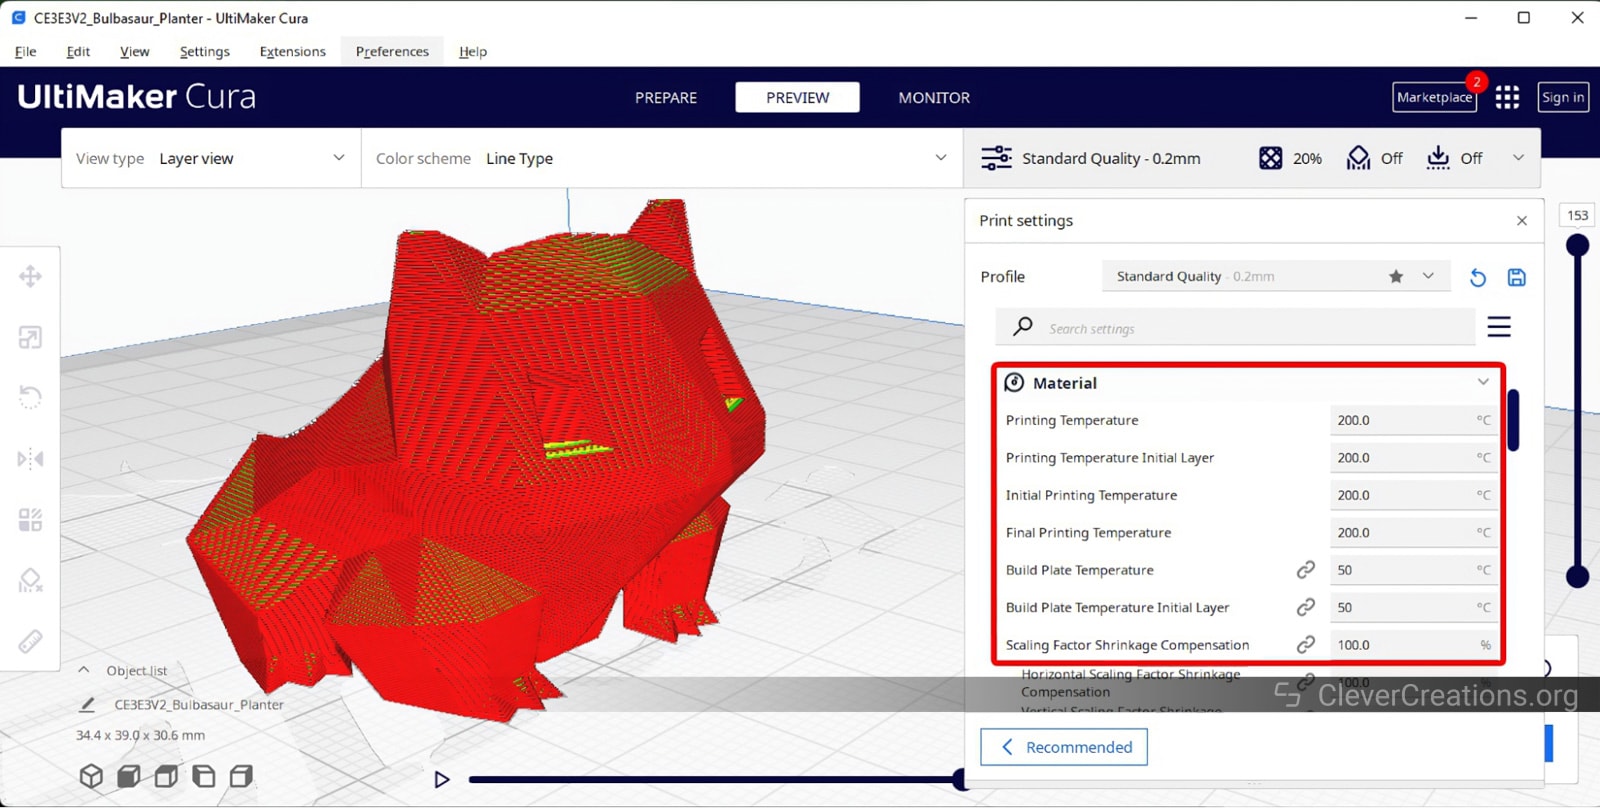
Adjust Flow Rate
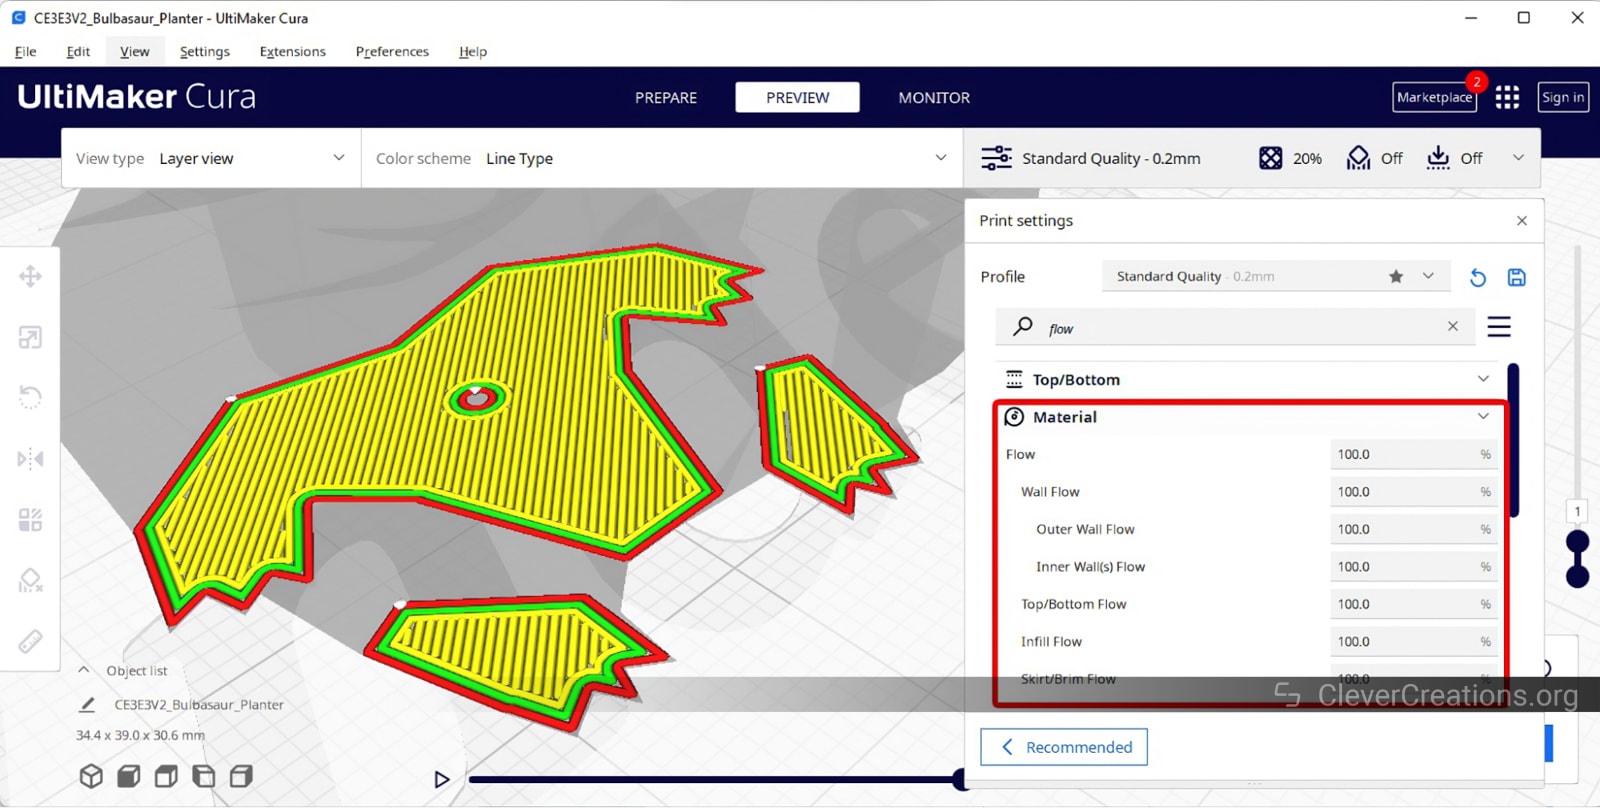
Since the Z-seam is caused by too much filament being extruded, one possible solution is to just the flow rate. A dialed-in flow rate will help keep your 3D prints from having extra blobs and will stop the Z-seam effect from happening.
You can find the flow rate extrusion settings in Cura under the material section. If your layer transitions have too many bumps and pimples, turn the flow rate down a little. Cura’s preset for this number is 100%. Try cutting it to 95% and see if that makes a difference. Print a retraction tower again to see any changes.
In PrusaSlicer, you can find these extrusion settings under the name “Extrusion Multiplier.” It is an absolute value of 1. Consider it a percentage and lower it to 0.95 or 0.9.
The goal is to cut down on the flow of too much material while printing. The flow should be enough so there is no under-extrusion or over-extrusion of the material. Keep in mind that this factor affects the entire 3D print, and not just the Z seam.
Calibrate E-Steps

Changing the flow rate is more like fixing the symptoms than curing the disease. Most of the time, when there is too much material, it is because the Extruder Steps or E-Steps are not set up correctly.
The E-steps control how much material the printer will push out in response to the Gcode. If the Gcode order is to extrude 10 mm of filament, but your printer is pushing out 11 mm of filament, an incorrect E-step value is usually to blame. This can result in blobs, stringing, thick extrusion lines, and exaggerated Z-seam features on your 3D-printed parts.
Adjusting the E-steps on your 3D printer by going through the extruder calibration steps ensures that the machine extrudes the exact amount of filament necessary.
Reduce Print Speed

If you don’t have a well-tuned 3D printer, printing quickly will hurt your 3D prints more than it helps you.
When printing at breakneck speeds, there isn’t always enough time for the pressure in the nozzle to decrease. This can make the filament ooze out of the nozzle during each layer change. As you have learned by now, this increases the appearance of Z-seams.
The easiest way to fix this is to slow down your outer wall speed to between 40 and 60 mm/s. This makes it less likely that any extra material in the nozzle will drip out and reduces Z-seam size.
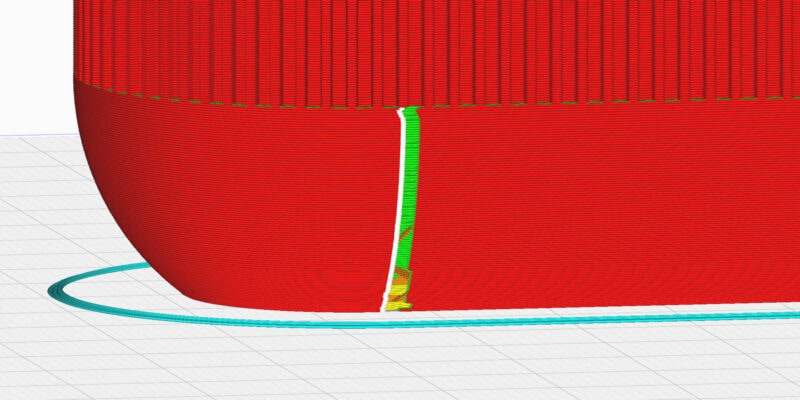
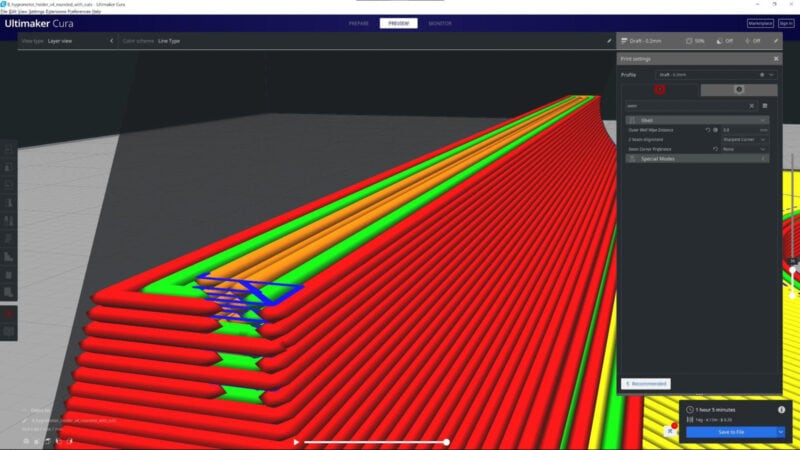
Outer Wall Wipe Distance
The slicer’s outer wall wipe distance setting tells the nozzle to travel slightly more without extrusion. It “wipes” the excess material on the outer wall with a travel move and closes the layer contour.
This feature reduces the Z-seam’s visibility by connecting the layer’s start and end with the excess material from the nozzle. It’s the opposite of coasting and works in favor of reducing the blobs on your print’s surface.
Try keeping this setting below 0.5 mm. Otherwise, the layer will come out as under-extruded with holes in your 3D print. You can alter the values as per your preferences, and print out a retraction tower or a calibration cube to quickly verify your outer wall wipe distance.
Coasting
The Cura coasting setting was made to reduce the effects of Z-seams on your 3D prints. The nozzle moves without putting out any material at the end of the layer when the coasting is turned on.
The nozzle doesn’t push out any filament and makes a travel move just before the layer changes. During this travel move, the layer is finished by the extra filament in the nozzle. There is no material left to ooze out of the nozzle, so your prints won’t have any blobs or pronounced Z-seams.
Set Linear or Pressure Advance
Marlin firmware uses linear advance, while Klipper firmware uses pressure advance to help deal with excess pressure in the nozzle. They can be considered the same thing, so we’ll talk about them together in this section.
The linear/pressure advance setting helps hide the Z-seam better than the coasting setting does. It predicts the pressure in the nozzle at the end of the extrusion and helps adjust the filament’s flow accordingly.
Simply put, if your linear advance is set up right, the printer will stop at the exact right moment, often way before the end of the layer change. This will reduce the amount of filament that leaks out and stop any extra bits of filament from sticking to the part.
As a result, you’ll end up with cleaner 3D prints with a less noticeable Z-seam. Enabling linear or pressure advance will also help you get more dimensionally accurate models.
In addition to these fixes, most 3D printing slicers have a setting that lets you hide or reduce the appearance of visible Z-seams in your 3D prints.
Technically, this setting doesn’t hide it, but it changes the Z-seam alignment so it’s less visible on your print surfaces. Let’s look at this setting in more detail.
Where Is the Best Z-seam Alignment?
Adjusting the Z-seam alignment is one of the best ways to hide the seam lines in your 3D prints better. You can position your Z-seams in about four different ways with Cura and PrusaSlicer.
Nearest/Sharpest
Both the Nearest option in PrusaSlicer and the Sharpest option in Cura position the Z-seam layer transitions near an edge or a sharp corner in your 3D prints.
If you print a cube, for example, the Z-seam will align with the cube’s sharpest corner. This makes the seam blend in with the model so that you can’t see it without specifically looking for it.
Setting the Z-seam alignment to the sharpest corner works great for making models with many edges. Think cubes, gears, boxes, and containers.
Aligned/Shortest

With PrusaSlicer, you can align your layers’ start and endpoints. The Align option makes the Z-seam the most pronounced, so it’s not the best choice if you do not want to expose Z-seams.
In Cura, the Shortest option works pretty much the same way. It makes sure that the start and end points of the previous layer and next layer align vertically.
This option works great if you have a spot for the seam corner preference, like at a sharp corner. For decorative 3D prints that need to be visually appealing from every angle, however, it is not ideal.
Random
The start and end points are positioned randomly throughout the print with the Random option. Since no two layers start in the same place, there is no vertically aligned Z-seam line that you can see.
You’ll still see some spots on the print’s surface, which you can reduce with the other fixes for Z-seams mentioned above. Since these spots are spread out over the whole print, it makes them less noticeable. Especially on 3D prints with dynamic surfaces, like miniatures.
It’s the best option for round models, art pieces, and prints with a curve. The Random option does take longer to print, but it is the option for best hiding the Z-seam effect in your parts.
User-Specified
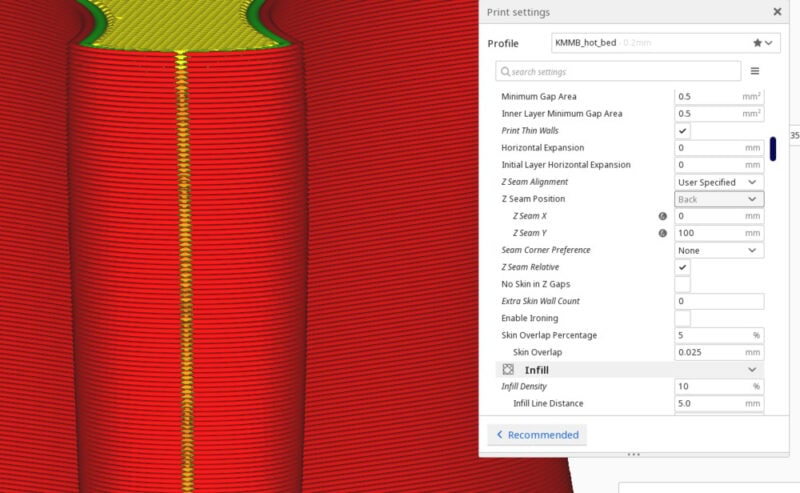
The User-Specified Z-seam setting in Cura allows you to specify the exact position of Z-seams in your 3D prints. You can align it on any face of your model and put it in the exact position of the layer’s start and endpoints.
It’s one of the more challenging options to fine-tune and can give disappointing results with the wrong settings. It’s key to know the X- and Y- coordinates of your print bed. Then, you can select the exact coordinates that your Z-seam should be facing with the Z Seam X and Z Seam Y fields.
Seam Painting
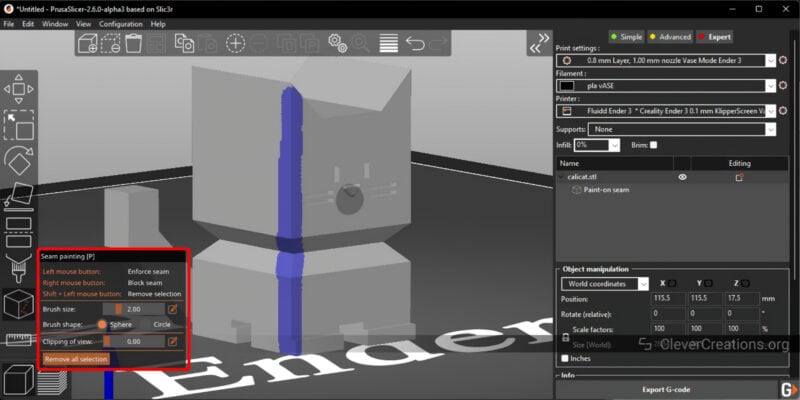
PrusaSlicer makes it easy to customize the Z-seam as per your preferences. It’s like Cura’s User-Specified setting, but you can set the seam position manually for each model.
You can use a paintbrush to put the Z-seam position on your model and to customize the starting point of each layer. This gives you much more control over how noticeable Z-seams are. If you have the time available, it’s worth the work.
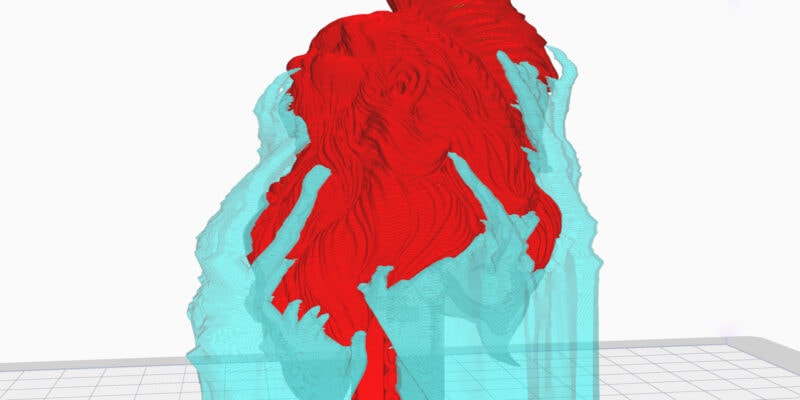
Bonus: Vase Mode
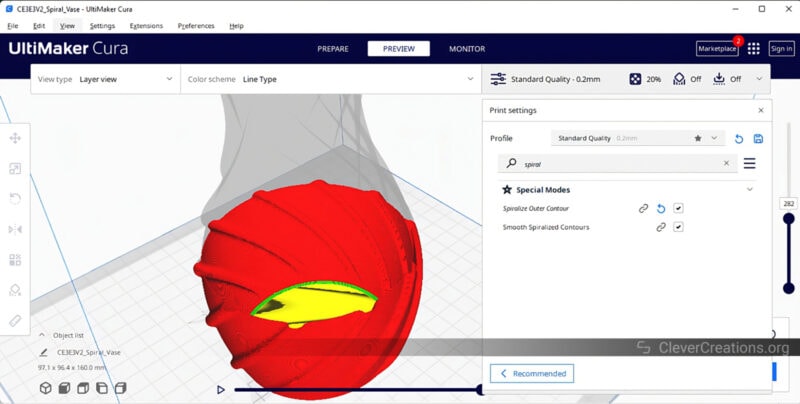
Only the Vase mode will guarantee that certain 3D prints are completely free of noticeable blobs and Z-seams.
In Cura and PrusaSlicer, this mode is called Spiralize outer contour or Spiral Vase mode. It lets you print the outside of your model in a single extrusion move. All of the layers are continuous, and the Z-axis keeps moving through the printing process.
There are no retractions to be made, and the nozzle keeps pushing out material non-stop. The result is that there are no layer start and end points and therefore no blobs.
The downsides are that vase mode can only be used on some 3D designs, and there is no option to use infill. In addition, not all 3D models are compatible with being printed as vases. Our dedicated article linked above will give you more information.
Conclusion: Is It Possible to Hide the Z-Seam?
In FDM 3D printing, it’s difficult to avoid a visible Z-seam in your 3D prints. It’s possible to reduce its appearance, but unfortunately, there’s no simple ‘Hide Seam’ button that works for every scenario yet.
To diminish the visibility of Z-seams, adjust the slicer settings for retraction and print speed, and enable coasting. Enabling linear advance or pressure advance on your 3D printer is a good idea as well. These fixes help lessen the blobs on your prints and improve the general print quality.
Lastly, adjust the Z-seam alignment to the shape of your model. Use the nearest or sharpest corner seam choice in your slicer to better hide the line of blobs or gaps in your prints if it has sharp edges.
We hope this article has shed sufficient light on a seam-ingly minor but common issue in 3D printing. If you have any questions or want to add something, feel free to let us know in the comments below.