
- Provides good results at high print speeds
- Can be used with all Klipper-compatible 3D printers
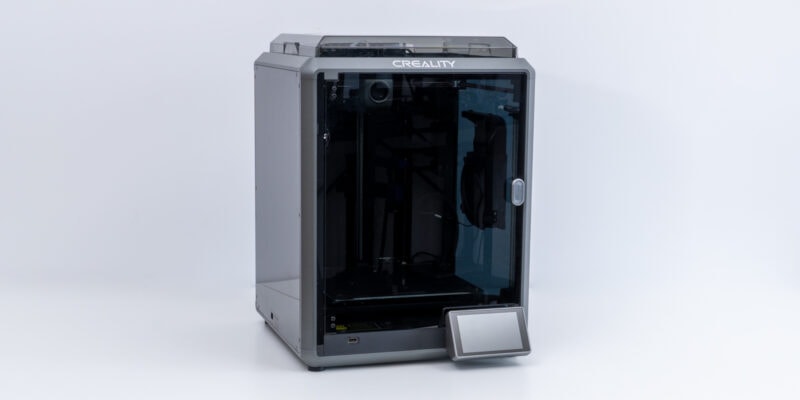
- Large, clear use touch screen
- Built-in Wi-Fi and Ethernet
- Plenty of I/O ports
- Easy to use for remote print monitoring and time-lapses
- Documentation is limited in scope
Upgrading to Klipper firmware is something that many 3D printer enthusiasts consider at some point. The benefits of using Klipper are well-documented, but the process of working with a Raspberry Pi and installing the firmware can be intimidating for some.
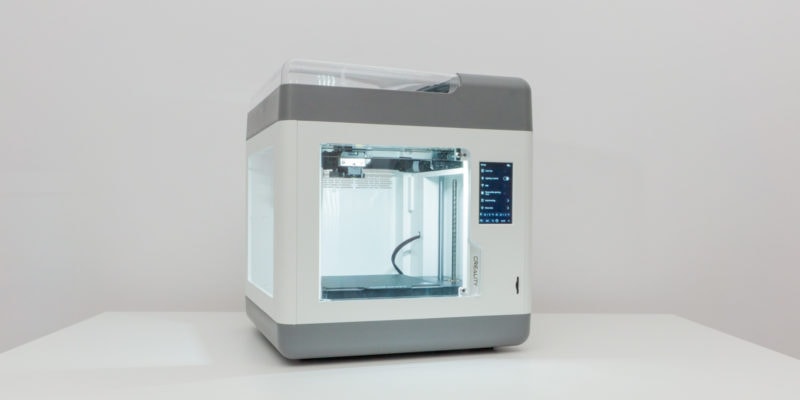
The Creality Sonic Pad is a tablet that promises to make using Klipper much easier. In this review, we’ll look at the Sonic Pad, how it works, and whether or not it’s worth the purchase right now.
A Quick Explanation of Klipper Firmware
Before exploring the Creality Sonic Pad, it might be a good idea to explain what Klipper firmware and its benefits are briefly.
In short, Klipper firmware is an alternative to the traditional firmware that comes installed on most 3D printers. Instead of running on the 3D printer, it runs on a more powerful Raspberry Pi or a different single-board computer.
While the 3D printer controller is still used, it only carries out commands, while the Raspberry Pi handles all the heavy lifting. This allows for more complex computations and gives you access to better features and high-speed printing.
For example, with Klipper you get better movement precision and a higher printing speed, but also features like resonance compensation and pressure advance. Without getting into too much detail here, all these things lead to significantly better prints overall.
Now let’s get to the Creality Sonic Pad review!
Creality Sonic Pad Specs
| Creality Sonic Pad Specifications | |
|---|---|
| Price | Creality | Amazon | AliExpress | Creality3DOfficial |
| SoC | Creality T800 |
| SoC Data Bus Width | 64-bit |
| RAM | 2 GB |
| ROM | 8 GB |
| WiFi Standard | 802.11 b/g/n |
| USB Port | USB 2.0 x 4 |
| LAN Port | RJ45 x 1 (100Mbps) |
| Vibration Sensor Interface | 1 |
| RatedVoltage | 12V |
| Display Type | IPS |
| Display Size | 7 inches |
| Display Resolution | 1024×600 |
| Multi-touch | Yes |
| Speaker | Yes |
| Vibration Sensor | Yes |
| Package Dimensions | 282x241x55mm |
| Product Dimensions | 222x128x40mm |
| Net Weight | 0.46 Kg |
| Gross Weight | 1.15 Kg |
Unboxing the Creality Sonic Pad
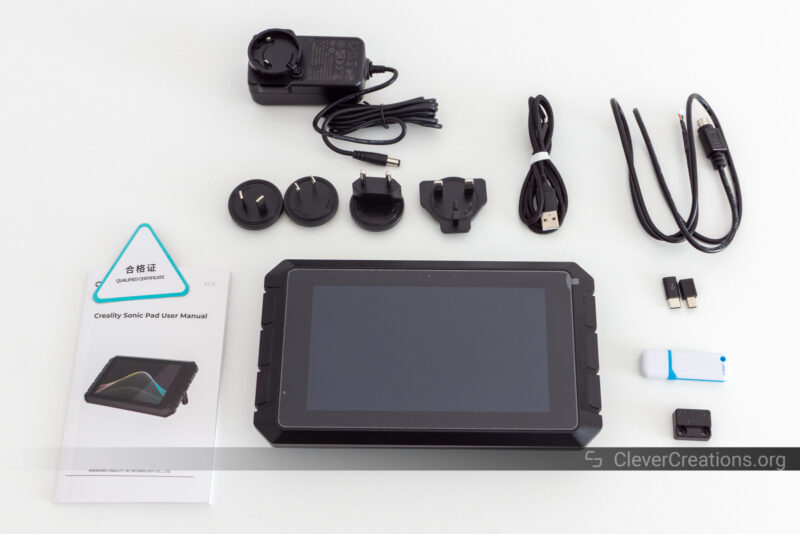
Inside of the box of the Creality Sonic Pad you find the tablet itself, a power adapter, a USB cable with various adapters, a USB stick, manual, and the accelerometer with its own cable.
Missing from the Sonic Pad that Creality provided to us was the baggy with accelerometer mounting screws. Those were shipped separately and arrived a few days later. The retail version of the Sonic Pad will have these screws included.
Getting Started With the Sonic Pad
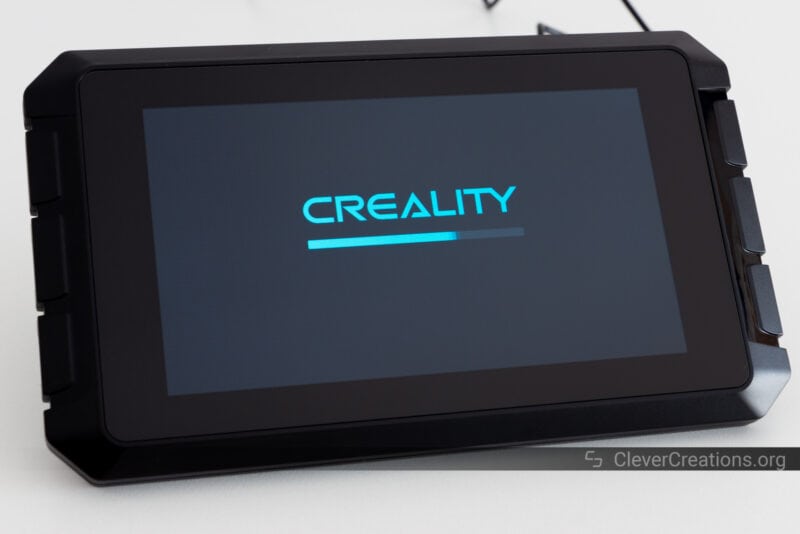
The first step in using the Creality Sonic Pad is to power the tablet on. This is already a lot easier than running Klipper on something like a Raspberry Pi + PI TFT50 combo, which requires you to deal with GitHub repositories, installing OctoPi, and more.
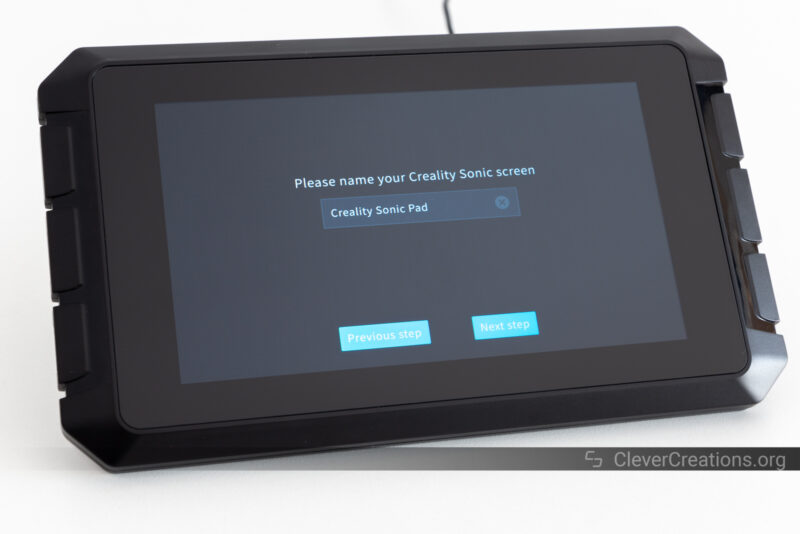
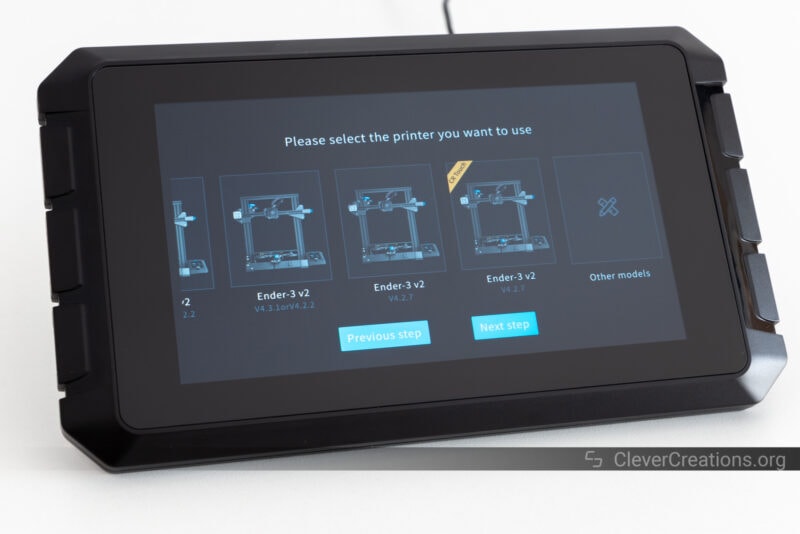
After powering the Sonic Pad on, you’ll have to take care of some formalities. Setting the language, accepting the privacy policy, selecting your region, and naming your Sonic Pad.
You are now prompted to select the 3D printer that you want to use the Creality Sonic Pad with. This lets the device know which firmware it should generate for the next steps.
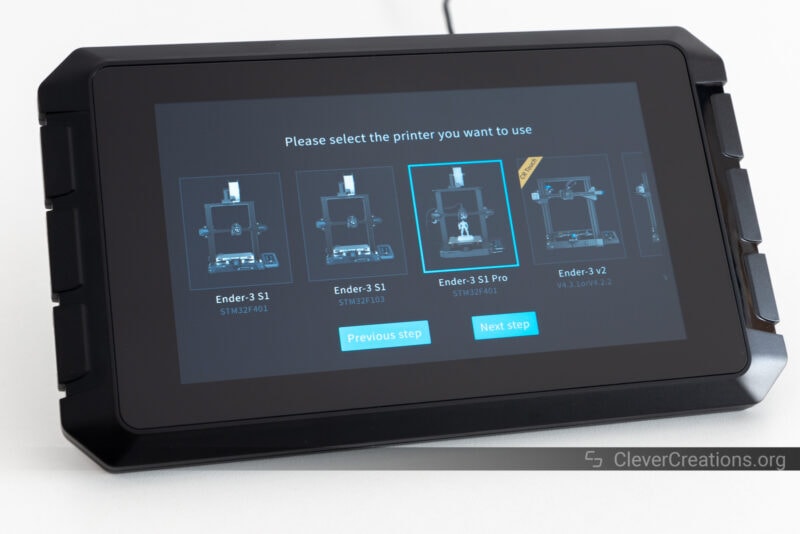
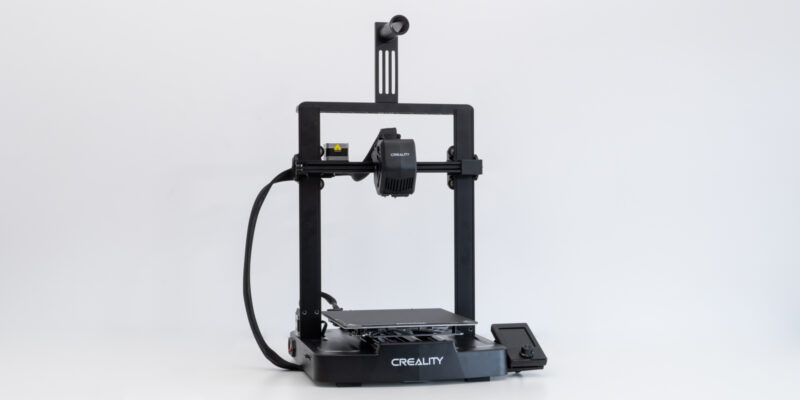
At the moment of writing this, the Creality Sonic Pad only supports the Ender 3 v2, Ender 3 S1, Ender 3 S1 Pro. The new Ender 3 v2 Neo has also been added with the latest firmware update. This is a narrow selection of 3D printers, and it’s a shame that the list isn’t longer.
While you can use the Sonic Pad with most FDM printers with a USB interface that are supported by Klipper, the process for generating and uploading that firmware is cumbersome. More on this later.
Another thing you have to do is check the specific processor that your 3D printer uses, even if you use one of the supported Creality 3D printers. Because of the current chip shortage, different versions of the same 3D printer use different chips.
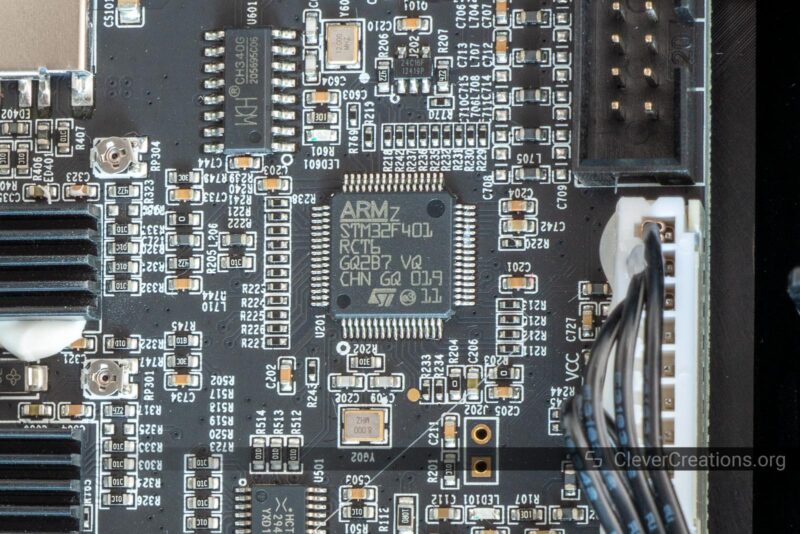
For example, the Ender-3 S1 has models with STM32F401 and STM32F103 processors. While Klipper supports both, it is still important for the Creality Sonic Pad to know which firmware to build for your 3D printer.
So be ready to open up your 3D printer and check the main chip that is mounted on the mainboard. The good news is that this is a one-time task and you only have to do it when setting up your machine.
When you have done this, select the correct 3D printer on the screen, insert the included USB stick, and tell the Sonic Pad to write the 3D printer firmware to it.
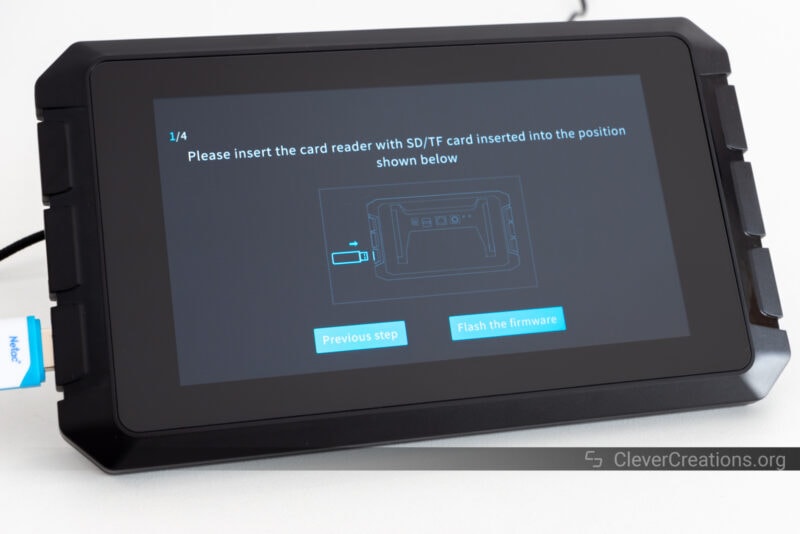
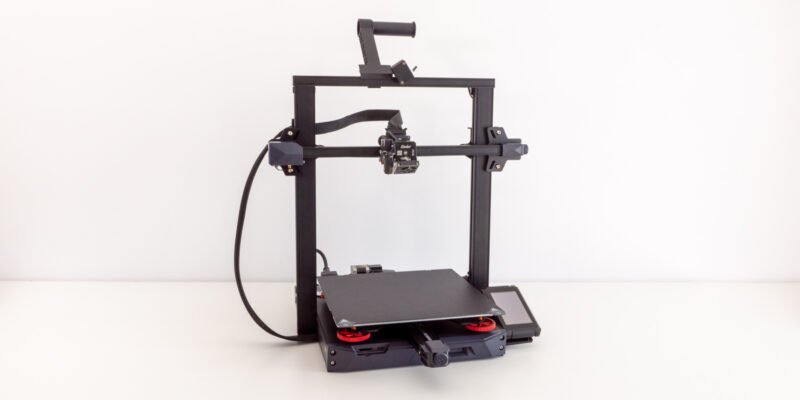
After this, the Sonic Pad prompts you to insert the USB stick into your 3D printer for flashing. The 3D printer we tested with, the Ender-3 S1 Pro, does not have a USB port, so we had to place the file in the root folder of its SD card instead.
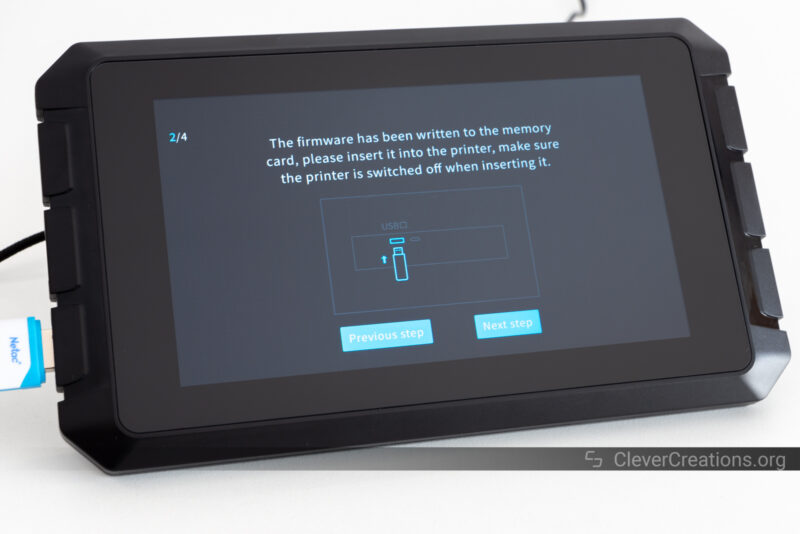
This is one of several things that are not mentioned clearly in the manual, which we imagine can lead to confusion for novice users.
The next step is to connect the Creality Sonic Pad to your 3D printer with the micro-USB cable. If the 3D printer has a mini-USB or USB-C port, you can attach one of the included adapters to the USB cable.

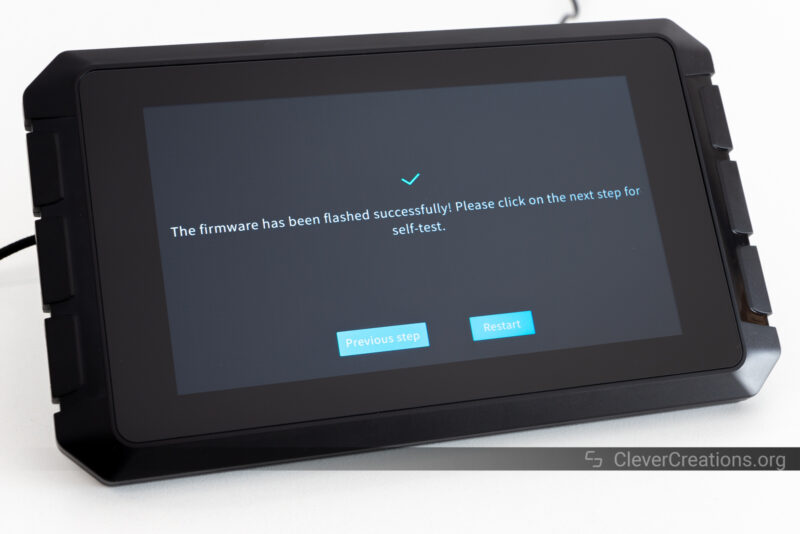
Now it’s time to select the ‘Next’ button in the lower right corner, which will start the process of flashing your 3D printer with Klipper. After a minute or two, your 3D printer will reboot and you can start using it with the Creality Sonic Pad.
Before you start 3D printing, it is important to do a self-test of the 3D printer. This ensures that all of the 3D printer’s components are controlled correctly. If you selected the wrong 3D printer or processor chip in the previous steps, this is where you would find out.
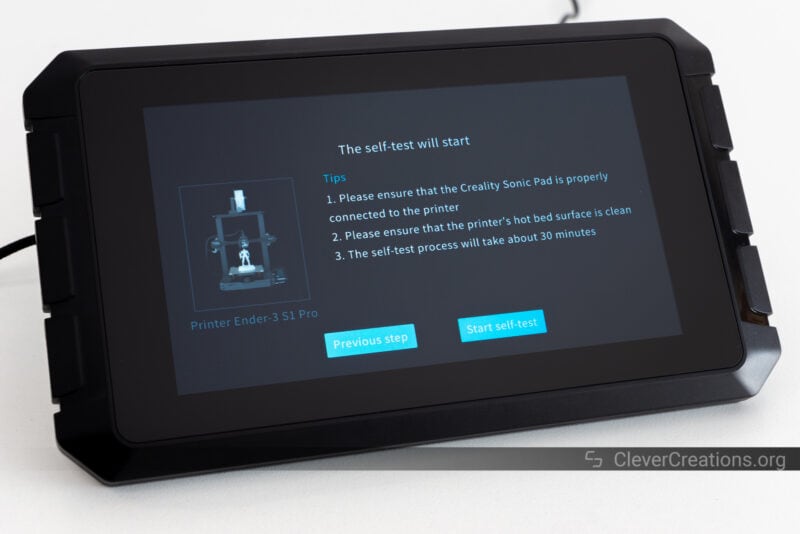
The screen’s 30-minute duration of the self-test is overstated. In our experience, it is more like 10-15 minutes.
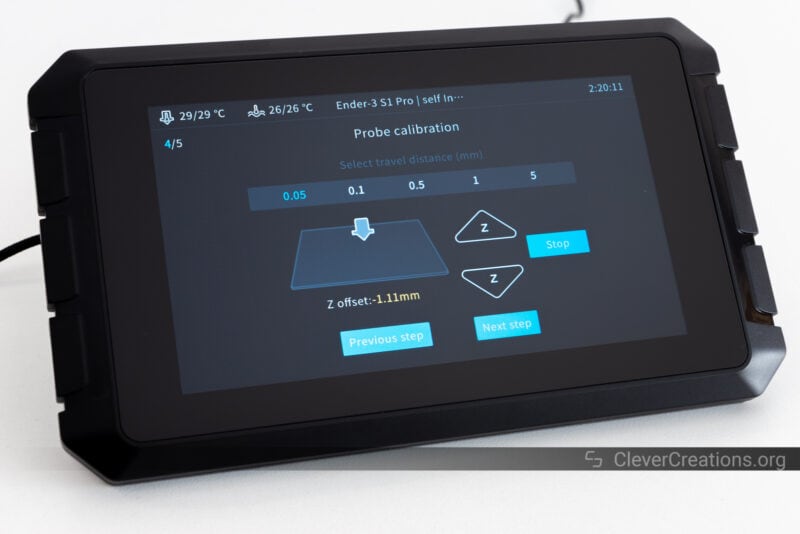
This process involves following the on-screen prompts to check the cooling fans, leveling the bed, setting the Z-offset, and probing the bed. Most of that is typical stuff that you would do when setting up a 3D printer for the first time.
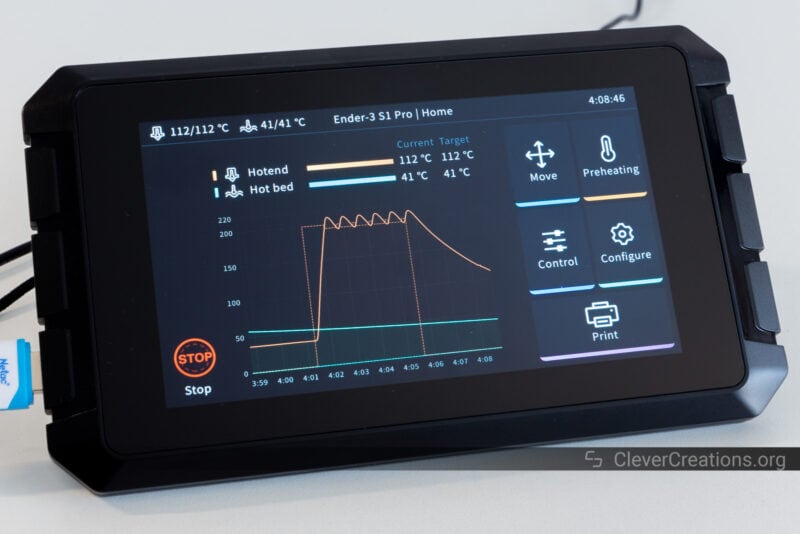
What is different is that you are interacting through the Creality Sonic Pad instead of directly on the 3D printer. The 3D printer’s screen does not output anything meaningful anymore until you flash its original firmware back at some point.
After completing this process, you are now ready to start 3D printing using the Creality Sonic Pad and Klipper firmware.
Creality Sonic Pad Features
Klipper Firmware
The main reason you would want to use the Creality Sonic Pad is for its support of Klipper firmware. A big limitation we noticed, however, is that a lot of the top features of Klipper firmware are not enabled straight after flashing.
By default, the pre-configured printer.cfg file that Creality provides with the Sonic Pad (accessible through the web interface) only has the basic configuration to get the 3D printer working. Things like Input Shaping and Pressure Advance, however, are not set up.
This is a huge disappointment, as one of the main selling points of the Creality Sonic Pad is its ease of use. For the best results—those that you’d expect at the Sonic Pad’s price point—you still have to tinker a bit and configure Klipper firmware further by yourself.
After flashing you do have the immediate advantage of Klipper’s high-precision stepper movement, but to get the rest of its benefits you’ll have to do some work yourself.
It would be nice to see Creality provide better printer.cfg files or at least documentation so that users know how to skip the hassle as promised. This would go a long way towards making the Sonic Pad a more attractive option to those who are not as technically inclined.
You can use the instructions below to get Input Shaping and Pressure Advance working on the Creality Sonic Pad.
Input Shaping
The Input Shaping feature of Klipper is designed to reduce the amount of ringing that can occur when 3D printing. It can be set up manually through a series of test prints, or more automated through the use of an accelerometer.
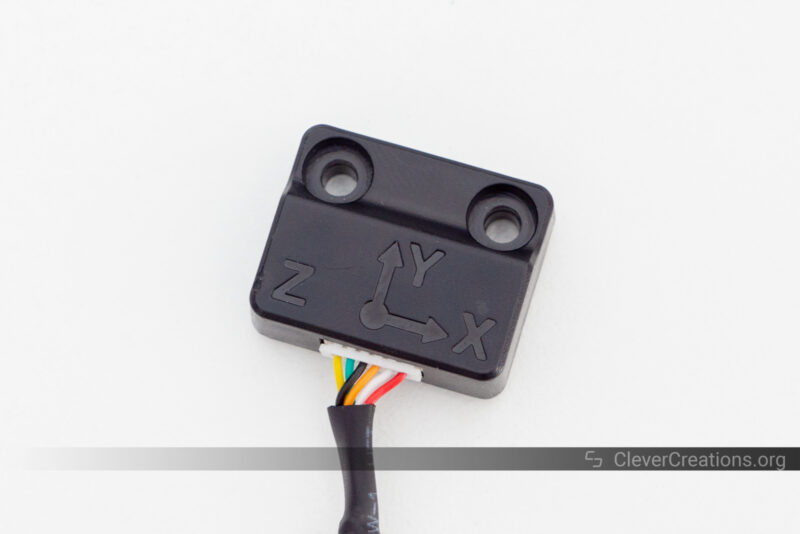
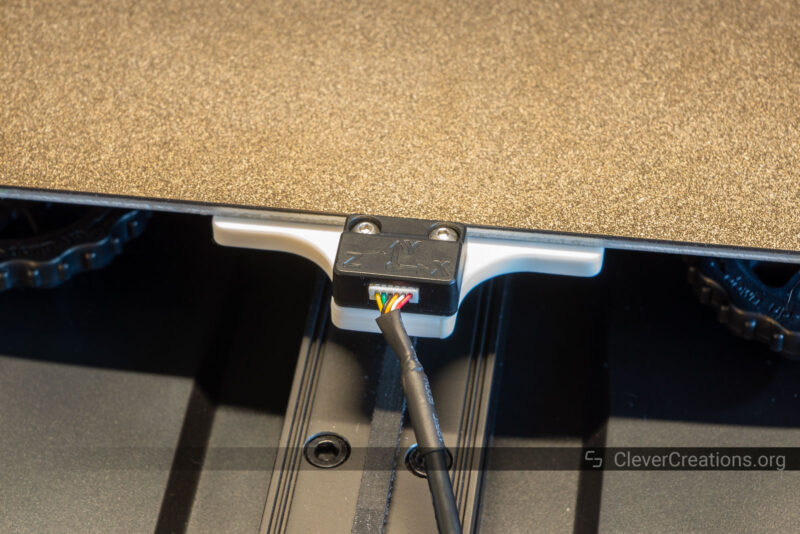
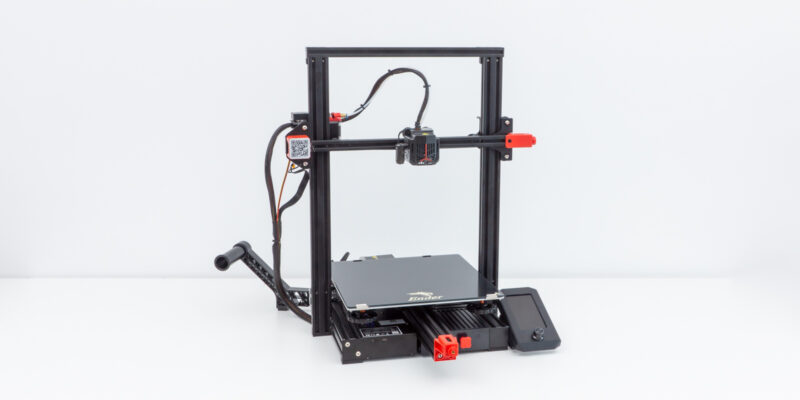
For the best results, it is recommended to use an accelerometer. Creality includes an ADXL345 accelerometer in the box, along with the required cable to connect it to the Sonic Pad.
Before you can install the accelerometer, however, you have to 3D print a mounting bracket for the accelerometer. The STL files for several extruder mounting brackets (for the Ender-3 v2 and Ender-3 S1 series) are included on the SD card, but that’s it.
If you have a different model of 3D printer, you’ll have to resort to finding the STL files online, creating your own, or using double-sided tape instead.
A bigger problem, however, is that Creality seems to have focused the whole Input Shaping application of Klipper firmware on measuring the resonance with the accelerometer attached to the print head.
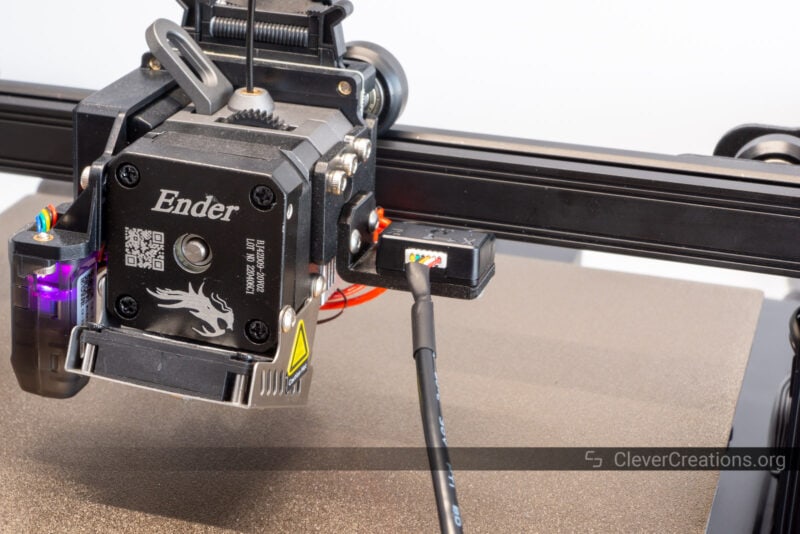
On bed-slinger 3D printers—those that move the print bed back and forth on the XY plane—the resonance must also be measured separately for the (typically) Y axis, with the accelerometer mounted to the bed.
Creality has not included any sort of guidance on how to do this or supplied an STL file for a bed-specific bracket. This is a serious omission, as it severely limits the usefulness of Input Shaping for those with bed-slinger 3D printers—which is most people.
You can do the following to solve this:
- Enable the ‘Console’ setting in the Sonic Pad Settings->Advanced Options. The easiest way to use the console is through the WebUI because the on-screen keyboard of the Sonic Pad takes a long time to type on.
- Attach the accelerometer to the print head and enter
SHAPER_CALIBRATE AXIS=Xin the console. This will test the resonance on the X-axis - Enter
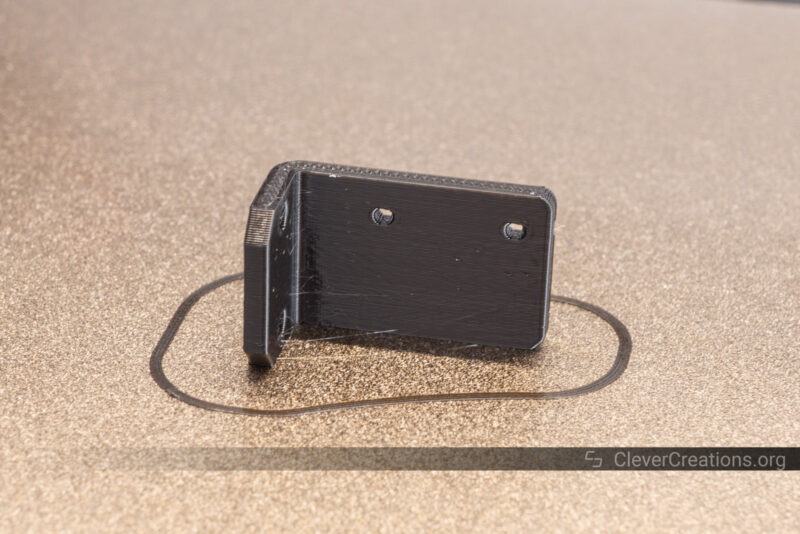
SAVE_CONFIGin the console. This saves the found values to the printer.cfg file. - Detach the accelerometer from the print head and mount it to the print bed. We have designed a mounting bracket that you can find here and 3D print.
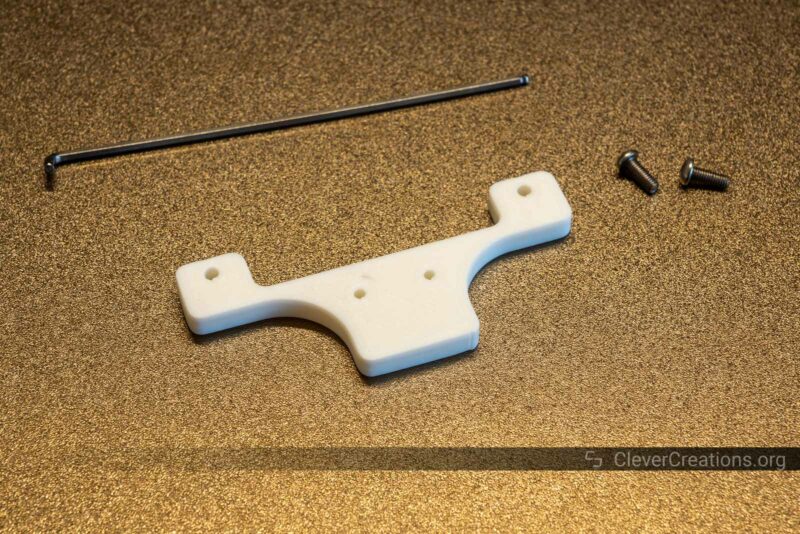
It uses the bed handle mounting points, so you’ll need to swap it out with the handle temporarily. Compared to using double-sided table or a bed clamp, this gives better results.
- Input
SHAPER_CALIBRATE AXIS=Yin the console. - Run
SAVE_CONFIGagain to save the Y-axis values as well.
This is admittedly a bit of a hassle, but once you’ve got it set up, the Klipper firmware’s Input Shaping now gives good results in reducing ghosting and ringing artifacts in your 3D prints.
Pressure Advance
Pressure Advance is an algorithm that compensates for the delay in filament flow. This is especially beneficial when extruding at high speeds. It does this by increasing the amount of filament that is fed into the hotend before a print move starts.
At the end of a print move, it does the opposite. The amount of filament fed into the hotend is decreased so that there is less pressure on the filament and oozing is reduced.
Again, this setting is not enabled by default on the Creality Sonic Pad and has to be configured and turned on manually. The official instructions on the Klipper firmware site are great for setting it up.
3D Printer Support
As mentioned above, right now, the Creality Sonic Pad only supports the Ender-3 v2 (Neo), Ender-3 S1, and Ender-3 S1 Pro out of the box. For other FDM printers, you’ll have to follow the complicated process of building a virtual Ubuntu machine, downloading the Klipper firmware, and building 3D printer firmware yourself.
We’re not sure why Creality hasn’t enabled SSH in Klipper to do this process on the Sonic Pad itself. This would be a lot easier than having to create and maintain a whole virtual machine just for the purpose of firmware building.
If you already have a Linux machine you could use, the process is a little bit simpler. You can get all of the necessary files from the Klipper GitHub repository and build the firmware yourself without the need for a virtual machine.
Most people don’t have a Linux machine, however, and so the process of using an unsupported 3D printer on the Sonic Pad is needlessly complicated.
Remote Control & Print Monitoring
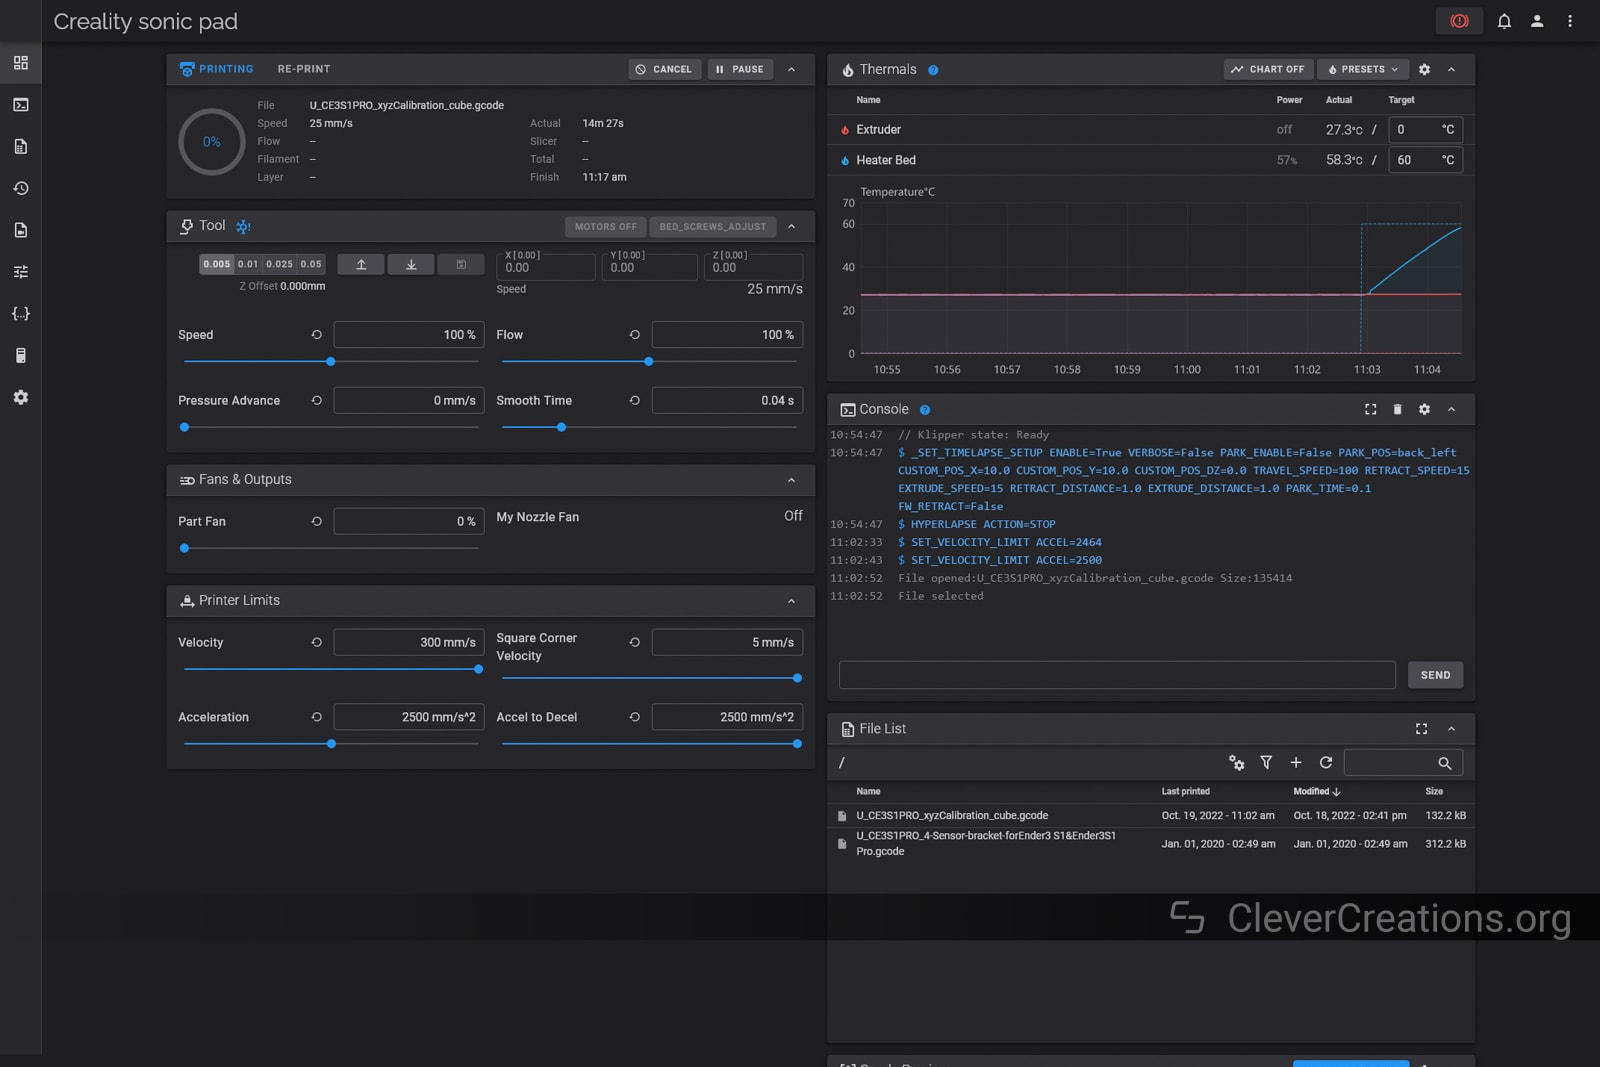
Through the Wi-Fi or Ethernet functionality of the Creality Sonic Pad you are able to monitor the progress of your prints remotely. This is done through a web interface that you can access through any web browser, on any device.
Creality provides a similar solution with its Wi-Fi Box, but Klipper’s Fluidd UI is vastly superior in both features and layout. From reading out the basic print info to adjusting things like pressure advance and smooth time settings on the fly, you can do it all from the dashboard.
By connecting a webcam to one of the USB ports, you can monitor your prints remotely in real time, which is a really neat feature. It’s similar to what you can do with regular Klipper camera setup.
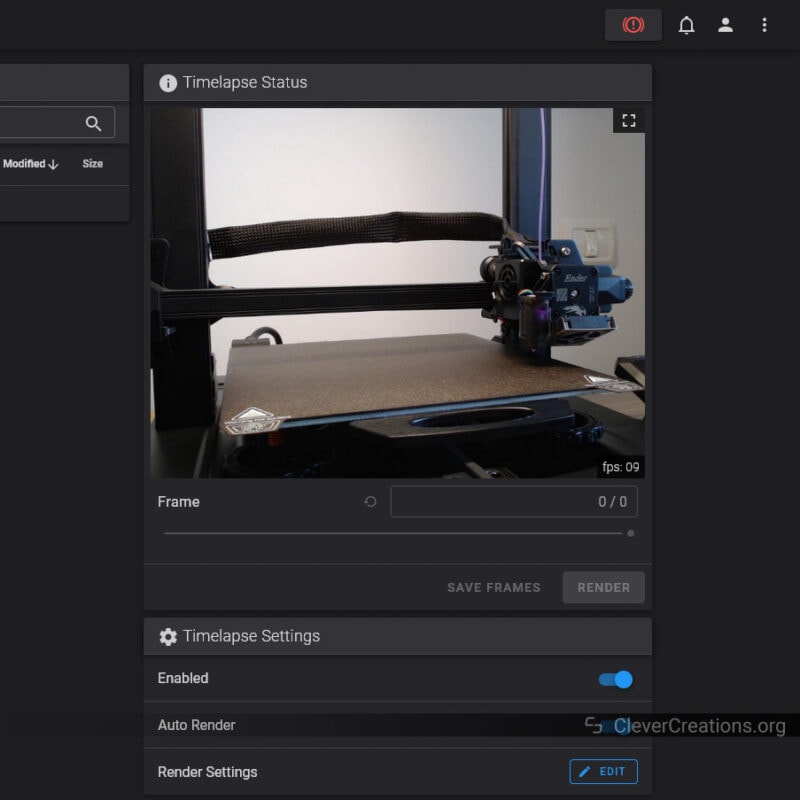
Automatically making time-lapses is possible too. They are saved on the Creality Sonic Pad itself and can be easily downloaded through the web interface. The web UI lets you adjust the render settings more in-depth than you can on the Creality Sonic Pad itself, so we recommend using that for more control over the output.
We tested the webcam functionality with both a Logitech C920, as well as with the camera that was included with the Creality CR-10 Smart Pro. Both worked well and we had no trouble capturing video from either camera.
Bed Leveling
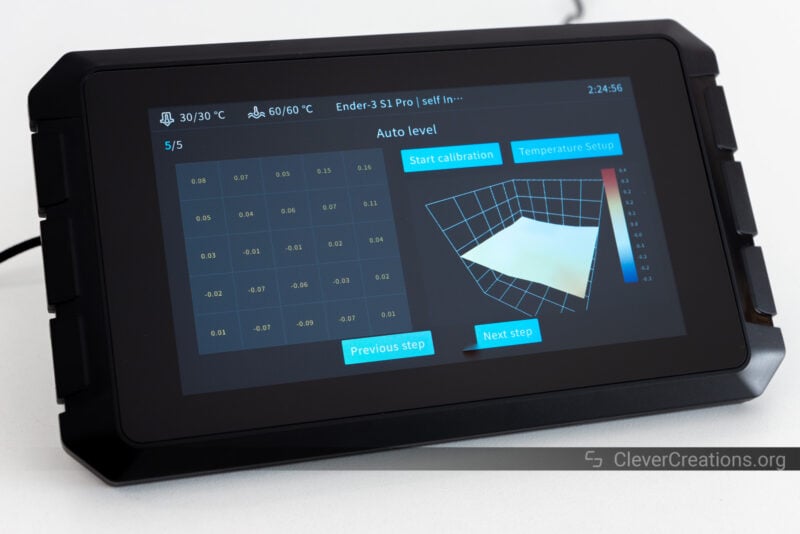
Klipper also supports the option for automatic bed leveling through a BLTouch or other probe. If your 3D printer already supported this feature, then not much will change. However, you will now have a nice visual map that displays the height of your bed at each point.
This can be really helpful in diagnosing issues with your prints. It is also practical to show when you need to manually level the bed. If one side of the bed is higher than the other, you’ll be able to see it clearly and make the necessary adjustments.
Creality Sonic Pad Hardware
LCD Screen
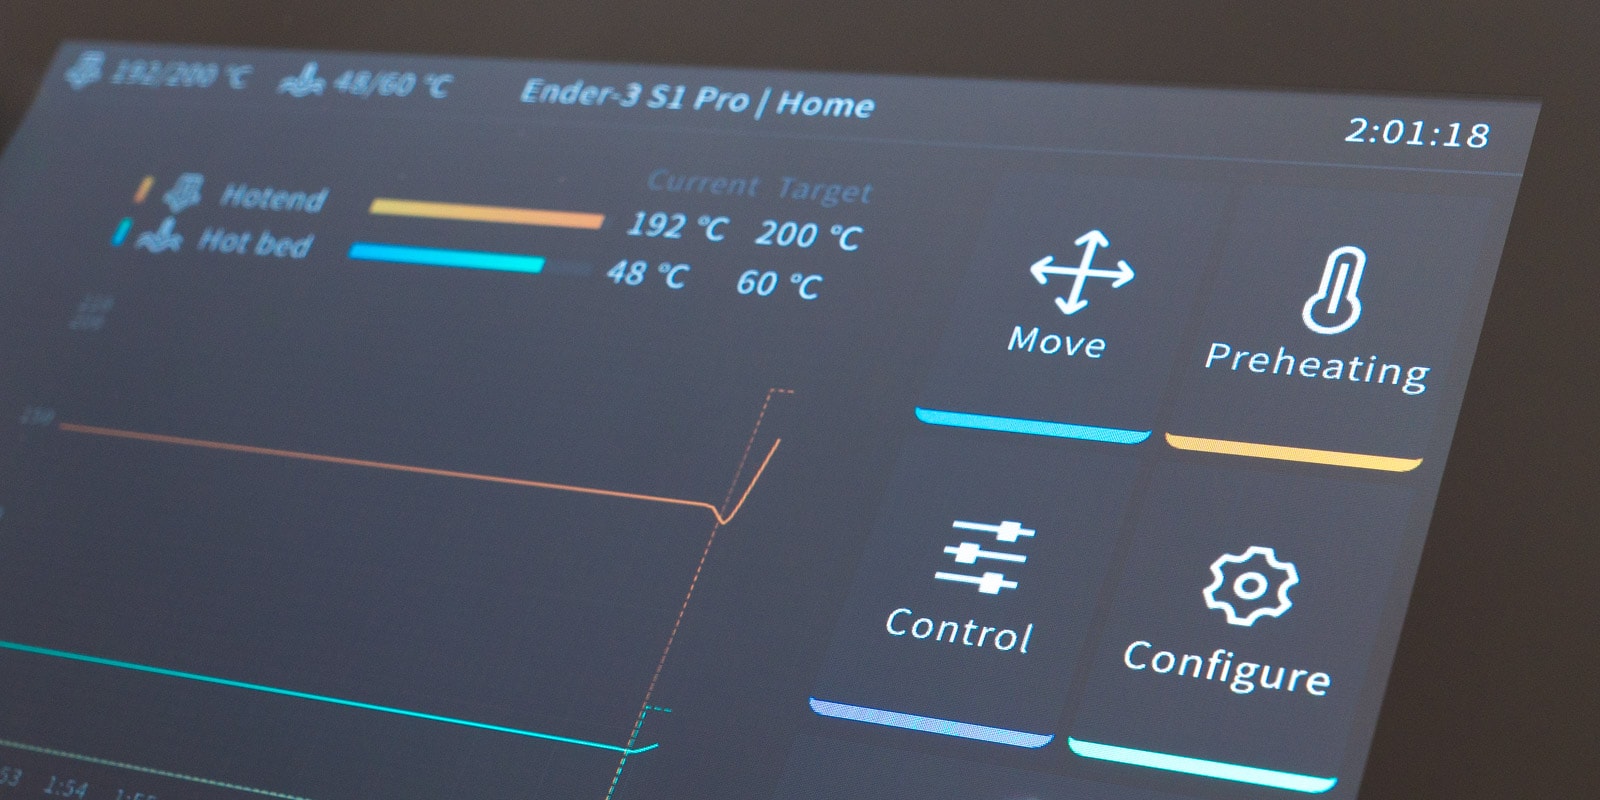
The main interface of the Creality Sonic Pad is its 7-inch color LCD touchscreen with 1024×600 resolution. It’s sufficiently bright and clear, and the icons and menu items are large and easy to read.
Interacting with the screen isn’t as smooth as we expected it to be. There is a slight lag between when you press something and when the screen responds to the input. It’s not a huge issue, but it is noticeable.
Compared to the touch screen on the Ender 3 S1 Pro and other 3D printers we recently reviewed, the Sonic Pad’s screen is a considerable upgrade.
Especially the Fluidd user interface is a lot better than what you get to work with on small 3D printer screens.
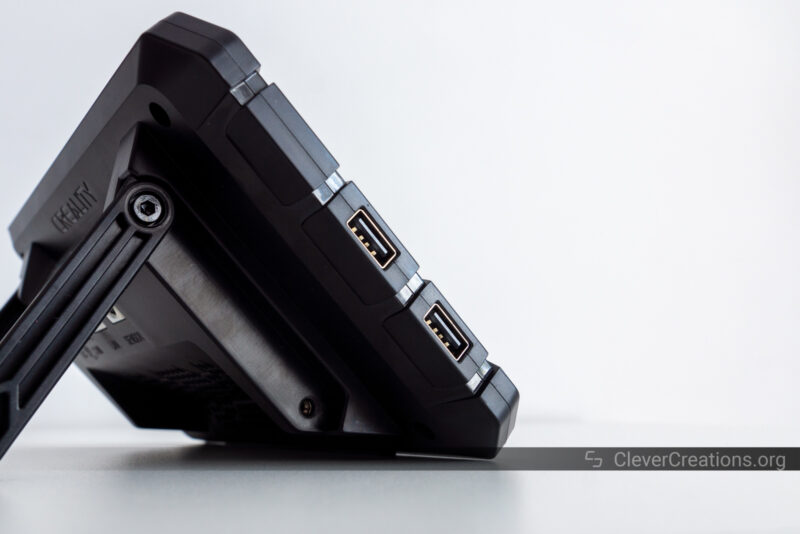
I/O Ports
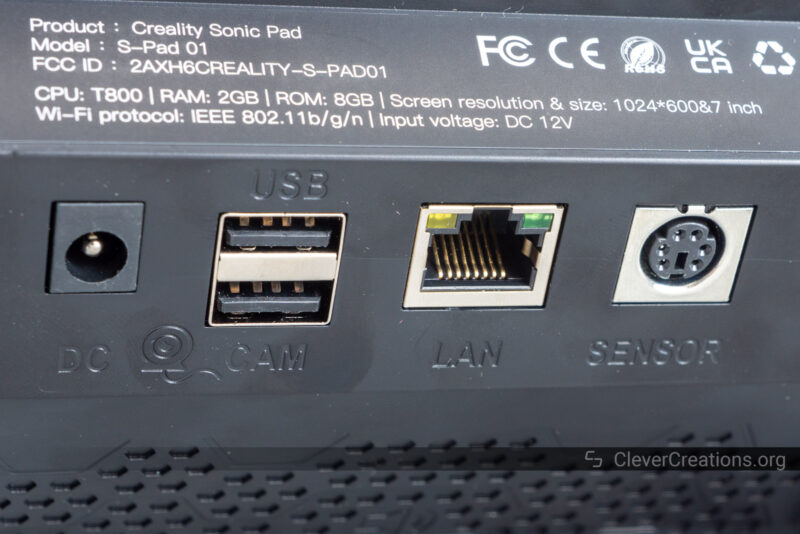
The Creality Sonic Pad comes with four USB ports, a port for the ADXL345 accelerometer, and an RJ45 Ethernet port for 100Mbps network connectivity.
You can use the USB ports for connecting your 3D printer, but also for attaching the USB flash drive and a webcam.
Even with the USB drive and webcam connected, you have two USB ports left. To us, this suggests that it might be possible to use the Sonic Pad to control multiple 3D printers at once.
At the moment, we don’t see an option anywhere to do this, but it might be something that’s added in a future firmware update. The competing FLSUN Speeder Pad is able to control 3 printers at once. From a hardware perspective, we don’t see why the Sonic Pad couldn’t do the same.
Creality Sonic Pad Test Results
Before Tuning
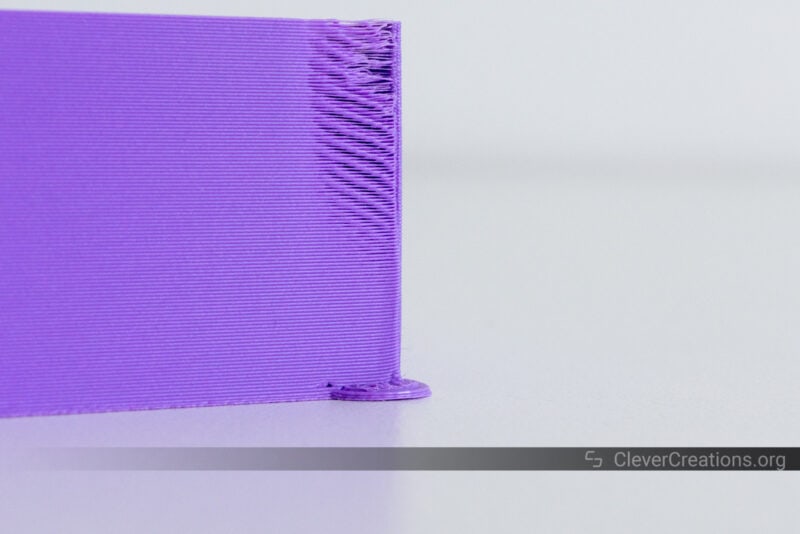
To get straight to the point, the print results with the default printer.cfg file are hugely disappointing. On our Ender-3 S1 Pro, the supplied config file by Creality set the acceleration to 5000 mm/s2. Without enabling Pressure Advance and Input Shaping, this leads to worse print results than you get with the 3D printer straight out of the box.
As you can see below, there is significant ringing present due to the lack of Input Shaping, as well as bulging corners due to the lack of Pressure Advance.
To make sure that sufficiently large print speeds could be achieved, we scaled this model up to 150%. We also used Cura instead of Creality Print slicer, as it gives better results.
After Tuning
After running through Klipper’s recommended resonance measuring procedure (separately on the X and Y axes) and enabling Input Shaping improved results by a lot. We also calibrated and enabled Pressure Advance (0.0425 with 40 ms Smooth Time).
As you can see, the print quality is a lot better. Most of the ringing has disappeared, and the corners look better too. The print speeds for this 3D print were identical to the previous test.
There are still a couple of print artifacts from lack of sufficient print cooling, as well as from our moist spool of filament—time to put it in a filament dry box. Both are addressable. Tuning further and reducing the acceleration to something more reasonable will help in improving the results further as well.
From this 3D print, it is clear that the Creality Sonic Pad / Klipper firmware combo is capable of delivering good print quality, but it needs extra configuration to do so.
Conclusion: Should You Buy the Creality Sonic Pad?
On paper, the Creality Sonic Pad is a great solution for running Klipper without much hassle on your 3D printer. Its hardware and listed capable features should make it a great option for anyone looking to increase their 3D printer’s printing speed without compromising on print quality.
In practice, however, the Sonic Pad falls short in several areas. All of these are software-related, so we are hoping that Creality addresses these soon.
The biggest issue is that Creality’s default configuration files do not provide any benefit over 3D printers with stock firmware. Acceleration is cranked up to a high level, but without enabling Pressure Advance and Input Shaping, this leads to print quality issues.
Its documentation and implementation of Klipper’s resonance measuring are also poor. Only measuring the print head / X-axis resonance without separately measuring the bed / Y-axis resonance does not lead to good results.
The list of supported 3D printers at launch is also rather short. With only four Creality 3D printers being officially supported right now, the Sonic Pad is not a very appealing option for anyone outside of the Creality ecosystem.
While it is possible for you to get the Sonic Pad to work with other 3D printers, the Klipper installation process is not as straightforward as it could be. Having to use a different Linux machine (or even create a virtual one) is not a practical way to generate Klipper-compatible 3D printer firmware. If Creality would have provided SSH access to the Sonic Pad, this would have been a non-issue.
Even with all these shortcomings, we think that the Creality Sonic Pad has potential. If Creality improves the instructions and default configs, and we really hope they do, the Sonic Pad would be an easy way to run Klipper on your 3D printer with good results.
To us, it feels a bit like the Sonic Pad has been rushed to market. Potentially to be the first Klipper controller available. FLSUN’s Speeder Pad was announced shortly after the Sonic Pad, and while it is not available yet, it looks equally promising. We are curious to see if that solution has a better implementation.
For now, we can only recommend the Creality Sonic Pad if you are willing to put in the extra work to get it configured and running properly. Compared to sourcing a Raspberry Pi + PI TFT50, for example, and building your own solution the Sonic Pad still provides a good value proposition.
Hello,
Great article! I just bought my first 3D printer and am looking at a Sonic pad so this was super helpful.
Question:
I don’t see a date on when you wrote this article, wondering if you have checked to see if Creality has improved on some of your original concerns. Would love to hear back
Hi Jason,
They have! Please see the blue text box near the top of the review, as well as this link. It’s a much better product now, but unfortunately we don’t have the time to rewrite the entire review to reflect this.
Kingroon provides links to the necessary kipper files as well as printer configuration files for the KP3. The instructions are for the Flsun Speeder Pad, but should be similar for the Sonic Pad. My Sonic Pad is “in the mail” until mid-April 2023 and I’ll have a better idea then if the instructions also work for it.