
- Massive build volume
- Good print quality
- Solid build quality
- Easy maintenance
- Plenty of connectivity options
- Remote touch screen (wired)
- Only comes with 0.4 mm nozzles
- Spool holder fits max. 1 kg spools
- Print surface too sticky for certain filaments
- Relatively high noise levels
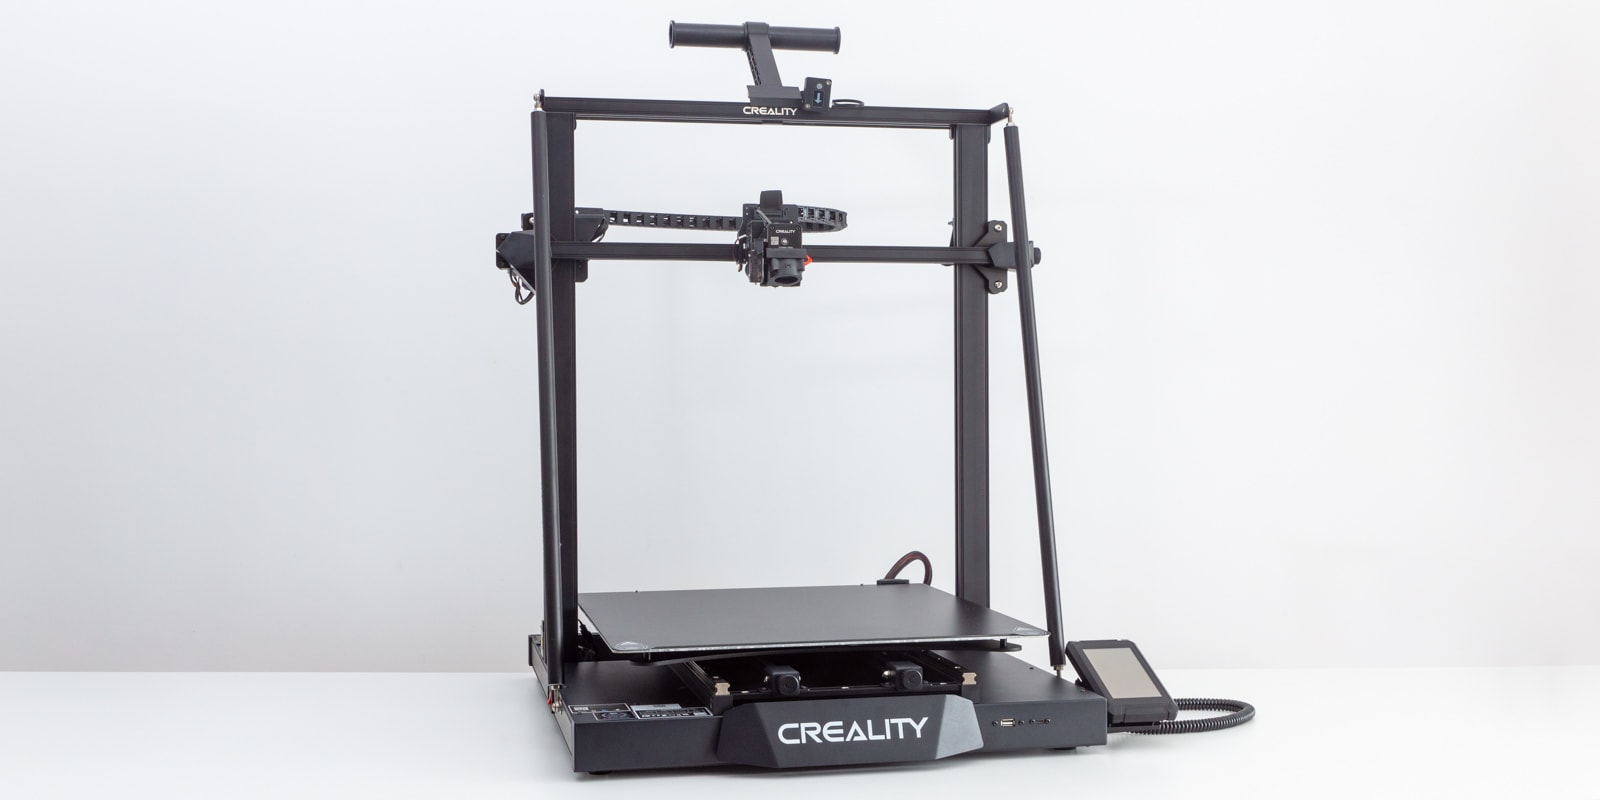
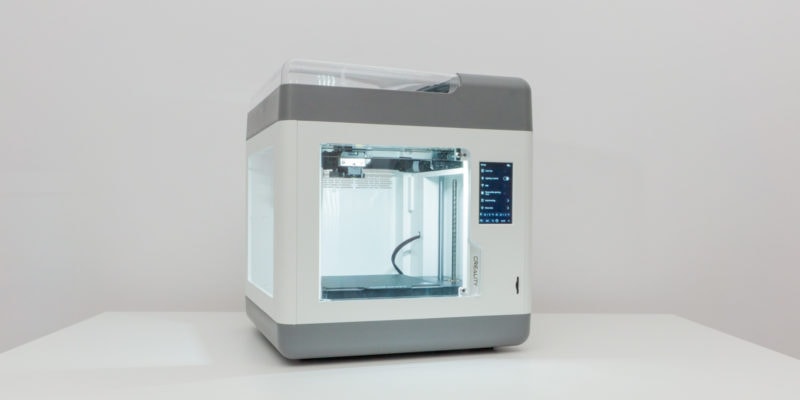
There’s no way around it. If you want to regularly print large objects, you’ll need a large 3D printer. While you can split 3D models, print them, and glue them together afterward, this is a time-consuming and challenging process. That’s where the Creality CR-M4 3D printer comes in.
With its massive 450x450x470 mm build volume and variety of features designed for reliable printing, the CR-M4 promises to be a capable machine for printing large models, batch printing, or running a print farm.
In this CR-M4 review, we’ll put the machine through its paces and see what it can deliver. We’ll look at its features, build quality, and print quality, and compare it to other 3D printers in its class. We’ll also assess the CR-M4’s value for money and whether it is a good choice for large-scale production.
Creality CR-M4 Specs
| Creality CR-M4 Specifications | |
|---|---|
| Price | Creality |
| Printing Size | 450x450x470 mm |
| Slice Thickness | 0.05-0.35 mm |
| Printing Speed | Recommended: 50 mm/s Maximum: 120 mm/s |
| Nozzle Diameter | 0.4 mm (0.6/0.8 mm optional) |
| Max. Nozzle Temperature | 100 °C |
| Max. Hotbed Temperature | 300 °C |
| Filaments | PLA, PETG, TPU, ABS, PLA-Wood, PA, PLA-CF |
| Power Loss Recovery | Yes |
| Filament Detection | Yes |
| Rated Power | 800W |
Box Contents
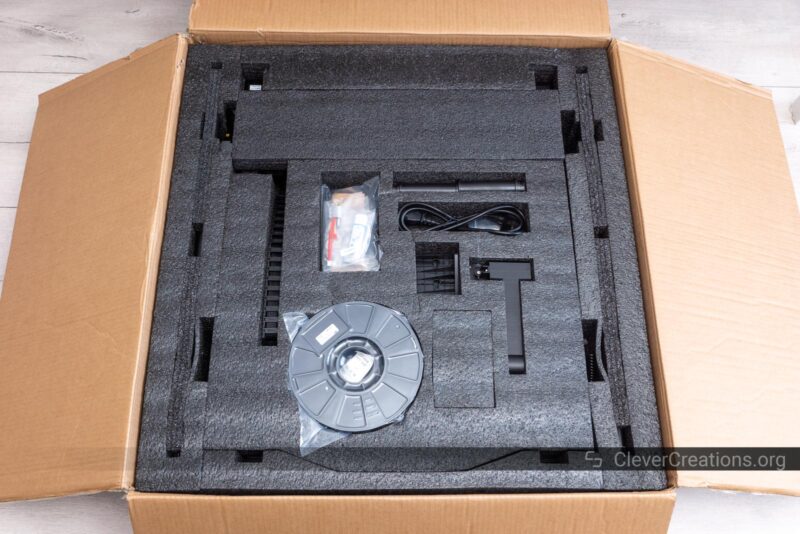
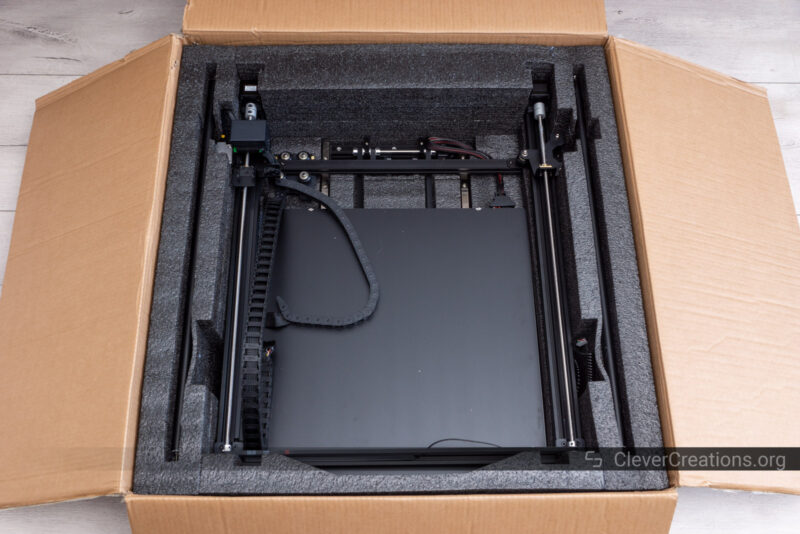
The Creality CR-M4 comes in a massive box that we recommend you handle with a second person. It’s hard to judge its scale from the pictures, but this 3D printer, even when disassembled, really is big.
After opening the box, you’ll find multiple layers of parts, accessories, and components. Again, taking them out of the box by yourself is not an easy task, so your buddy will also come in handy here.
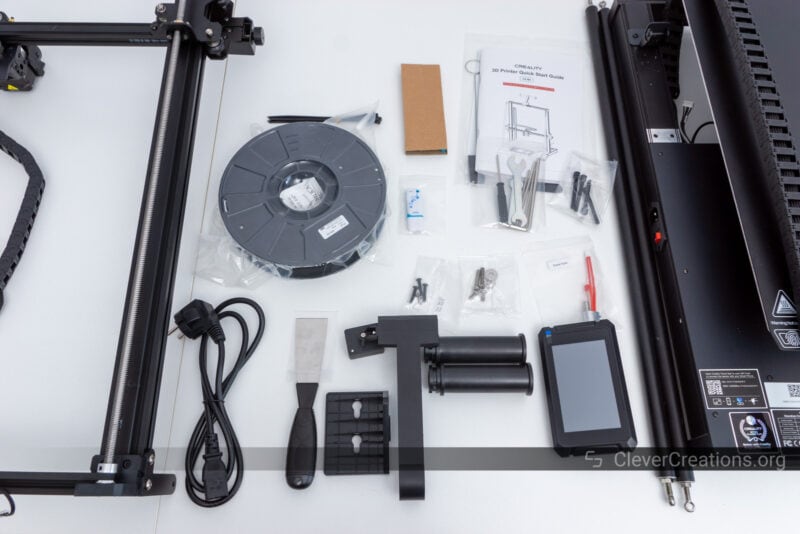
Aside from the giant components of the CR-M4 3D printer itself, you’ll also find a variety of other bits, bobs, and 3D printer accessories. In total, you’ll get:
- CR-M4 base
- CR-M4 gantry
- Z-axis drag chain
- Touch screen
- Touch screen frame
- Two pull rods
- Spool holder
- Filament
- Spare hot end
- USB stick
- One spool of PLA filament
- Printing tool pack
- Assembly tools
- Bolts for assembly
It’s the standard stuff you get with practically any 3D printer nowadays, except for the spare hot end. It’s a good set of accessories to get started with 3D printing, even though we suspect the CR-M4 won’t be the first 3D printer for most users.
Getting Started

Just like with the unboxing, setting up the CR-M4 3D printer is also best done with two people. Some of the steps, like putting the machine on its side to connect the stepper motor wiring underneath, are challenging to do by yourself.
You’ll also need a big table or surface to work on, as the various components are quite large.
Aside from that, the CR-M4 is easy to assemble. We expected it to have more complicated steps than usual, but it is essentially the same couple of steps as always but with larger components.
Some small details that we found interesting or that might be useful:
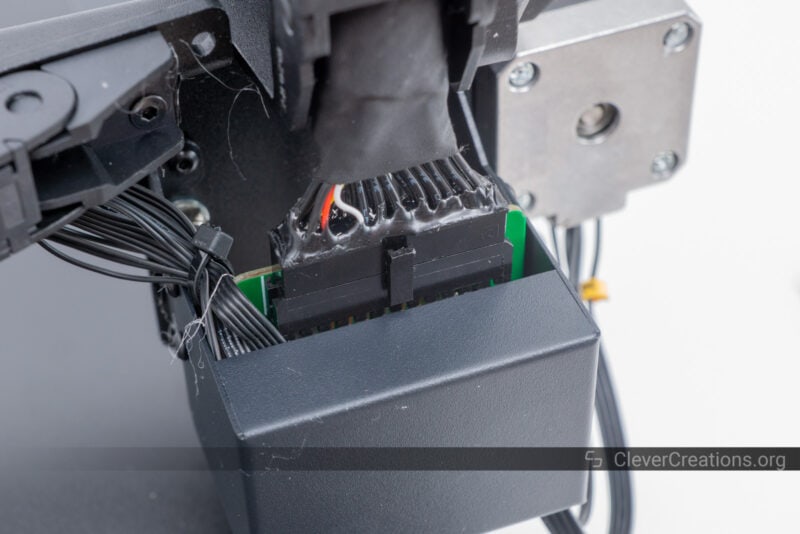
The frame gantry has a 24-pin ATX connector that connects most of the X-axis components at once. It’s not something we have seen before, but we prefer it over connecting various cables separately.
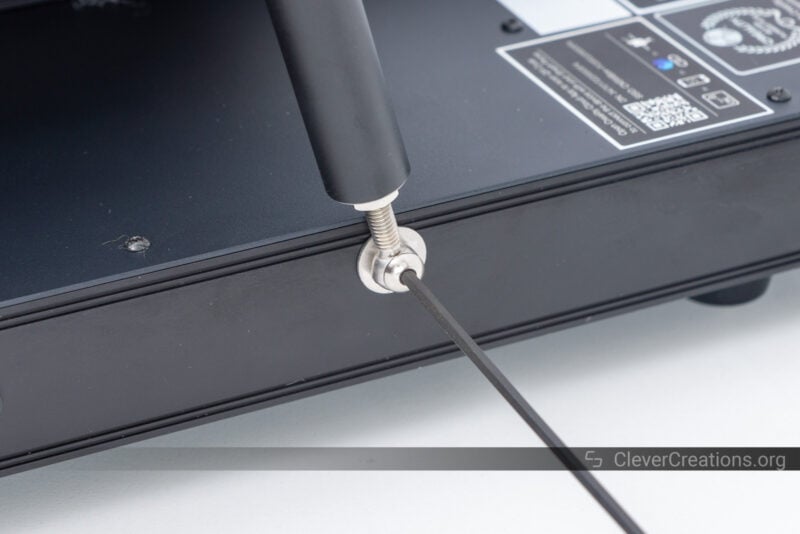
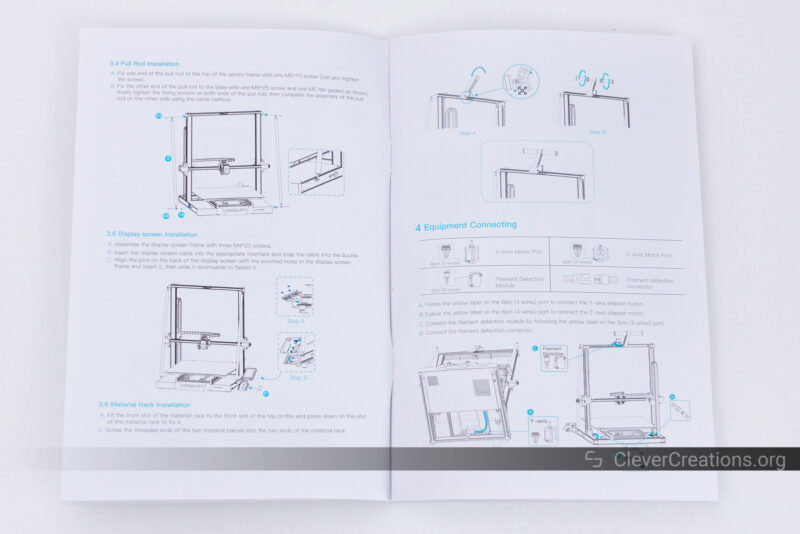
When connecting the pull rods, make sure to tighten the metal nuts against the pull rods after you have installed them. This step is not mentioned in the manual, but it is important to make sure the rods are secured properly.
The steps in the manual are not that clear. Some of the pictures can be hard to make out because of their small details.
It’s a minor issue if one at all. If you are considering the CR-M4, it likely isn’t your first 3D printer and you’ll have a good idea of what goes where already.
Because of its size, this 3D printer takes longer to get up and running than usual. However, setting aside 30 minutes for the unboxing and setup will still be enough.
Creality CR-M4 3D Printer Features
The Creality CR-M4 is a 3D printer that is mostly designed for reliable 3D printing with a large build volume. As such, it doesn’t have many fancy bells and whistles that you might find on other 3D printers.
It’s a no-nonsense machine that focuses on getting things done, and its main features have been designed to do just that.
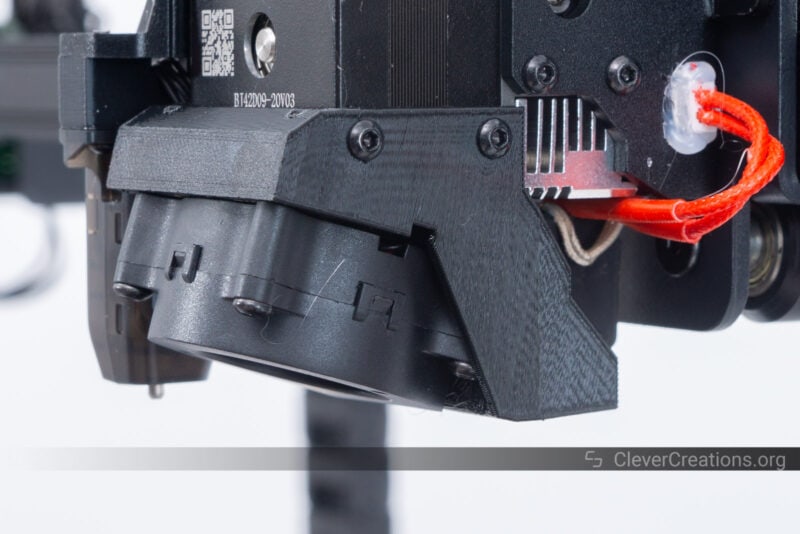
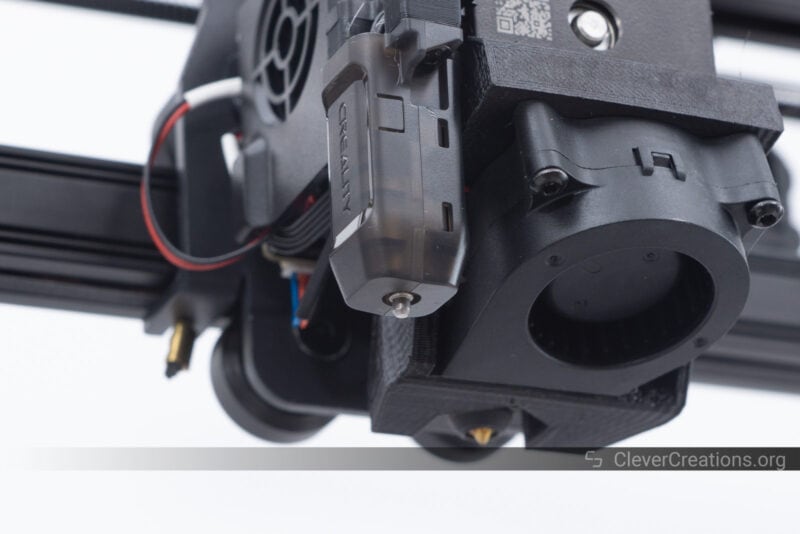
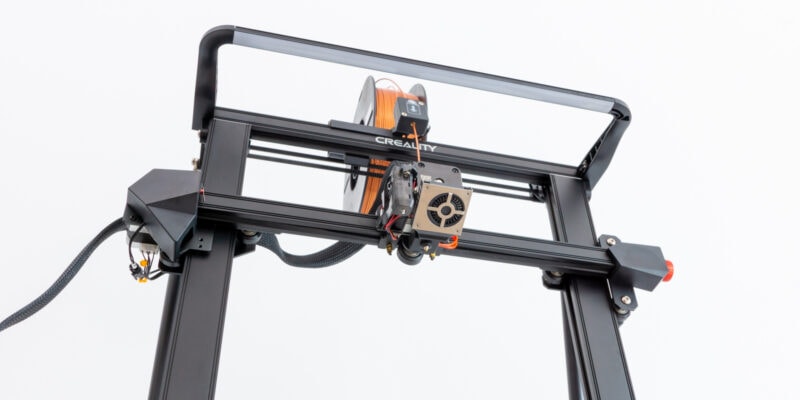
Extruder
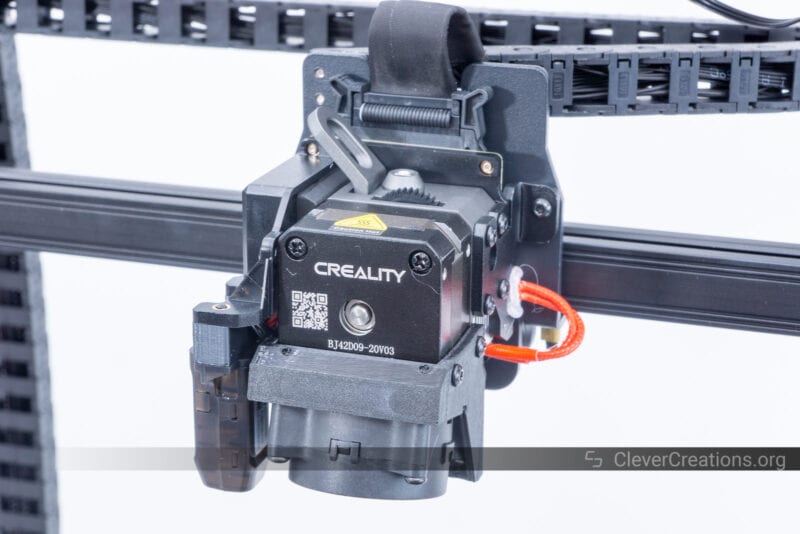
The CR-M4 uses the same Sprite extruder as all other recent Creality 3D printers. We’ve covered it extensively in our other reviews, so we won’t go too much into detail here.
Our experience with it is that it is a reliable extruder that works with practically any 1.75 mm filament. It works well, and there isn’t much reason to have a faster or more powerful extruder on a 3D printer like this.
Hot End
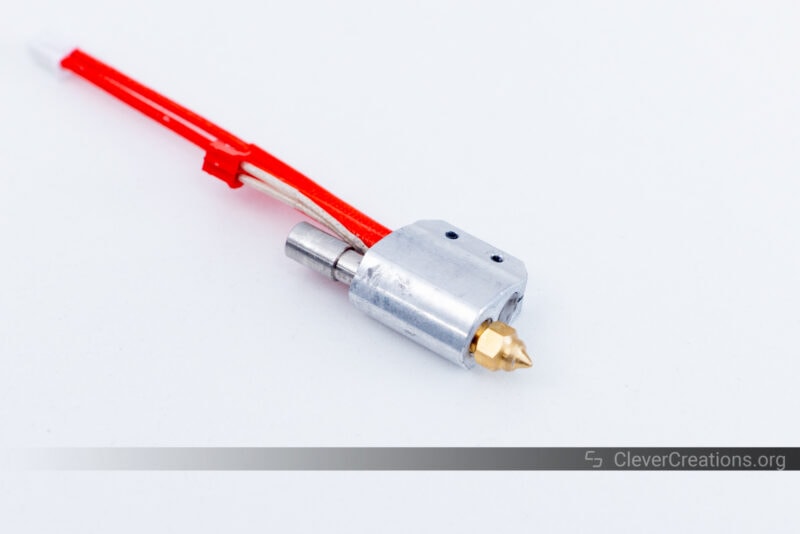
The hot end follows that same trend. Nothing fancy, just a reliable and sturdy hot end. It has a maximum temperature of 300°C, which is more than enough for most materials. Aside from your standard PLA, TPU, PETG, and ABS filaments, it will also melt materials like Nylon and PC.
At full power, it draws 50W, which means it heats up quickly. It takes 53 seconds to get from room temperature up to 200°C, and 1:32 minutes to get to the maximum of 300°C.
Its heat break is smooth instead of threaded, so swapping hot ends is quick and easy. Ideal if you want to keep the downtime of the 3D printer to a minimum in the case of a clogged nozzle.
The CR-M4 also comes with a spare hot end. It’s identical to the one that is pre-installed, which is both an advantage and a disadvantage.
On the one hand, it’s easy to swap out if something happens to the main one. You won’t have any compatibility issues or need to re-slice your upcoming 3D prints with new settings.
On the other hand, the identical 0.4 mm brass nozzle limits your ability to print with different nozzle sizes or abrasive filaments.
We would have much rather seen a 0.6 mm or 0.8 mm nozzle, or a hardened stainless steel one for that matter.
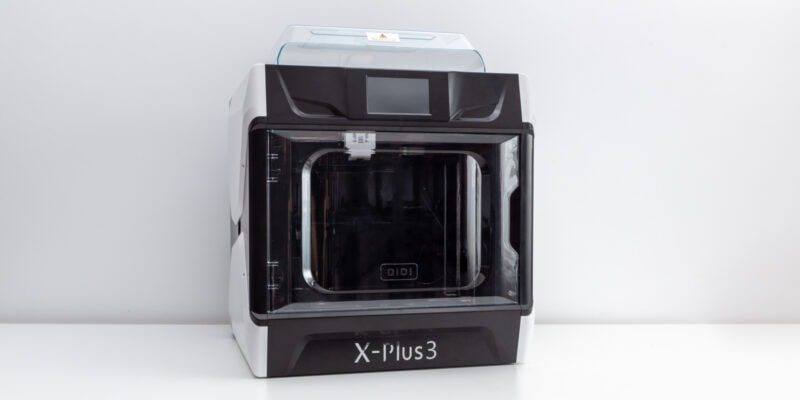
On the QIDI X-Plus 3 we recently reviewed, the second hot end came with a steel nozzle. It comes in useful for printing carbon-filled, wood-filled, glow-in-the-dark, and other abrasive filaments.
You can always buy those nozzles and install them yourself on the (spare) hot end, but it would have been nice if Creality included something that wasn’t a standard 0.4 mm brass nozzle with the machine. Especially for the price.
Overall though, we have no problem with the hot end. It functioned exactly as we expected it to—reliably.
Print Cooling
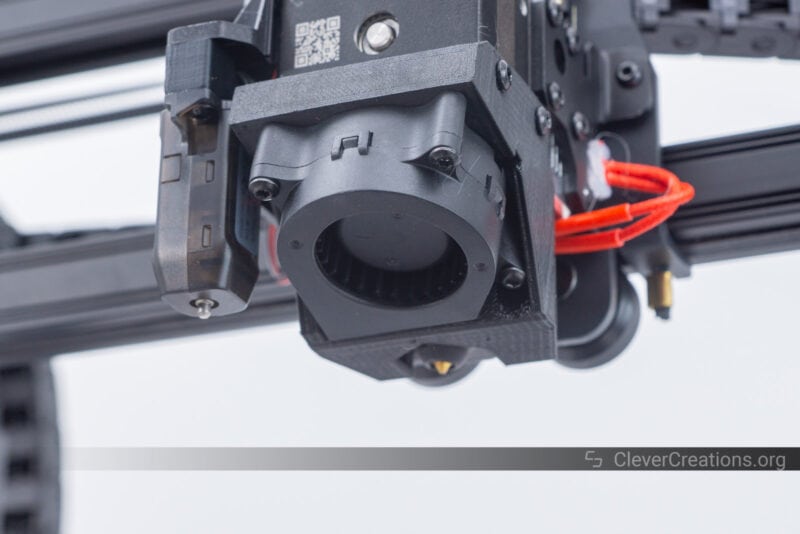
The print cooling fan of the CR-M4 is thicker than what we typically see with the Sprite extruder. Instead of a 40×10 mm blower fan, the print head uses a 40×20 mm version to cool the freshly extruded plastic.
This should help with better performance, such as improved bridging and overhangs. While a more powerful cooling fan also lets you print layers faster, the CR-M4 is not a fast enough 3D printer to make use of that.
Just like most of Creality’s other machines, the print cooling fan faces the print bed. As a result, it sucks in warm air that rises from the print surface.
Compared to sucking in cooler air from the side, this gives a worse cooling performance. Especially if you use the print cooling fan on the lower layers close to the print bed.
To direct the air from the fan to the nozzle, the printer uses a 3D-printed fan shroud. The CR-M4 version we received is an early version and we expect the retail version to have an injection-molded fan shroud. That’s similar to what we saw on the recent Ender-5 S1.
The 3D printed version worked fine in our tests, and their performance depends more on the design itself than it does on the way it was manufactured.
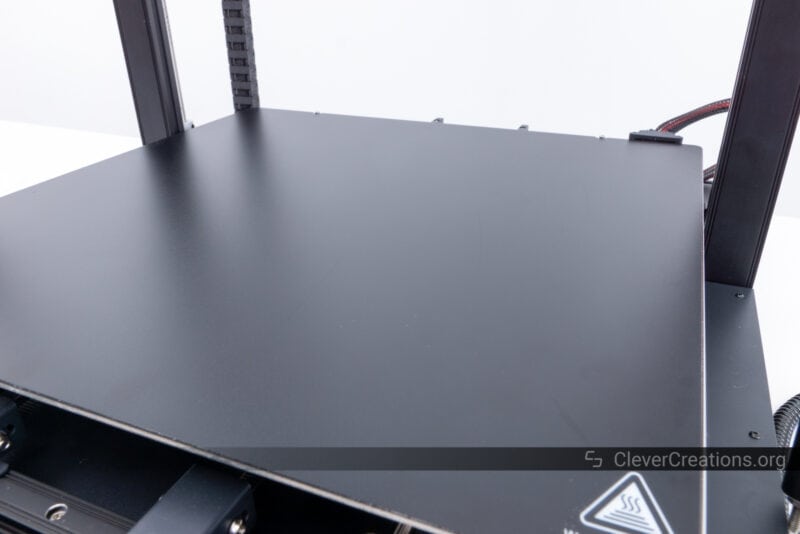
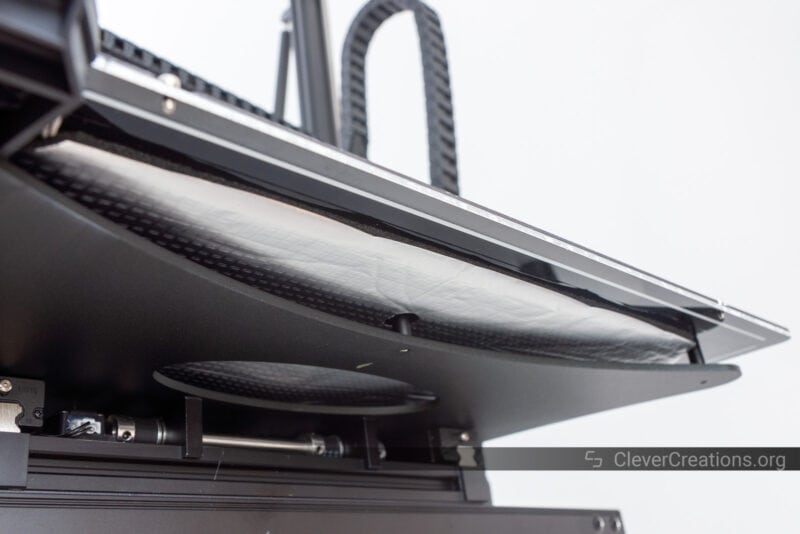
Massive Print Bed
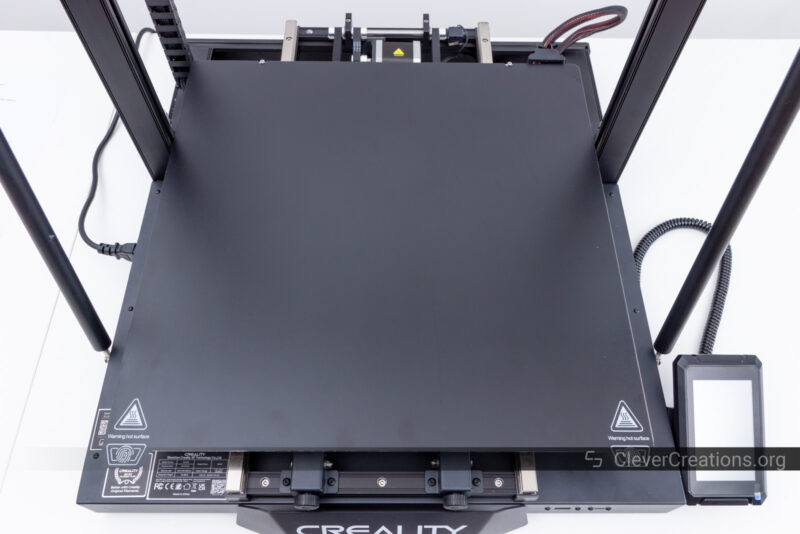
The print bed of the CR-M4 is ginormous. At nearly half a meter in both directions (450×450 mm), it provides a massive print area for your 3D printer projects.
Compared to a large 3D printer with a more typical 300×300 mm bed, it provides more than 2x the surface area to print on. When compared to a regular 220×200 mm bed, the difference is over 4x.
Just like many of Creality’s other printers, the flexible print surface is PC-coated. One difference is that this coating uses medium-sized sand instead of coarse sand.
Bed adhesion is always a balance between getting prints to adhere well during the printing process, and still being able to remove them easily once the print has finished. According to Creality, the medium sand better matches the needs of large prints.
Larger prints have higher bed adhesion requirements because of their higher tendency to warp, but they also need to be easier to remove as they’re harder to pry off.
In practice, the print surface of the CR-M4 sticks better than many of the coarser PC-coated print beds we’re used to. We had no bed adhesion issues with any of the filaments we tested with.
In fact, we had to be very precise with the nozzle offset when printing with PETG and TPU. When the offset is set too high (i.e. the nozzle is too close to the print surface), the filament would stick to the bed too strongly.
We’re talking about differences of 0.05 mm here, so it’s important to dial in the offset correctly. You can adjust this setting during printing, and we recommend you keep an eye on it while the first layer is being printed.
One thing we noticed is that the print surface gets dirty quite quickly when working with PETG and TPU. The prints leave marks on the bed that are hard to remove.
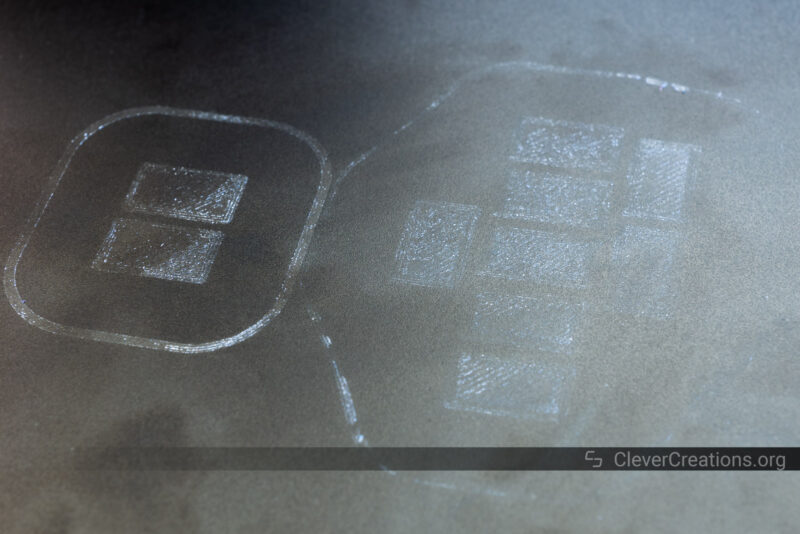
We’re not 100% certain whether this is the coating of the bed coming off, or filament residue being left behind on the print surface. Cleaning the bed with isopropyl alcohol doesn’t remove it, so it could be a concern for the long-term durability of the surface.
Temperature Uniformity
For a large print bed, the temperature uniformity is decent. At 60 °C, over 90% of the surface lies within a couple of degrees Celsius.
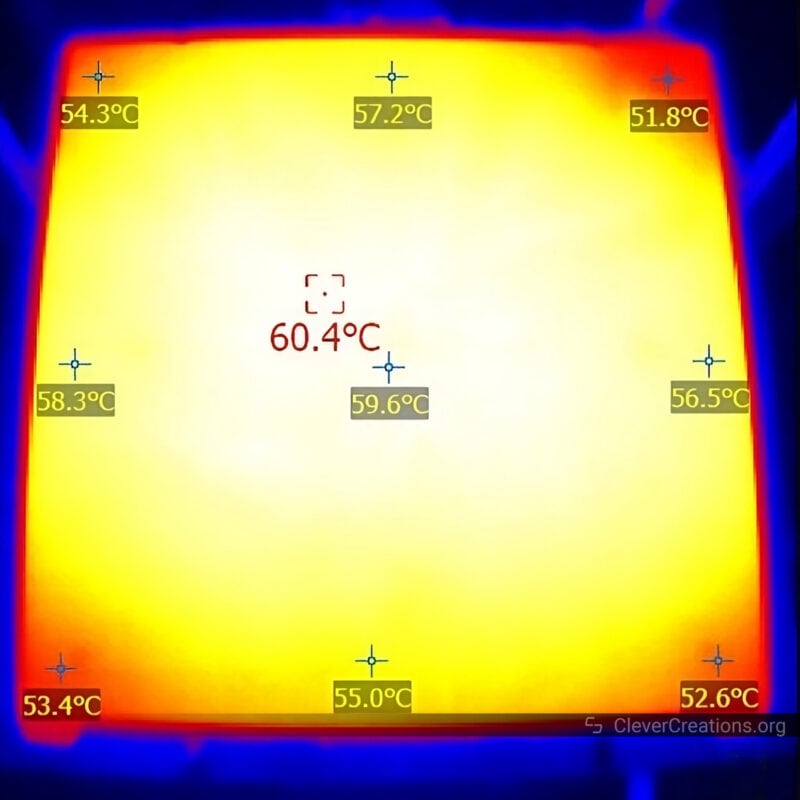
You can see above that only the corners of the surface have a noticeably lower temperature than the rest. You’ll want to avoid those sections if you’re printing with materials that tend to warp.
At 100°C, the difference between the center and corners is more pronounced. But again, most of the bed is still within a few degrees, as you can see below.
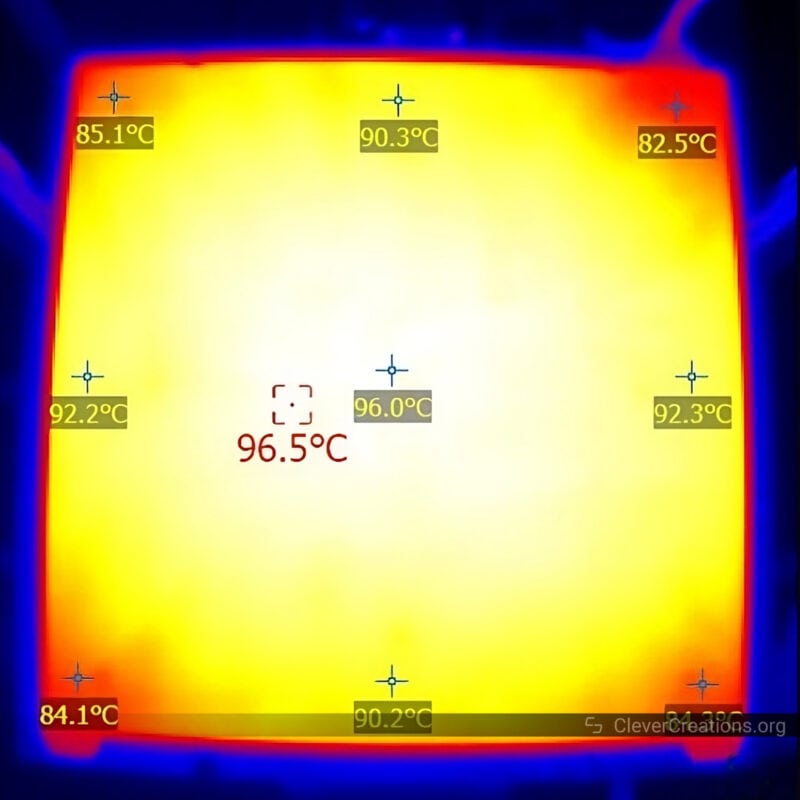
Interestingly, the surface of our CR-M4 print bed only reached up to 96 °C, even though the bed thermistor reported that it got to 100 °C.
It’s possible that the bed thermistor is off by a couple of degrees, or that we should have used a different emissivity setting on our thermal camera due to the smooth print surface.
Either way, in practice, the temperature uniformity is good enough. In combination with the sticky surface, you are unlikely to experience warping with large prints in filaments like PLA and PETG.
ABS is a different story, and we only recommend doing large prints on the CR-M4 in ABS if you use some kind of 3D printer enclosure.
We don’t think the following is necessary for most users, but if you want to improve the temperature in the corners, you could add extra insulation to the underside of the bed. For some reason, the stock insulation stops a couple of centimeters from the edge.
Heating Times
You might think that the massive print bed of the Creality CR-M4 takes ages to heat up, but nothing is further from the truth. The 3D printer has a dedicated 800 Watt power supply just for the bed itself.
Heating the print bed from room temperature to 60 °C only takes 3:26 minutes. Reaching the maximum 100 °C temperature takes 9:36 minutes in total.
That might sound like a lot, but it’s faster than most 300×300 mm direct current (DC) powered print beds. Reaching the same temperatures quicker with more than double the print area is quite a feat!
Now, we should mention that the print bed draws around 700 Watts at full load, so with the current energy prices, you’ll want to keep an eye on your electricity bill if you print for extended periods. And make sure to factor it into your prices when 3D printing for other people.
Automatic Bed Leveling
The CR-M4 uses a touch probe to provide the 3D printer controller with the necessary data to adjust for any imperfections in the bed. Such a large bed is impossible to get perfectly straight, so this feature is key to perfect first layers.
Just like on most other 3D printers, the ABL sensor probes in a 5×5 grid on the bed. Because of the large surface area, we would have liked to see a denser grid pattern (6×6) for more granular data and better accuracy.
Then again, the 5×5 pattern worked well in our testing, and increasing it would also require more time each time you run the ABL sequence. As it stands, the 2 to 3 minutes it takes to complete the entire process is acceptable.
Other Features
There are not many ‘fancy’ features, like LED light strips, for example, on the Creality CR-M4 3D printer. Its main selling points are its massive print area and reliable performance, which we must say it delivered on.
One thing that did stand out to us was its spool holder. It’s a double-sided spool holder that can handle up to two filament spools at the same time.
Since the machine doesn’t have any dual extrusion capabilities, it’s a bit of an odd choice. However, it does help during longer prints since you can preload two identical spools and reduce downtime when one filament spool runs out.
In that regard, we would have liked to see a taller spool holder that fits larger 2.3 kg (5 lbs) spools. The existing one fits spools up to 1 kg, which you’ll burn through rapidly on a 3D printer with such an enormous print volume.
It’s not that hard to design and print a spool holder for large spools yourself, but for the price of this 3D printer, it would have been nice to see one in the box.
You’ll also find that the CR-M4 has a filament runout sensor (mounted on the spool holder) and an auto-resume feature that kicks in when the power goes out. Both features are important when you run big print jobs, but they are such standard features nowadays that we don’t think they are worth elaborating on further.
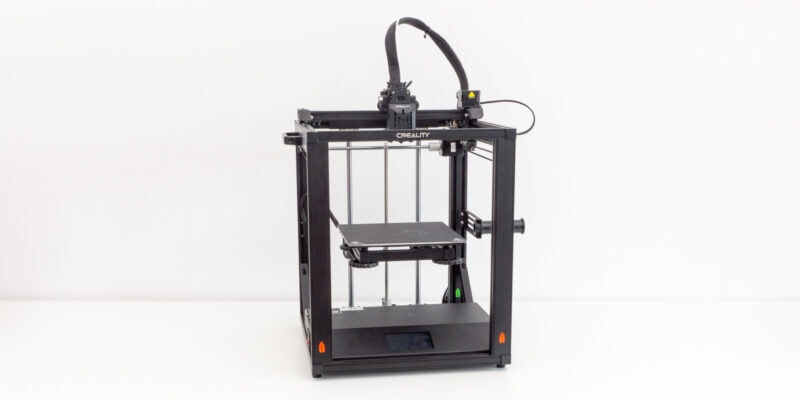
Build Quality and Construction
Build Volume
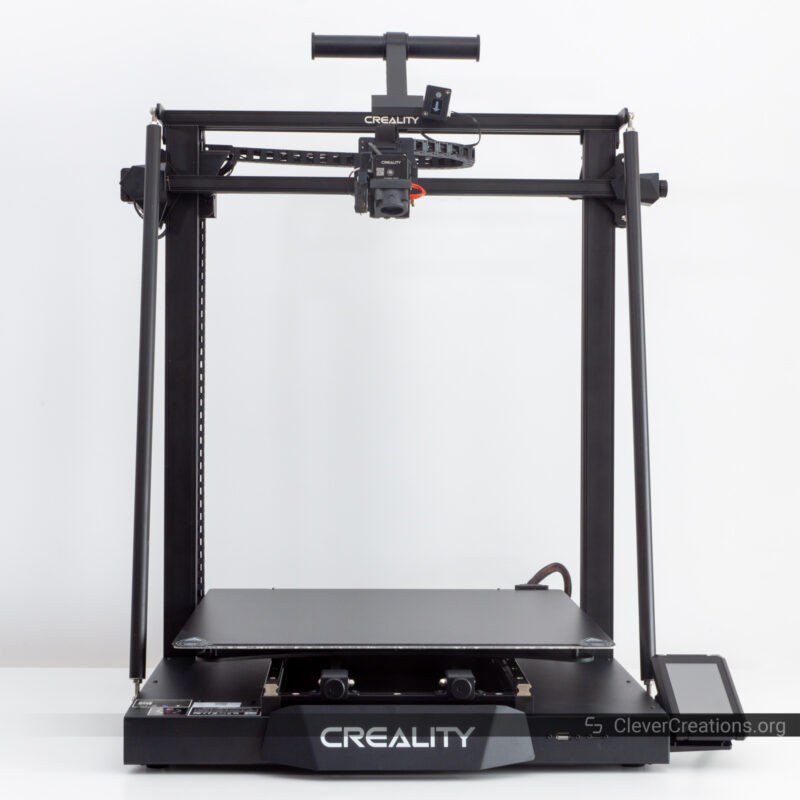
With its 450x450x470 build volume, the Creality CR-M4 offers you 95 liters (25 gallons) to make whatever you can dream up. We’re talking weeks of print time to fill the entire print area. We highly recommend you get larger nozzle sizes (0.6 / 0.8 mm) to avoid the need to print for such extended periods.
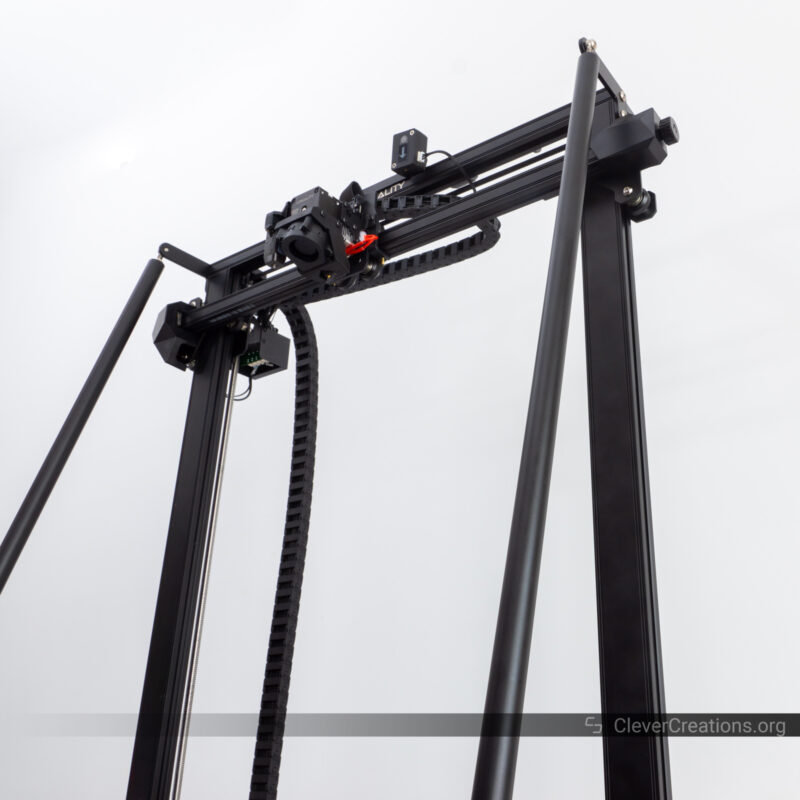
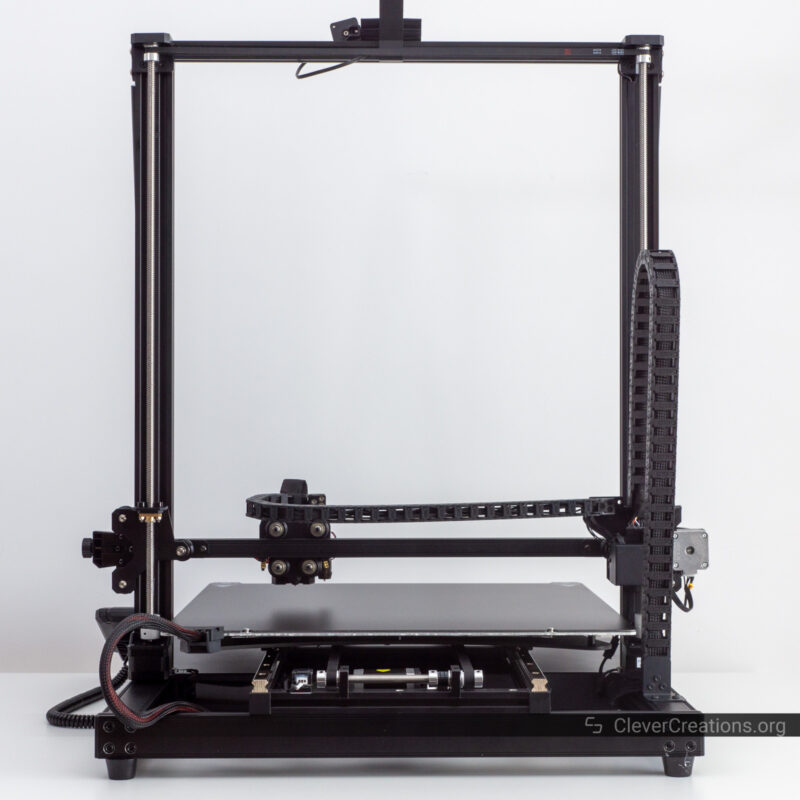
The machine uses a typical inverted-T open-frame design that doesn’t provide a whole lot of rigidity when scaled up. To address this, Creality added pull rods in the Y-axis orientation that help with stability and reduce wobble.
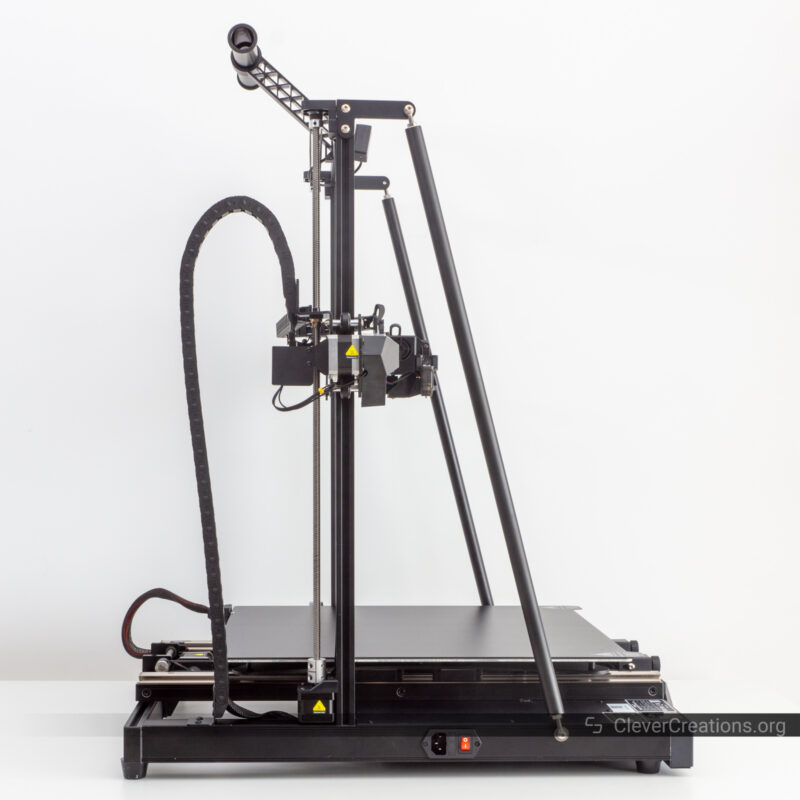
The pull rods are identical to the ones we saw on the CR-10 Smart Pro, just a bit longer.
One difference is that on the CR-M4, the pull rods are mounted facing the front. On the CR-10 Smart Pro, they faced the rear. This is only an aesthetic difference.
In practice, the pull rods help form a stable triangle that eliminates most wobble. Even in the higher print speed tests, we didn’t notice any significant vibrations or ringing.
Component Quality
Overall, the component quality of the 3D printer is excellent. Since it is a machine focused on durability and reliability, nearly all important components are made of metal. There’s very little plastic to find throughout the entire machine.
One exception is the X-axis belt tensioner, which is still made of plastic. It’s not a part that sees a lot of stress, so it is not a huge concern.
Rigid Y-Axis
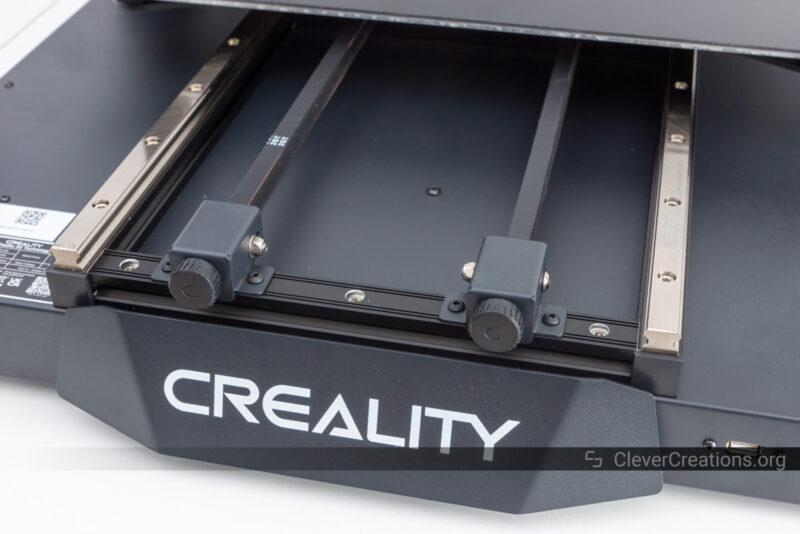
Instead of a V-Wheel construction, the Creality CR-M4 uses dual linear rails to guide the heavy print bed across the Y-axis. They are chunky MGN15 linear guides, with two carriages per rail to increase the stability of the bed.
There’s no unwanted movement anywhere. Even if you wanted to, it would be very difficult to push the bed out of alignment.
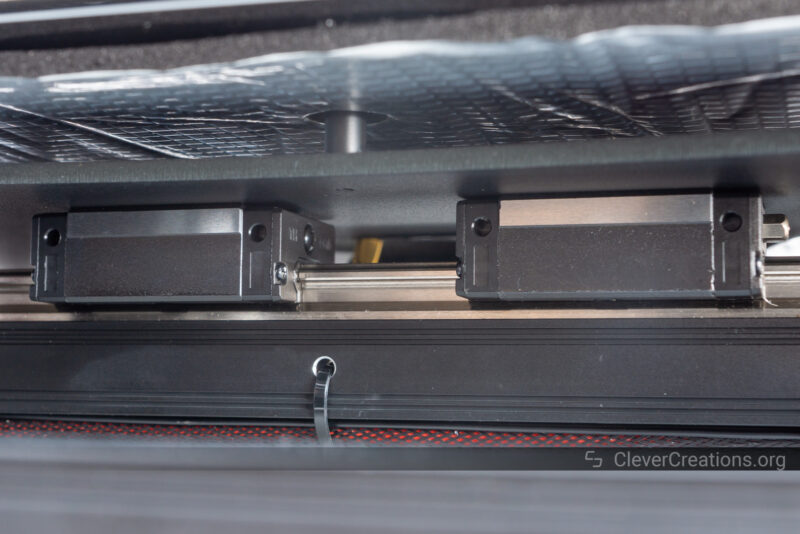
Compared to V-wheels, these linear rails reduce print quality issues that could arise from slop in the Y-axis. Even a small bit of play shows up amplified near the edges of this large print bed.
The linear guide rails generate less maintenance as well. Unlike V-wheels, there’s no need to regularly check for tightness and make adjustments. Aside from standard 3D printer lubrication, there’s little required to keep them functioning properly.
In addition, the 3D printer uses dual belts with metal belt tensioners on the Y-axis. It’s all designed to manage the massive size and weight of the print bed without imbalances or other issues that could negatively affect print quality.
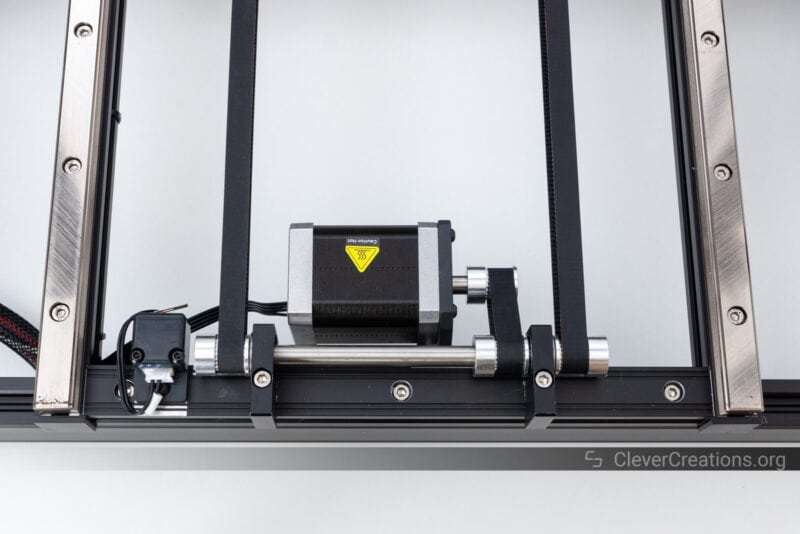
Dual Z-Axis
Unsurprisingly, the Creality CR-M4 uses a dual Z-axis arrangement with two stepper motors and two leadscrews. It’s a standard setup on most smaller 3D printers nowadays, but on a large 3D printer it is even more crucial to prevent the X-axis sagging on one side.
New are the floating lead nuts on the Z-axis. They move freely on the X- and Y-axes and only restrict movement in the vertical direction.
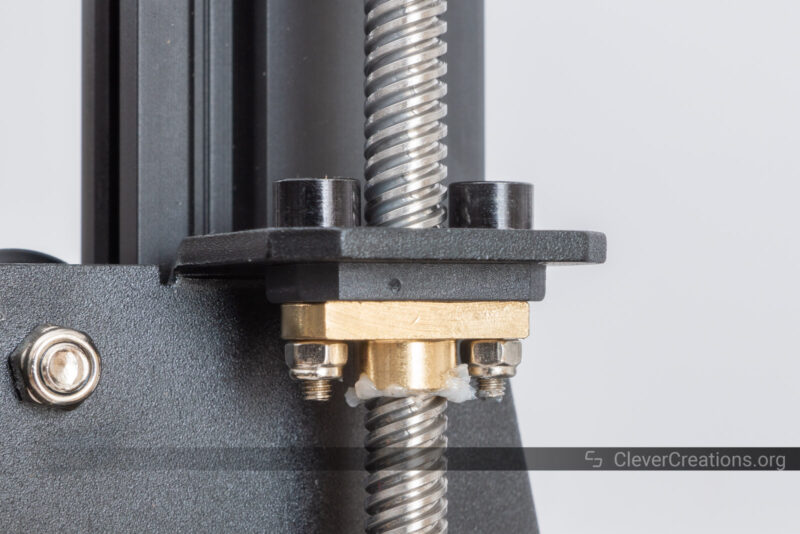
It’s an arrangement that is supposed to reduce Z-wobble caused by misalignments in the lead screws. In practice, it works well and we haven’t noticed any wobble or banding on any of the prints that we have made, even at taller heights.
The lead screws are connected at the top through two pulleys and a timing belt to prevent the two screws from going out of sync. It works well, even though the timing belt has a lot more slack than we’re used to seeing.
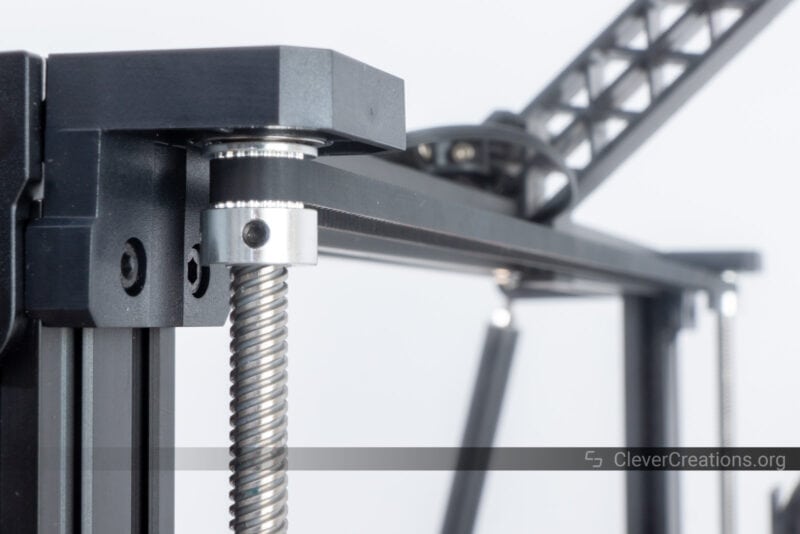
A linear guide rail setup on the Z-axis would have further helped improve accuracy and reduce maintenance. The current V-wheels can only do so much before they start to wear out. It’s something we think Creality can improve on in future versions or successors of the CR-M4 3D printer.
Electronics
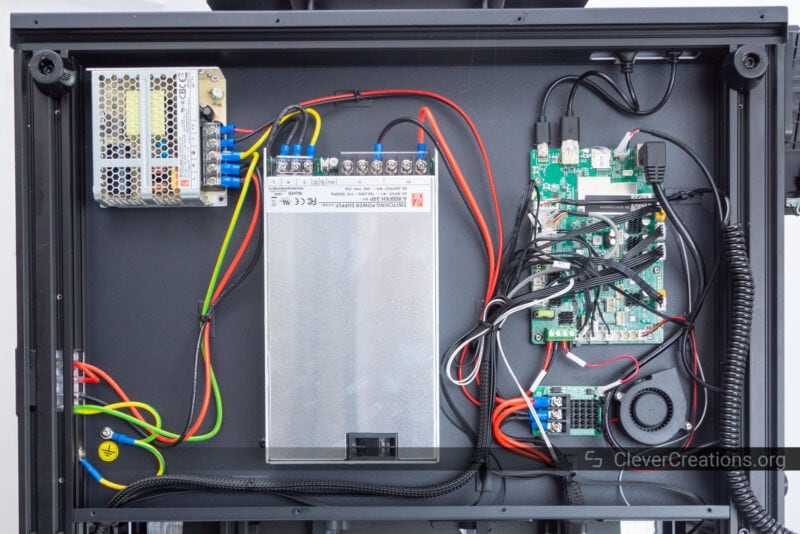
Controller Board
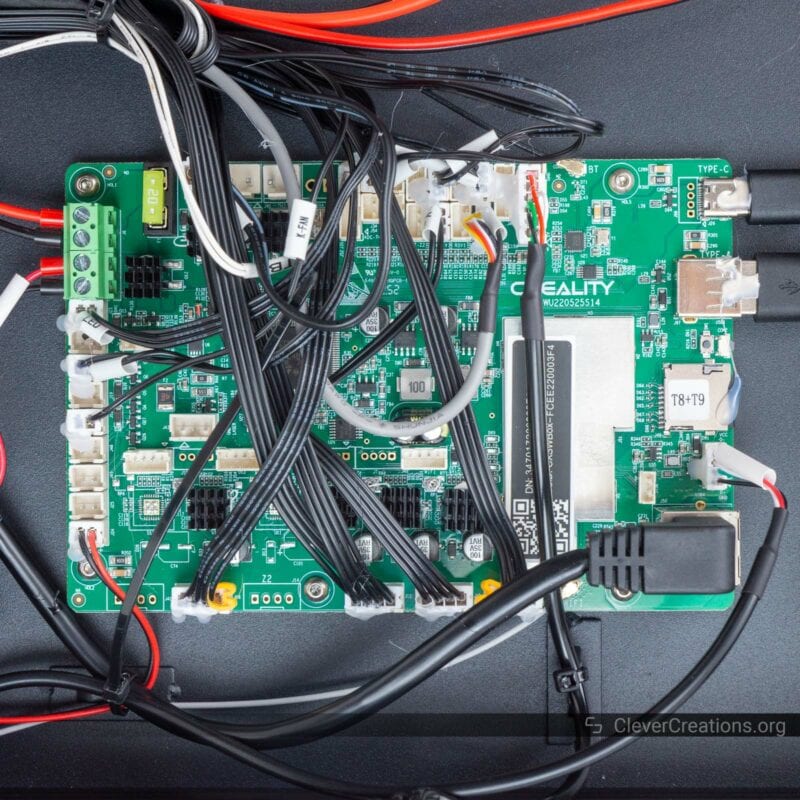
The CR-M4 uses a rather large controller board with plenty of inputs and outputs. For example, it comes with extra USB connections (USB-A and USB-C), as well as an ethernet port.
Interesting to see is the space for six stepper motor drivers and a large number of unpopulated other connectors on the board. We’re expecting to see Creality use this exact board in more of their upcoming releases, as it offers a lot of flexibility.
Also new is the onboard Wi-Fi module that is partly responsible for the larger size of the controller PCB. Previously, we’ve seen Creality use a Wi-Fi Box PCB in some of their 3D printers to provide Wi-Fi functionality. The onboard module is both cheaper and more reliable in the long run.
Despite the seemingly wide range of features, the board still uses the same ARM STM32F401 MCU as on its previous controller boards. This means that the CR-M4 is compatible with Klipper firmware, for example in combination with the Sonic Pad, to speed up your prints.
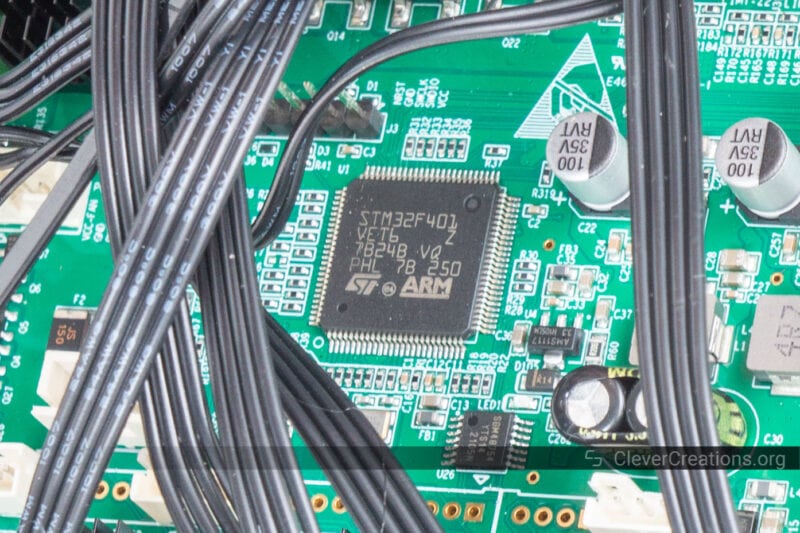
We’re seeing a trend towards stock Klipper support in upcoming 3D printer releases. With the CR-M4 you are still dependent on an external processor for the associated intensive calculations.
To prevent thermal issues during long 3D prints, the MCU and stepper motor drivers are cooled with a powerful radial fan. It’s partly responsible for the above-average noise level of the 3D printer but otherwise does a good job cooling the board.
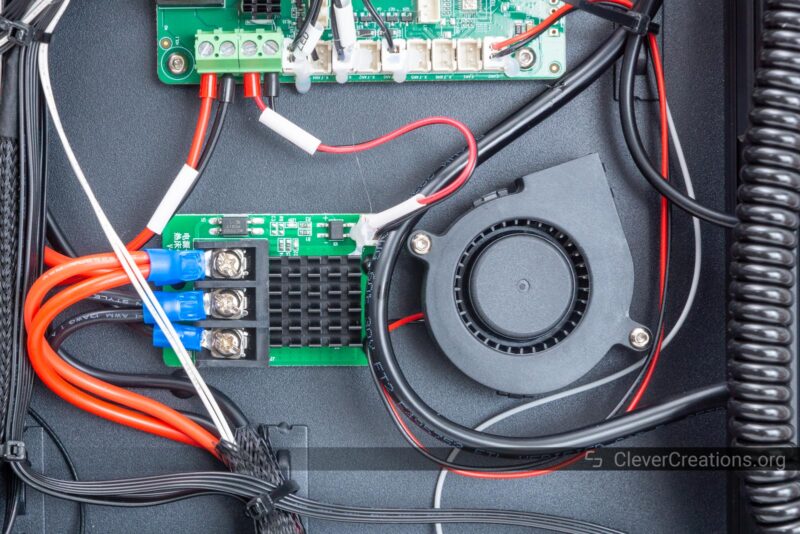
Pictured on the left is the PCB that toggles the power to the heated bed. Switching ~700 Watts would be too much to handle for the MOSFETs on the main controller, so the CR-M4 uses an external board with larger MOSFETs.
Power Supplies
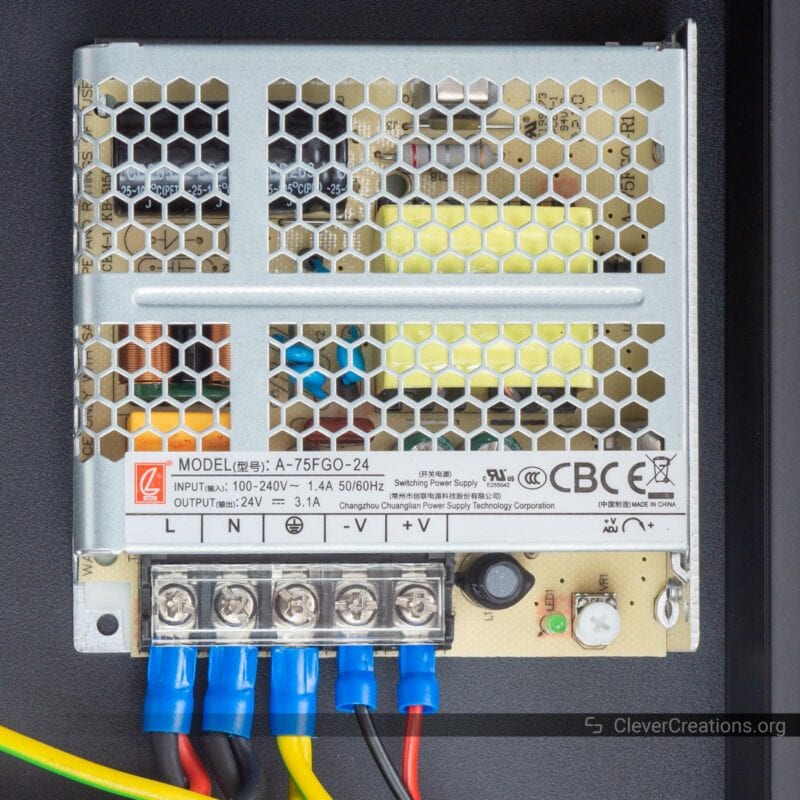
The CR-M4 uses two separate power supplies. The first is a 24V 75W PSU, which is responsible for powering the smaller stuff, like the controller board, fans, hot end heater, and so on.
The second PSU is a significantly larger 24V 800W unit. Its sole job is to power the heated bed. Its high capacity requires it to have active cooling, which again, is more noise to deal with.
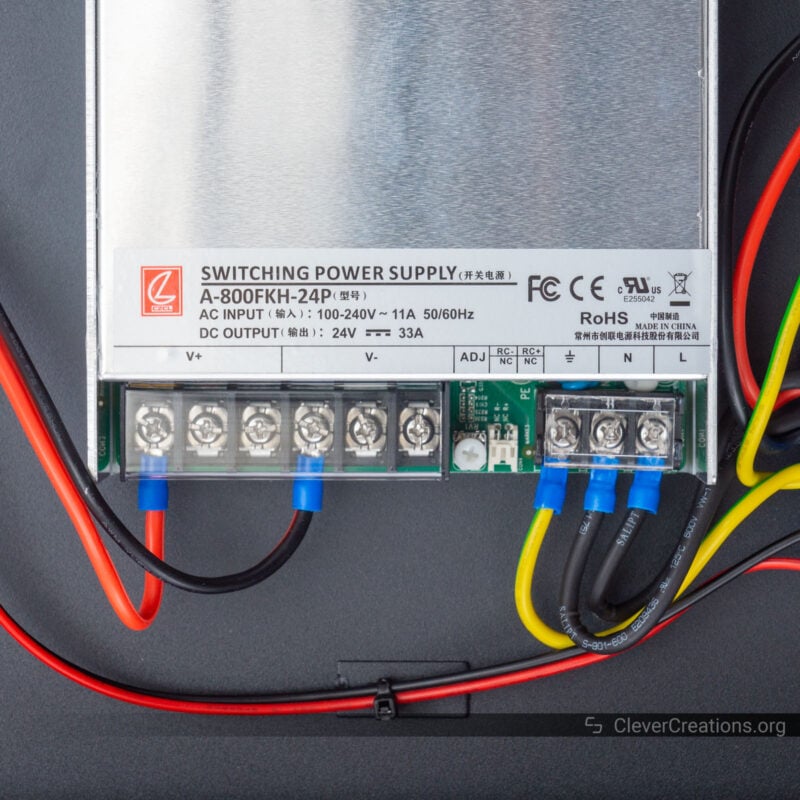
Having two power supplies means that when the heated bed toggles on or off, it doesn’t cause unwanted voltage fluctuations for the other components. It’s a good design choice and something we’ve seen higher-end 3D printers do as well.
Both PSUs are from the CZCL brand. We couldn’t find much about the brand, aside from the fact that its power supplies are commonly used for powering LEDs.
We would have preferred to see Mean Well units. These have good durability and reputation and are in our opinion worth paying extra for. With the CZCL power supplies, it’s a guess whether or not they will hold up over time.
Safety
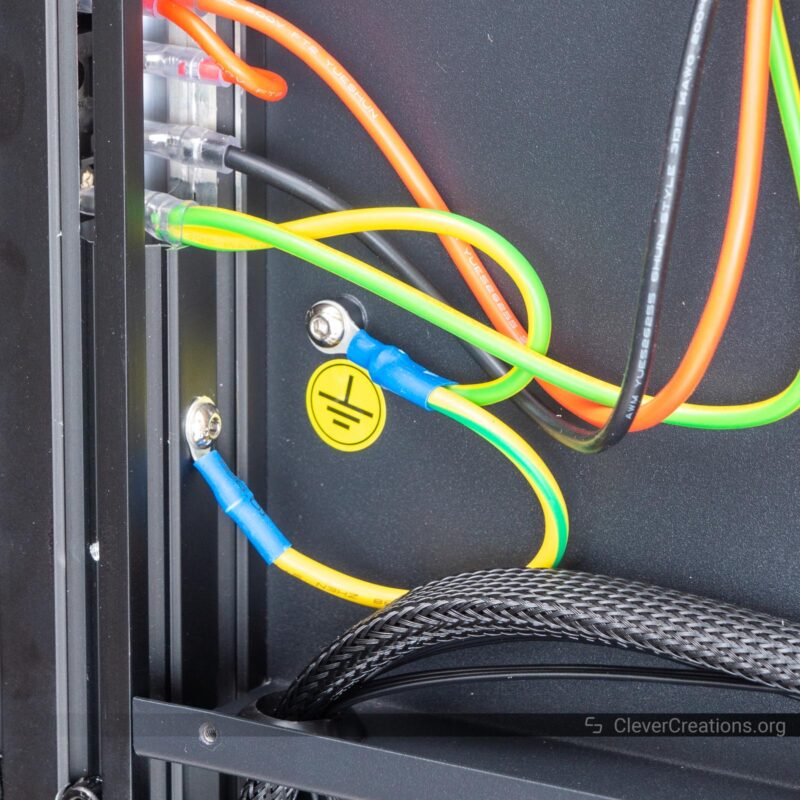
We’ll keep the safety section short, as Creality has nailed this aspect down on all recent 3D printers. The frame is grounded, high-current wiring has been crimped, moving cables have strain relief, inputs are fused, and the heavy-duty bed wiring has a sufficiently large wire gauge.
All wiring has been tie-wrapped in place as well, with pluggable connectors on the controller board being glued in place with a dab of hot glue. The latter is more of a reliability than a safety aspect, but it shows that everything is well thought out.
Cable Management
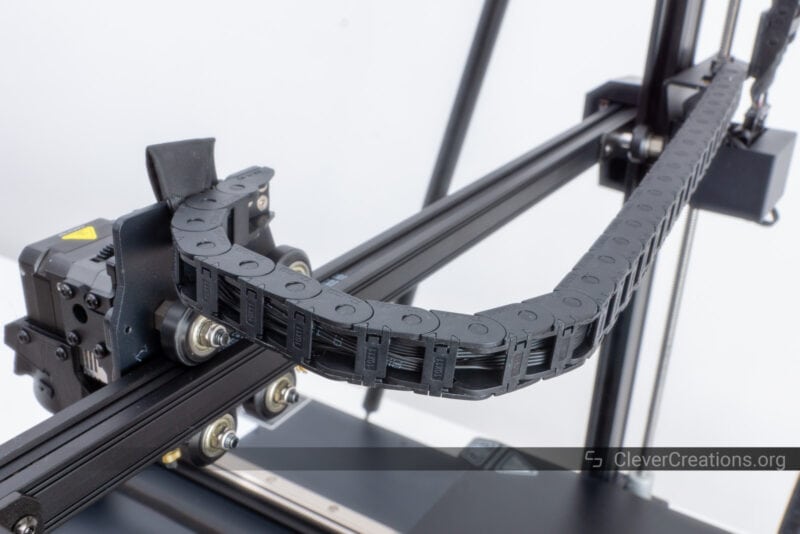
It’s good to see that the Creality CR-M4 uses drag chains, or cable chains, to keep all the moving cables in check. Without them, there would be too many cables flopping around due to the printer’s massive size.
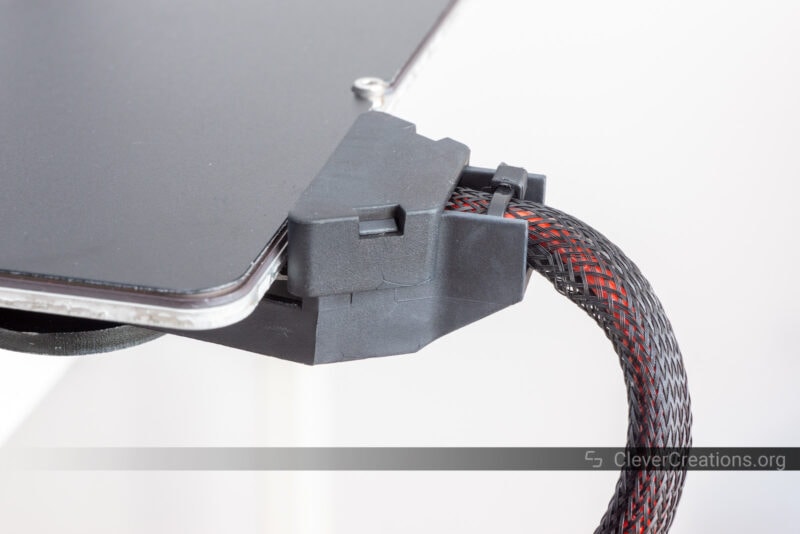
The print bed also has a strain relief bracket, and all stationary wiring has been neatly tied down. Everything that has a cable associated with it has been properly taken care of.
Sound Levels
Because of its loud blower fans and actively cooled power supply, the CR-M4 makes more noise than your average 3D printer. Sure, it has silent stepper drivers, but the fan noise is way more noticeable than the stepper motors.
We assume the average user of the CR-M4 will care more about productivity than sound levels, so for many, this won’t be a problem.
However, if you are running the CR-M4 in a home environment, then you may want to implement one or more methods to make your 3D printer quieter. You will likely have plenty of 3D prints that run into or throughout the night, and having a noisy machine running nearby while you are trying to sleep can be a nuisance.
Ease of Use
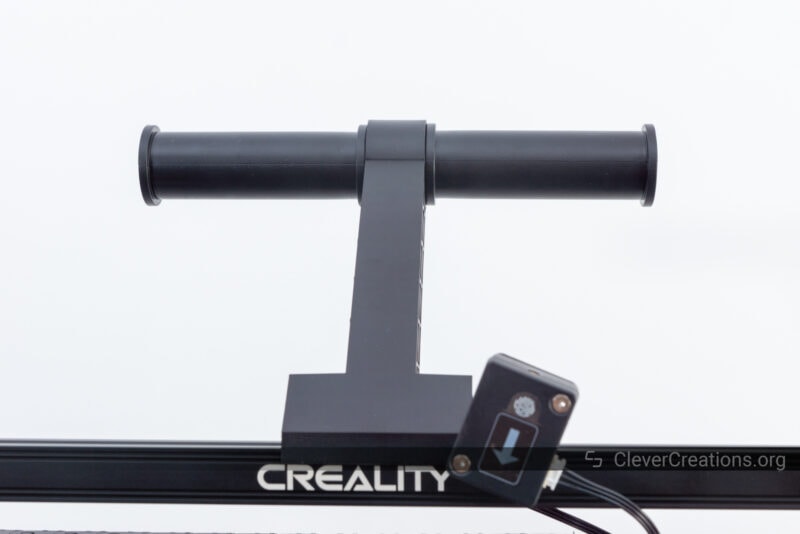
4.3″ Touch Screen
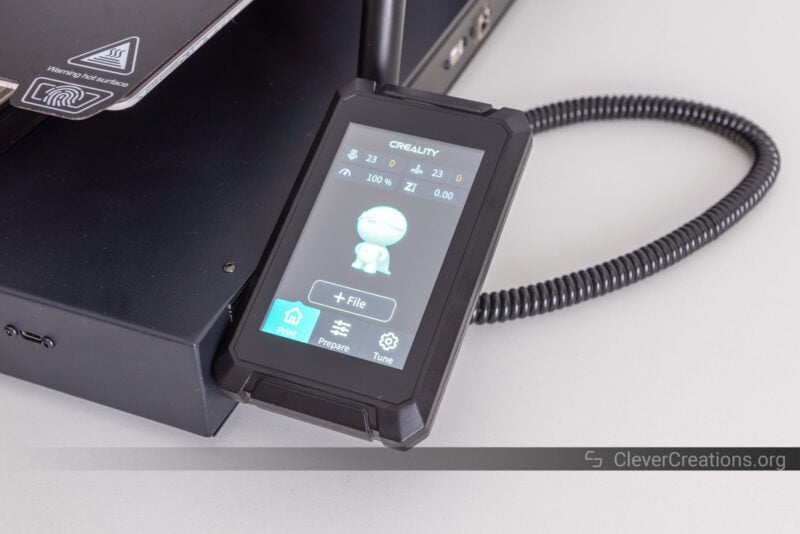
You’ll use a 4.3″ touch screen to interface with the CR-M4. It’s the same screen as on most of Creality’s other 3D printers. It works well but isn’t anything special either.
What is new is that the touch screen is connected by a long coiled cable. This can be useful if you want to control multiple CR-M4 printers from one point, without walking over to each of them like you are playing a simultaneous exhibition chess match.
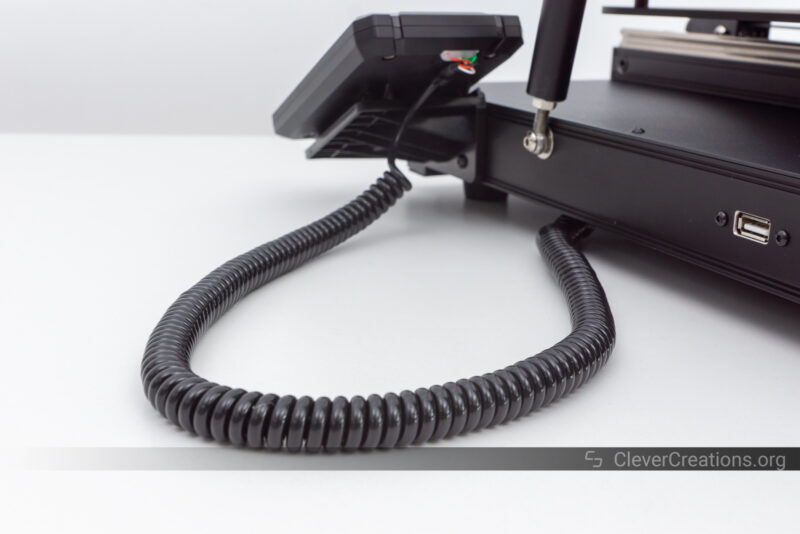
When stretched, we measured the touch screen cable to reach about two meters or six feet. You could stretch it a bit further if you are ambitious, but when we did this, we started worrying about the permanent deformation of the cable.
User Interface
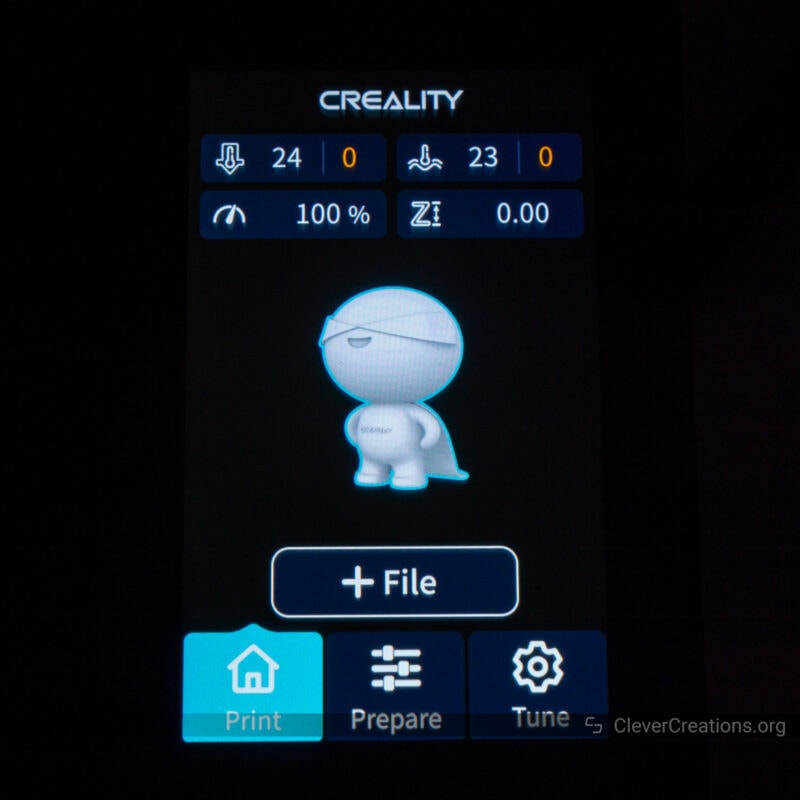
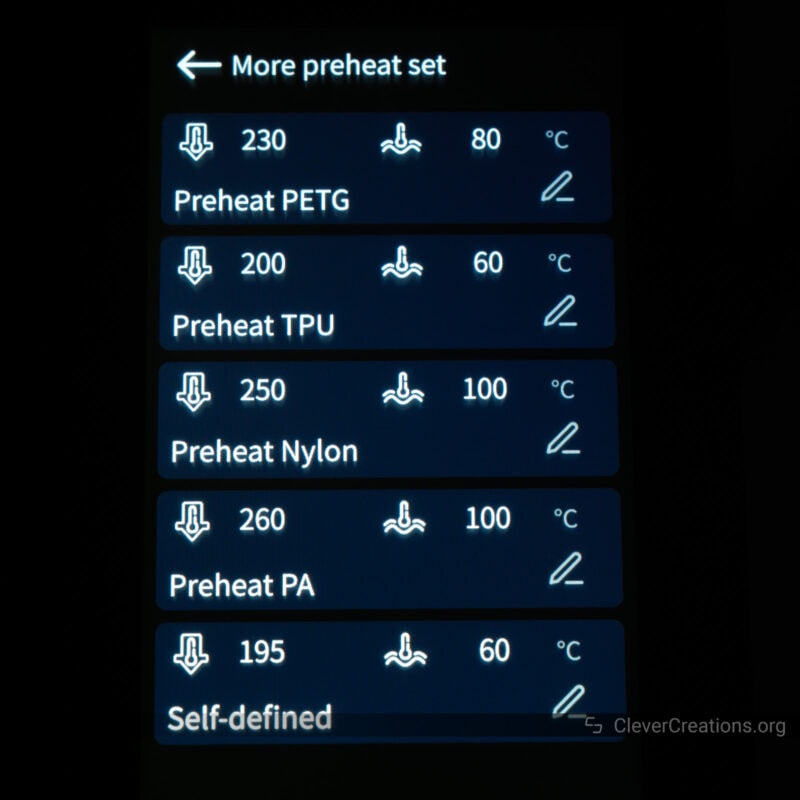
The CR-M4 3D printer has a straightforward user interface with the most common settings laid out logically. You’ve got your basic print, preheat, and movement controls, as well as a variety of preheat settings for various filaments.
As far as the configuration of the printer goes, the UI offers a good amount of control. You have direct access to various advanced settings that let you tweak the behavior of the printer, even though it will be more efficient to do this directly through GCode.
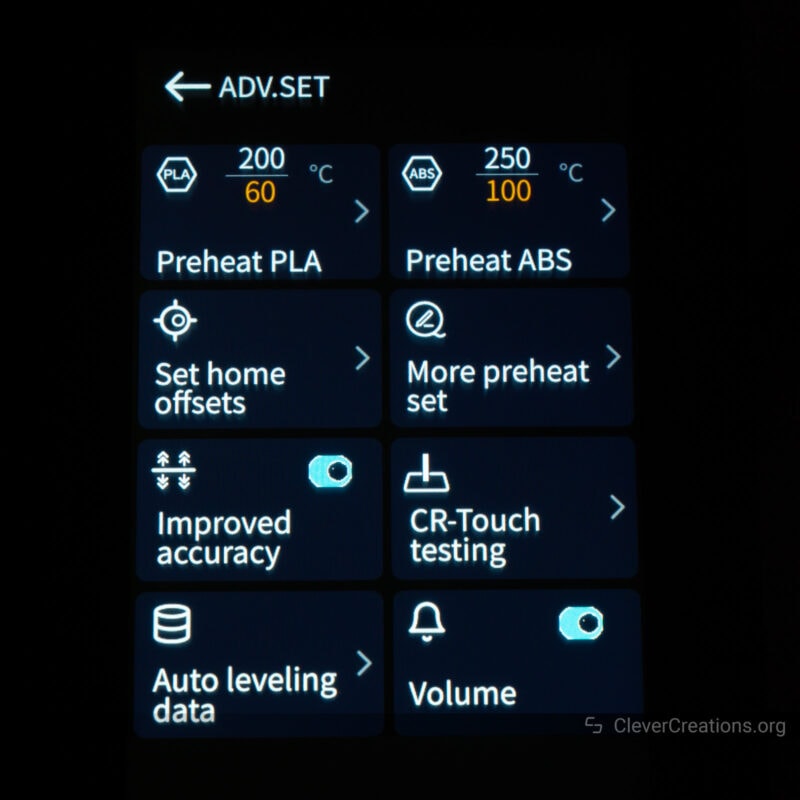
One thing that bothers us about using the CR-M4 is that the screen automatically dims after a while. When you want to use the touch screen for something, you’ll need to tap it first for it to light back up again. We couldn’t find a setting to disable this feature.
Connectivity
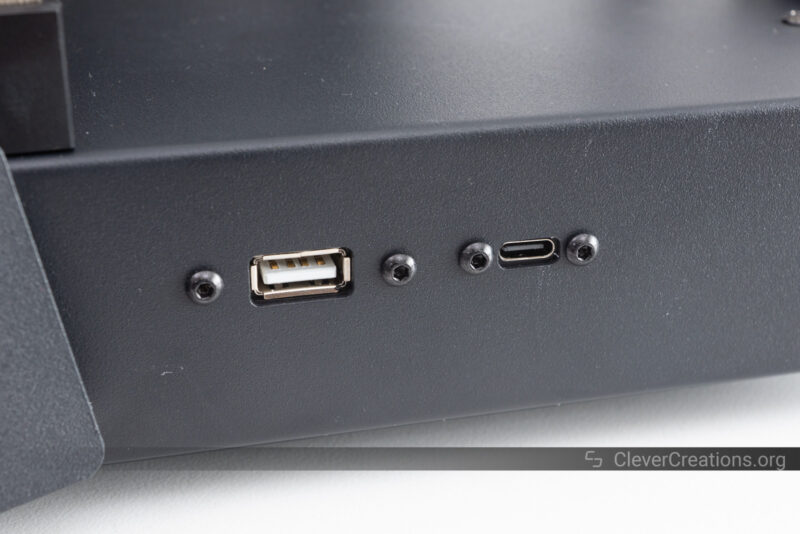
There are plenty of ways you can connect to your Creality CR-M4 3D printer. You’ve got dual USB-A and USB-C ports on the front of the machine, and an additional USB-A and Ethernet port on the side.
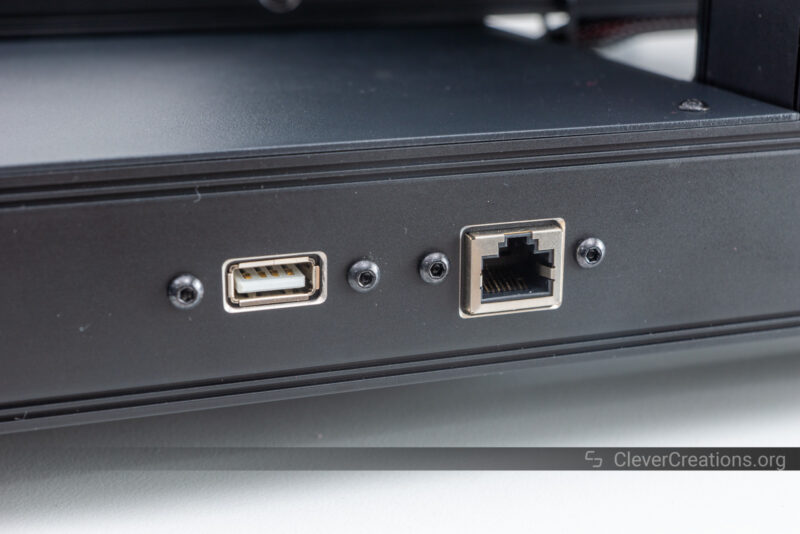
There’s also the onboard Wi-Fi module that lets you connect to your 3D printer wirelessly, so there is little need to fumble around with cables or USB sticks if you don’t want to.
With this many connectivity options, you can simply use what works best for your workflow without having to make compromises.
Maintenance and Repairability
If you experience issues with the CR-M4, they won’t be difficult to troubleshoot. For example, the hot end is relatively quick to swap, and the electronics area can be easily accessed after removing its cover underneath the machine.
Given the focus on reliability, we think it is unlikely that you will have to repair the 3D printer often. But if you are running these machines 24/7 for prolonged periods, there’s always something that will pop up sooner or later.
When that happens, it won’t be difficult to get the CR-M4 back up and running.
Creality CR-M4 Print Quality
For most of the test prints below, we tried to find a balance between print time and print quality. Due to our review deadline, we did not have the luxury of week-long 3D prints, so we settled on using thicker layer heights at the cost of print quality.
It’s worth noting that none of the prints needed bed adhesive or a brim or raft. The print surface has no problems adhering to all filaments, and as mentioned earlier, sometimes even too well.
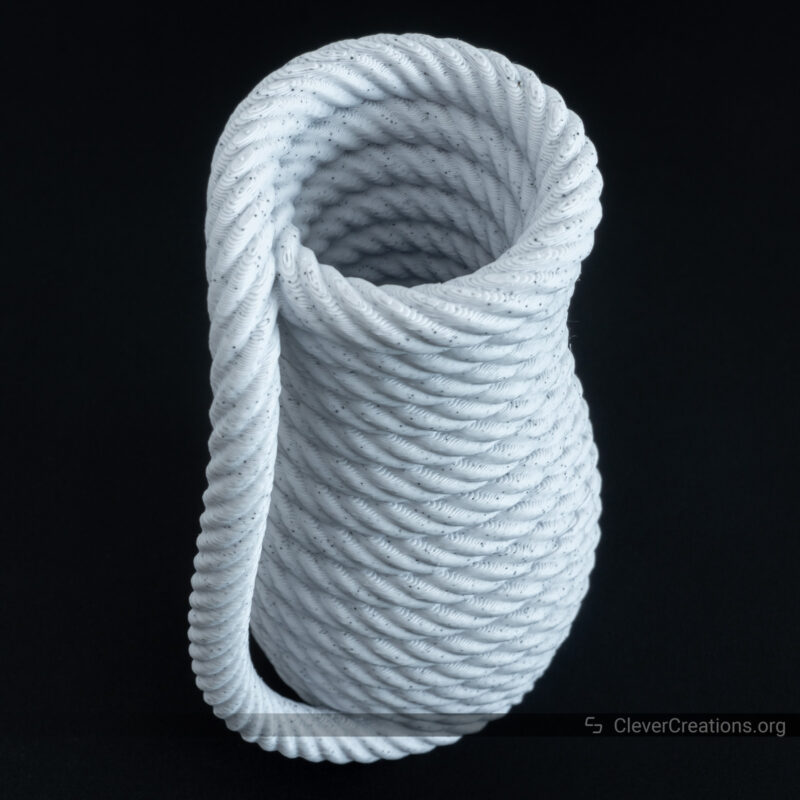
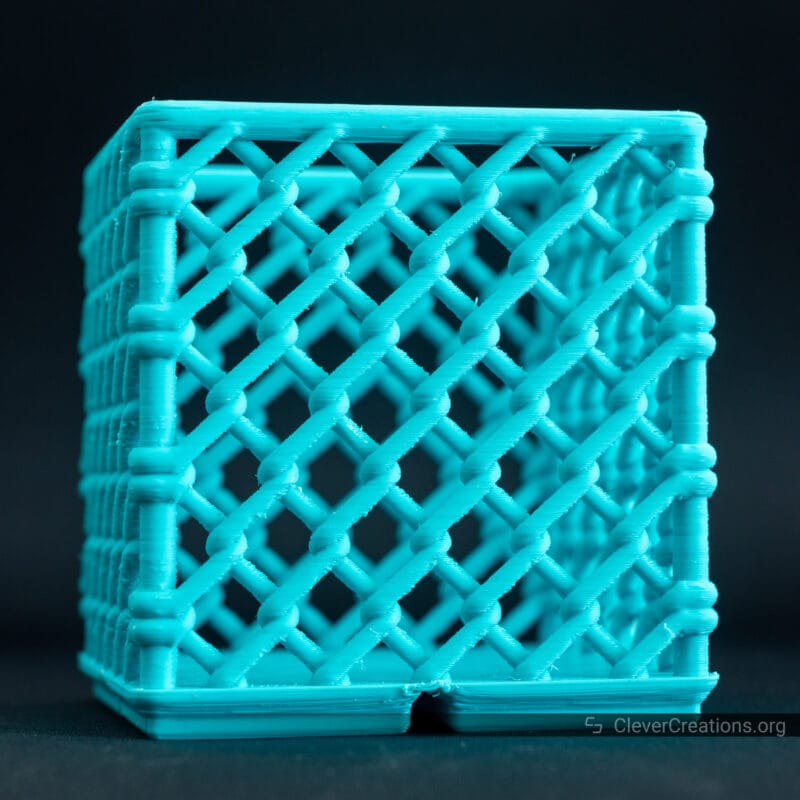
Coiled Rope Vase
To start, we tested this coiled rope vase in PLA. We are quite happy with its results. The overhangs came out nicely, partly due to the improved print cooling fan.


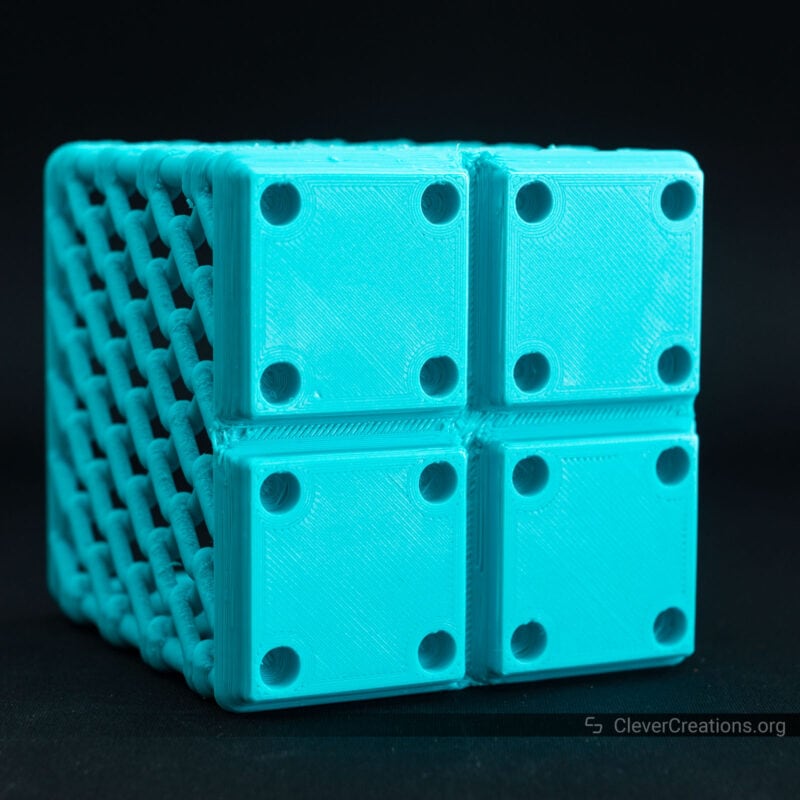
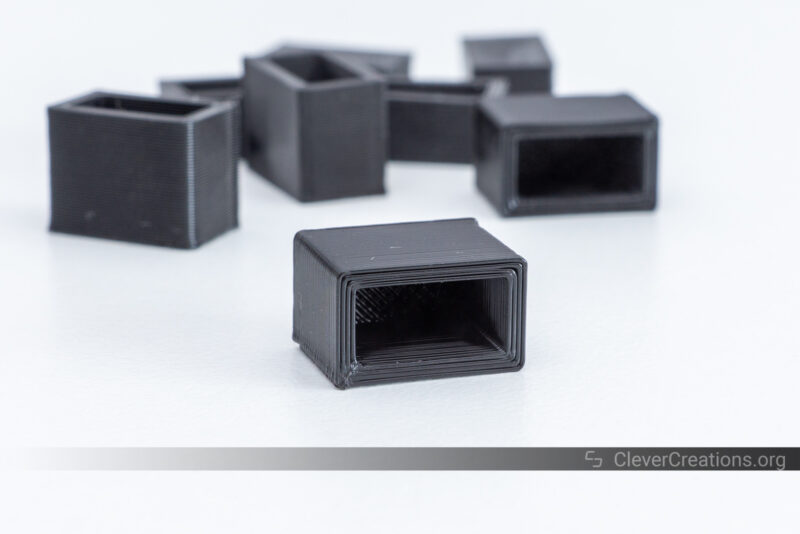
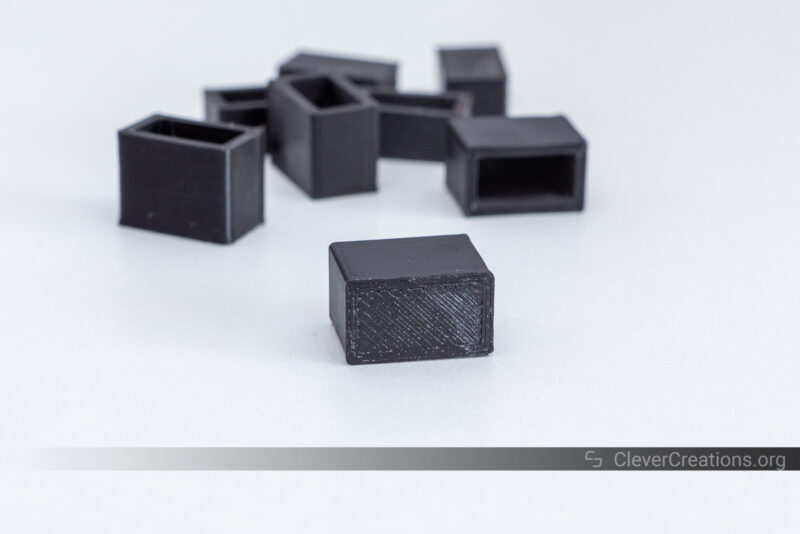
Desiccant Containers
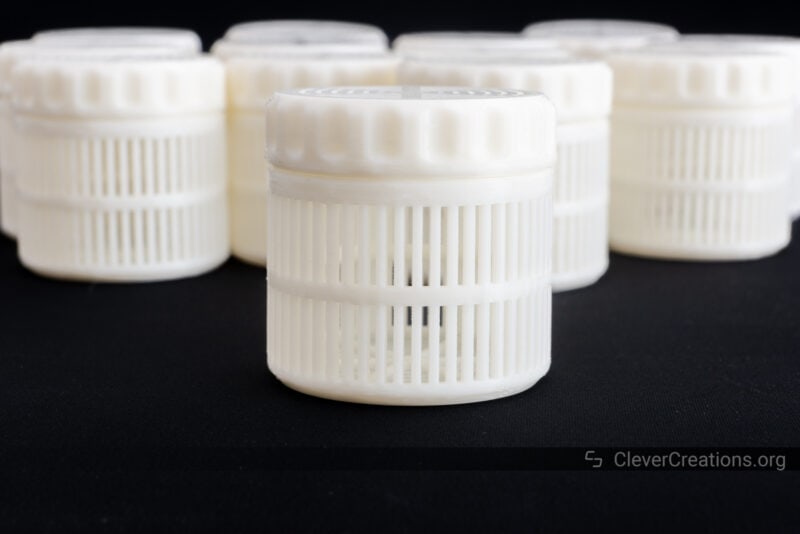
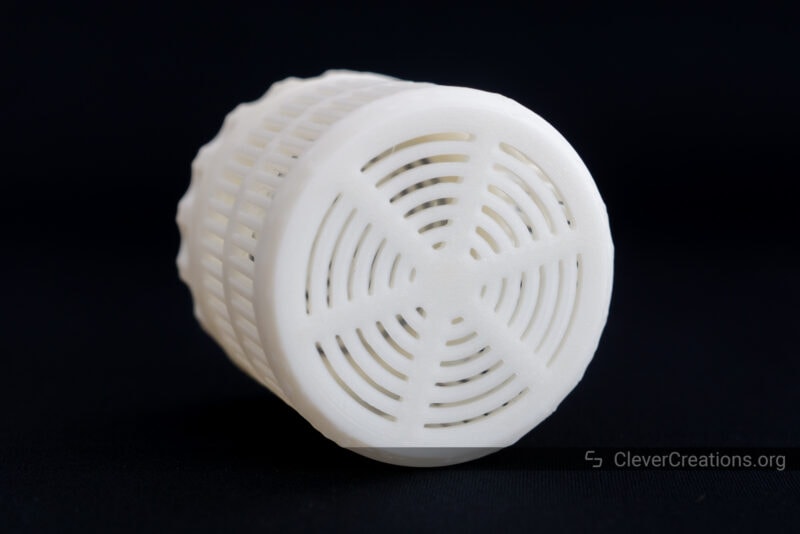
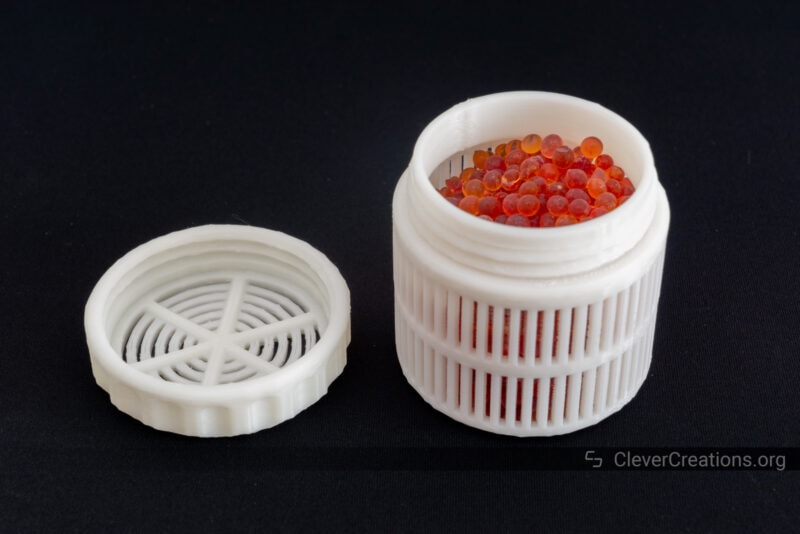
For a more intensive test, we filled the build plate with a collection of desiccant containers and lids, and let the printer do its thing for a couple of days. The small spokes on the containers took forever to print, but that was more the CR-M4’s problem to deal with than it was ours.
The containers and lids stuck well to the build plate over the entire area. It’s a good indicator that the CRTouch bed leveling sensor is working correctly.
The lack of stringing between the thin spokes is nice to see too. The Sprite extruder did not disappoint.
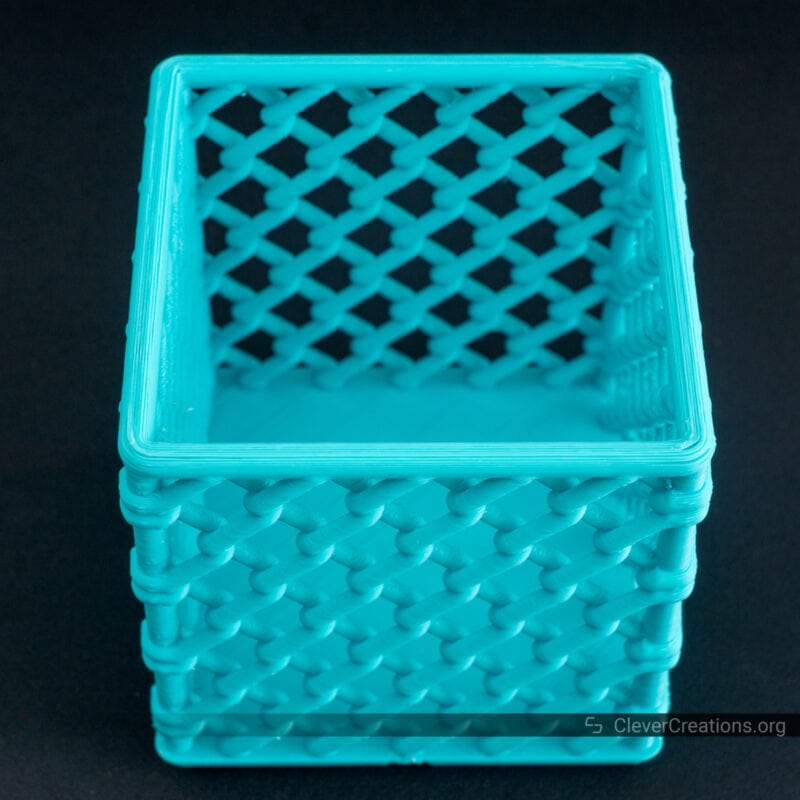
Chain Link Gridfinity Bin
This PETG Gridfinity print gave us more trouble. We think that’s more due to the specific filament and print settings than the CR-M4 3D printer.
On the initial layers, we had the print temperature set too high, leading to curling and poor-quality overhangs. Lowering the nozzle temperature improved things, especially in reducing PETG stringing around the chainlink section.
When reaching the top rim where the printer started printing fast again, the previously set temperature was too low to keep up with the increased flow rate. As you can see, the top layers are poorly melted and do not adhere well.
To solve this in the future, we’d either slice the print with different nozzle temperatures for the different sections or stick to a more consistent print speed for the entire print. Switching to a less temperature-picky filament would work too.
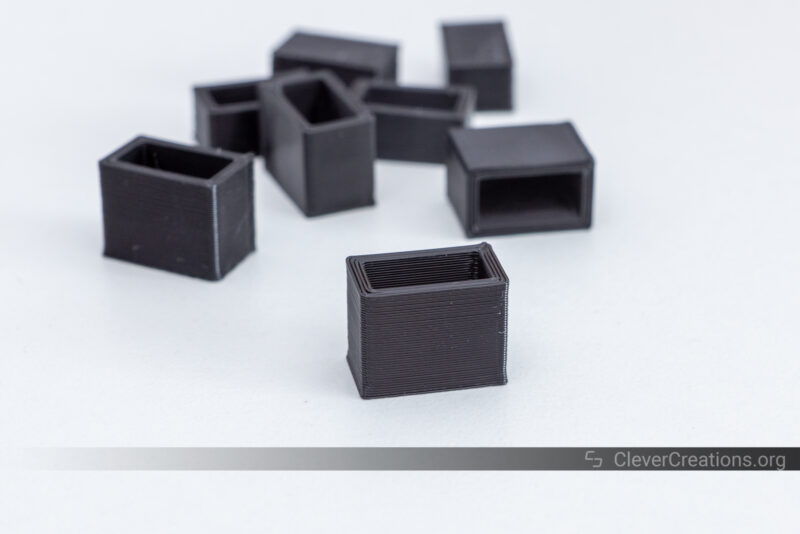
Rubber Feet
Even though the CR-M4 is designed for massive prints, we thought we’d test it with some small prints as well. If you want to batch print many small items at once, you might want to know how the 3D printer performs with those.
We needed a bunch of small feet for one of our custom projects, so decided to settle on a test case with flexible TPU filament.
The rubber feet themselves printed well, with only a small Z-seam and no stringing. The Sprite extruder is certainly capable of handling small details, even with flexible filaments.
What bothered us was the way the print surface adhered to the TPU. Even though the feet had a small surface area, they were particularly hard to get off. Because they were flexible, bending the print surface did not help at all to get the prints off.
After removing the feet (with a plastic scraper tool and elbow grease), we noticed that the feet left marks on the build plate. We’re not sure how this would affect the long-term print surface quality, but we would advise using a different build surface for flexible filaments.
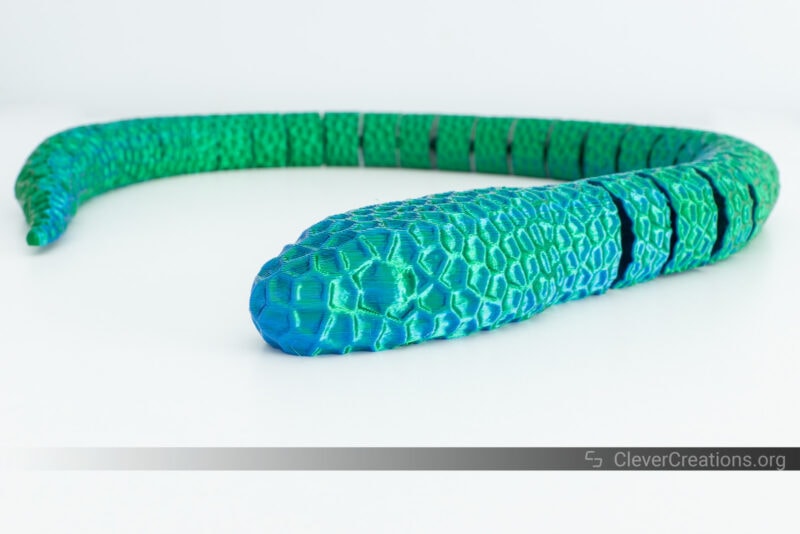
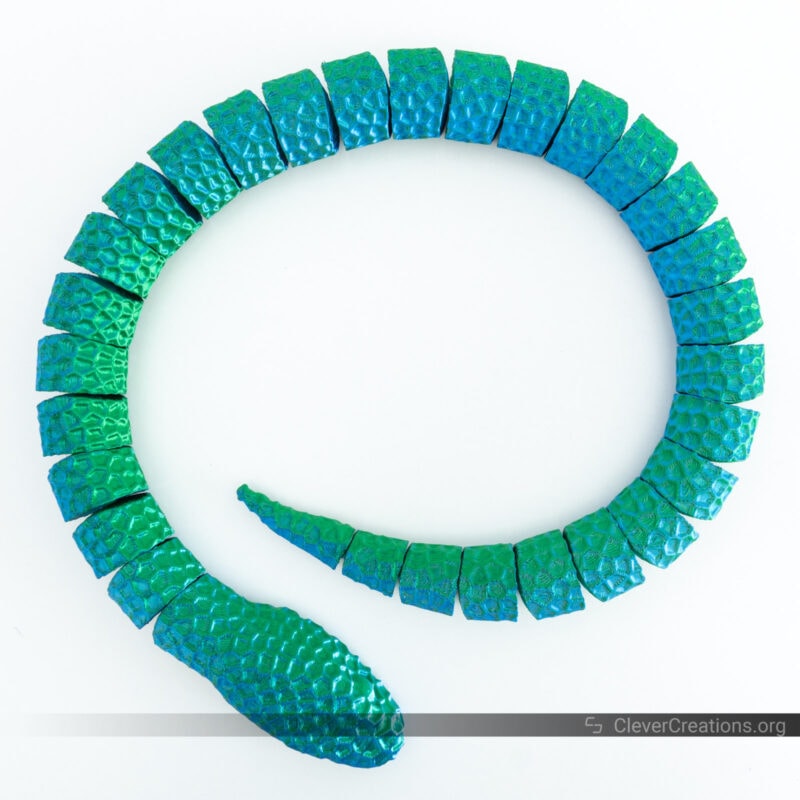
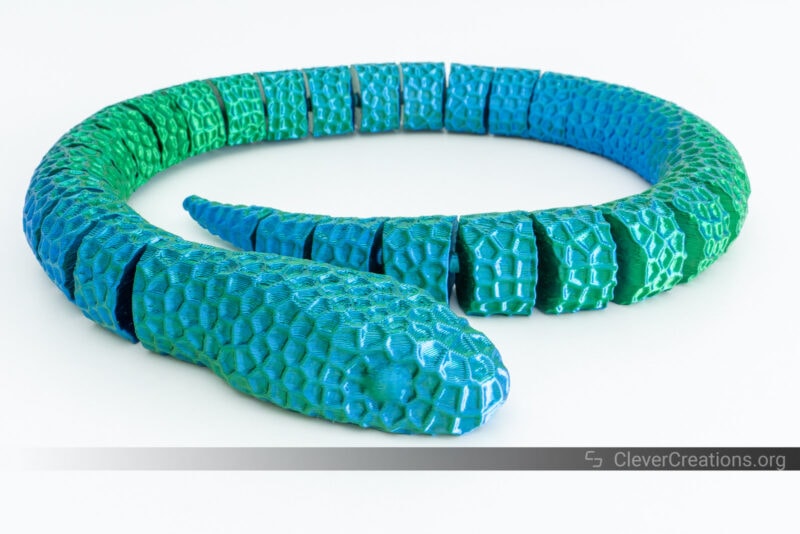
Articulating Snake
Back to a large print again, this multi-color articulating snake was our last test. It took a long time to print, but the CR-M4 kept its cool and finished it in one go.
Straight off the bed, some of the articulating segments were stuck together and needed force to come loose. We’re not sure if that’s because of the 3D model itself, the fact that we scaled it up, or because of dimensional accuracies from the print process.
Since the threads from the desiccant containers and lids from earlier fit nicely, we believe the dimensional accuracy is on point with this 3D printer, and it is one of the other two factors that caused this.
Altogether, we are happy with the results of the Creality CR-M4 3D printer. Without larger nozzles, however, printing larger items takes needlessly long.
Alternatives to the CR-M4 3D Printer
There are a couple of other large 3D printers that you can opt for instead of the Creality CR-M4. None of them comes close to the massive 450x450x470 build volume of the CR-M4, but they have strengths in other areas.
Creality CR-10 Smart Pro
The CR-10 Smart Pro is one of Creality’s other recent large 3D printers but with a wider feature set than the CR-M4. For example, it comes with a monitoring camera, a LED strip, and other things that improve user-friendliness.
With a 300x300x400 mm print area, it’s still considered a large 3D printer but doesn’t have close to the same volume as the CR-M4. At $300 less and with more features, it can be a better option for those who don’t need the absolute maximum in print area.
Anycubic Kobra Max
The Kobra Max is Anycubic’s current biggest 3D printer. With a 400x400x450 mm area, it’s nothing to scoff at. In terms of features, however, it falls short compared to the CR-M4.
For example, it uses a Bowden extruder instead of a direct drive, and the hot end is only capable of reaching 260 °C. While you can print faster with it, the Bowden extruder doesn’t offer you the same print quality and reliability as a direct drive.
It also lacks the onboard Wi-Fi module and other connectivity options of the CR-M4, and the general build quality is not as good.
At the end of the day, these are all details that can be overlooked if you are on a tight budget. Given that the Kobra Max costs half the price of the CR-M4, it can be a good alternative if you don’t mind the lower print and build quality.
MINGDA Magician Pro
The MINGA Magician Pro falls in the same category as the Kobra Max, in that it is a large 3D printer that comes in at half the price of the CR-M4. Unlike the Kobra Max, the Magician Pro has a direct drive extruder that lets you print more reliably and with better print quality.
Print cooling is also much better than on the CR-M4, as the printer comes with dual fans for more consistent cooling.
As far as the MINGDA brand goes, it isn’t that well-known or popular. So in terms of reliability and customer service, you may have to do some digging and find out what the general opinion is before investing.
Bottom Line: Who Should Get the Creality CR-M4?
The Creality CR-M4 3D printer is an excellent choice for anyone who wants a durable, large 3D printer that can output high-quality prints 24/7.
Aside from the fact that it is the biggest consumer 3D printer at the moment, the CR-M4 is designed to be reliable and has several features that let you keep it running with very little downtime.
It’s not particularly fast, and you’ll have to deal with some of the machine’s quirks to get the most out of it. For example, the 3D printer is loud, the print surface sticks too well to some filaments, and the stock spool holder is not capable of handling large spools.
The CR-M4 is also not cheap, but since there are no other competitors with consumer 3D printers with this build volume and focus on reliability, the price is justifiable if you need it.
We’d recommend this 3D printer to anyone running a print farm, who needs to print large parts regularly, or people that are serious about making money with their 3D printer. Most hobbyists and casual 3D printer users have better fitting options available.
In conclusion, the CR-M4 3D printer is not for everyone, but if you need its print volume and reliability, it’s the best choice on the market right now.

very deep informative report, thanks mate, now I searched many websites, only yours was having answers to my questions. CR-M4 is interesting printer, but might be scary as first choice for 3d print world
Hey Musac,
It’s definitely overkill as a first 3D printer. Unless you have a specific need for a large 3D printer, the Ender 3 S1 line will probably work better.