Setting up a Klipper webcam can be tricky at times. It’s common to face issues with the connection, or find that your camera is incompatible with your setup. You can also encounter problems when multiple cameras connected to the Pi don’t show up in Mainsail. Not to mention, the setup and configuration process itself is a challenge too.
This article is here to put an end to your webcam woes with Klipper firmware. We’ll guide you through every step needed to configure camera(s) in your system, from selecting the right model to configuring it for your 3D printer, including setting up the streaming protocols and more.
Let’s get ready to camify your Klipper printer!
Why Add a Webcam to Your Klipper Setup?
Integrating a webcam into your Klipper setup can provide invaluable benefits. Here’s why adding a webcam to your 3D printer is a wise choice:
Remote Monitoring
Whether you’re at work, running errands, or simply in another room, having the ability to remotely monitor your 3D prints can offer peace of mind. With an external camera connected to your Klipper setup, you can keep an eye on your prints from anywhere in the world with internet access.
Additionally, some software has AI failure detection features built-in. These apps use the webcam image to recognize print failure automatically and alert you in case anything goes wrong. They can help save your filament and printing time in case of print failures. Not to mention the other benefits of using Klipper on Android or on other mobile devices.
Time-Lapse Videos
Time-lapse videos of 3D prints are mesmerizing to look at. You get to see the hours-long process condensed to a few seconds or minutes. Additionally, these videos serve as a valuable tool for diagnosing the cause of print failures when you happen to run into them.
Klipper allows you to customize various video parameters, which can help you capture better time lapses. No matter if you use one or more USB webcams or a DSLR camera with your Klipper 3D printers, you can record your 3D printing time-lapses with ease before showcasing your work to your friends, colleagues, clients, or on social media.
Choosing the Best Webcam for Klipper
While Klipper can connect with a wide variety of webcams, some options offer better compatibility and ease of connection than others. Here are the two popular webcam options we recommend for Klipper based on our experience:
Webcams
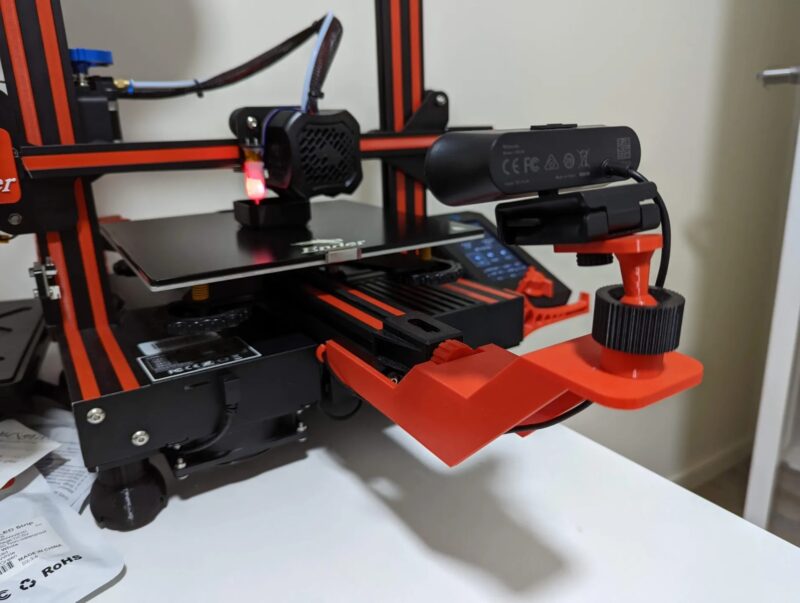
Logitech C270
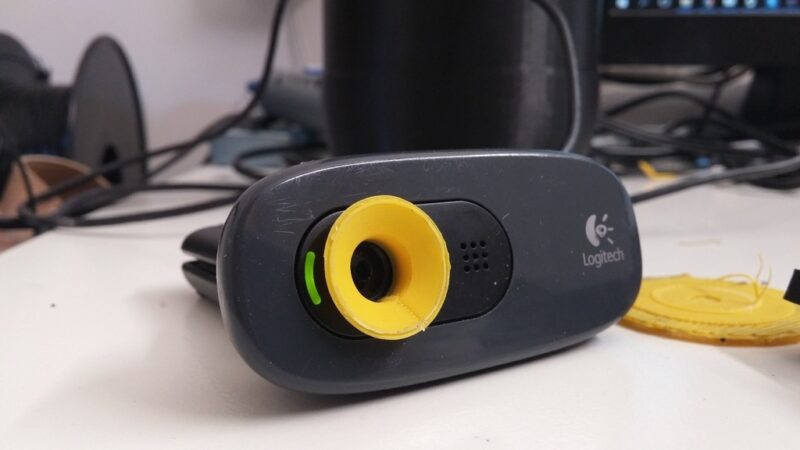
The Logitech C270 is a budget-friendly USB camera that’s easy on the wallet and outputs decent video quality. It has a maximum resolution of 720p and can shoot videos up to 30fps. The built-in microphone is good, and, needless to say, this USB webcam has good compatibility with Klipper firmware.
Logitech C920
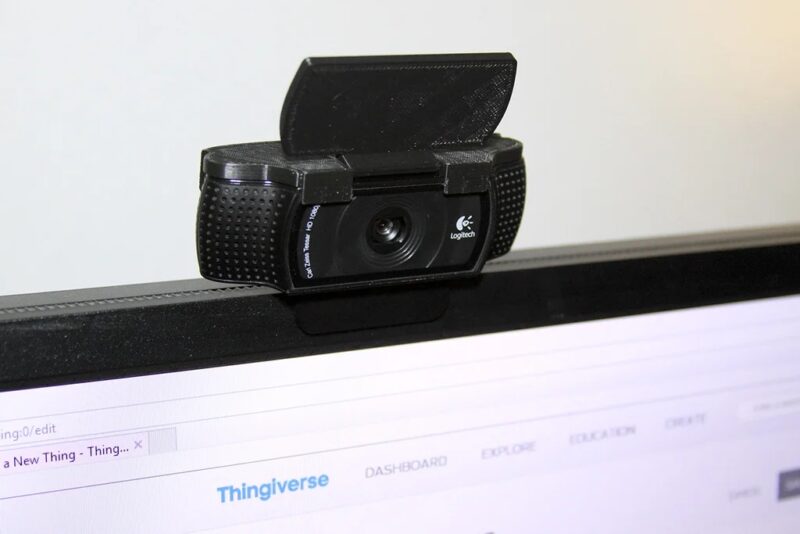
The second option we recommend is the Logitech C920. An excellent option for those high-quality video recordings you might have seen on your social feeds.
Using the C920 Pro, you can shoot videos up to a 1080p resolution at 30fps. It has a wider 78° field of view than the C270, which helps cover the entire print area when using a large 3D printer.
The C920 is a premium USB webcam and the better option if you want to share your videos on social media. It’s plug-and-play with Klipper and offers additional control options for fine-tuning its video quality.
Considerations
There are several key considerations you should look at when selecting a Klipper webcam. Here’s a closer look at some essential factors to keep in mind:
Resolution
The resolution of your USB webcam determines the clarity and detail of the images and videos it captures. The higher the resolution, the better the camera quality. However, higher-resolution cameras use up a lot of bandwidth and can strain the single-board computer you use to run Klipper, especially when you use multiple cameras.
Light Sensitivity
Opt for webcams equipped with advanced light correction technology, which can adjust to different lighting conditions. It allows you to maintain an optimal image quality even in poorly lit spaces. Alternatively, you can add LEDs to your Klipper printer.
Field of View
Field of View (FOV) determines the total extent of the scene captured in each frame. A wider FOV allows the camera to cover more print area in a single frame. This can mean the difference between being able to mount your webcam inside the 3D printer versus outside of it.
Compatibility
Ensure that the webcam you choose is compatible with Klipper and supported by the Crowsnest plugin. Most Logitech USB webcams work easily with Klipper and a Raspberry Pi board. The Octoprint forum has a list of supported USB webcams known to work with Octoprint. It is safe to assume that these webcams will work with Klipper without issues.

Step-by-Step Guide to Installing a Webcam in Klipper
The process of setting up a webcam on a Klipper 3D printer has become easier over time, but it still requires instructions. In the steps below, we’ll go over the detailed process of installing a Klipper webcam using the Crowsnest service on the Mainsail interface.
Installing Crowsnest

Typically, Crowsnest comes pre-installed with a Klipper installation. However, if for any reason you don’t have this webcam service installed on your Klipper instance, you can easily install it using the KIAUH tool by following these steps:
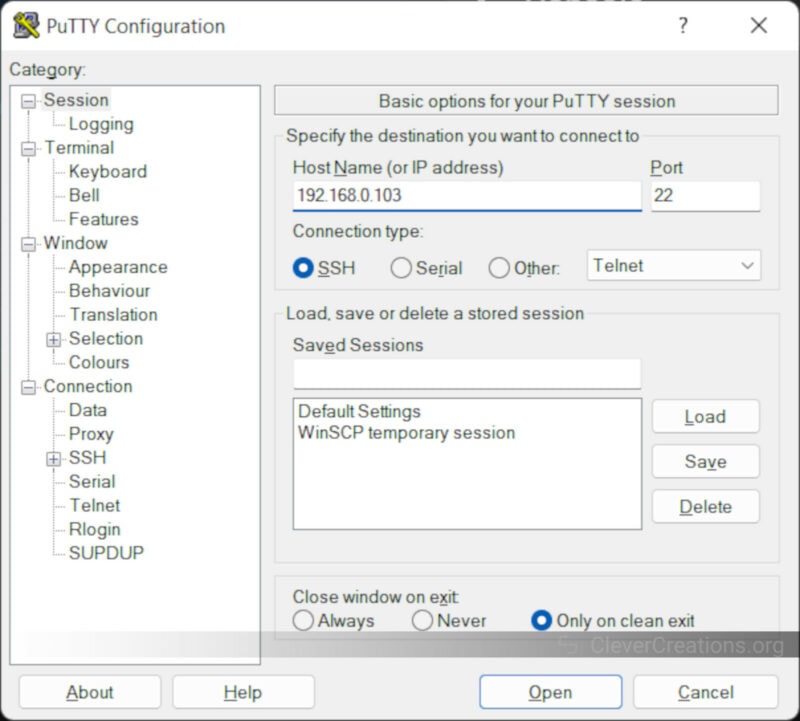
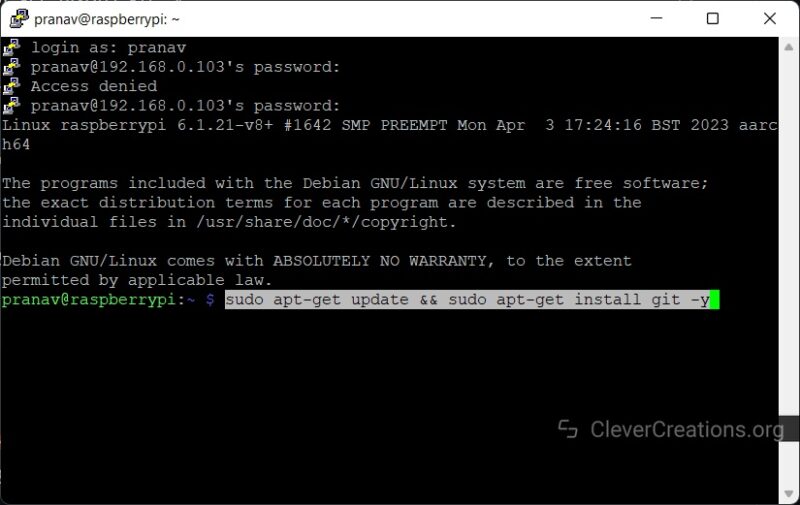
- Connect wirelessly to your Raspberry Pi using the SSH method and PuTTY tool.

- Install git on your Raspberry Pi with the following command –
sudo apt-get update && sudo apt-get install git -y
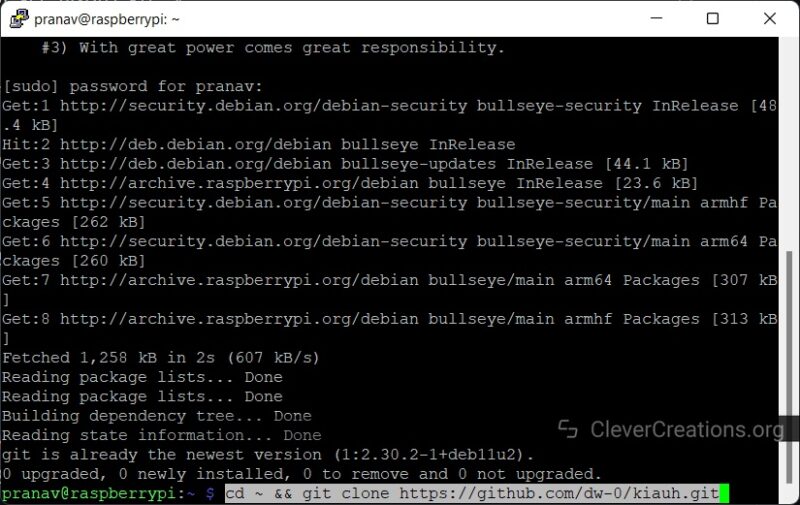
- Clone the Github’s KIAUH directory on your Pi with –
cd ~ && git clone https://github.com/th33xitus/kiauh.git - Once the cloning and installation process is completed, you’ll get a success message.
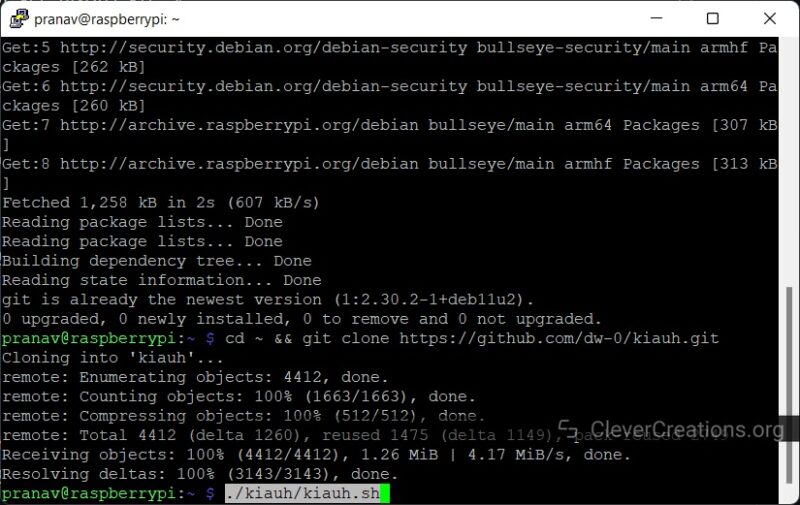
- Launch the KIAUH script by entering the following command-
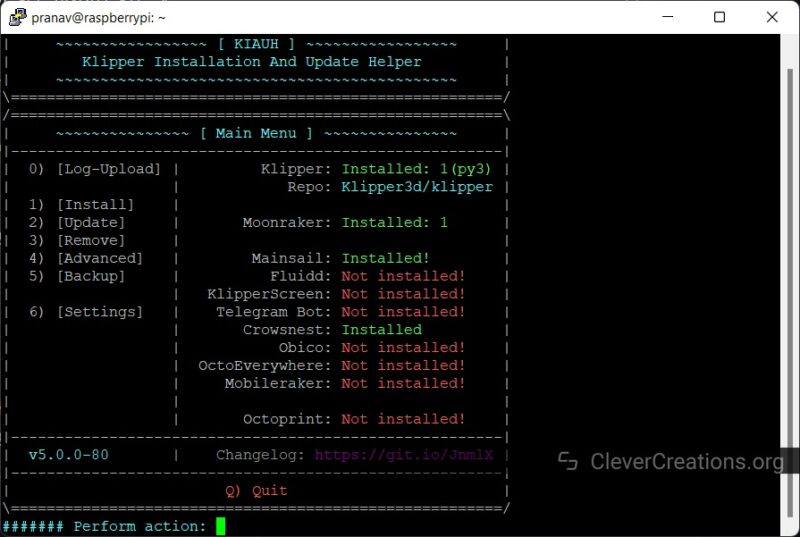
./kiauh/kiauh.sh - You’ll notice on the main dashboard a list of software on your Klipper instance. If you have Crowsnest installed, it’ll be marked in green.

- You can skip this step and move on to the next if you have Crowsnest installed.
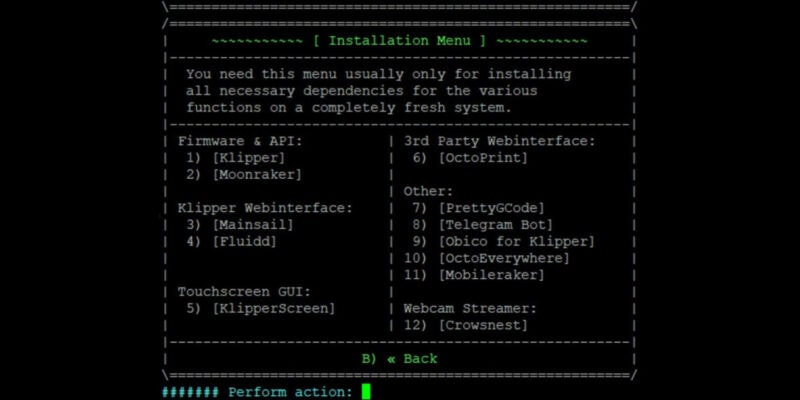
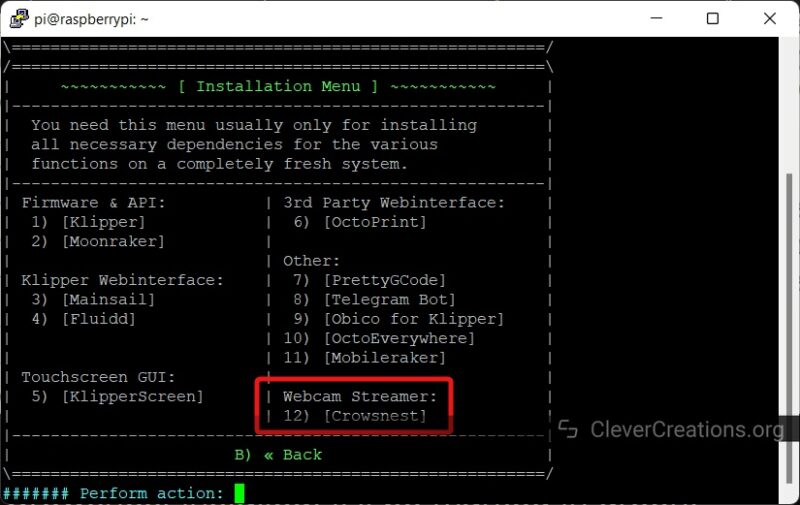
- In case you see “Not Installed” written beside Crowsnest, enter the Installation menu. Type 1 and Press Enter.
- In the installation menu, Crowsnest will be number 12 under the Webcam Streamer section. Type in 12 to begin the installation process.
- After the installation is completed, you’ll get a successful installation message. At this point, you can connect your webcam to the Raspberry Pi or Klipper pad.
Now that Klipper has a webcam streaming service installed, it’s capable of recognizing the webcam and outputting its video feed. Next, you need to configure the webcam settings in Klipper so that it shows the video stream in your Mainsail web interface.
Configuring the Webcam in Mainsail
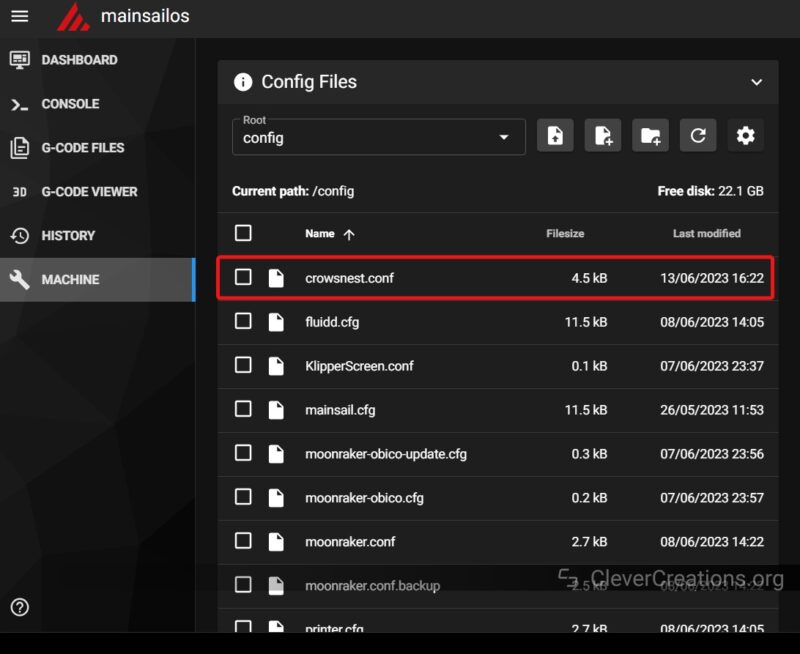
All webcam configurations are stored in the crowsnest.conf file. If you only use a single Klipper webcam, there’s no need to access it now. The only thing we need to do is tell Mainsail to show the webcam stream on its dashboard.
- Click on the Gear icon (settings menu) in the toolbar at the top.

- Scroll down in the menu and click on the Webcams option. Select Add Webcam.
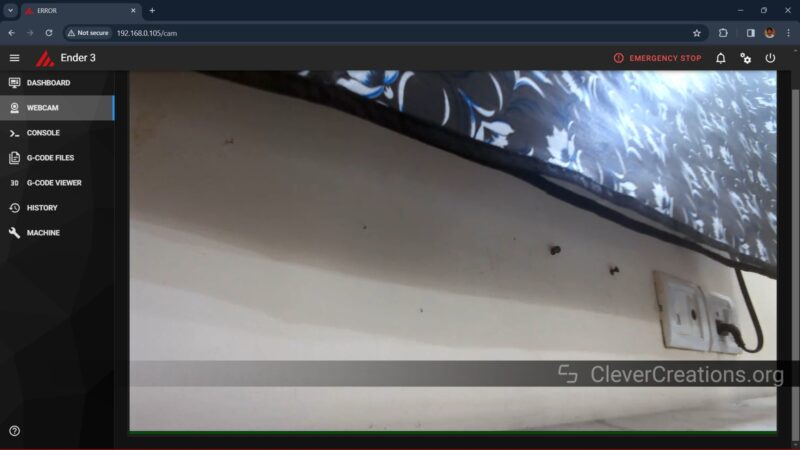
- If you have the webcam connected, the video stream should show up by default in the small preview window.
- Give your webcam a suitable name.
- If you are an advanced user, you can change the webcam service. If you don’t know what this means, leave it as it is.
- You can flip and rotate the webcam video to match your preferences.
- Once you’re content with the settings, click Save Webcam.
- In the left navigation panel, you should now be able to see a separate webcam section.
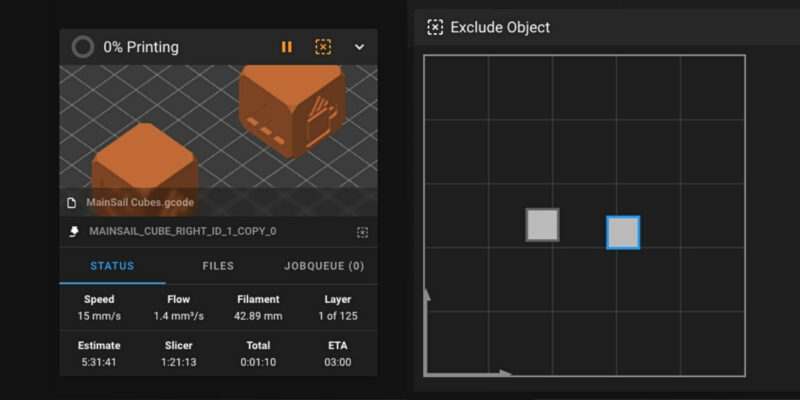
- Click on it to get the live video stream from your webcam. Additionally, the webcam stream will be visible in a separate Dashboard tab.
That’s it! You’ve now successfully added a webcam to your Klipper firmware using the Crowsnest service. If the video quality and webcam stream look right, you can leave everything as it is. However, if you want to add more webcams or fine-tune your video settings, check out the next section.
Advanced Configuration: Setting Up Multiple Cameras and Adjusting Camera Parameters
This section is specifically for users who want to add multiple cameras to their Klipper setup or need more control over the video quality. We’ll break this section into two parts. The first part will guide you through setting up multiple cams, and the second portion will explain all about adjusting the different camera parameters.
Setting Multiple Webcams in Klipper
By default, Mainsail has four camera ports mapped to separate URLs. While Klipper will recognize a second webcam as soon as you connect it to the Pi, it won’t necessarily show its video feed. Follow the below steps to set up multiple webcams (and their webcam settings) in Klipper.
Configuring the Crowsnest Settings
- Connect the second webcam to the Raspberry Pi.
- Open the crowsnest.conf file by clicking on the machine settings tab in the left navigation panel.

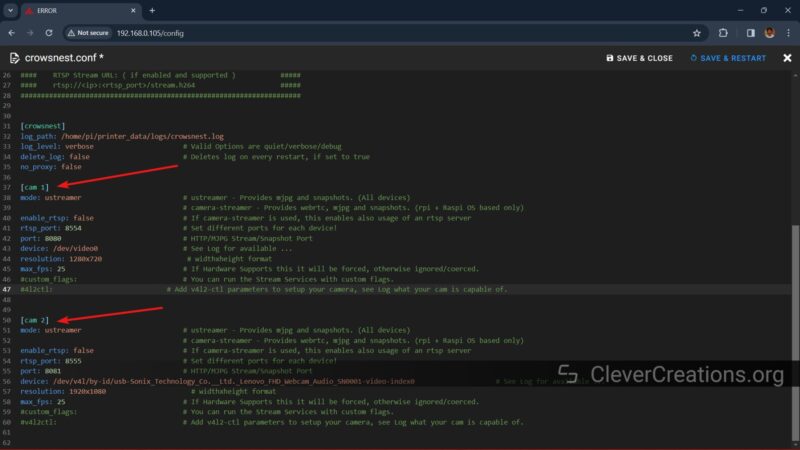
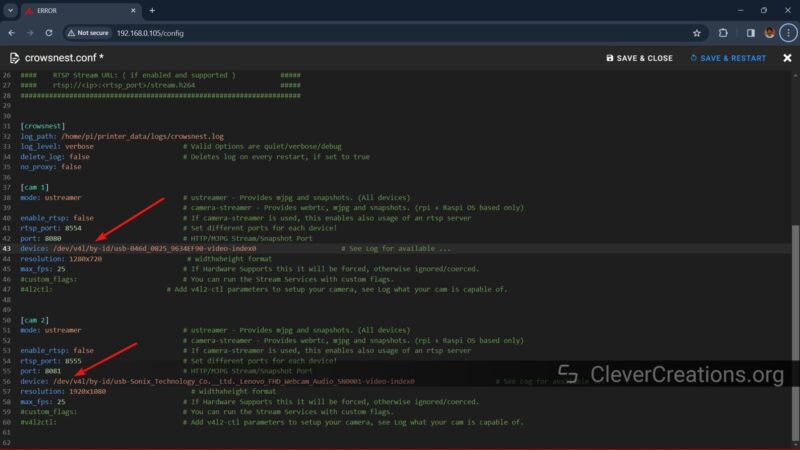
- You’ll notice there’s a section named [cam 1]. This section stores all the relevant settings for your primary webcam.
- Copy the entire section and rename it as [cam 2]. Change the port ID to 8081.
- If you’re adding a third camera, add another section as [cam 3] and change the port ID to 8082. For the fourth camera, the section should be [cam 4] and port ID 8083.
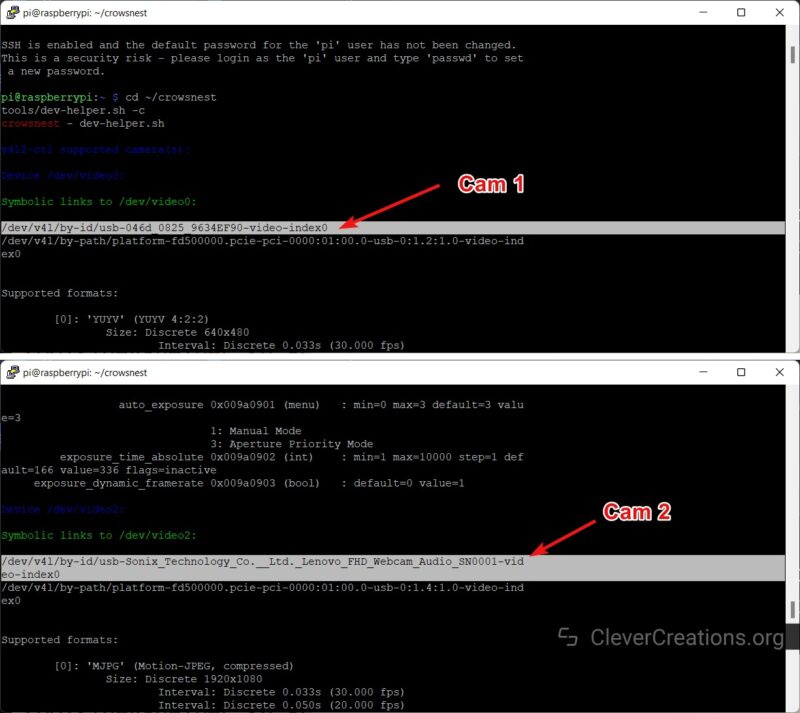
- We need to set the device ID now. SSH to your Pi with the PuTTY tool and enter the following command:
cd ~/crowsnest tools/dev-helper.sh -c - The above command will give you a list of all the connected webcams to the Pi. The first immediate device will be your primary webcam. You can skip this. Scroll below to find /dev/video2 and other green links.
- The devices will show up in green with their IDs mentioned just below. We need to copy the by-id line. Refer to the image below and the highlighted section.

- Paste the copied by-id line in the device line in the [cam 2] section.
- Repeat this step for the third and fourth cameras in their respective sections.
- Save and restart the crowsnest.conf file.
Adding the Second Webcam in Mainsail
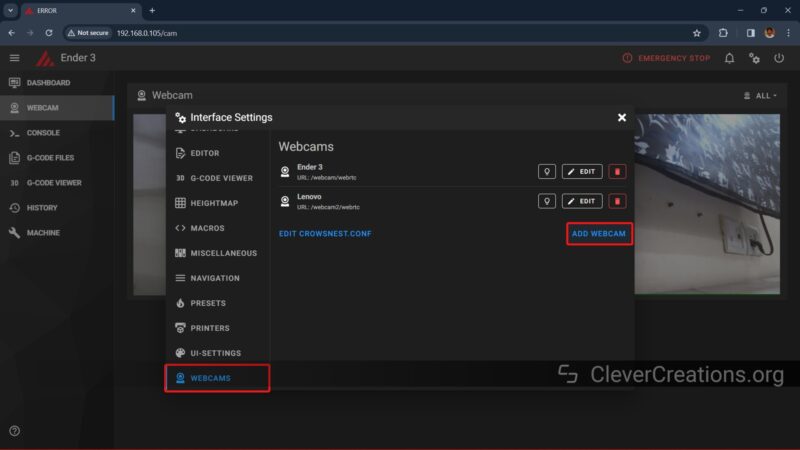
- Open Mainsail settings by clicking on the gear icon in the top toolbar.
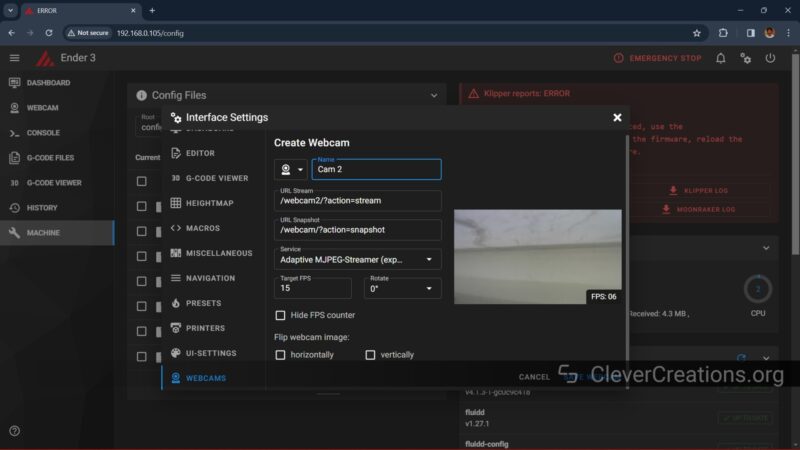
- Go to the Webcam section and click on Add a webcam.
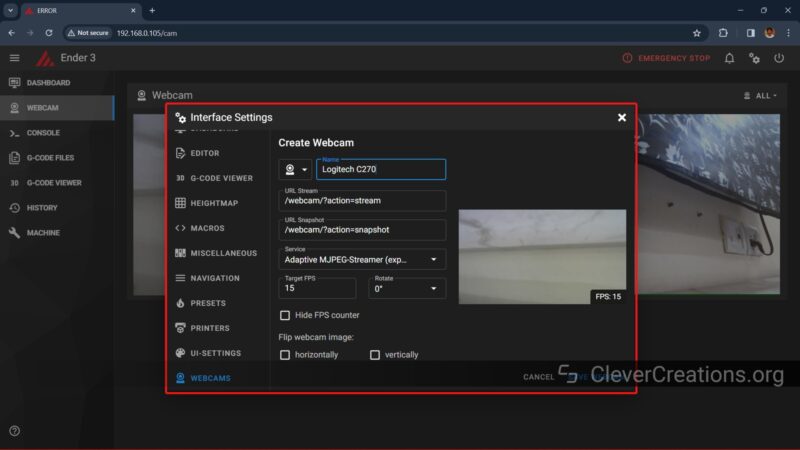
- Give the camera a name.
- Change the URL stream to /webcam2/?action=stream for the second camera.
- Change the URL snapshot to /webcam2/?action=snapshot
- For the third and fourth cameras, change the numbering in the above sections to 3 and 4, respectively. For example, the URL stream will look like /webcam3/?action=stream and /webcam4/?action=stream. The same goes for the URL snapshot.
- You should now see a small video stream from your second camera in the preview window.
- Set the FPS settings and rotate and flip the camera as per your preferences.
- Click on Save Webcam and close the menu.
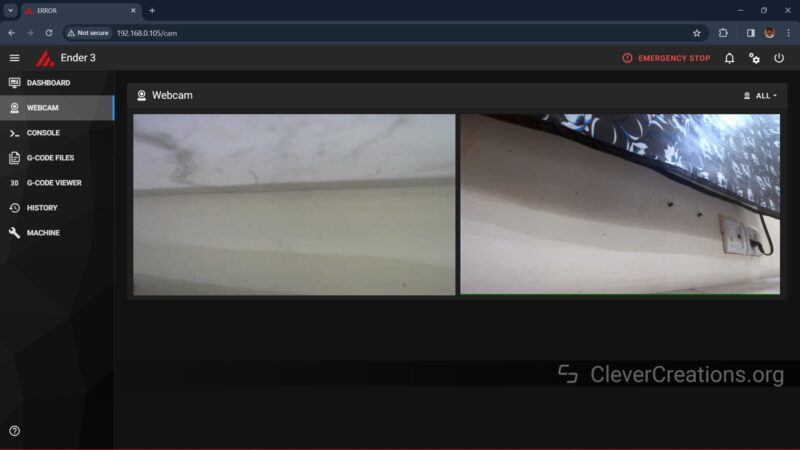
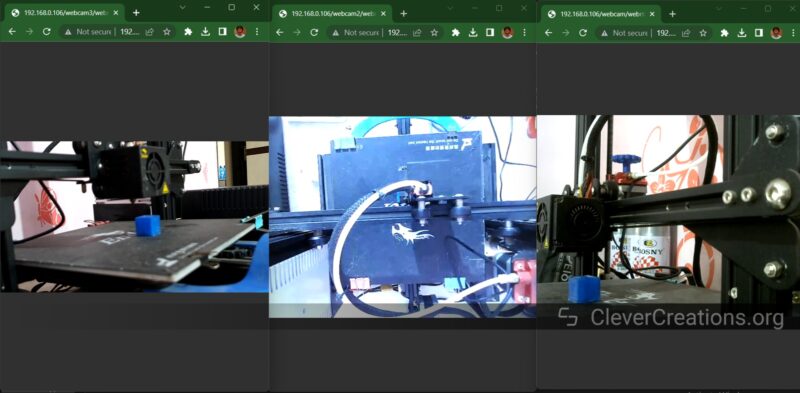
- Open the Webcam section from the left navigation panel. You should see two webcam streams side-by-side.

That’s it! Using this multi-cam setup, you can monitor your prints from various perspectives and get a good look at the printing process. Multi-angles or combining a nozzle cam with a wide view camera, it’s all possible!
Adjusting Camera Parameters in Klipper
There are two advanced camera settings you can adjust in Klipper that may affect your video stream. First is the video streaming mode/service, and second one is setting the camera parameters using Crowsnest. Let’s look at both of these options in detail.
Video Mode
In the crowsnest.conf file, under the [cam x] section, you’ll notice the first line is for adjusting the camera mode. The default option is set as ustreamer. This mode allows you to stream mjpeg and snapshots from your webcam without using too much of the Raspberry Pi’s (or other SBC) resources.
Ustreamer works with boards other than a Pi and supports high-quality video streaming with ease. The drawback, however, is there’s some latency in the output video. It’s challenging to get a real-time view of your printing process, especially with a higher resolution video stream.
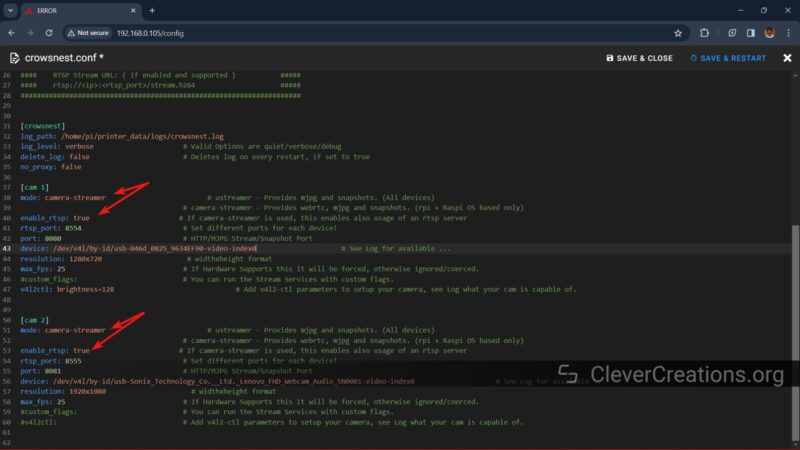
To solve the latency issue, Crowsnest has a second camera mode: camera streamer. Using this mode, you can stream a high-quality video from your Raspberry Pi camera module or a USB webcam with the lowest possible latency. When we tested it with Raspberry Pi cameras and Logitech and Lenovo webcams it worked flawlessly.
This high-quality video comes in handy for recording exceptional time-lapse videos with minimal strain on the Pi. Especially with remote 3D printing apps, like when you use Klipper on an Android phone, you’re able to get a crisp and clear video stream of your 3D prints in real time, allowing for a better remote 3D printing experience.
To view the above camera feed, edit the [cam] section in your crowsnest.conf file to look like the image below. Remember, the device ID will be different for each user based on their webcam.
Next, go over to the webcam configuration in Mainsail and edit the camera URL Stream to the following settings:

Crowsnest supports various camera-streaming services, each with its own unique benefits. You can refer to the Mainsail Docs to understand the different streaming services briefly. For a more detailed explanation, here’s an excellent article by getstream.io. It delves into the differences between each camera-streaming service.
That’s about it for the video mode configuration. Try it for yourself and see the difference in camera quality between the two modes.
Setting Camera Parameters in Crowsnest
If the video quality is not up to the mark, you can adjust the camera settings in Crowsnest. Crowsnest allows you to change various camera parameters like focus settings, brightness, gain, exposure control, sharpness, and more. Getting these settings dialed in can be quite a task, but if you want the absolute best video quality, the effort can be worth it.
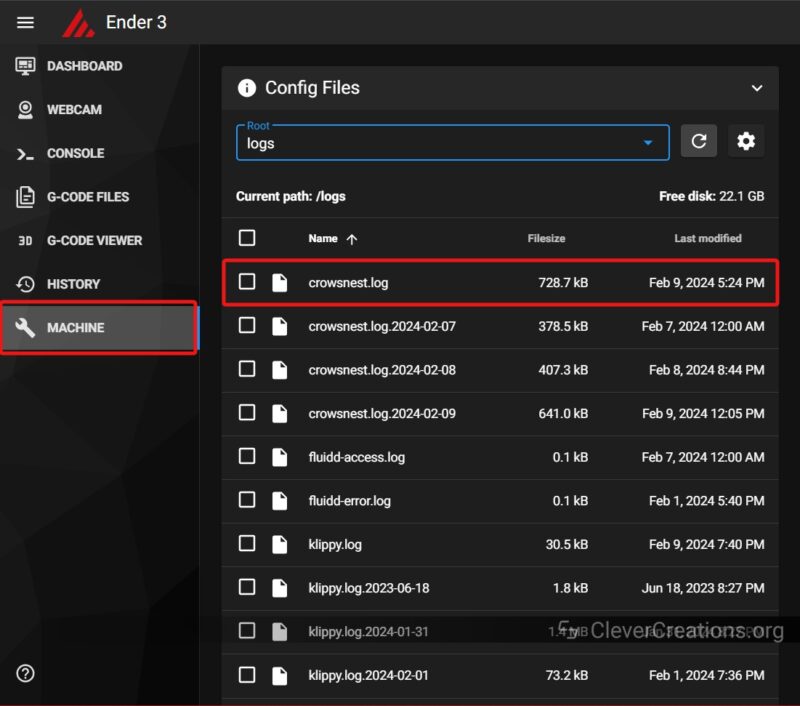
- Open crowsnest.log by going into the Mainsail’s log folder.

- Search for the connected webcam by using the term “by-id .”You’ll see your webcams listed in the log file. You can use this step to find the webcam ID we entered previously while setting up the webcam.
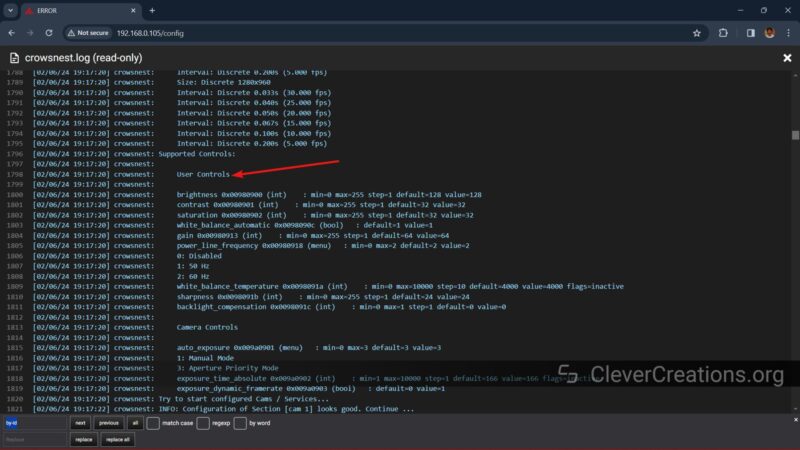
- Below these camera IDs, you’ll find the various resolution and FPS settings that your webcam can support. You can use this information to set the camera resolution and FPS in Mainsail.
- Below that, you’ll find a section on User controls. This section indicates all the settings that you can modify for your webcam. Make a note of these settings or copy-paste them somewhere.
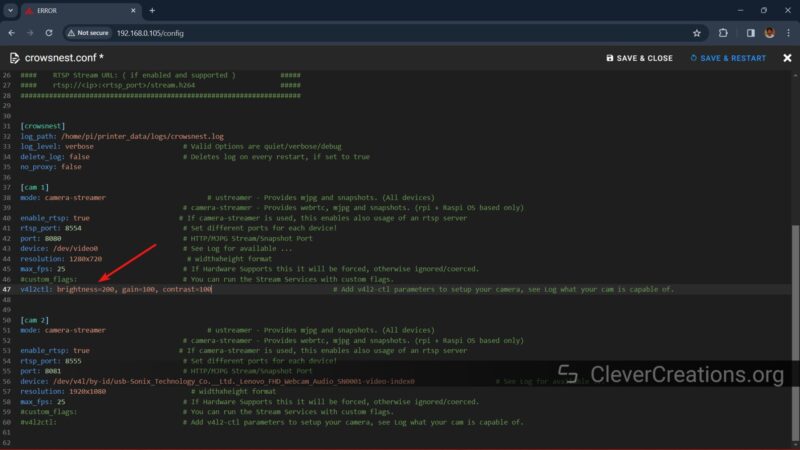
- Open the crowsnest.conf file and go to the [cam] section.
- Remove the hash symbol to uncomment the last line – v4l2ctl:
- Type in the brightness=200, gain=100, contrast=100… The log file gives you a range of settings that you can input in this line.
- Save the file and restart Klipper. You’ll notice the webcam quality is altered as per your settings.
- If you have multiple webcams, repeat the same procedure for each of them. You can find out their respective supported settings and configure their individual cam sections in the configuration file.
You might have to try out various values for each setting until you get the ideal results, so it may take a while to get the video quality on point. With enough patience, however, you can acquire the best video quality for your remote monitoring and time-lapse needs.
Conclusion: Is the Klipper Webcam Setup Worth It?
Integrating a webcam into your Klipper setup is not as difficult as you think. Additionally, it gives you a range of benefits, from live remote monitoring to capturing time-lapse videos and even automatically detecting print failures.
In most cases, if you’re using a single webcam with Crowsnest, it’s almost a plug-and-play setup. You need to connect the webcam to the Pi and add it to your Mainsail instance from its settings. This is enough for most users with basic monitoring needs.
For advanced users, Crowsnest and Klipper let you configure multiple webcams and adjust their settings to the pixel. You can fine-tune the video quality, streaming settings, and more using the Crowsnest service.
We believe this guide serves as a one-stop solution for your Klipper camera requirements. We’ve tried to cover almost everything there is to know about setting up a webcam in Klipper. Still, if you have any questions or run into any issues during the setup process, feel free to reach out. We’d be glad to help you out!