
One of the most underrated features of the Klipper firmware is its Macros. It’s one of those features that probably won’t use right away. But once you understand it and get the hang of it, you won’t get enough of automating your tasks with them.
Klipper makes using these 3D printing Macros extremely easy. You can find loads of pre-configured Macros online or even create one in a few steps.
In this article, we’ll explore the relatively unknown world of Klipper Macros. This article will walk you through the entire concept and give you the tools to stop wasting your time on the boring aspects of 3D printing.
Let’s automate your printing!
What are G-code Macros in Klipper?
Gcode macros in Klipper are custom commands that help you automate specific tasks on your 3D printer. They are a series of predefined Gcodes bundled together to perform any 3D printing operation at the click of a button.
Suppose you want to heat the print bed and the nozzle to a specific temperature and level the print bed before your print begins. Now, you can manually do each step from your printer’s control window.
But imagine doing that for EVERY print! It quickly gets repetitive, tedious, and time-consuming. Not to mention, if you run a 3D printing business or a print farm, you want to save as much time (i.e. money) as possible.
Instead, you can create a Macro (a custom button) in Klipper that consists of all the Gcode commands necessary to heat the nozzle and print bed, and level it the latter as well. Now, every time you begin printing, you can simply click this macro, and your printer will do all the tasks on its own.
In essence, a Macro is designed to automate 3D printing tasks such that they’re more accessible and user-friendly. Macros help you streamline your 3D printing workflow and utilize your time more effectively.
Reasons For (and Against) Using Klipper Macros
When it comes to using Klipper Macros, it’s worth considering its advantages and disadvantages. This will help you make an informed decision about whether or not they are right for you.
Let’s look at some of the reasons that might make you embrace the use of Klipper’s Macros, and a few that might make you think twice.
Benefits
Increased Efficiency
Macros streamline repetitive tasks and reduce the constant manual intervention that you’d need to do otherwise. Instead of going through multiple steps, you press one button and therefore make much better use of your time.
Consider the above example of preparing the 3D printer for printing. Instead of manually setting the temperatures and initiating the bed leveling process EVERY TIME, you create a Macro ONCE. This saves you a lot of time, which you can devote to other useful activities.
Error Reduction
Because macros remove the need to manually type in commands, they reduce the chances of mistakes. Not only does this create a safer 3D printing process, but it also decreases the likelihood of print failures.
For instance, if you set an incorrect print temperature or forget to home the axes before bed leveling, things can go wrong and you can potentially damage your printer. However, using a Macro prevents these mistakes from showing up. Your 3D printer will always perform the tasks in the correct order and with the right parameters.
Customization
The most important benefit of Macros is that you can customize them to your liking. With adequate knowledge, skill, and experience, you can create custom macros that execute a particular task—or combination of tasks—that is important to your workflow.
For example, if you have a habit of 3D printing models with a small surface area, there’s no need to probe the entire print bed for each of these prints. Instead, it is enough to probe only a portion of the print bed to cut down on leveling time.
It’s precisely what the Print Area macro by ChipCE is designed for. It probes only the print area of the 3D model(s) on the bed and significantly reduces print preparation time. Similarly, you can create customized macros for practically any other operation.
Drawbacks
Learning Curve
There’s a learning curve to creating and using Macros in Klipper. You need to understand the basics of programming and also have knowledge of how G-code commands work. When starting out, it will be challenging to understand the syntax and workings of a Klipper macro.
Potential Errors
Macros are a collection of G-codes. Just as with any code, if you make a mistake somewhere, errors are bound to appear. In the case of Klipper macros, too, incorrectly written code can cause printing issues.
For example, setting the wrong nozzle temperature or configuring the wrong start and end point for leveling are going to give you undesired results. Therefore, it’s crucial that you thoroughly test every macro before you implement it in your workflow.
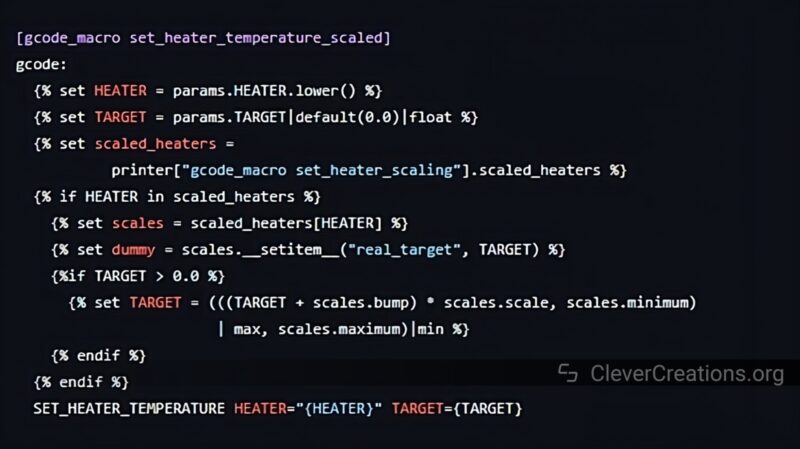
Macro Structure
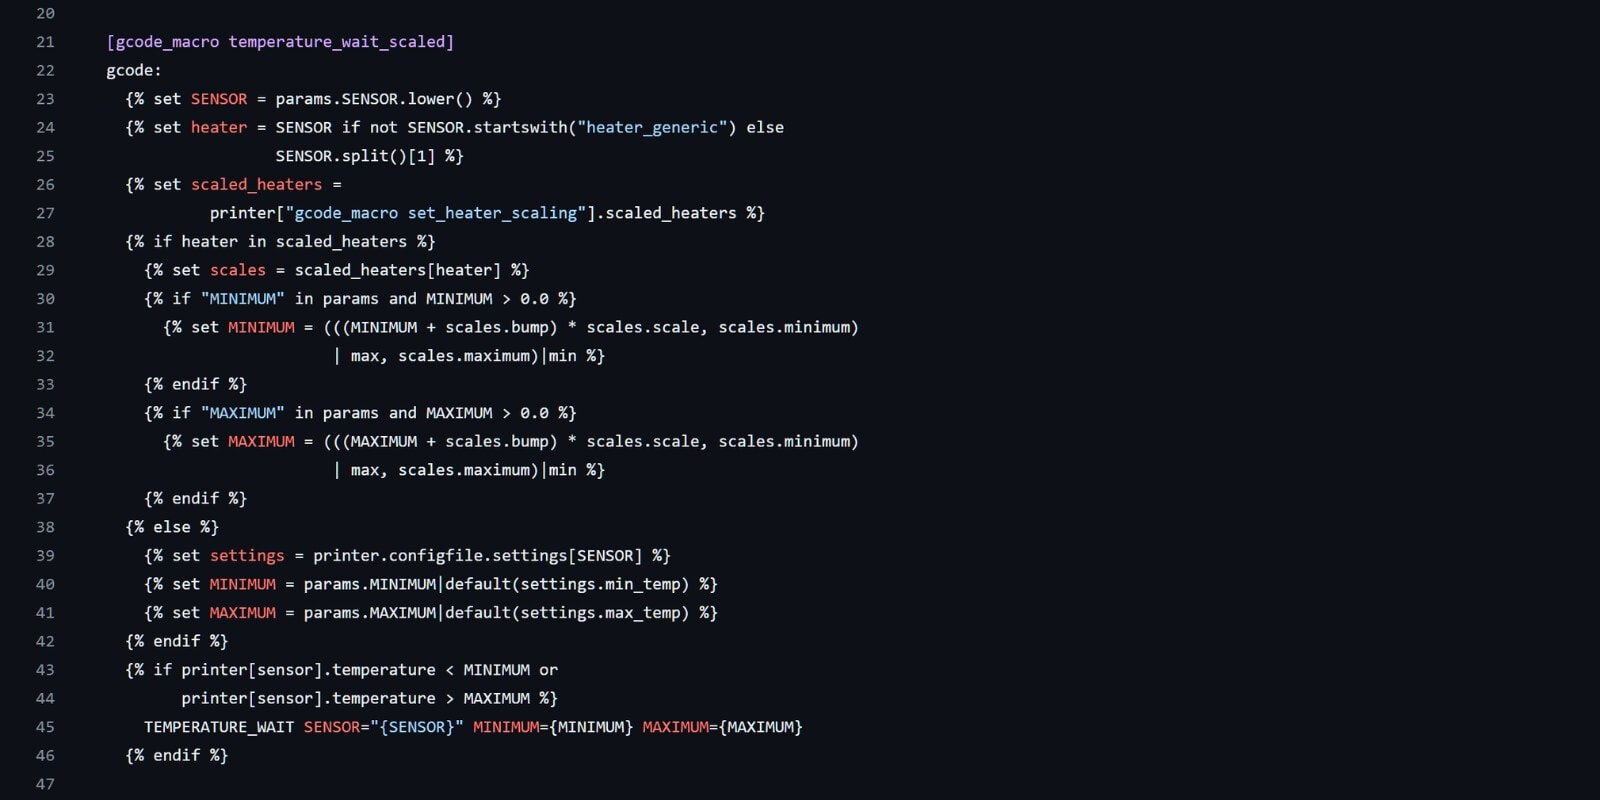
Macros are written in a simple text file format consisting of G-code commands. Each line represents a specific command or action, ensuring that the printer interprets and executes the macro accurately.
Let’s take an example of preheating the print bed and the nozzle for printing with PLA filament.
[gcode_macro PREHEAT_PLA]
  {% set EXTRUDER_TEMP = params.EXTRUDER_TEMP|default(150)|float %}
  {% set BED_TEMP = params.BED_TEMP|default(60)|float %}
  SET_HEATER_TEMPERATURE HEATER=extruder TARGET={EXTRUDER_TEMP}
SET_HEATER_TEMPERATURE HEATER=heater_bed TARGET={BED_TEMP} - [gcode_macro PREHEAT_PLA]
This line defines the macro with the name “PREHEAT_PLA”. When you want to preheat the printer for PLA, you’ll click on the PREHEAT PLA button on the Klipper interface.
- {% set EXTRUDER_TEMP = params.EXTRUDER_TEMP|default(150)|float %}
This command sets the extruder temperature to a predefined value that’s stored in Klipper. If you don’t provide a target temperature, it sets the default value to 150°C. The float filter at the end ensures the value is treated as a floating-point number (a positive or negative number with a decimal point).
- {% set BED_TEMP = params.BED_TEMP|default(60)|float %}
Similar to the extruder temperature, this line sets the bed temperature to a predefined value. If there’s no value set, it defaults to 60 °C.
- SET_HEATER_TEMPERATURE HEATER=extruder TARGET={EXTRUDER_TEMP}
This line uses the SET_HEATER_TEMPERATURE command to set the temperature of the extruder heater. The EXTRUDER_TEMP variable that we’ve previously defined specifies the target temperature. The HEATER=extruder part indicates that the command is used for the extruder heater.
- SET_HEATER_TEMPERATURE HEATER=heater_bed TARGET={BED_TEMP}
This line sets the temperature of the heated bed using the SET_HEATER_TEMPERATURE command. The BED_TEMP value that we’ve set earlier specifies the temperature. The HEATER=heater_bed part indicates that the command applies to the heated print bed.
In summary, this macro allows you to customize the preheating temperatures for your hot end and the print bed. If you do not provide specific temperatures, the macro will use the default parameters.
To adjust the preheating temperatures, you can modify the variables EXTRUDER_TEMP and BED_TEMP based on the requirements of your specific PLA filament. Of course, you can make Klipper macros to preheat for any other 3D printing material as well.
The above is just one example of many macros that you can use in Klipper. However, you don’t need to write them all from scratch. Instead, you can import pre-made macros as well. In the next section, we’ll be taking a look at exactly how you can do that!
How To Add a Gcode Macro to Klipper
To add a G-code Macro in Klipper, you can either manually add macros to your Klipper 3D printers or load predefined macros.
Creating and adding your own macros can be time-consuming, and as mentioned above, you need to have good knowledge about programming.
Adding predefined macros is much easier! It saves you a lot of time, and you can still customize these to your liking.
In the guide below, we’ll be using Justin Schuh’s Macro collection. It consists of more than 60 different predefined macros that you can use for your printers and is worth checking out. Here’s how to use it:
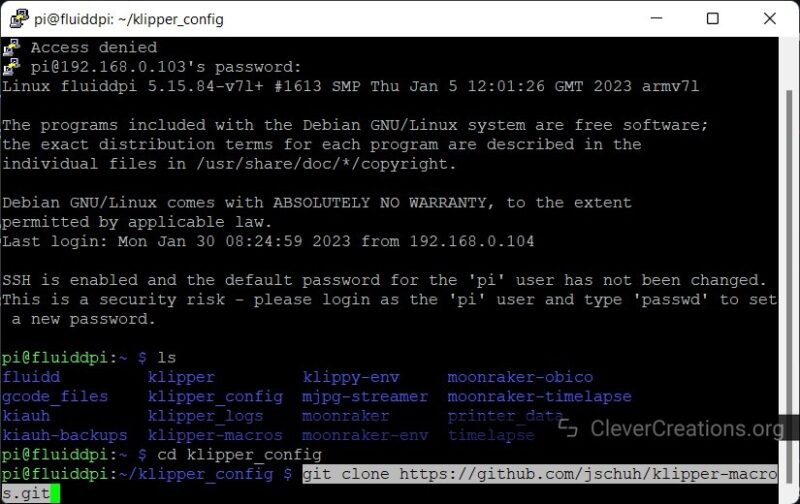
- Open PuTTY and connect to your Klipper 3D printer.
- Go to the printer_data/config file and type in the following commands.
ls
cd klipper_config
- Then copy and paste Justin’s GitHub repository using the following command
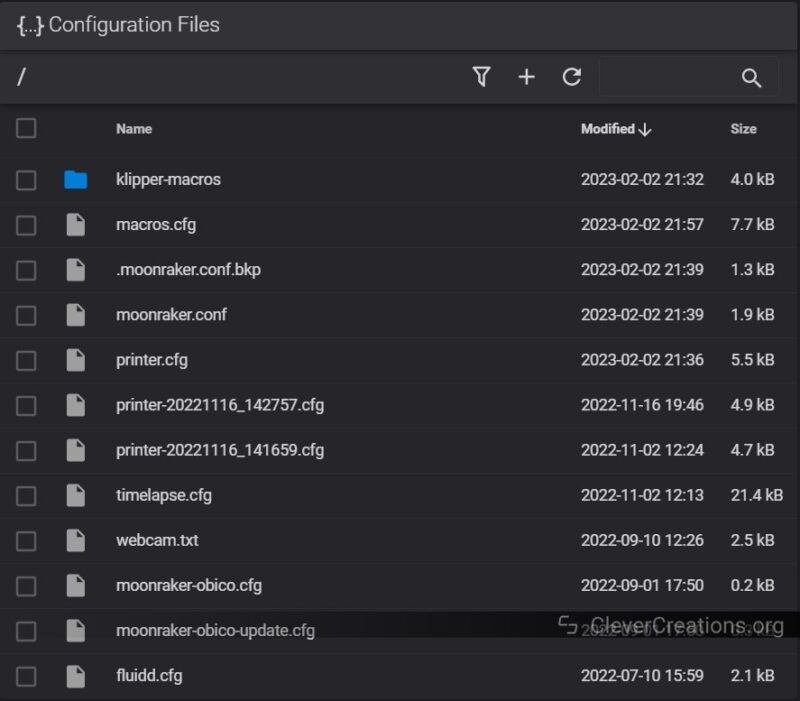
git clone https://github.com/jschuh/klipper-macros.git - Close the PuTTY terminal and restart the Klipper firmware. Open the configuration section, and you should see a folder named klipper-macros.

- Create a macros.cfg file in the config section.
- Copy and paste the Klipper setup code from Justin’s site in this configuration file.
- Save and close the file.
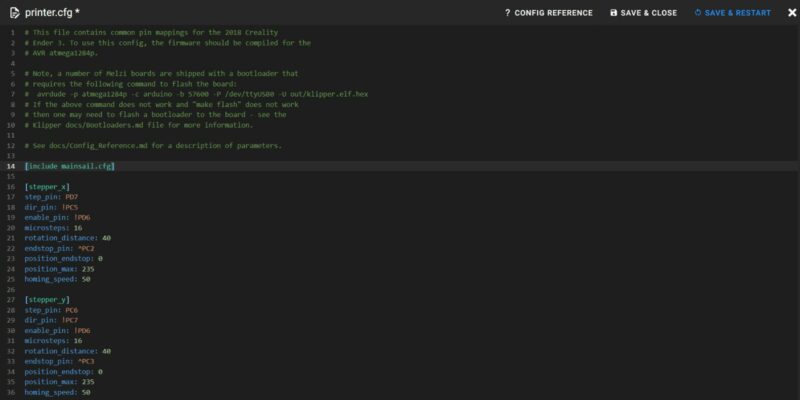
- Open the printer.cfg file and input the command [include macros.cfg]
![Screenshot of the printer.cfg file with [include macros.cfg] command.](data:image/svg+xml,%3Csvg%20xmlns='http://www.w3.org/2000/svg'%20viewBox='0%200%20800%20409'%3E%3C/svg%3E)
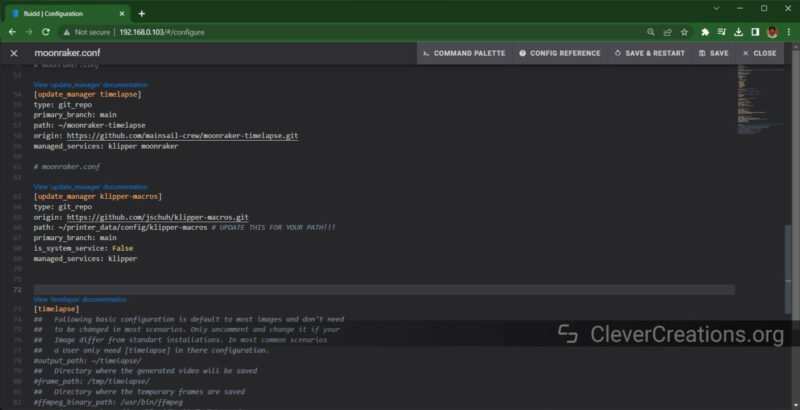
- Add the following section in your moonraker.conf file.
[update_manager klipper-macros]
type: git_repo
origin: https://github.com/jschuh/klipper-macros.git
path: ~/printer_data/config/klipper-macros # UPDATE THIS FOR YOUR PATH!!!
primary_branch: main
is_system_service: False
managed_services: klipper
- Save and restart the firmware.
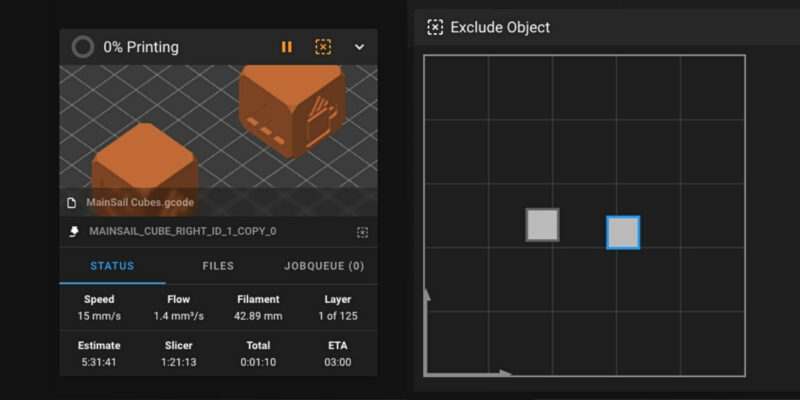
![Screenshot of the printer.cfg file with [include macros.cfg] command.](https://clevercreations.org/wp-content/uploads/2024/02/best-klipper-macros-gcode-4-800x409.jpg)
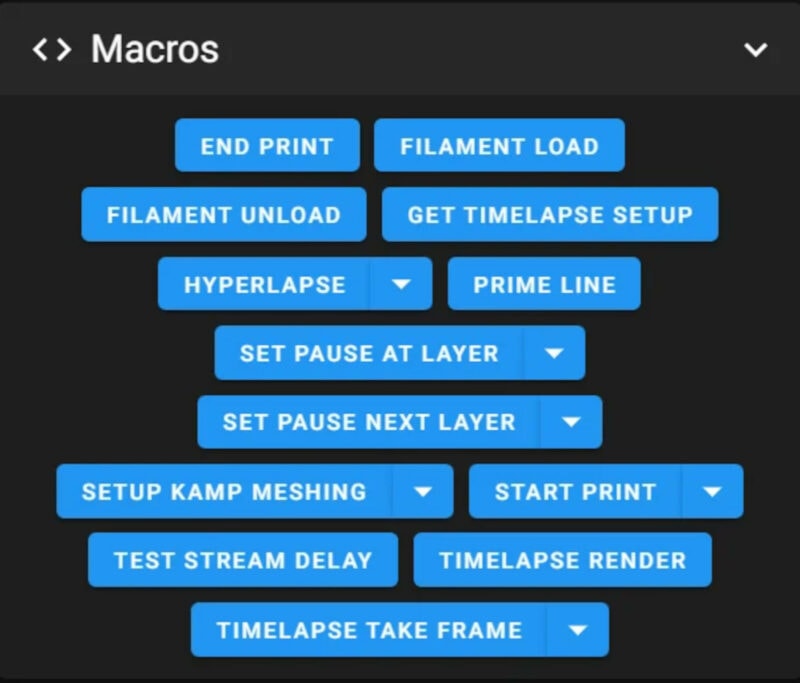
Congratulations! You have successfully installed Justin’s macros on your Klipper 3D printer. All of its macros will now show up under the Macro section on your Mainsail or Fluidd interface.
Furthermore, the last step ensures that whenever there is an update to the Macros, Klipper will notify you and update the macros smoothly.
Alternatively, you can choose to write macros on your own. To do this, create the macros.cfg file and write your macros in it, or copy-paste templates from Klipper’s website. Then, input the [include macros.cfg] command in the printer.cfg file and restart the firmware.
This method gives you the most flexibility in terms of adding custom macros. You can choose and add macros created by different users for different purposes and printers. If you want to understand the nitty-gritty, we recommend reading this detailed tutorial on Klipper’s Discourse that goes into more detail.
Where to Get Klipper Macros?
We have found that GitHub Repositories are one of the best sources to get Klipper macros. Like Justin’s and Klipper repositories, many users upload their custom macros to GitHub. A quick (Google) search can help you look for these users.
A second great source for Macros is various 3D printing communities. There are also Reddit communities, Discourses, and even Klipper Discord groups where members often share their macros and experiences.
Recommended Macros
While the choice of macros depends on your specific needs, there are a few versatile ones that are suitable for most 3D printer users. We recommend trying these out first if you want to dive in but aren’t sure where to start.
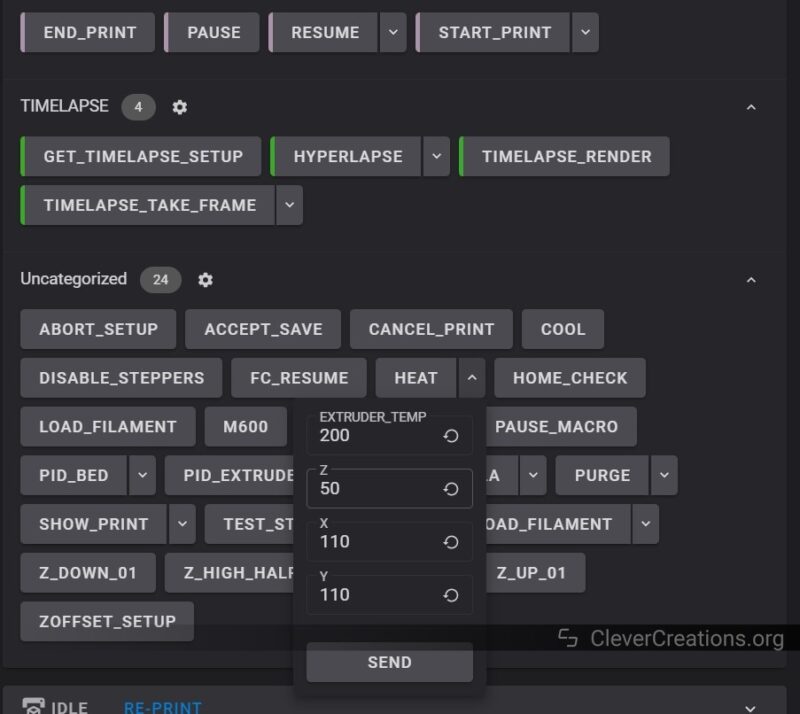
START_PRINT and END_PRINT
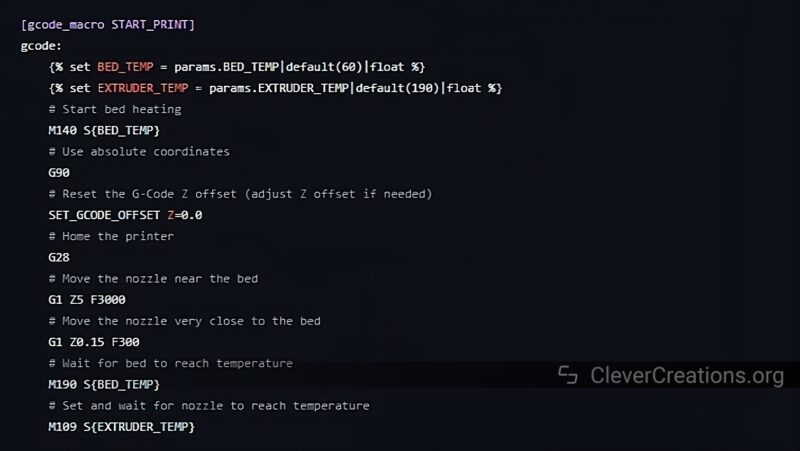
The START_PRINT and END_PRINT macros let you configure the start and end sequence for a 3D print. For example, you might want to use the START_PRINT macro to set the heating temperatures, Z-offset, and add custom movements that the printer performs before the print.
Suppose you want to make changes to your 3D printer, like adding a bed leveling sensor. Normally, you would need to update the start Gcode command sequence in the slicer to reflect this change. This can be inconvenient, especially if you want to re-print previously sliced models. You’d have to re-slice these models to take into account the bed leveling sensor.
Instead, with the START_PRINT macro, you insert the START_PRINT command in the Start G-code of your slicer. If you want to make any changes to the start G-code, you can simply edit the START_PRINT macro itself in Klipper.
Then, whenever Klipper reads the START_PRINT command, it’ll use the updated macro commands and automatically execute the new starting sequence. The same principles apply to the END_PRINT macro as well, even though this is something we don’t find ourselves updating that often.
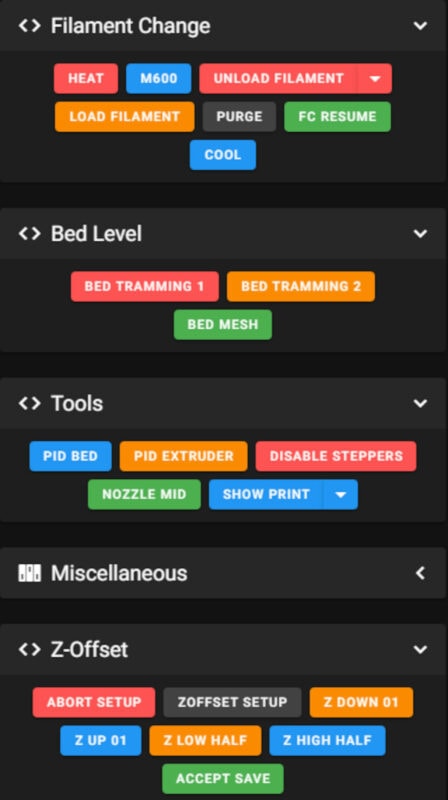
Filament Change or M600 Macro
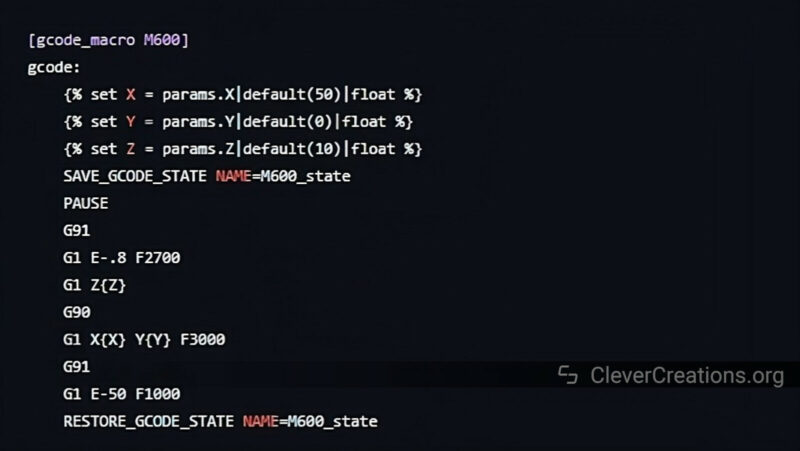
This macro instructs the printer to perform certain actions when it detects a M600 command in the Gcode file. The slicer uses the M600 comment to indicate a filament change, but you might want to modify the exact actions you want your printer to take when it encounters this.
Using this macro in Klipper, you can edit the rest position of the extruder when it pauses to change the filament. You can also set the retraction and purging distance of the material with this macro.
Troubleshooting
If you encounter any issues with these macro examples or other macros, here are some troubleshooting tips.
Check your Syntax
One of the most common reasons for faulty macros is incorrect syntax. Double-check the syntax and the sequence of the Gcode commands in your macros. A single misplaced comma, letter, or symbol can disrupt the entire process and result in things not working as you’d like.
Compatibility
Ensure that the macro you’re using is compatible with your 3D printer. For example, if your printer does not have an auto-bed leveling sensor, the bed level macro is not going to work. The same goes for other hardware components of your printer. Heater specifics, bed dimensions, motherboard I/O options, it all varies depending on the machine you use.
Test Before Use
Always test your macros before you use them during an actual print job. This allows you to make critical adjustments to the Gcode commands before use and ensures that the macro works as intended.
Conclusion: Are Klipper Macros Worth Using?
Klipper macros can be an incredibly useful tool, provided you know how to use them correctly. They can help you save time, simplify complex commands, and customize your 3D printing process more effectively.
There will be a slight learning curve right off the bat. But the benefits that we learned above far outweigh the small initial challenges that you might face.
We believe this guide must’ve brought you a step closer to understanding the macros in Klipper. We encourage you to use this guide as a reference and try some macros yourself. If you encounter any issues, feel free to comment, and we’d be glad to help you out.