
Klipper’s Pressure Advance feature solves several problems that affect your print quality at high speeds. Bulging corners, excessive stringing, and inaccurate dimensions are the most notable issues you’ll run into 3D printing at fast speeds.
These issues often arise due to inaccurate filament pressure in the nozzle. The solution to this—adjusting the nozzle pressure—sounds simple on the surface. But in reality, it is not that simple.
This is where Klipper’s Pressure Advance feature steps in. It adjusts the pressure in the nozzle such that the print quality is not affected even when you print fast. In combination with features like Input Shaping, it truly elevates your 3D printing experience to the next level.
In this article, we will dive into the concept of pressure advance, understand its significance, and learn how to tune it for your specific 3D printer with Klipper.
Let’s relieve some pressure and advance your 3D prints!
What Does Klipper Pressure Advance Do?
Pressure advance is a feature of Klipper firmware that helps to address the delay between the extruder motor movement and the flow of filament from the nozzle. This is especially important during sudden acceleration and deceleration moves, which can cause notable issues with filament pressure in the nozzle.
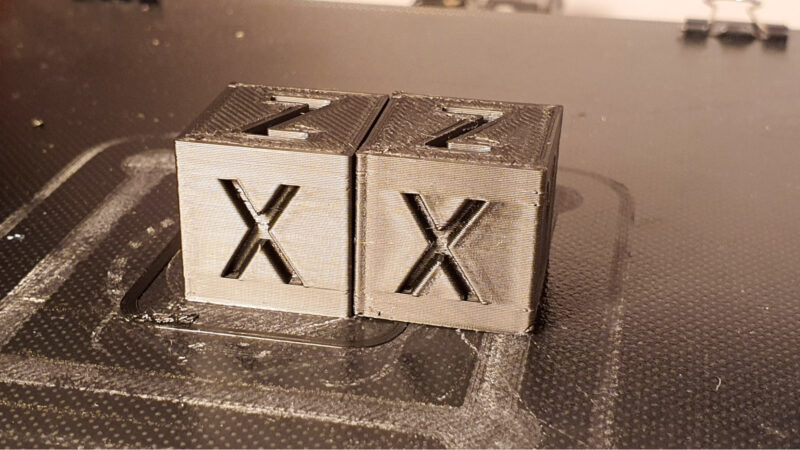
If the pressure in the nozzle is not properly regulated during these moves, it can result in bulges on the corners or small gaps in prints. You’ll also find that stringing can be caused by unwanted nozzle pressure.
Pressure advance solves this by anticipating the pressure in the nozzle and adjusting filament movement before the pressure becomes a problem. The higher your print speeds, the more likely you are to see benefits from this.
For example, if the nozzle is decelerating as it approaches a corner, the pressure advance feature will reduce filament flow to allow the leftover filament to fill up the corner. Conversely, if the nozzle is accelerating suddenly from point A to B, the feature will make sure that the extruder pushes extra material into the hot end to prevent under-extrusion.
We should point out that this is a very simplified explanation of the pressure advance in Klipper. It’s easier said than done, and you’ll find that there’s a lot of complicated math behind this function. Luckily, we don’t need to understand it to make use of it.
If you are familiar with Marlin firmware, you’ll know that Marlin has a feature with a similar name—Linear Advance. We already hear you wondering, isn’t this the same thing?
Linear Advance vs Pressure Advance
Linear advance and pressure advance are often used interchangeably. In essence, both features have a similar goal—to fine-tune the nozzle pressure and filament flow.
While these features work similarly on the surface, they have different mathematical models. This 3D Printing Stack Exchange discussion explains the nuances better than we can, so if you like to know the details, it’s worth checking out.
The essence, however, is that in Marlin’s linear advance, the acceleration slows down considerably to make for prettier corners and to avoid oozing. While this is easier to use and adjust for, it also affects your print speeds negatively.
On the other hand, the Klipper’s pressure advance system does not affect the print speed at all. It adjusts the movement of the extruder motor such that there’s no need for it to slow down. This feature enables the printer to execute moves that would not be possible with Marlin’s linear advance.

How to Tune Pressure Advance with Klipper?
Tuning pressure advance can be tricky for first-timers, but with these instructions, there’s little that can go wrong. In this tuning method, we use the bulging phenomenon at corners to calibrate pressure advance.
The official Klipper documentation is quite extensive, and it may be overwhelming for some. We have simplified the process into 10 easy steps for you:
- Download and load the Pressure Advance Square Tower file in your 3D printing slicer.
- The Pressure Advance tuning tower is designed to be printed at fast speeds to show the effects of nozzle pressure. Set the following slicer settings accordingly to help print the tower quickly and achieve the desired results.
- Infill: 0%
- Print speeds: ≥100 mm/s
- Layer height: 75% of the nozzle diameter. If possible, use a 0.4 mm nozzle and set the layer height to 0.3 mm.
- Disable any acceleration settings and auto-speed settings in your slicer.
- Slice the tower and send the G-code to the printer.
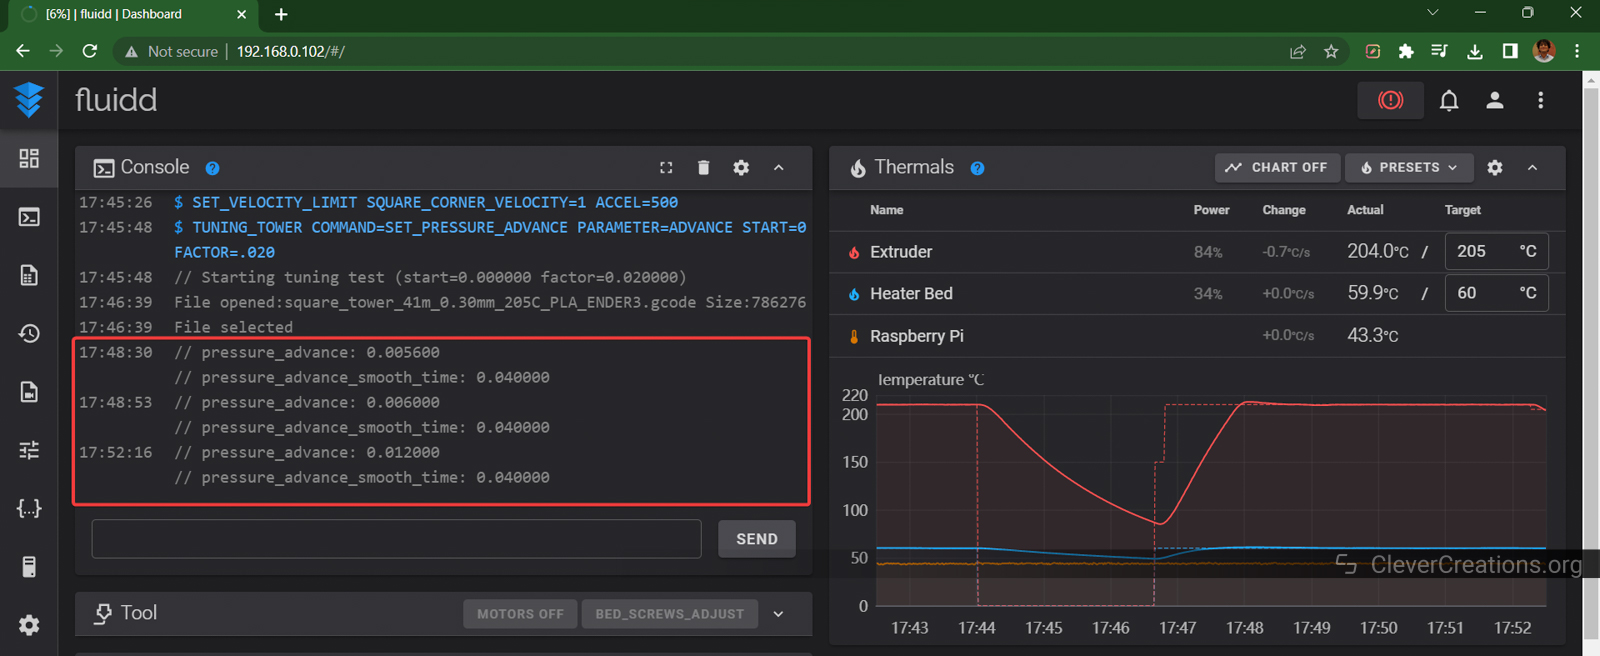
- Set the Corner Velocity. By sending the following Gcode command in the Klipper Terminal:
SET_VELOCITY_LIMIT SQUARE_CORNER_VELOCITY=1 ACCEL=500
This step slows down the nozzle at the corners and emphasizes the effects of extruder pressure. It’ll help to get a better understanding of the issues. - Set the pressure advance values for our test. If your printer uses a direct drive extruder, input the following command in the terminal:
TUNING_TOWER COMMAND=SET_PRESSURE_ADVANCE PARAMETER=ADVANCE START=0 FACTOR=.005If you have a Bowden extruder, use the following command:
TUNING_TOWER COMMAND=SET_PRESSURE_ADVANCE PARAMETER=ADVANCE START=0 FACTOR=.020
These commands instruct the printer to change the pressure advance value at every layer for the tuning tower. You can see this change in real-time in the terminal window as the Gcode progresses. - Print the tuning tower.
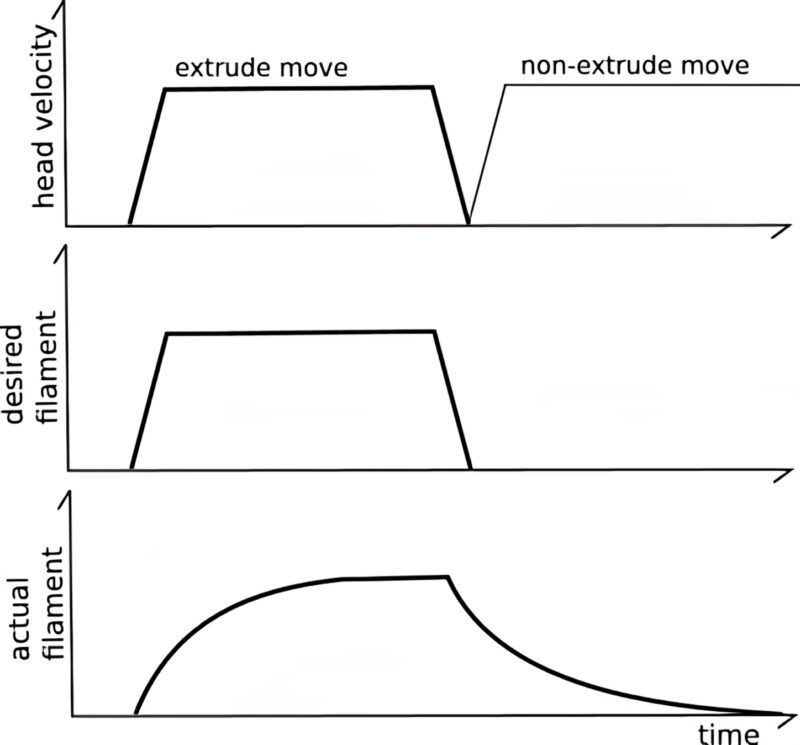
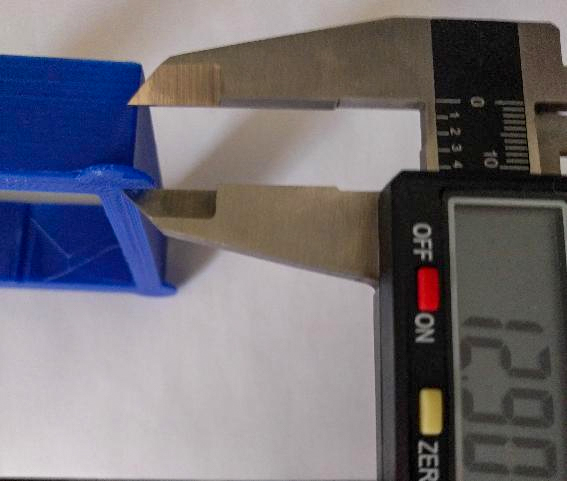
- Use a measuring scale or a vernier caliper and measure the layer height (from the bottom) that has the best quality corners. If there’s any doubt, choose the lower layer height. Write this height down, as we’ll need it for the next step.

- Calculate the Pressure Advance value with the following formula:
pressure_advance = <start> + <measured_height> * <factor>For example, if you used a Bowden extruder (factor 0.2) and you found that the corners look best at a height of 12.90, the pressure advance is as follows:
pressure_advance = 0 + 12.90 *.020 = .258 - The typical pressure advance values range between 0.050 and 1.000. Bowden extruders usually have a higher value. After checking whether your measured value falls within the typical pressure advance values, write it down. If you have a value that differs wildly, you’ll want to double-check your measurements and calculations.
- Open the Klipper printer.cfg file and input the
pressure_advance = <calculated_value>at the bottom of the [extruder] section. Then save and restart the firmware.
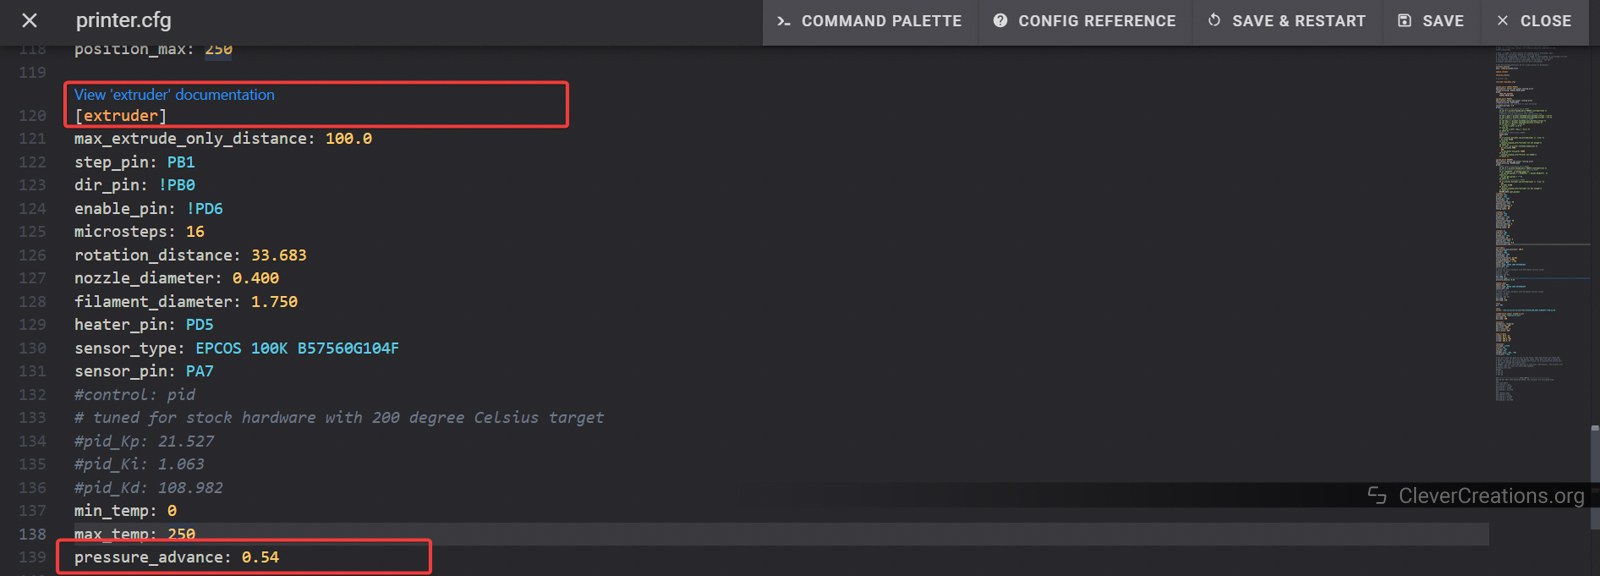
That’s it! The Klipper firmware will now use the new Pressure advance value for the next prints.
What Does Pressure Advance Smooth Time Do?
Pressure advance smooth time controls how the pressure advance setting is applied while printing. It kind of looks ahead for the speed changes and adjusts how fast or slow the nozzle pressure should change.
A smooth time that is too small can cause sudden pressure changes, leading to poor print quality. Conversely, a value that is too high might not adjust nozzle pressure fast enough. The right smooth time value creates a balance that sufficiently reduces print defects like corner blobs.
For most 3D printing setups, the default smooth time setting will work well. However, if you want to delve deeper, there’s a Discourse thread and the Klipper Kinematics Documentation that you can refer to. These sources explain the effects of pressure advance smooth time and how you’d want to go about tuning it.
Troubleshooting Pressure Advance
Even though tuning pressure advance is quite straightforward, things can go amiss and results won’t always be as expected. That’s 3D printing for you. To help you troubleshoot PA, here are some tips that’ll help you get to the correct pressure advance value.
Fine-tune the Printer
Pressure advance is dependent on the extruder, filament, printing temperature, and nozzle. Make sure all these elements are working well and configured correctly before you run the test. Once the other parameters are locked down, it’s time to introduce the pressure advance factor.
Check the Slicer Settings
Once you start with the PA test print, do not change any other slicer settings than the ones listed in step 2 above. The tower is designed to print at a high flow rate and changing seemingly unrelated slicer settings can affect the printing results in unexpected ways.
Corner Does Not Print Well
One corner of the test print can come out looking different than others. This is because sometimes the slicer can decide to change the layer at that particular corner.
If this occurs, disregard that specific corner and calibrate pressure advance using the other three corners. If you have any doubt about the right pressure advance value, it’s a good idea to lean on the conservative side and go for the lower value.
Print Quality Is Unaffected
If the print quality does not improve even with a pressure advance value of up to 1.000, then there may be another issue at play that is responsible for the corner bulging. Disable pressure advance and rule out other parameters that may affect your print quality.
Extruder Skipping
A high pressure advance value can make the extruder skip. If this occurs, use a lower acceleration value or disable pressure advance setting altogether.
What Is the Best Pressure Advance for Klipper?
The best pressure advance setting for Klipper is dependent on several factors. The type of extruder, the material you’re printing with, print temperature and extrusion rates, acceleration, and jerk settings, are all relevant. Unfortunately, there’s no single value that works for all printers and configurations.
As mentioned earlier, a good pressure advance configuration value lies between 0.050 and 1.000. It’s all about experimentation and patience, and ultimately you’ll have to tune pressure advance by finding the value that works best for your particular setup.
Can You Set PA in G-Code Instead?
Yes, you can set the pressure advance value in GCode as well. There are three ways that let you do so:
Use the Klipper Command Terminal
You can input the following G-Code command in the Klipper Gcode terminal before you begin the 3D print:
SET_PRESSURE_ADVANCE [EXTRUDER=<config_name>] [ADVANCE=<pressure_advance>] [SMOOTH_TIME=<pressure_advance_smooth_time>]Edit the Gcode File (After Slicing)
Open the sliced file in a text editor like Notepad++. Add the following command to the Start Gcode section:
M900 K0.02The M900 command sets the pressure advance, and the K denotes the pressure advance value.
Use Slicers
OrcaSlicer and the Bambu Studio are a few of the slicers that currently give you the option to set the pressure advance value in their filament settings. The slicer adds the M900 command in the start Gcode automatically, removing the need for any post-processing.
We believe it’s likely that other slicers will implement this feature down the line as well. So if you’re interested in this option, it’s worth checking out if Cura, PrusaSlicer, or whichever slicer you use has added it yet.
Conclusion: Is Pressure Advance Worth It?
Pressure advance is a great tool to mitigate your print issues and improve the print quality. In our experience, the improvements on the corners, decreased bulging, decreased stringing, and less oozing, are definitely worth the effort of tuning pressure advance.
Initially, it might seem like a lot of effort to fine-tune the pressure advance setting. But unless you change materials every other print, you won’t have to do it very often. Once you have it set up and working, it’s unlikely that you’ll 3D print with pressure advance disabled again.
Be patient, experiment a lot, and you’ll be surprised with how well your print can print even at blazing-fast speeds!
If you have any questions about pressure advance or Klipper’s other features, feel free to leave a comment!


Would like to understand, say not using a model but an actual print I having trouble with, to know whether to increase or decrease PA. From what I read, neither direction is stated as to what it does. Like, what happens if its too low, what happens if its too high, so therefore X is happening and so maybe I need to raise/lower the PA. It would be nice to have that info. Thank you.