

- Capable of fast 3D printing
- Print surface offers excellent adhesion
- All-metal hot end
- Stock Klipper firmware
- Automatic bed leveling
- Print head LED lights
- Double-sided print surface
- Print head wiring wears out
- Default acceleration settings are too ambitious
- Various QA issues
- Loud fans at full power
- V-slot wheels instead of linear rods
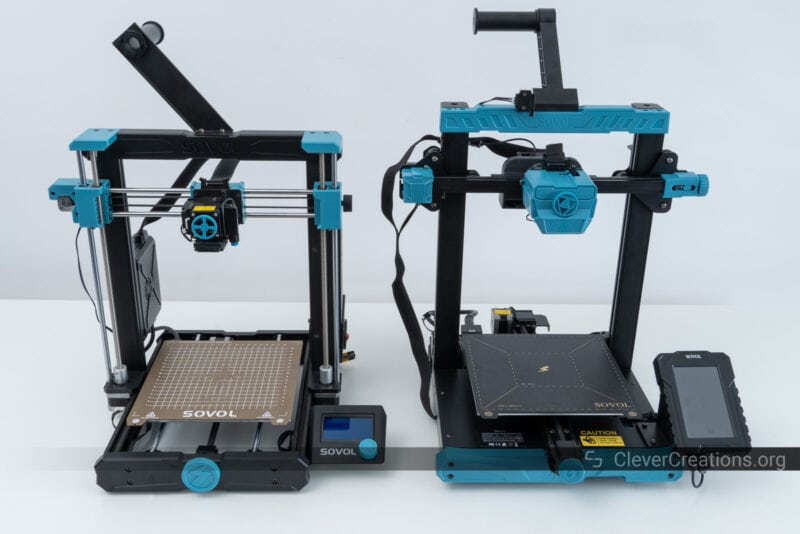
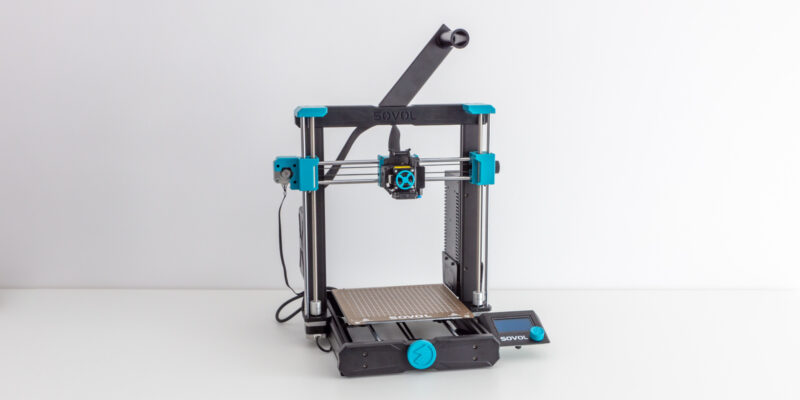
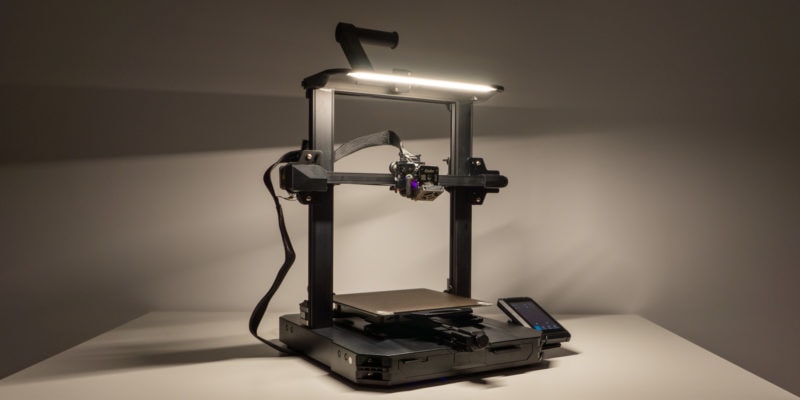
With its latest SV07 3D printer, Sovol is joining many other printer manufacturers by focusing on a fast 3D printing experience. Unlike other manufacturers’ machines, the Sovol SV07 has a budget approach that makes it more accessible for beginners.
The 3D printer has quite a few similarities with the SV06 and SV06 Plus that we previously reviewed. However, it also comes with plenty of upgrades and improvements that could make it worth upgrading to.
In this review, we’ll take a look at the Sovol SV07 3D printer to see how it performs under pressure. Any feature-rich machine on a budget looks good on paper, but it must deliver on its promises. Let’s take a look and see if it does!
Sovol SV07 Specs
| Sovol SV07 Specs | |
|---|---|
| Price | Sovol | AliExpress | Amazon |
| 3D Printer Type | FDM |
| Build Volume | 220x220x250 mm |
| Recommend Printing Speed | ≤250 mm/s |
| Printing Accuracy | ±0.1 mm |
| Nozzle Diameter | 0.4 mm (Replaceable) |
| Nozzle Temperature | ≤300 °C |
| Hotbed Temperature | ≤100 °C |
| Supporting Materials | PLA, ABS, PETG, TPU, WOOD |
| Material Diameter | 1.75 mm |
| Support File Format | G-code |
| Voltage Input | 115/230V 50/60HZ Output:24V |
| Operation System | Windows, Linux, Mac |
| Power | 350W/24V |
| Software Language | English |
| Print Method | USB, Wi-Fi |
Unboxing
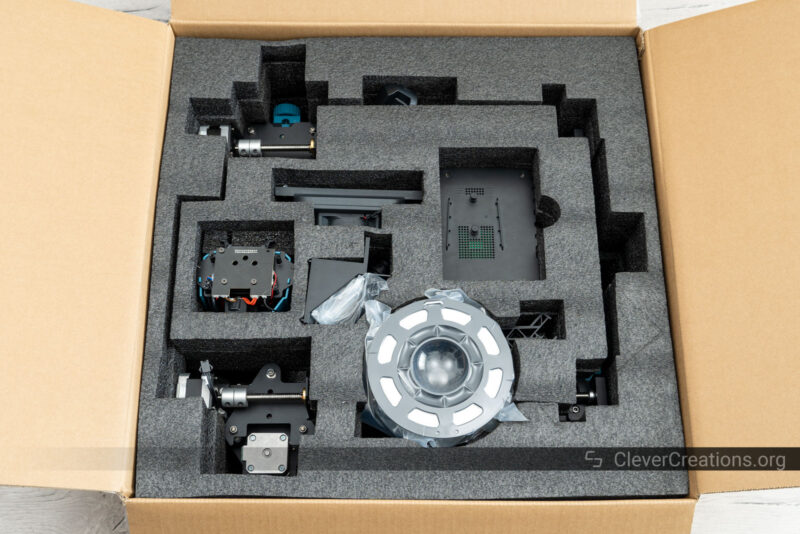
The Sovol SV07 3D printer comes in a surprisingly small box. This is mostly because, just like all other open-frame 3D printers on the market, it arrives disassembled. But with its 220x220x250 mm build volume, the main components don’t take up much space either.
You’ll get the following things in the box:
- Gantry
- Base
- Extruder
- Touch screen
- Print cooling fan assembly
- Spool holder
- Accelerometer + cable
- Power cable
- Zip ties
- Various bolts
- Various tools
- USB Flash Drive
- Spare Nozzle
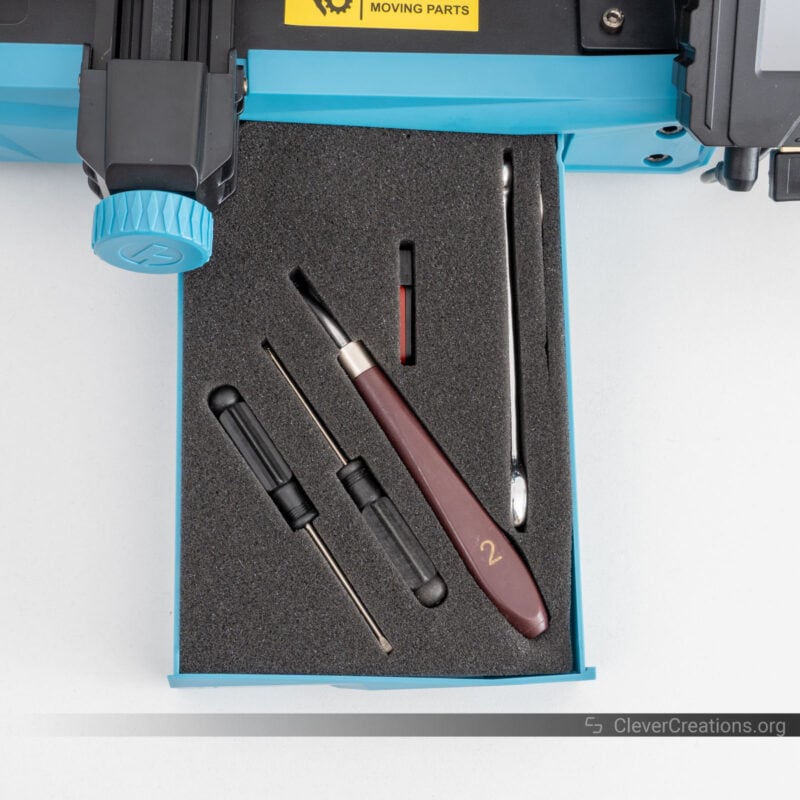
We should point out that you can find a good number of tools in the tool drawer of the printer. We like this approach, as it keeps several of the accessories for 3D printing within reach.
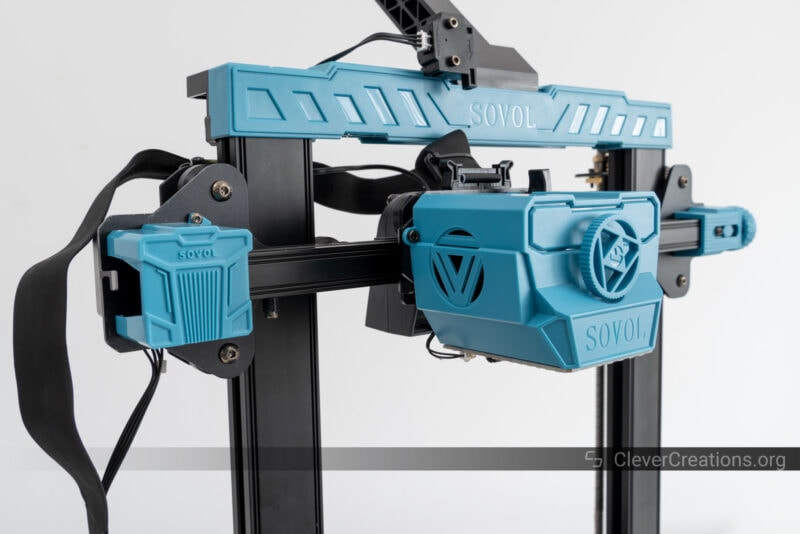
From this list, a couple of things stand out. The first is the large print fan assembly, and the second is a small accelerometer with an accompanying cable. Both are new additions that help increase print speed, and we’ll cover them in much more detail later in this review.
For now, let’s get the Sovol SV07 3D printer set up first.

Getting Started
Getting the SV07 3D printer up and running is not complicated, but it does take more time than other budget 3D printers. There are extra components to install, manual cable management to perform, as well Klipper-related calibration steps to do. In total, we spent about 30 minutes on the process.
The manual that was included with our SV07 was fairly out of date. For example, it indicated that we had to install the print cooling fan by screwing bolts into the X-axis aluminum extrusion. In reality, the fan assembly had to be attached with T-nuts.
It’s a small difference, but it showed us that the product had undergone some revisions that were not documented in the manual. This is not a deal-breaker, but it’s worth noting. You might need to do some additional research if you come across something that doesn’t match up with the manual.
The manual also came with a collection of typical Chinese->English translation typos. For example, kiliper instead of Klipper, limtis instead of limits, those sorts of things.
Altogether, it gave us an impression of a product that was rushed out. There are other indicators of this in the product as well, and we’ll get into them in this review.
Sovol will likely address this in future revisions of the SV07, but for now, we can only review the product in front of us.
On the plus side, the steps and images in the manual are clear. In the end, we didn’t encounter any problems getting the printer up and running, which is what we value the most.
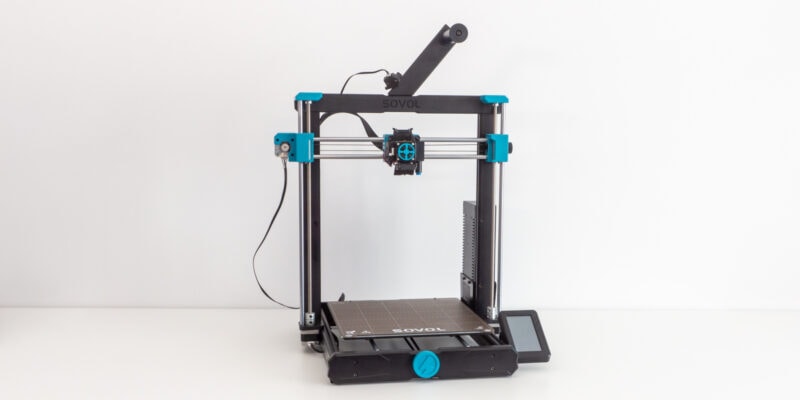
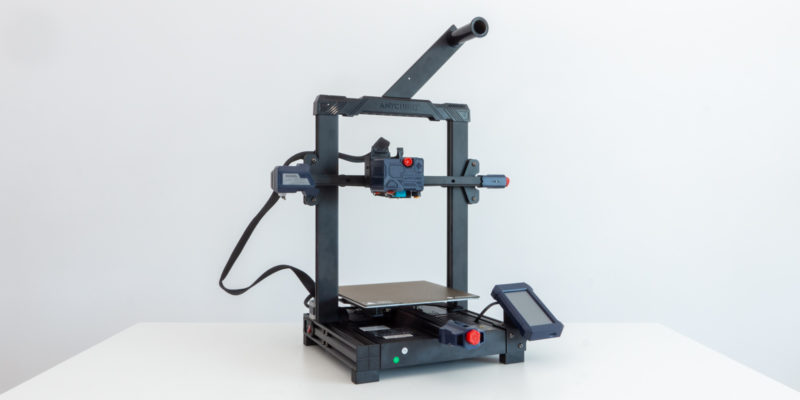
Sovol SV07 Features
The Sovol SV07 is a fast 3D printer, so compared to its SV06 predecessor, it comes with several improvements that are focused on increasing print speed. Aside from that, the machine also sees a couple of new features that help increase its ease of use. Let’s take a look at the most important ones.
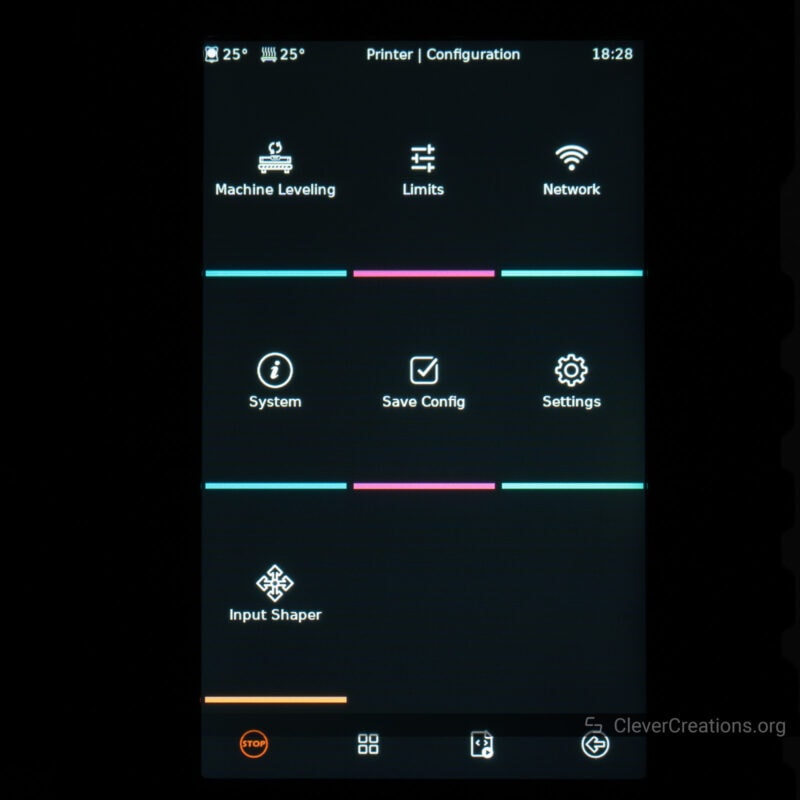
Klipper Firmware
Arguably the standout feature of the SV07 is its inclusion of Klipper firmware. It’s an impressive feature at this price point, and from what we can see, Sovol is the first manufacturer to do so on a budget 3D printer.
Klipper is a feature-rich open-source firmware with a nice set of features. For example, it allows 3D printers to adjust for unwanted vibrations in their components. This allows you to print a lot faster without needing a more rigid (read: expensive) printer.
Klipper firmware requires a more powerful processor that isn’t easy to include at low price points. Sovol has done this by using an external Makerbase Klipper Pad (somewhat similar to a Sonic Pad). The pad takes care of all the intensive calculations that Klipper requires, with the SV07’s regular 3D printer controller merely executing simple commands.
The resonance compensation feature is called Input Shaping. To get it configured, you’ll need to mount the accelerometer onto the X- and Y-axes (first one, then the other) and connect it to the Klipper Pad via a cable. Then you can tell the pad to run calibration sequences that help it figure out which unwanted resonance frequencies it should tune out.
When done correctly, this works well. But we found that Sovol’s mounting of the accelerometer is not ideal. On both axes, you can only mount the accelerometer with a single screw.
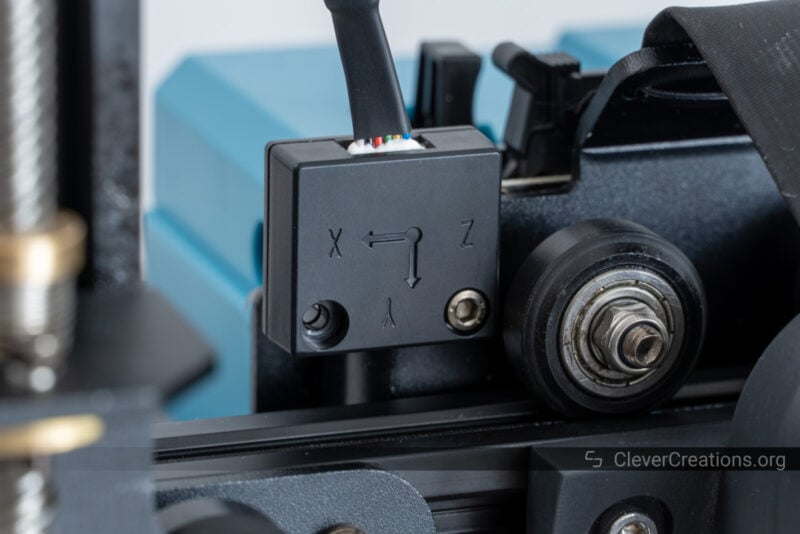
Not only does this single mounting point make it more difficult to align the accelerometer with the axis, but it also creates the opportunity for the accelerometer to vibrate loose during the calibration process.

We prefer to see a set of two mounting holes next to each other. That would guarantee the accelerometer is perfectly in line with the axis and it would keep it better in place. To properly calibrate the Input Shaper function, the captured data must be accurate.
You also need to unscrew the bolts of other components before you can mount the accelerometer. That feels a bit improvised to us and we think dedicated mounting points or brackets would improve the experience.
Of course, this approach saves money, but we don’t think it is ideal.
As it is, it is important that you:
- Perfectly align the accelerometer with the axis. Make sure that it is not rotated in any way.
- Tighten the single screw to reduce the chance of the accelerometer moving during the calibration process.
Also worth pointing out is that Sovol indicates the SV07 resonance compensation is pre-configured at the factory and you won’t need to run the Input Shaper process yourself. We don’t necessarily agree with that. The shipping process, assembly, and things like belt tension all affect the resonance behavior of the printer.
Therefore, we recommend always running the process yourself to get better results. It’s a bit tricky on this machine given the aforementioned issues, but it is more than worth it for the improved printing performance.
Extruder
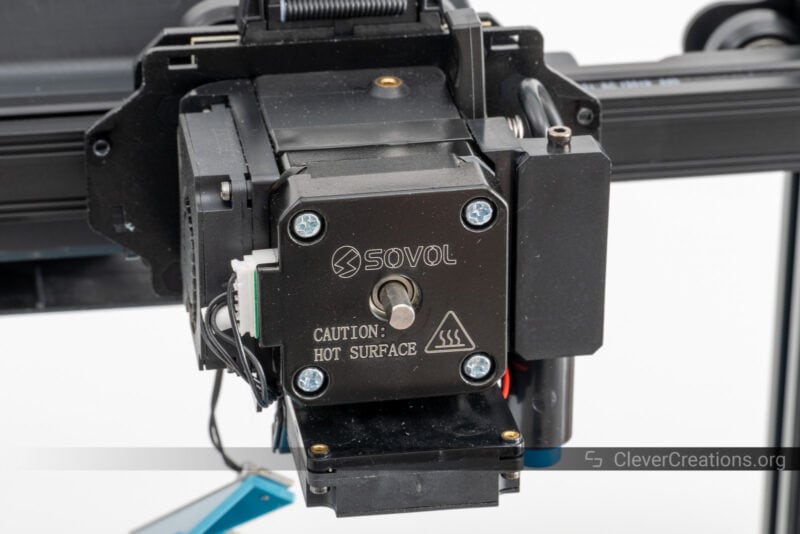
The Sovol SV07 features the same planetary-geared extruder as its predecessors. It’s both fast and powerful enough to push lots of filament into the hotend. We’ve covered it plenty in our previous reviews, so we’ll keep this section short.
One thing that we have noted about the extruder is that its internal gears are not made of metal. They are made of Delrin-like plastic and don’t last nearly as long as metal gears would. We would much rather see metal gears for durability. Again, likely a cost-saving measure.
Something that Sovol kept and we do like is the front-facing wheel on the print head. It allows you to manually feed and unload filament without having to press your fingertips on an exposed gear. This makes it easier to use than Creality’s Sprite extruder, for example.
Hot End
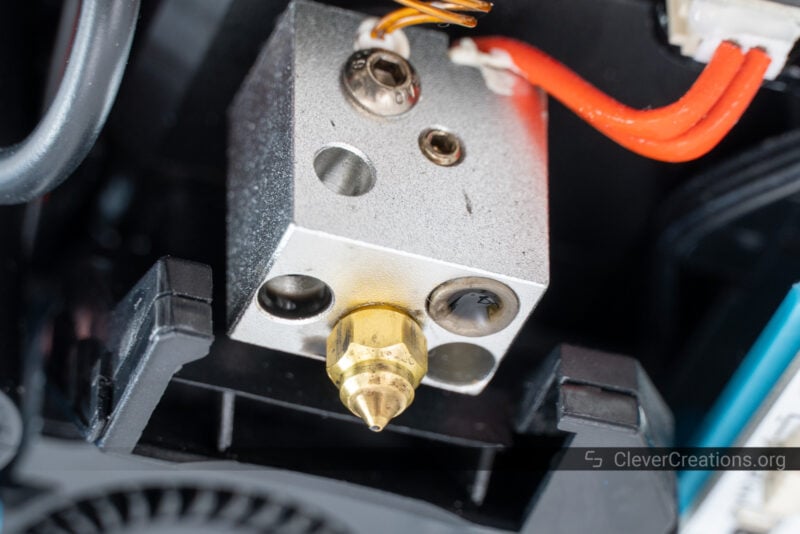
The SV07 hot end is near-identical to the one we encountered on the SV06 Plus. It’s full of holes and doesn’t have a whole lot of thermal mass, but the 50W heater cartridge is well-capable of compensating for that.
With its maximum 300°C nozzle temperature, the hot end can handle a wide range of filament materials. We noticed this is something that Sovol always does well. Where other manufacturers have base models with a 250°C nozzle temperature limit and higher tier products with a 300°C limit, Sovol offers a 300°C all-metal extruder with all its models.
Something we noticed during testing is that the Klipper firmware is configured to immediately shut down for safety when the nozzle reaches 301°C. To prevent accidental shutdowns during 3D printing from PID overshoots, we recommend you don’t set the nozzle temperature over 290°C
Print Cooling
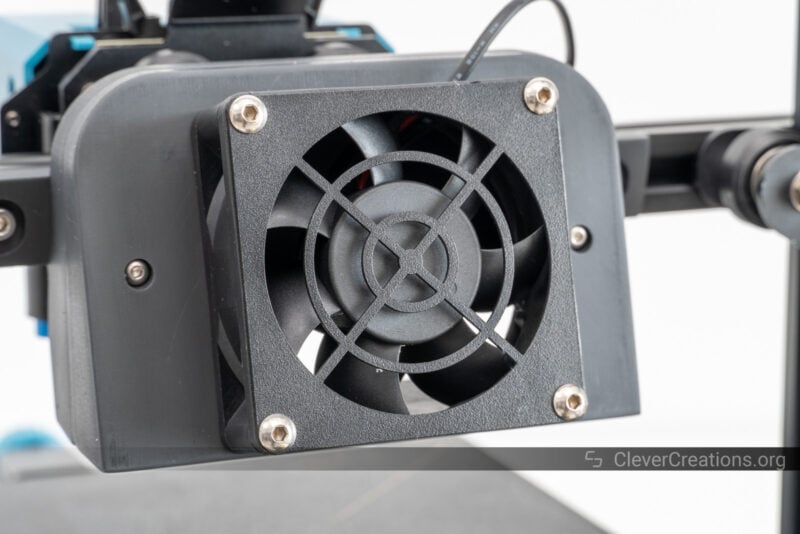
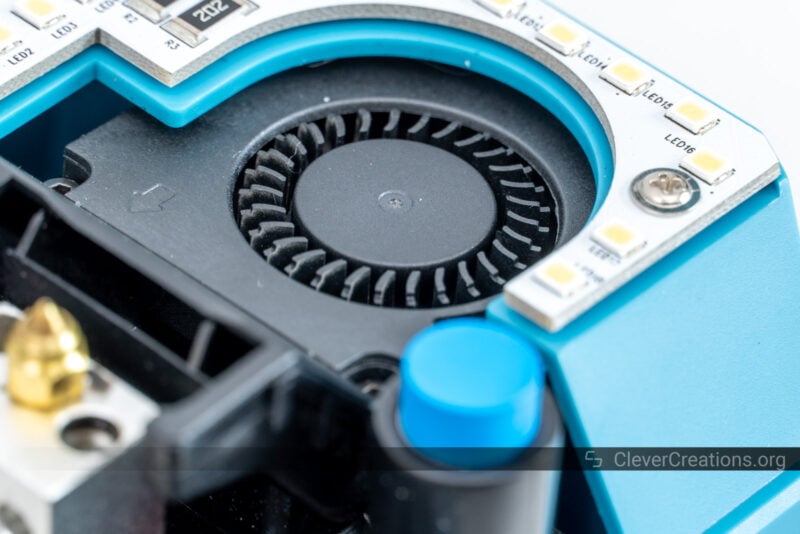
New on the SV07 is a large print cooling fan. It is mounted on the aluminum extrusion of the X-axis and its goal is to rapidly cool the freshly extruded plastic. It decreases the amount of time each layer needs to harden and you can print a lot faster.
The fan is an axial fan, which is a type of fan that typically does not have a lot of static pressure. However, Sovol has chosen a high-static pressure axial fan that pushes an incredible amount of air through the duct. It’s a good design decision on Sovol’s part that we were happy to see.
It’s so powerful that we recommend dialing down the fan’s speed when necessary. Not only did we note a lot of air turbulence around the nozzle that can impact bridging, but the fan is also annoyingly loud.
Aside from the big print cooling fan, the SV07 print head also contains a smaller fan. It’s a typical 40x40x10 mm blower fan that provides a bit of cooling, but not much else.
This fan also sucks warmer air from the print bed area which can impact cooling performance. It’s good that Sovol went with the additional larger fan.
Print Bed

Regular readers of our 3D printer reviews will know that we ran into issues with both the SV06 and SV06 Plus print surfaces during our testing. They both had their paint come off when 3D printing ABS at high print temperatures.
We’re happy to note that when testing the SV07, we did not run into this problem. Both the print surface and its paint are improved.
Not only did all filaments we tested (PLA, ABS, PETG) stick well and came off the bed easily without bed adhesive, but the paint did not come off either.
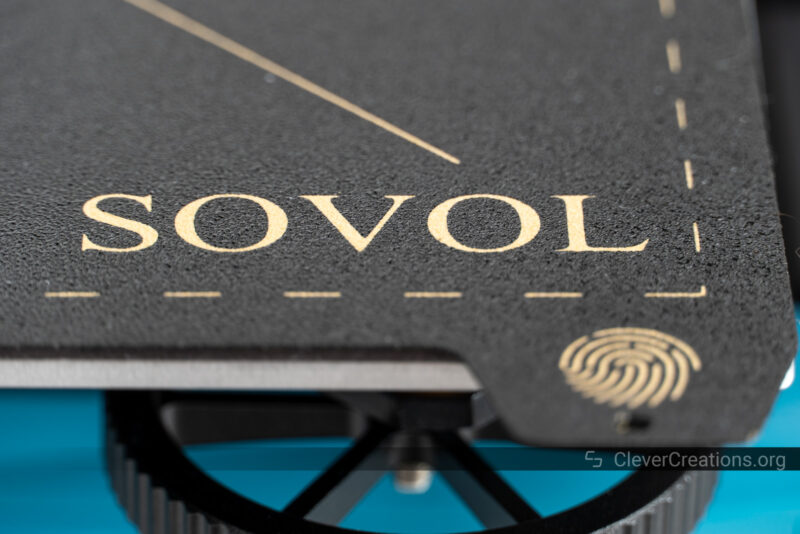
The print surface is double-sided, with an identical surface on the back. It’s another upgrade over Sovol’s previous 3D printers, as they only had one side you could use. Double the sides means twice as long before you need to replace the print bed.
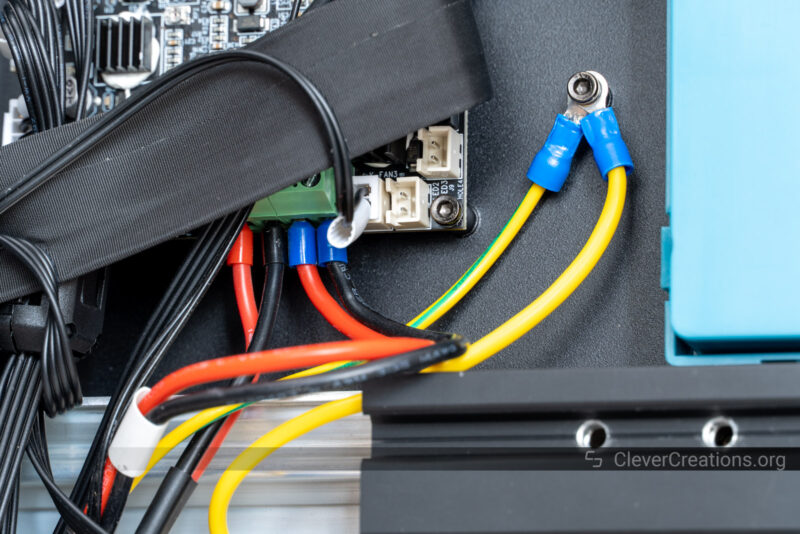
Bed Mounting
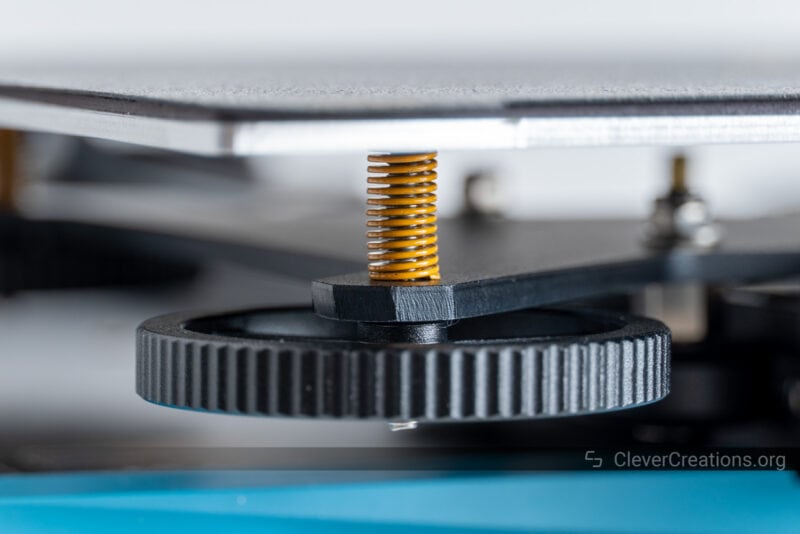
Interestingly, the SV07 comes with two different ways to mount the print bed to the Y-axis carriage. The default is four springs and aluminum wheels. It’s the typical setup that lets you manually level the bed.
It also allows for some ‘give’ when accidentally moving the nozzle down into the bed. The bed simply moves down on the springs, without the nozzle damaging the surface.
A downside of this setup, however, is that it creates the opportunity for the print bed to slightly flex up and down during 3D printing. When print quality is a priority, that’s not what you want.
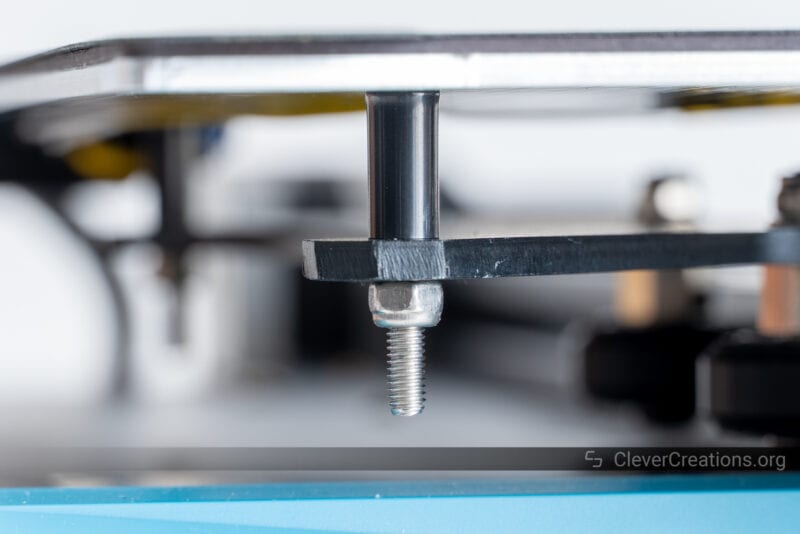
Because the SV07 features automatic bed leveling, there’s not much need for manual leveling anymore. This is why Sovol has included a set of rigid spacers for mounting the print bed instead.

The big advantage is that the fixed print bed can’t move up and down during 3D printing. With components being slung around at high speeds, that’s a good thing to prevent.
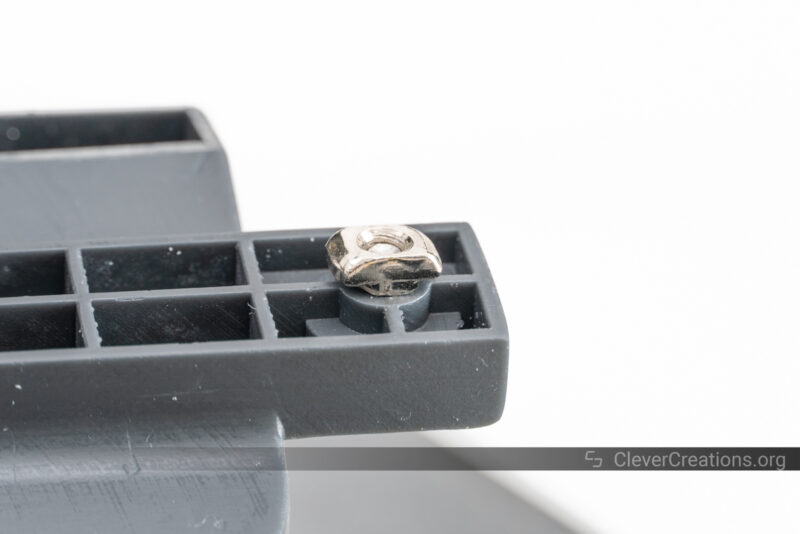
Swapping the mounting hardware out is relatively easy, but we encountered an issue. The spacers come with an additional set of mounting bolts that are too short for use with the included locknuts (nearest picture above). The bolts don’t reach the grippy section at the far end of the locknuts.
The result is that the nuts vibrate off after a while. We noticed this after we had several of them lying on our workbench after a long test print.
It’s another one of those things that made us feel some of the Sovol SV07 features were added late and not thoroughly tested.
To solve this, we recommend you just use the rigid spacers with the long bolts that are used for the springs. It’s not the most aesthetically pleasing setup because the bolts stick out, but at least the nuts stay secure. An alternative is that you use the short bolts and apply blue Loctite.
Temperature Uniformity
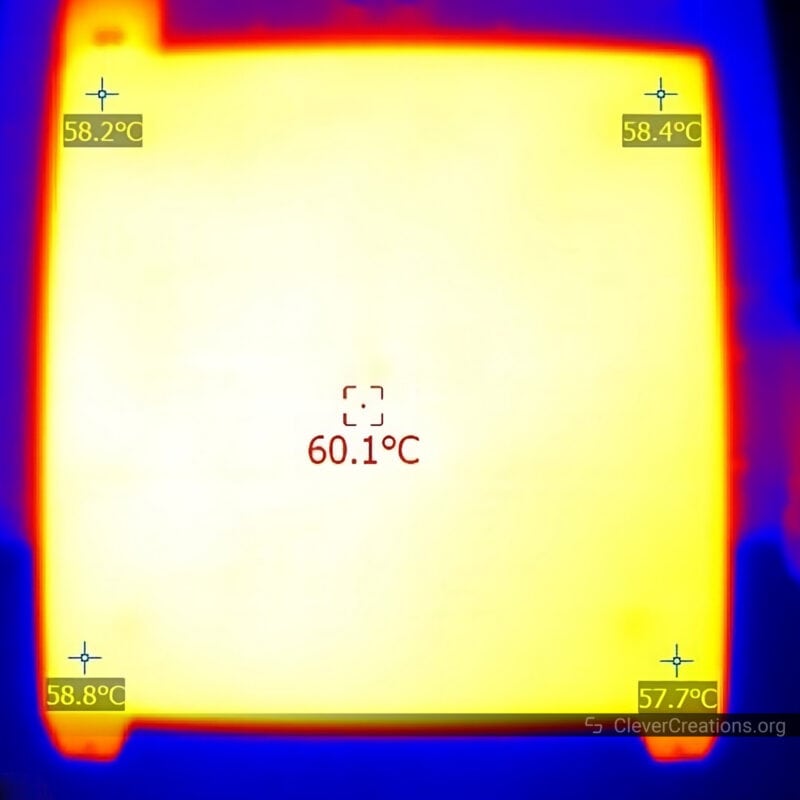
The temperature uniformity of the SV07 print bed is great. Its modest 220×220 mm print area is easy to keep at a consistent temperature throughout. In the thermal image above, you can see that at 60°C, the temperature of the print surface lies within 2 degrees Celcius.
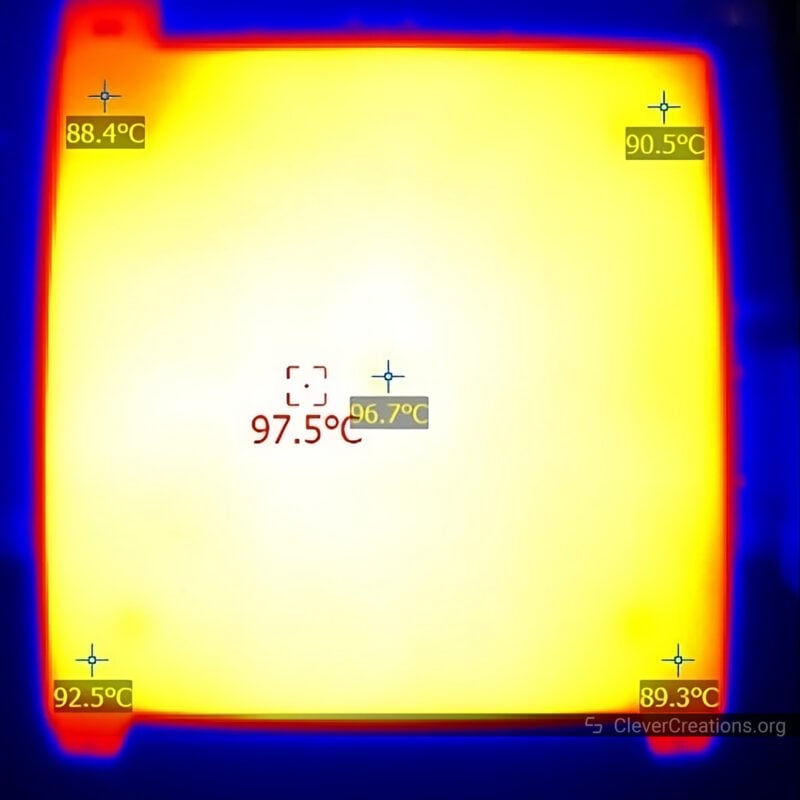
At 100°C, there is more spread. On some corners, there’s almost a 10°C difference from the center. This makes sense, as it’s more difficult to maintain a higher temperature across the print bed.
The uniformity could have been better with insulation on the underside of the print bed, but Sovol has chosen to omit this.
We are okay with this given the small print area and budget price point of the SV07. For comparison, the print bed of the SV06 does not have insulation either, but the larger bed on the SV06 Plus does.
All in all, you can use this print bed across its entire temperature range without having to worry much about warping from temperature differences.
Heating Times
Because of its compact size, the print bed also doesn’t take long to heat. Getting up to 60°C takes a mere 2:20 minutes, whereas reaching the maximum 100°C takes 8:05 minutes. The last number might sound like a lot, but looking at the rest of our 3D printer reviews, it’s about average for a print bed this size.
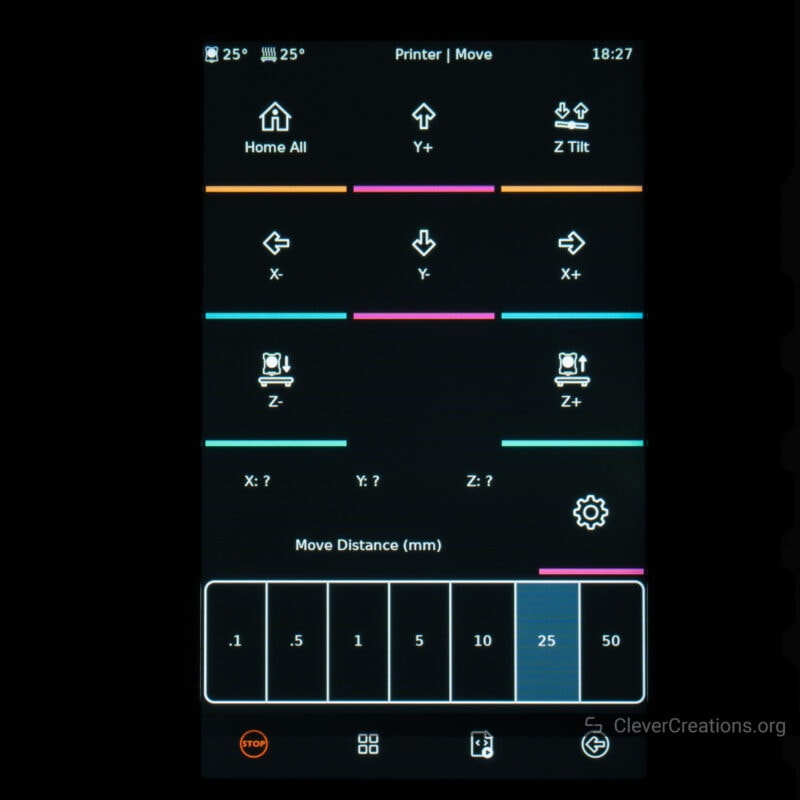
Bed Leveling
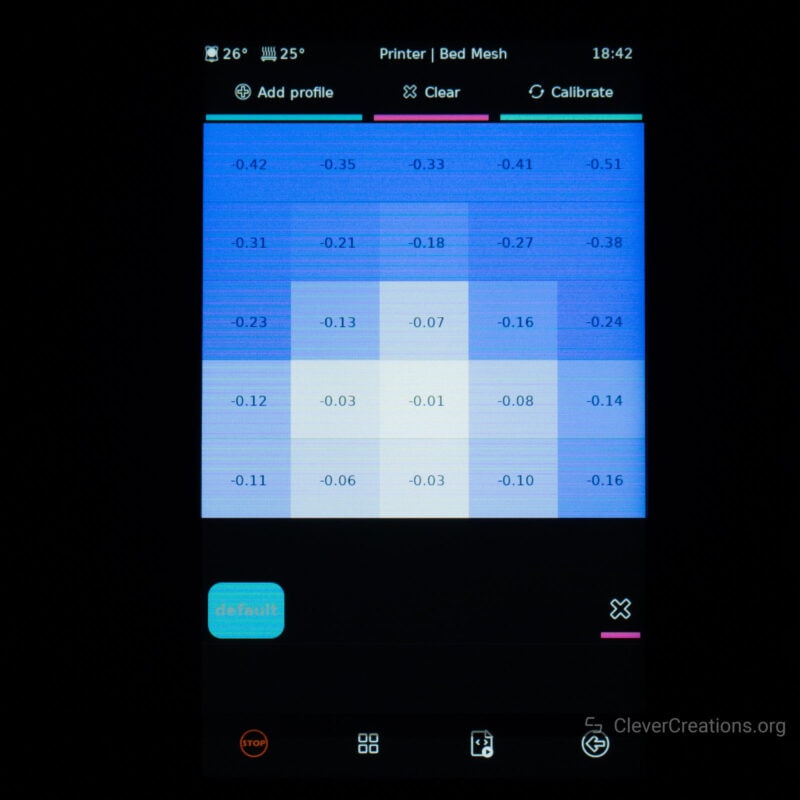
Like practically every 3D printer nowadays, the SV07 comes with a bed leveling sensor that helps the machine figure out where the print bed is at. By measuring a variety of points on the bed, the 3D printer can figure out how much it needs to compensate for unevenness in print bed height.
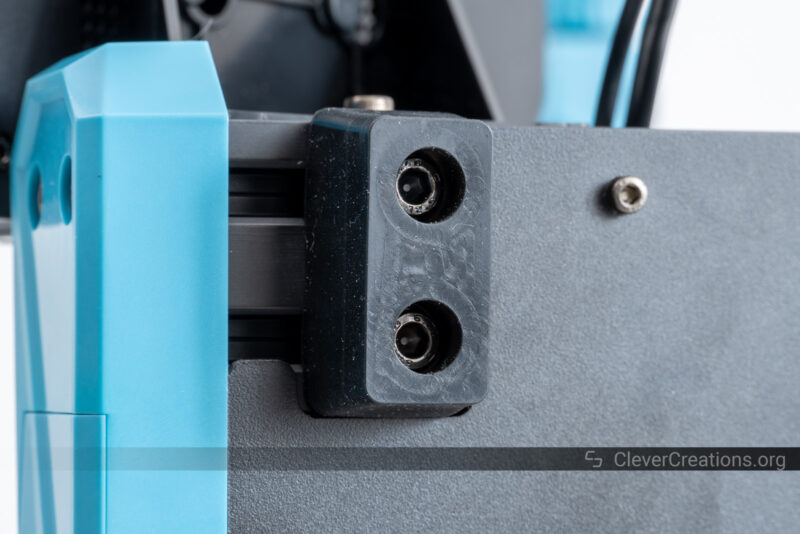
It’s a capacitive proximity sensor that is mounted on the side of the print head assembly. Compared to a physical probe, it isn’t as accurate. It’s still accurate enough, however. And because it does not have any moving parts, it has great reliability.
On the touch screen of the printer, you can see the results of the probing mesh. We find this to be very useful for checking the level of the print bed.
In our case, with the bed mounted on the hard spacers, the bed was only off by roughly 0.5mm. Enough to not need any manual leveling.
Other Features
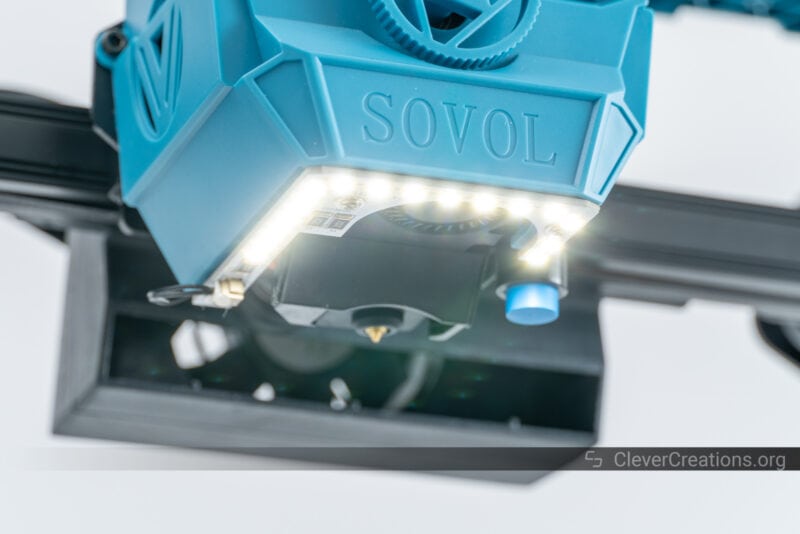
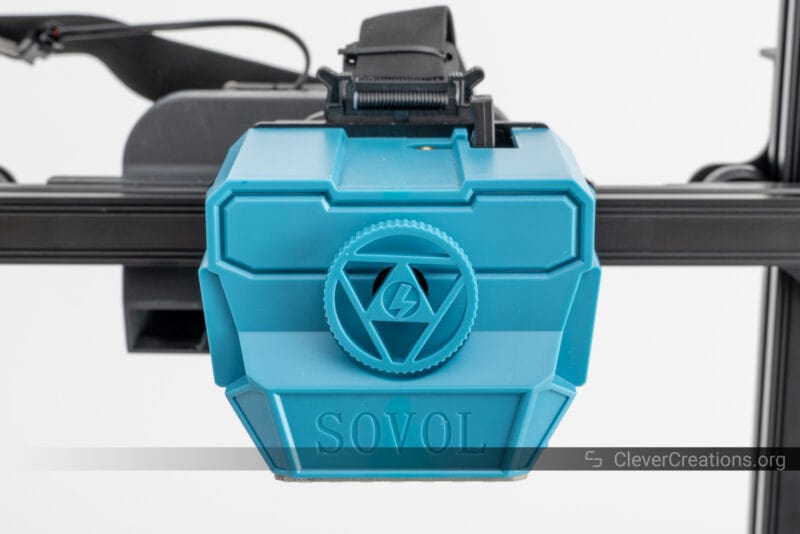
Another new feature we encountered on the SV07 is the LED lights on the print head. These help you get a better view of the 3D print while in progress. They provide plenty of light with a good color temperature (not too cool, not too warm).
The positioning of the LEDs is not ideal, however. They are placed forward relative to the nozzle, and we found that they don’t light up what’s going on under the nozzle very well.
They are still useful for getting a good view of what the print looks like when the print head lifts, but we think their use would have been better if they were moved back.
Another minor feature is the spool holder. It has an integrated bearing that allows for less friction when the filament is fed into the extruder. It’s a good addition to a 3D printer that is focused on high print speeds.
Build Quality and Construction
The low price and many features of the SV07 mean that Sovol had to make compromises in terms of overall build quality. There’s only so much that can be implemented on a 3D printer around $300 and it’s our job to check how the balance between price and quality is struck.
On the SV06 and SV06 Plus, we found this balance to be okay. There weren’t premium materials used and it wasn’t the most rigid structure, but no important safety features were omitted either. Let’s look at how the SV07 fares in that regard.
Rigidity & Kinematics
Given that the Sovl SV07 is a bed-slinger that aims for fast 3D printing, you might think that it needs to be very rigid to do so without significant quality loss. While this is somewhat true, it is less important than it is on other Cartesian 3D printers.
The main reason for this is the resonance compensation feature of the Klipper firmware. This compensates for some of the rigidity deficit by compensating for vibrations in the system.
This works well when configured correctly, but as we covered above, it is important to do the calibration sequence right. Otherwise, the resonance compensation won’t be able to compensate well and the print quality will suffer.
Something else we ran into during testing is that the default acceleration settings of the 3D printer are set way too aggressively. Acceleration is set to 8000 mm/s², whereas the default acceleration to deceleration setting is 3000 mm/s².
When we tested one of the included Gcode files with these settings, we ran into missing steps on the Y-axis. It appears like the Y stepper motor is not powerful enough to sling the bed around at those speeds, resulting in layer shifting.
We set the belt tension correctly and verified that the motor pulley was tightened properly, but unfortunately, that didn’t make a difference.
What did solve the problem was to reduce the aforementioned settings to 5000 mm/s² and 2000 mm/s² respectively. Still fast, but more realistic given the hardware configuration of the 3D printer.
We’re not entirely sure whether there was an issue with our SV07 machine or if Sovol went too ambitious with the acceleration settings. Given that our machine works fine in every other aspect, we think it might be the latter.
When set to new values, everything worked as intended and we were able to continue our testing without running into any layer-shifting issues.
Build Volume
You’ll can 3D print objects with a maximum 220x220x250 mm volume on the Sovol SV07. It’s the standard size for these types of 3D printers and is the same build area as the SV06 predecessor offered.
We think it’s likely that Sovol will bring out an SV07 Plus version with a bigger build area in the future. For now, the SV07’s print area is decent enough to do some nice 3D prints in.
Component Quality
In terms of component quality, the SV07 has made progress relative to the SV06 in certain areas but also steps back in others. It’s a logical consequence of the extra features at the same cost.
The Progress

One of the major improvements you’ll find on the SV07 is metal components for its motion system components. For example, the print head carriage and parts on the Z-axis gantry are made of steel.
Previously, these were all made of injection-molded plastic, which is not as rigid or durable.
There are still many plastic parts incorporated in the design of the SV07, but these are more cosmetic than structural.
Another improvement is the print bed, which is clearly of higher quality than before and doesn’t have the same issues with paint peeling that the SV06 had.
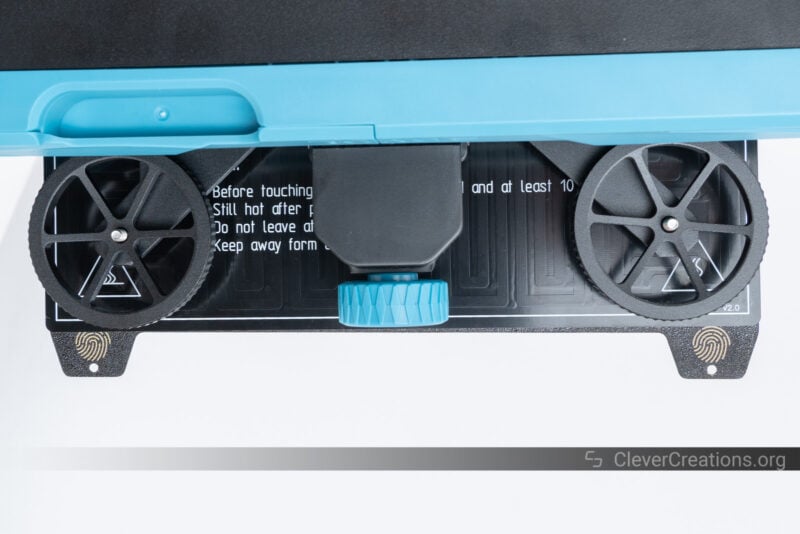
Something else we noted is the feet of the 3D printer. Where the SV06 had rubber feet that were stuck on with double-sided adhesive, the ones on the SV07 are bolted on. We had one of the rubber feet on the SV06 come off during shipping, so we are happy to see this improvement.
The Downgrades
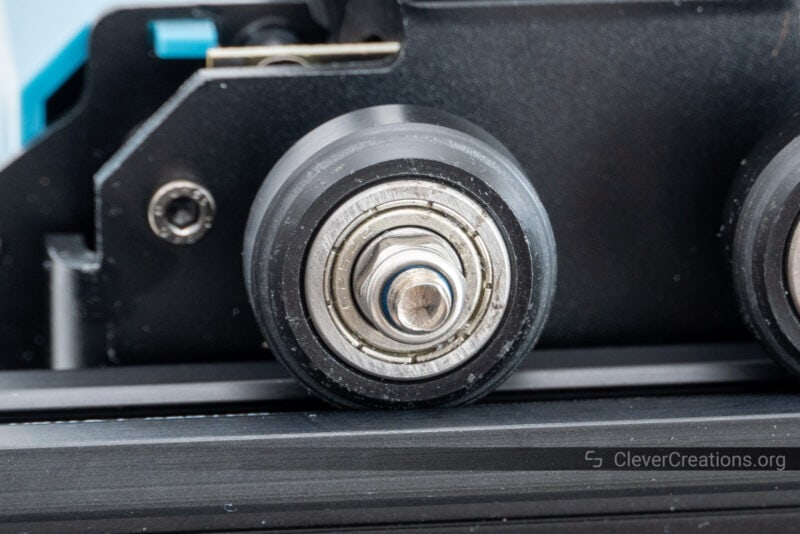
One of the main downgrades on the SV07 3D printer is the switch from linear rods and linear bearings to delrin V-slot wheels. These are known to wear out over time and require more frequent adjustments to keep them running smoothly.
The linear rods were one of the advantages of Sovol’s machines over similarly-priced 3D printers from Creality and Anycubic. With the switch to V-slot wheels, this advantage is lost.
Something else we encountered was a clicky bearing on one of the V-slot wheels straight out of the box. It resolved itself after a while, but we still consider it an indicator of overall build quality.
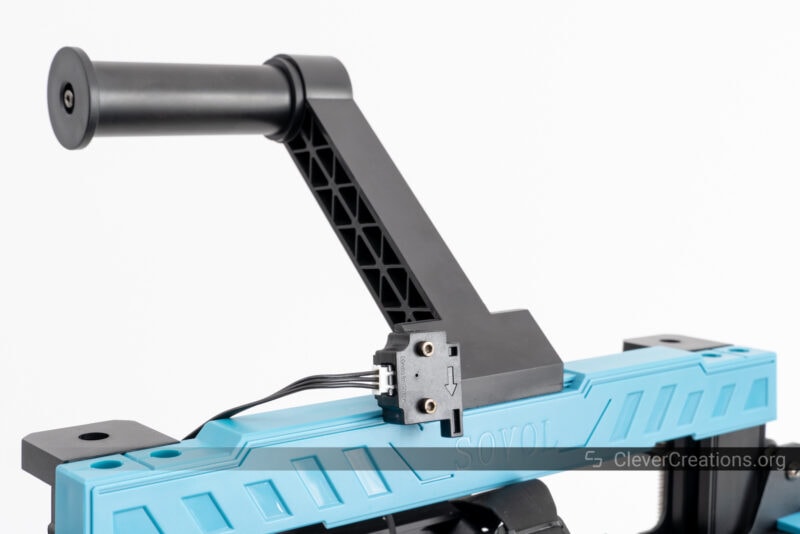
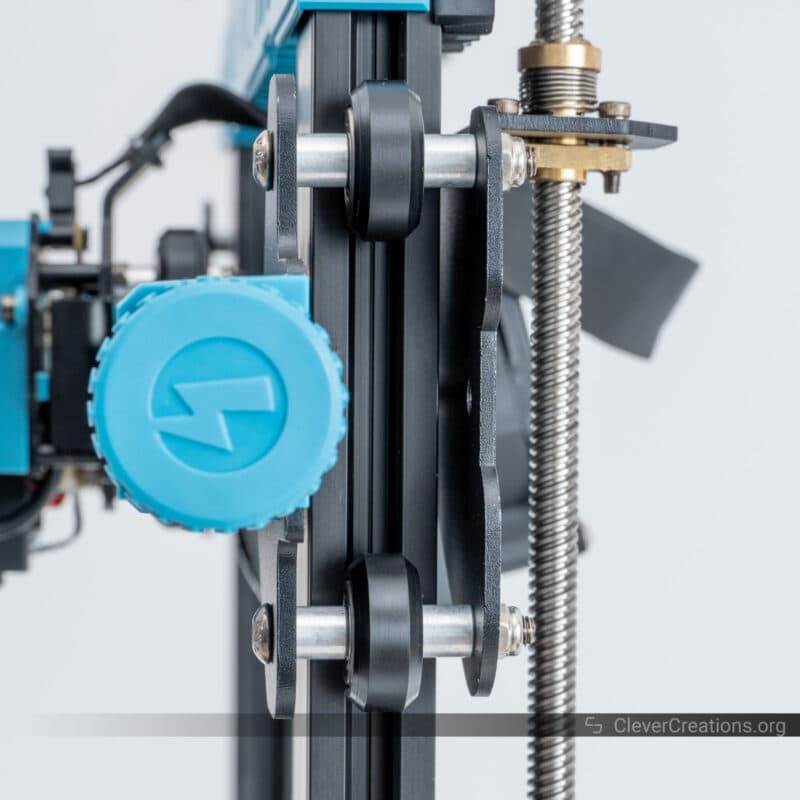
Z-axis Configuration
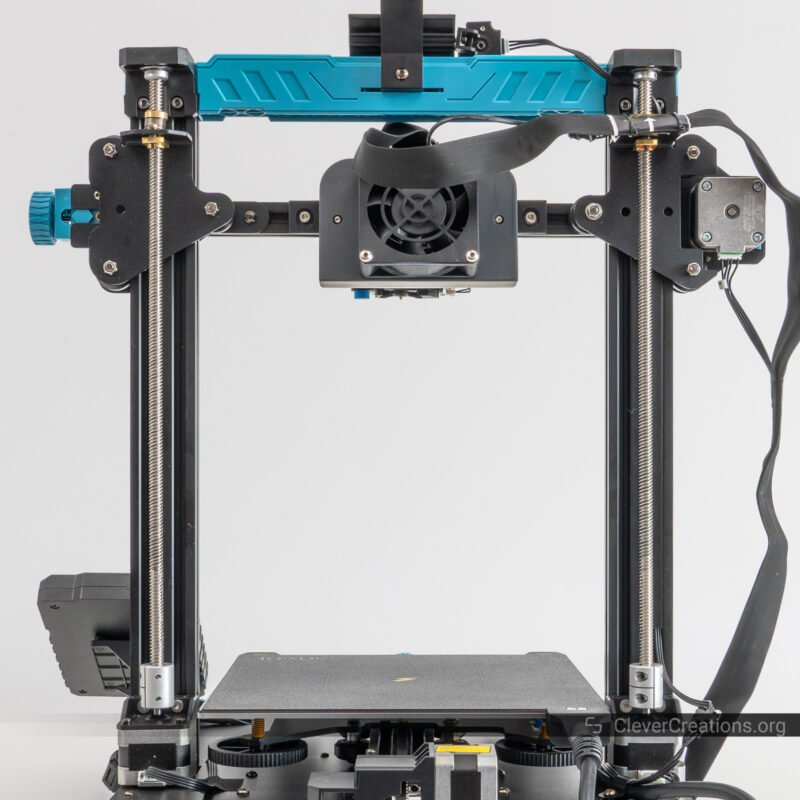
The Sovol SV07 comes with two stepper motors and lead screws on the Z-axis. It’s a common setup that prevents X-axis sagging.
Where the SV07 differs from other 3D printers is that its Z-axis stepper motors are independently controlled.
Other 3D printers often have these lead screws connected through a belt and pulleys to prevent missing steps and keep them in sync.
On the SV07, the X-axis is kept parallel to the print surface through firmware. Its Z-tilt function automatically compensates for any misalignment by adjusting the height of the X-axis on both sides individually.
In practice, we found this to work very well. We didn’t run into any issues with poor first layers or other issues caused by a misaligned X-axis on our tests.
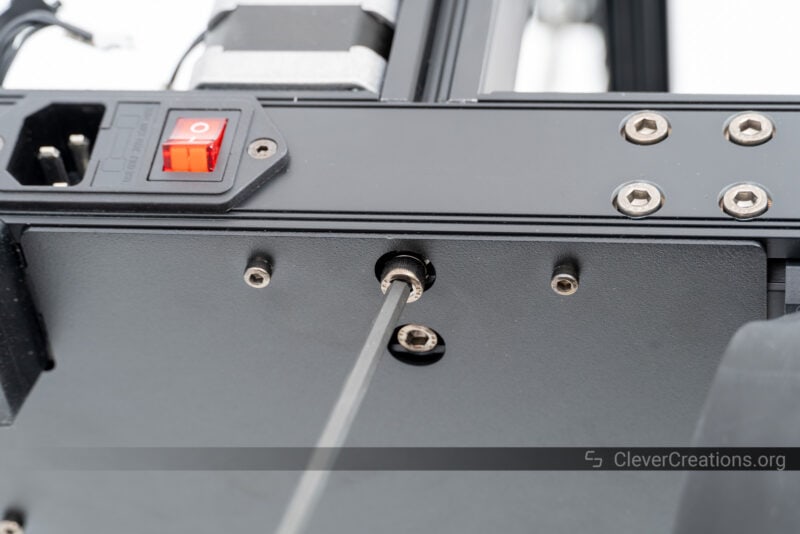
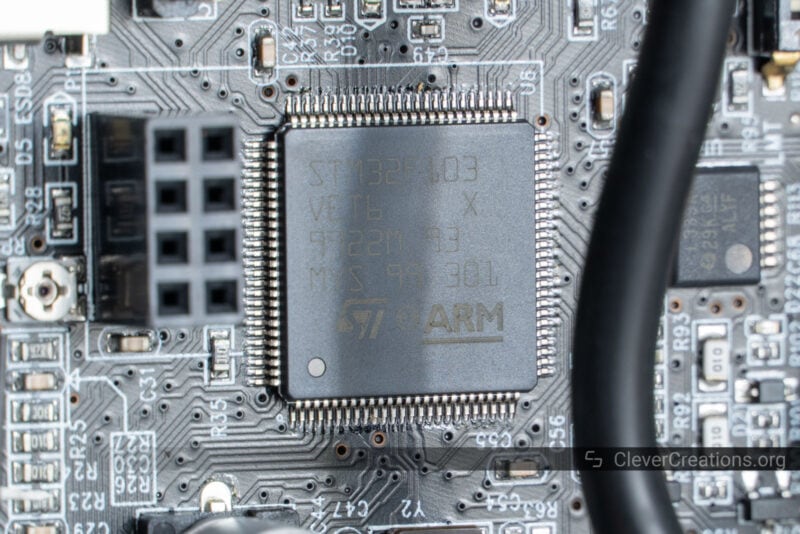
Electronics
Controller Board
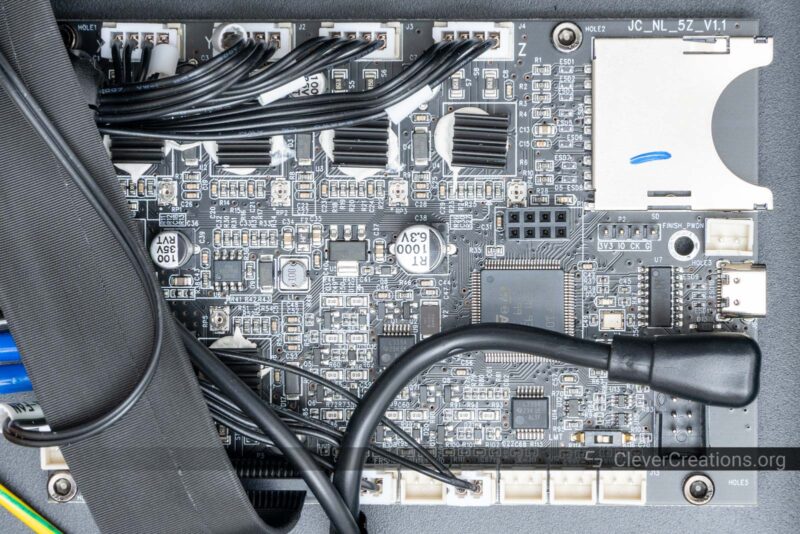
The controller board of the SV07 is similar to that of the SV06 and SV06 Plus. One specific difference that stands out to us is the use of an STM32F103 chip instead of the previous GD32F103.
It could be that Sovol made this change due to chip-shortage issues, but it could also have been a choice for better Klipper compatibility.
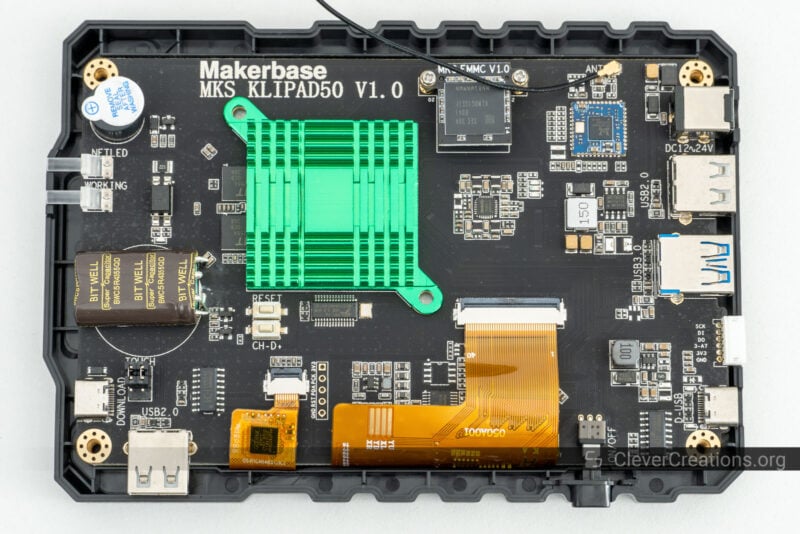
On that topic, the Klipper aspect of this 3D printer is handled by a Makerbase Klipper Pad. It’s an off-the-shelf solution that allowed Sovol to re-use its existing controller board designs. It’s a practical solution that goes a long way in keeping the costs of this 3D printer low.
Power Supply
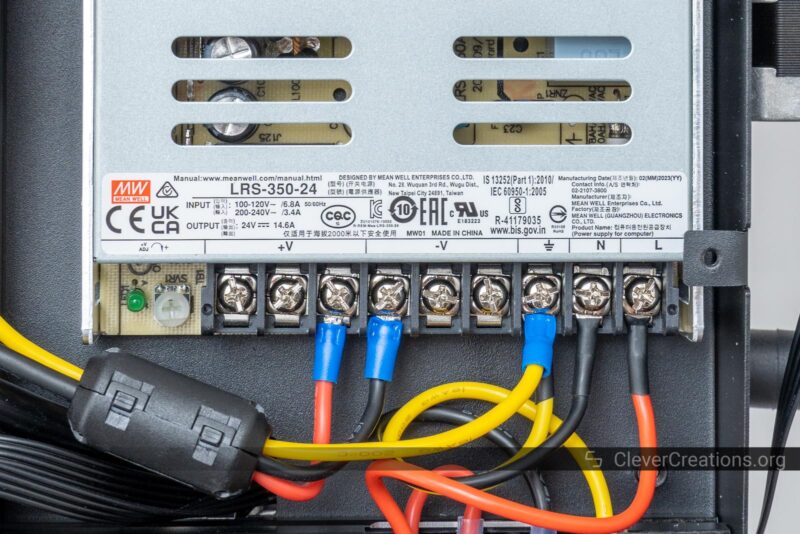
The SV07 uses an actively-cooled 350W MeanWell-branded power supply. It’s exactly what we like to see. It’s a reliable choice.
Safety
We find ourselves keeping the safety sections short lately (a good thing). With the SV07, that’s no exception.
All safety aspects we tested for on the machine are okay. Grounding, fuses, crimped wire ferrules, wire gauges, it’s all within the required parameters and there are no issues we can report.
Cable Management
On the cable management side, however, we did notice a couple of things that could be improved.
The first thing is that the cable management feels a bit rough around the edges. A lot of it consists of the user tie-wrapping cables to the components during the printer assembly. Even though it works and is acceptable at this price, we’d love to see something more integrated.
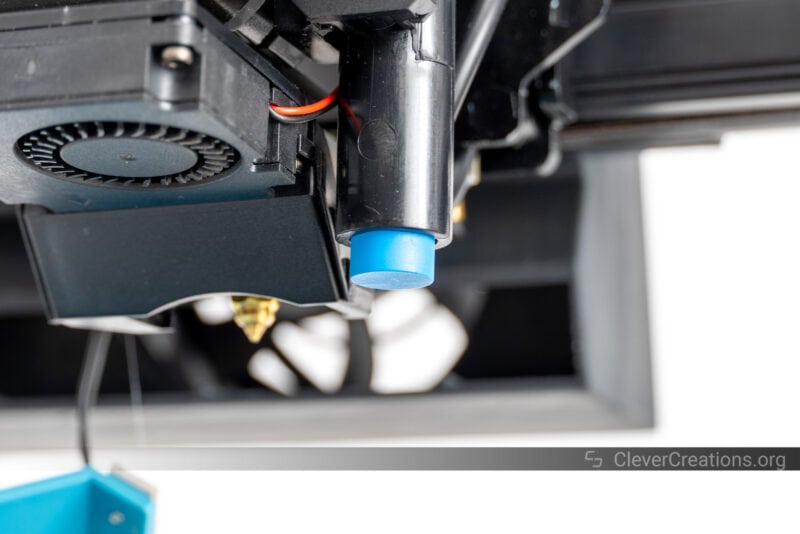
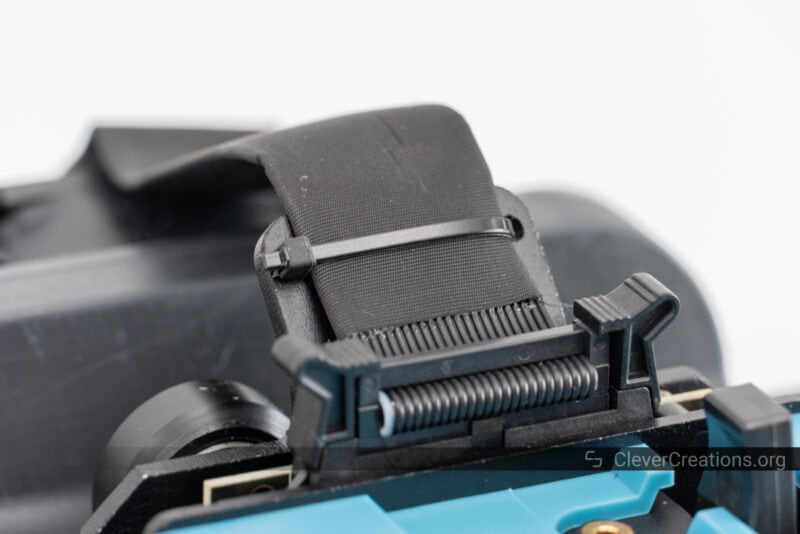
The second thing, however, is a bigger concern to us. The ribbon cable of the print head rubs against the large print cooling fan when the print head moves around.
Because of this, the ribbon cable gets damaged over time. We’d like to see an improved solution for this by Sovol ASAP, as it can be a serious safety concern.
In the couple of weeks that we tested the SV07 3D printer, we saw considerable wear on the ribbon cable.
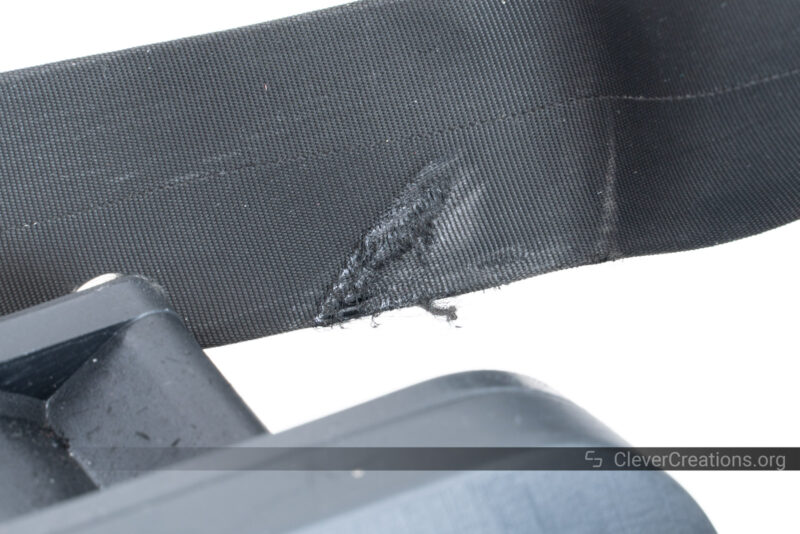
We suspect this is because the large fan was a late addition to the 3D printer that was not thoroughly tested by the development team.
If you buy the SV07 and don’t want to risk problems in this area, you can put a layer of duct tape around that section of the ribbon cable and keep an eye on it. It’s not elegant, but it works.
Sound Levels
The sound levels of the Sovol SV07 mainly depend on the use of the large print cooler fan. If you frequently print PLA, PLA+, or other low-temperature materials, you are likely to use it a lot.
With that fan at full power, the 3D printer is loud. Almost unpleasant to be around in the same room.
With the fan at 80% power or less, however, we found the sound levels to be more manageable. The fan still puts out plenty of air at lower settings, so our recommendation is to not run it at 100% unless you absolutely need to.
When you do that, the SV07 is nearly as silent as any other 3D printer in this class.
Ease of Use
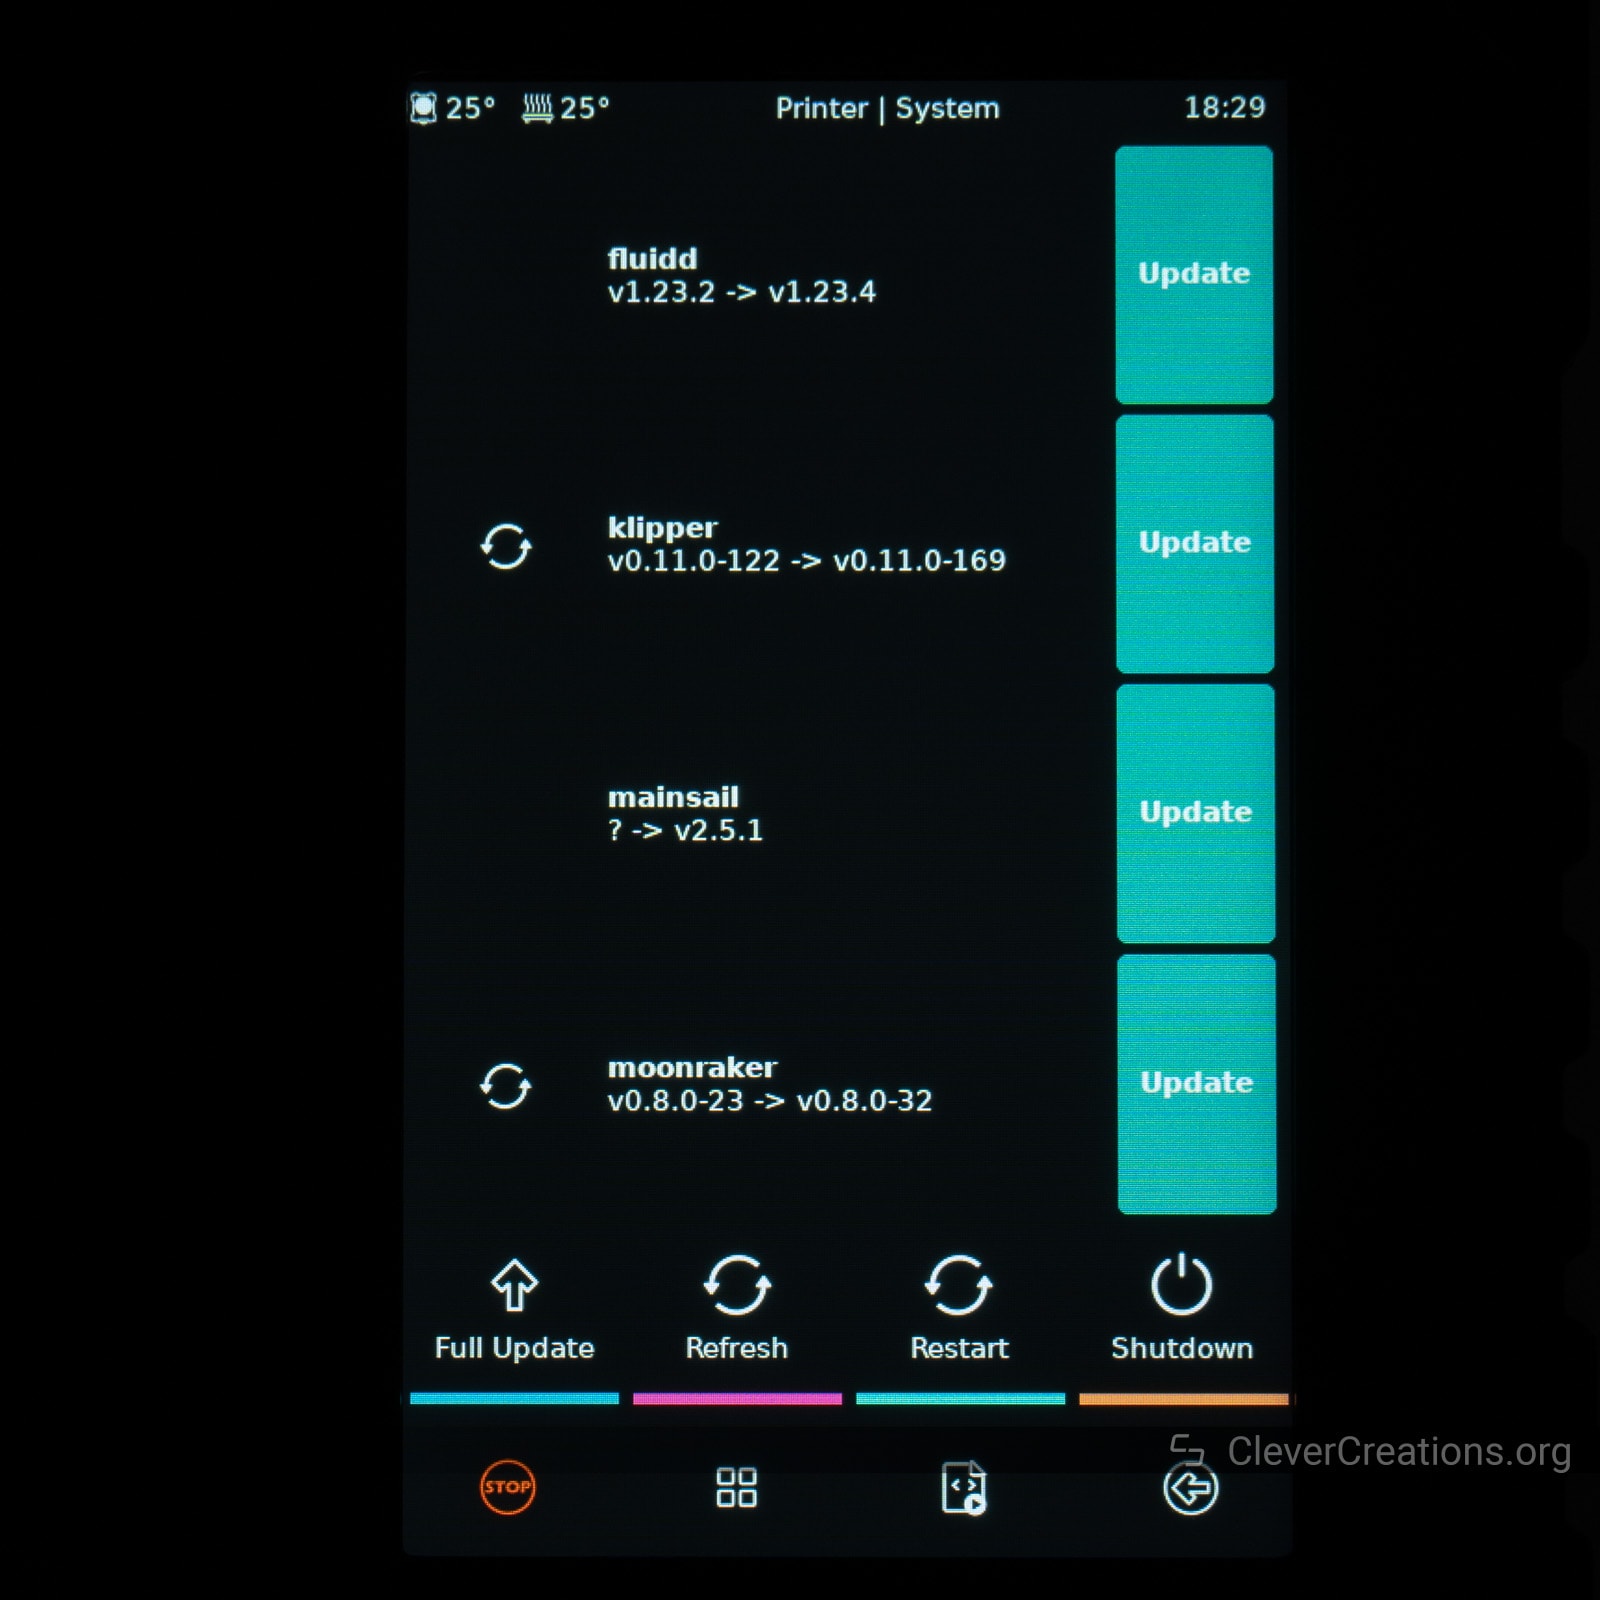
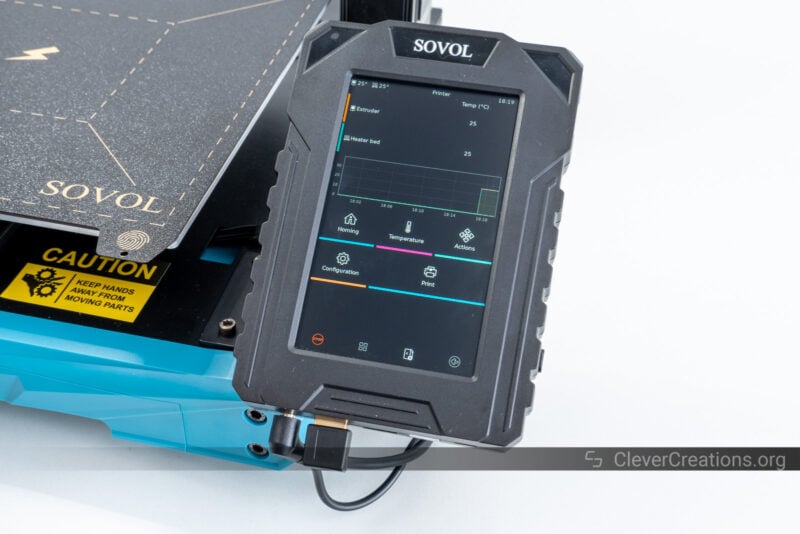
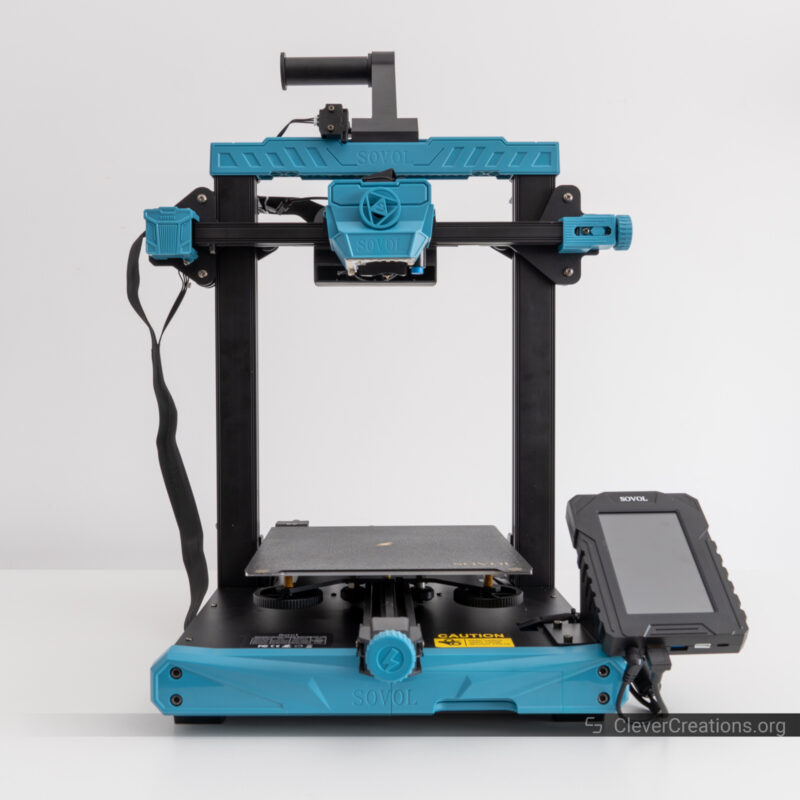
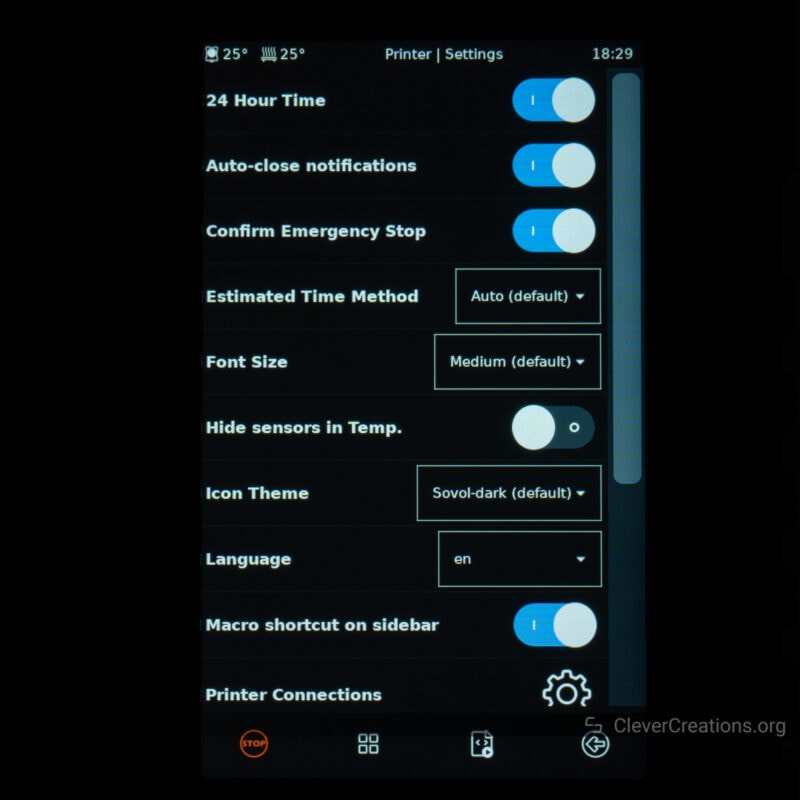
To interact with the SV07 you use the 5″ touch screen of the Makerbase Klipper Pad. It’s a larger screen with a higher resolution than what we’re used to seeing. It’s surprisingly responsive, no doubt due to the more powerful processor behind the scenes.
The interface on the touch screen is KlipperScreen, which interfaces with Klipper via Moonraker. It’s a more complicated user experience than the standard interfaces, but that does mean more potential to tweak your settings and prints.
If you are new to Klipper, it might take some time to get used to, but in the end, it’s an intuitive and powerful solution.

Maintenance and Repairability
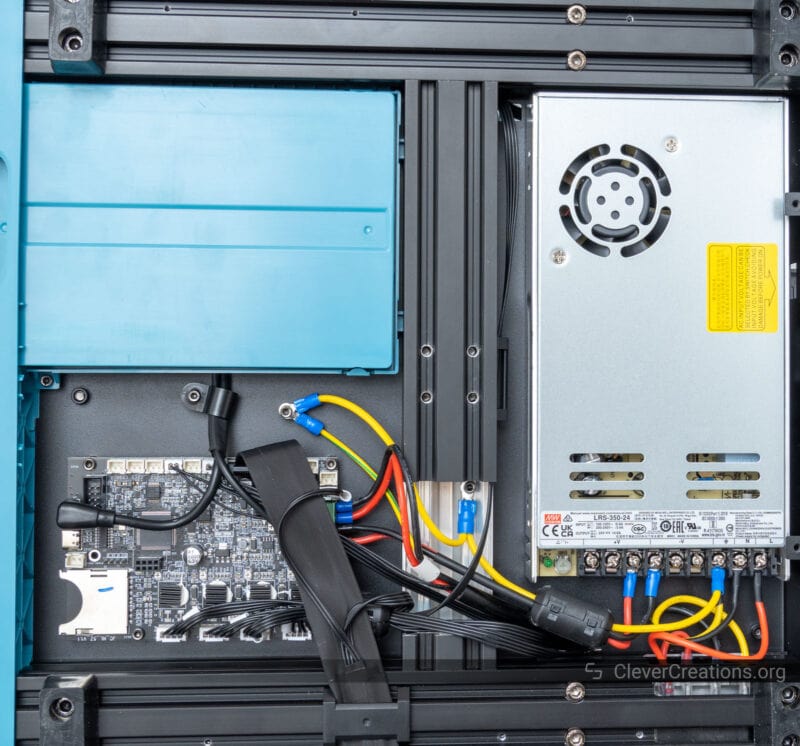
Most of the Sovol SV07 components are easy to access and replace if necessary. All electronics (aside from the Klipper board) can be found on the underside of the machine. By removing a single panel, you have access to the entire area.
The print head is a bit harder to take apart and troubleshoot because of the planetary gears, but it’s unlikely you’ll have to get into those during regular maintenance.
Overall, the repairability and maintainability of the SV07 are excellent for a 3D printer in this price range.
Sovol SV07 Print Quality
Despite its flaws, when configured correctly, the Sovol SV07 3D printer is capable of delivering quality prints without issues. In our testing, we had great results across the board with PLA, PETG, and ABS at high print speeds.
We’ve included a list with setup suggestions at the conclusion of this review. These will help you solve the issues we ran into during the testing of this 3D printer.
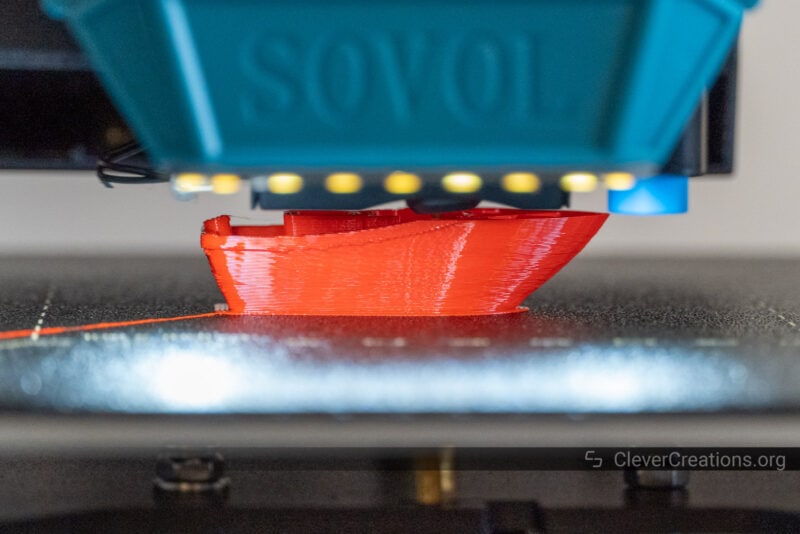
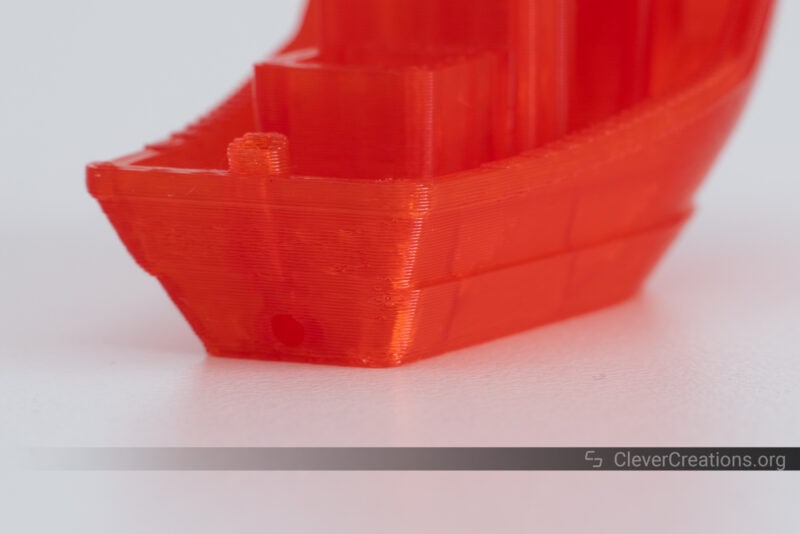
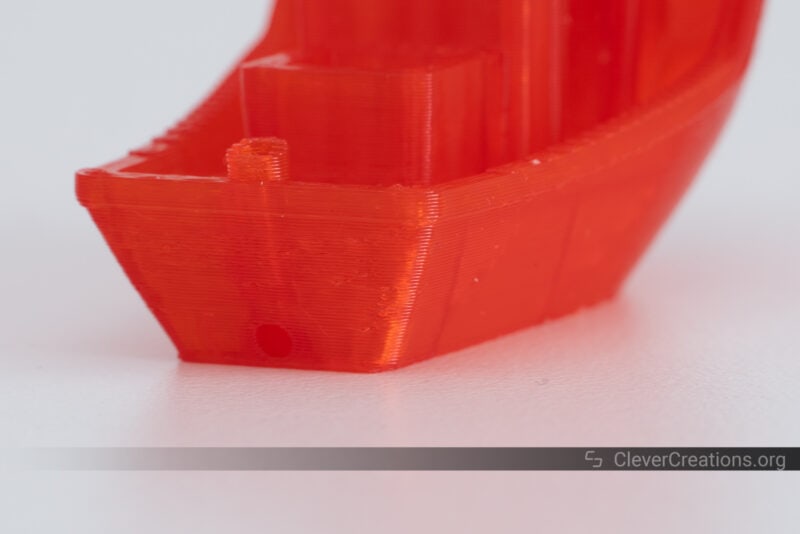
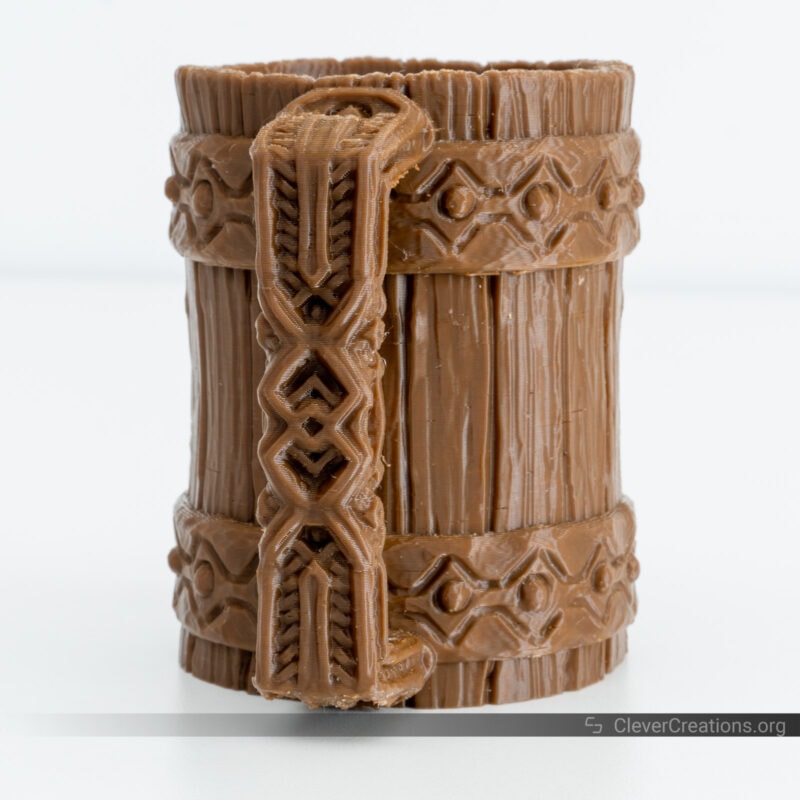
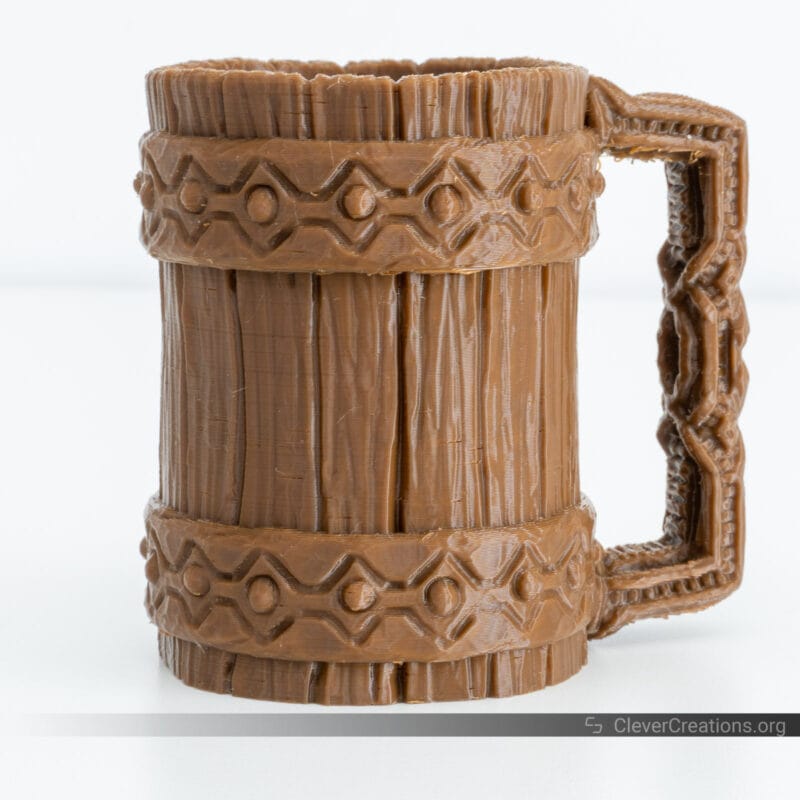
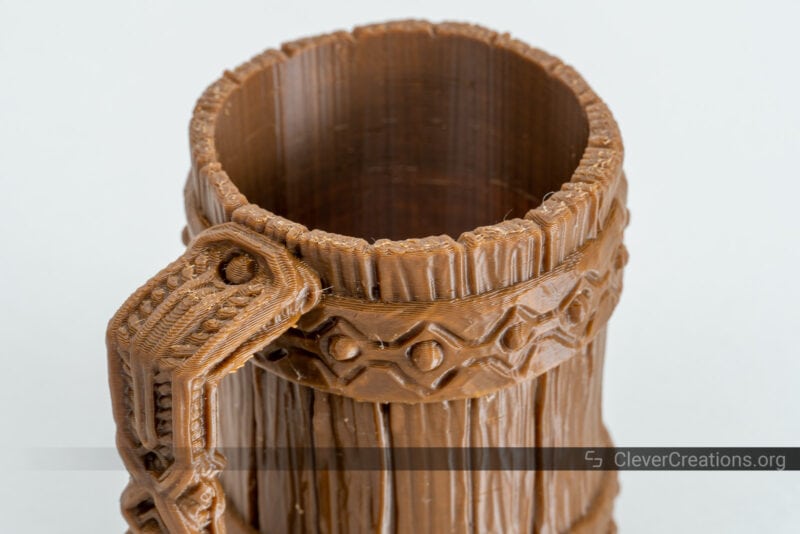
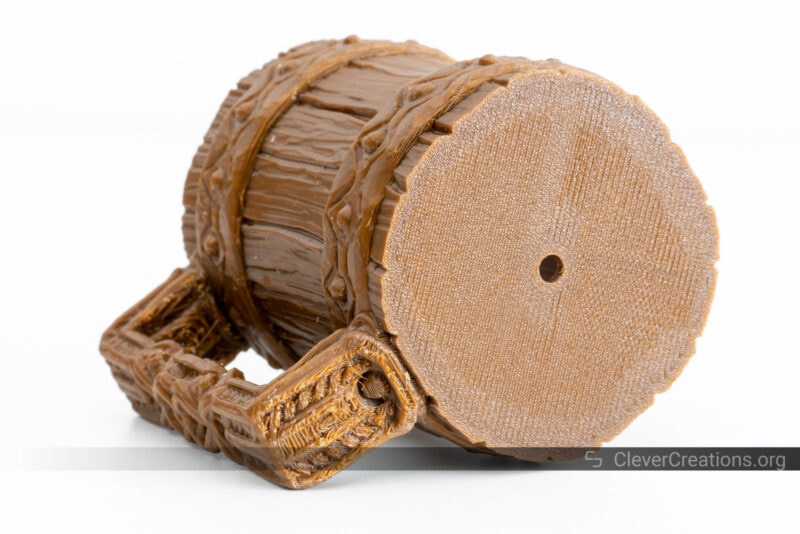
The Rowdy Flagon – Tankard
The test print of the tankard turned out great, especially in terms of the details. The only negative thing to note is that the external shell has some underextrusion which we narrowed down to loose extruder spring tension.
It’s something that didn’t show up on any slower prints, but when tasked with outputting more filament, the extruder couldn’t push enough filament through.
After increasing the spring tension, the SV07 3D printer handled the rest of our fast prints without issues.
This print has some strings here and there. Our only roll of brown filament had aged a bit and was not behaving as a new one.
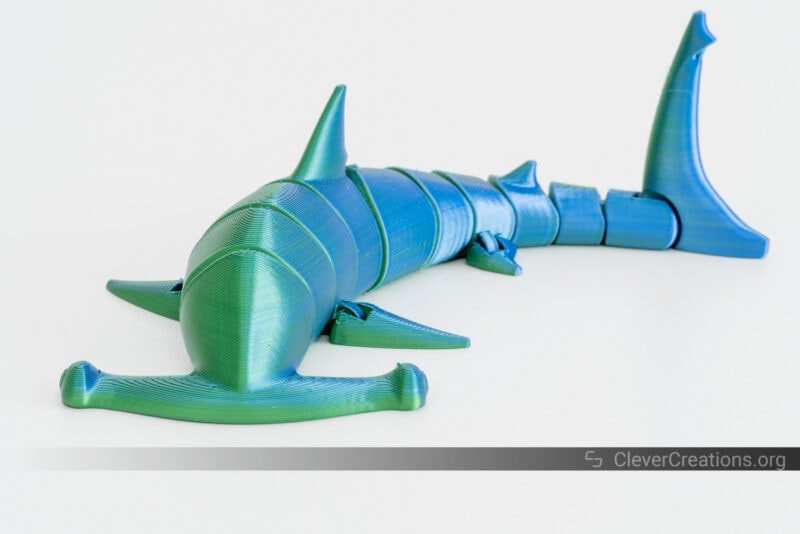
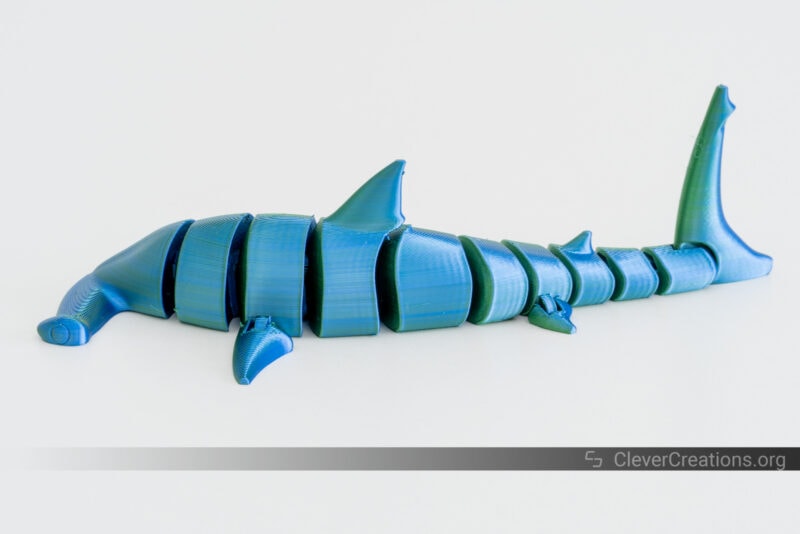
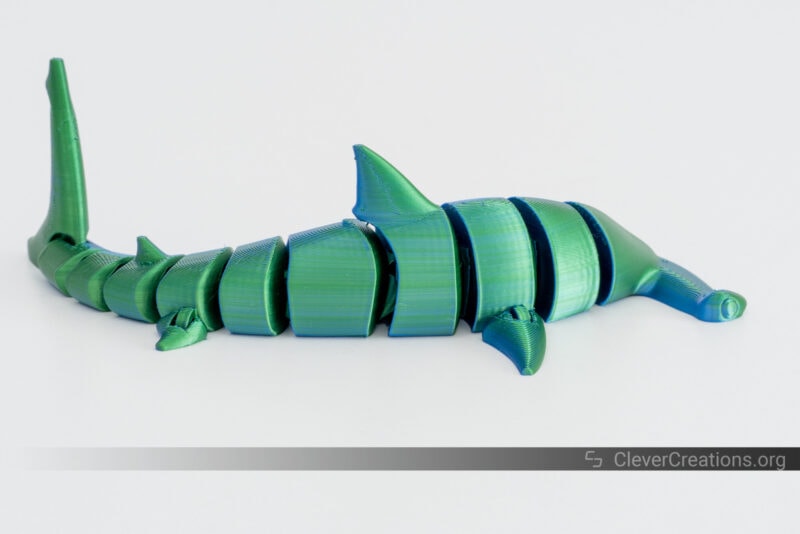
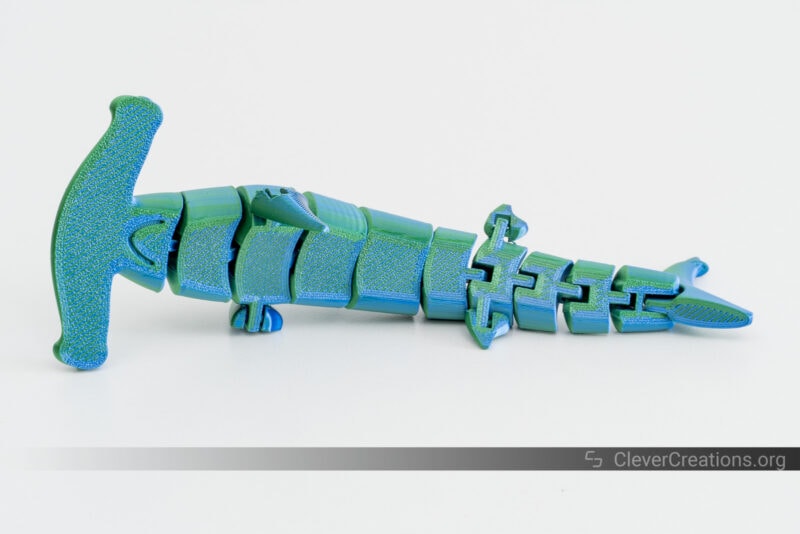
Flexi Hammerhead Shark
This Hammerhead shark was a great test for the printer’s dimensional accuracy at high print speeds. The printer handled the print without any problem and after removing it from the print bed, all sections were able to move without having to pry them loose first.
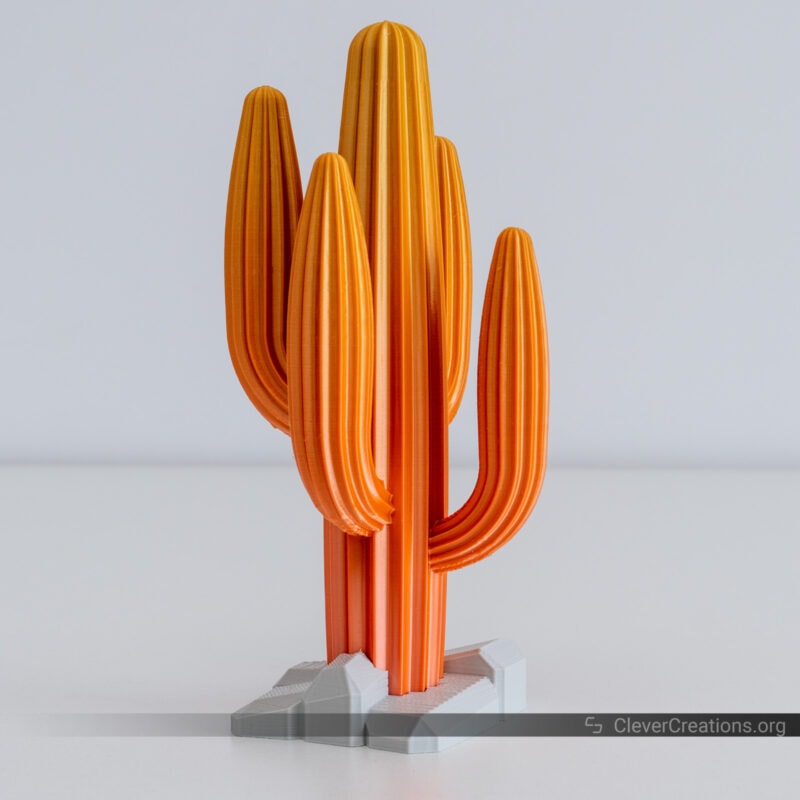
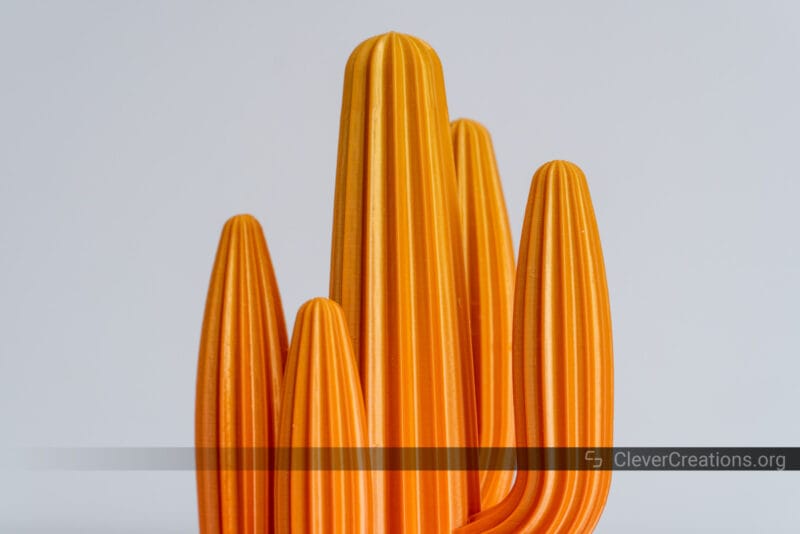
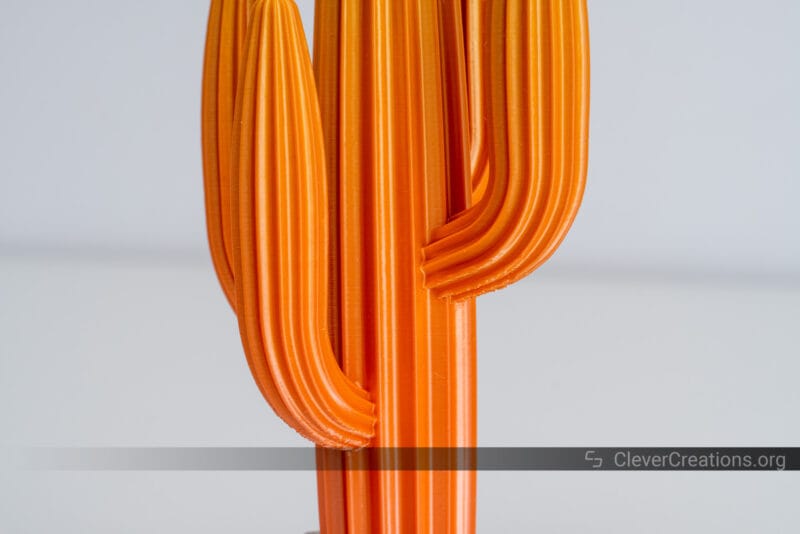
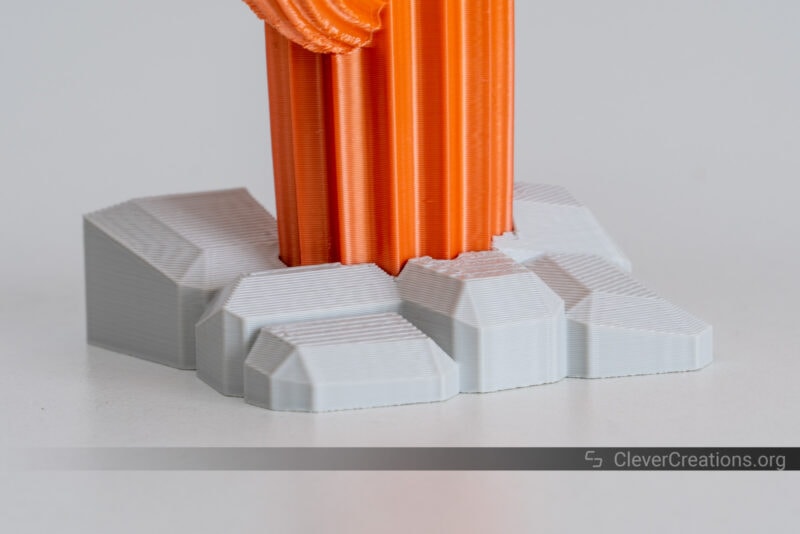
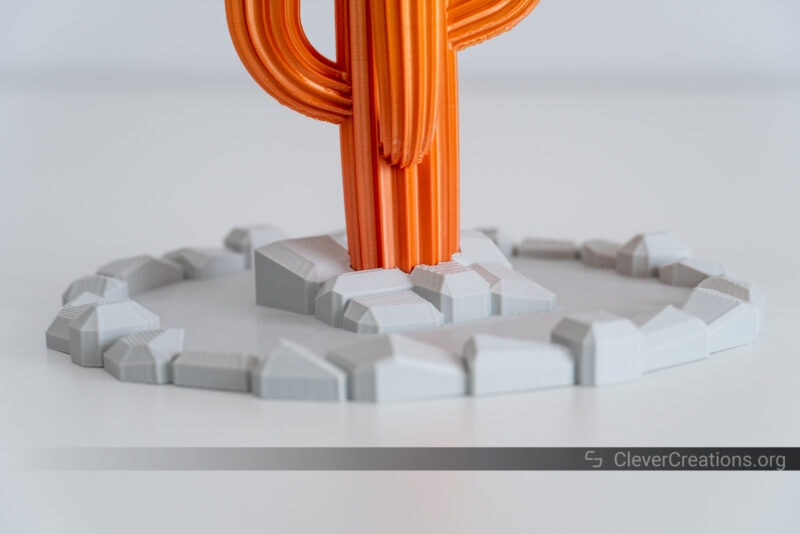
Saguaro Cactus with Rocky Base
The results of this cactus were nothing to complain about either. The only issue we noticed was minor ringing on the base that can be resolved by tuning the 3D printer further.
The large base took up nearly the entire print surface but came out perfectly thanks to the automatic bed leveling system.

Alternatives to the Sovol SV07
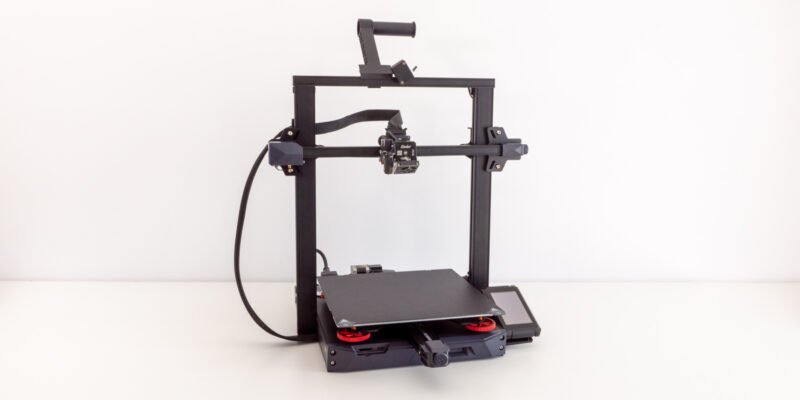
Sovol SV06 vs SV07
The SV07, with its Klipper firmware and high-powered print cooling, feels like a whole other class 3D printer than the SV06. In terms of print speed, the SV06 doesn’t light a candle to the SV07.
In terms of reliability, however, the SV06 still has the upper edge in our book.
The V-slot wheels of the SV07 are not as durable as the linear rails of the SV06, and you are likely to run into more issues with the former over time. While this is an aspect that you can upgrade, it’s still something to keep in mind when deciding between the two.
The version of the SV07 that we tested also had a few niggles that we would like to see addressed by Sovol in future revisions. The SV06, on the other hand, is well-fleshed out at this point.
If you already have a Klipper Pad or SBC that is configured to run Klipper firmware, you won’t go wrong picking up the SV06. Especially given its considerably lower price than the SV07.
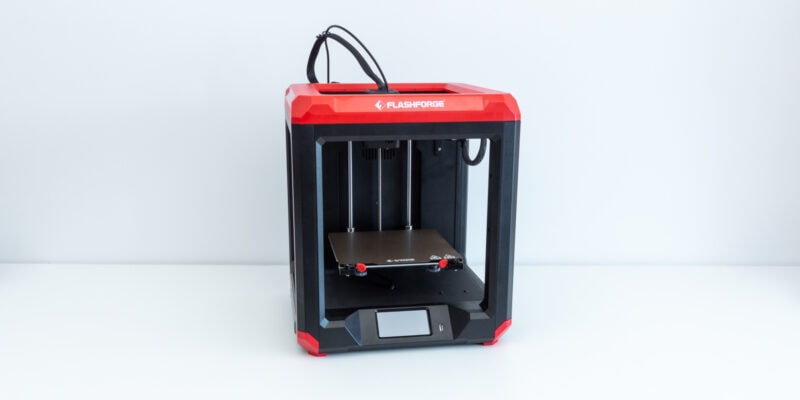
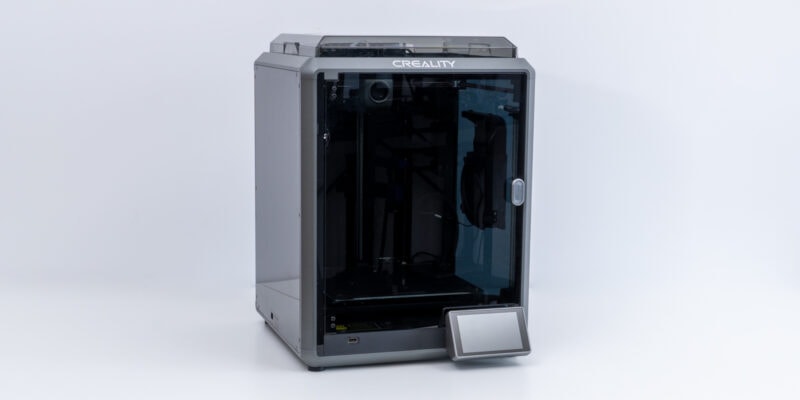
Anycubic Kobra 2
Anycubic’s latest release, the Kobra 2, is the successor to the Anycubic Kobra and promises similar print speeds as the SV07. It doesn’t have the same Klipper firmware as the SV07, but it has plenty of other features that make it a respectable alternative.
For example, the Anycubic Kobra 2 uses linear rods with metal rollers that are more reliable than the V-slot wheels of the SV07. It also comes with a sensor for automatically setting the nozzle’s Z offset, which makes the calibration process less of a pain.
When it comes to the overall package, though, we feel that the SV07 still has the upper hand. Its higher-powered fan and Klipper firmware make a big difference in achieving fast prints.
Bottom Line
The Sovol SV07 3D printer has not impressed us as much as Sovol’s other recent releases. While it is a capable 3D printer at its core, it does not seem to have been tested enough before release.
There are several aspects, like the print head wiring, manual translations, and the default acceleration settings, that feel rushed and could have been improved with more development time.
The price and feature set are still highly competitive when compared to other 3D printers in its class, so it’s worth considering if you’re on a tight budget and don’t mind putting a bit of extra work in to get the best out of this 3D printer.
If you decide to buy the Sovol SV07, our recommendations are as follows:
- Run the Input Shaper calibration and make sure that the accelerometer is correctly aligned with the axes.
- Reduce the acceleration and acceleration to deceleration settings to 5000 mm/s² and 2000 mm/s² respectively to avoid missing steps. Higher settings might work too, but based on our testing, the default 8000 mm/s² and 3000 mm/s² are too ambitious.
- If you decide to use the rigid spacers to mount the print bed, use the long bolts from the spring mounting. Otherwise the nuts will vibrate off.
- Adjust the extruder spring tension. Ours needed to be increased to extrude properly at high speeds.
- Reduce the large print cooling fan speed to 80% or lower to reduce noise.
- Add an extra layer of tape to the section of the print head ribbon cable that rubs against the big fan.
With those changes, you’ll solve the majority of the issues we found on the Sovol SV07 3D printer during this review.
Sovol will probably address these issues in future iterations of the SV07. In the past, we have seen that the company is typically great at incorporating feedback into its products.
Until then, however, we’d suggest that you be ready to put some extra work in yourself to get this 3D printer to its full potential.
I have bought the Sovol SV07 Plus and sad to say that I beleive I have wasted my money. There has been an extremly high failure rate with this machine. I have had to have the control board replaced after the first one kept crashing. The bed leveling system had to be reset after every attempted print. I have have the machine change the position of the base in the middle of the print several times. The program failed every time if there machine had to restart (filament runout, power failure). Cables comming lose/detached in the middle of prints. I have continualy trying to get this machine to work and chased numerous “fixes” to sort the problems. My only plus is that the replacement parts were reasonbly quick.
Unfortunitly I can see only one use for this and that is as an ancor for a boat.