
- Fast engraving and cutting
- Curved engraving capabilities*
- Precise alignment of engravings and cuts
- Generous work area
- Fully enclosed
- Excellent safety features
- Relatively silent
- Integrated fume exhaust
- Quick-swappable laser modules
- Wi-Fi connectivity
- Built-in lighting
- Great accessories
- Limited user interface
- *Probe doesn't work well with steep slopes
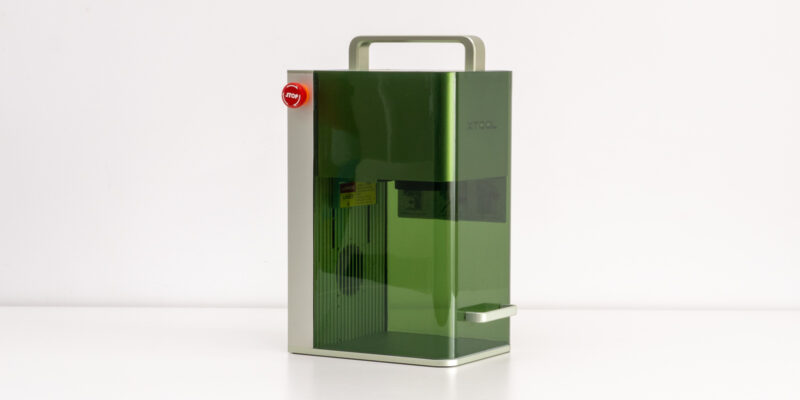
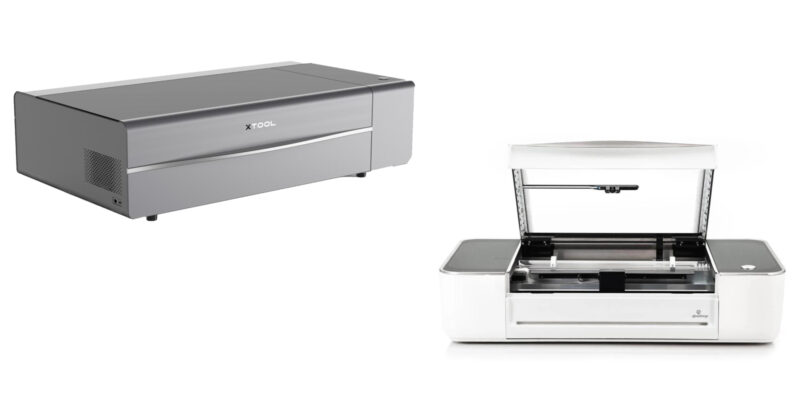
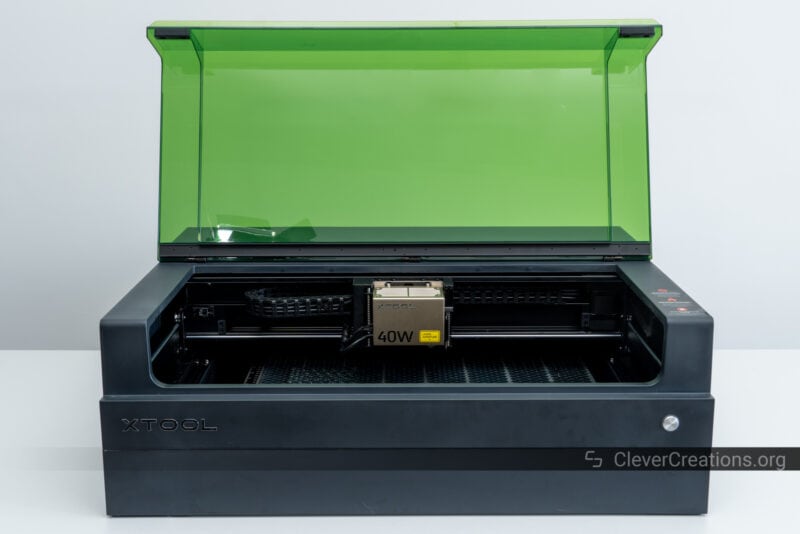
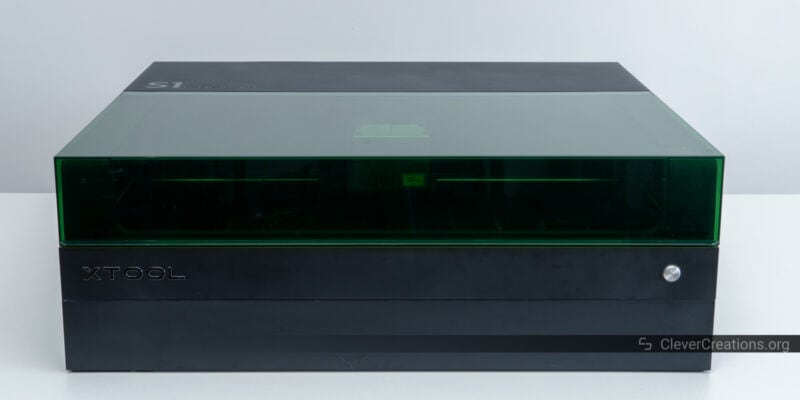
The new xTool S1 laser cutter is a good example of a machine that pushes the boundaries of what is possible. With a 40W(!) diode laser stack, a full enclosure, curved object engraving, and many useful features, it has a lot to offer.
You can even upgrade the machine further with a variety of accessories. From automatic passthrough functionality to an IR laser module that lets you engrave metals, it sounds like the ultimate laser machine.
Today, we’ll put the laser cutter and its accessories to the test to see how their features translate into real-life performance. After reading this xTool S1 review, you’ll know exactly whether this is the machine for all your projects.
xTool S1 Specs
| xTool S1 40W | xTool S1 20W | |
|---|---|---|
| Laser Power | 40W | 20W |
| Spot Size | 0.08 x 0.10 mm | 0.08 x 0.06 mm |
| Working Speed | 600mm/s | |
| Working Area | 498 x 319 mm 19.61″ x 12.56″ |
498 x 330mm 19.61″ x 13″ |
| Working Area with Automatic Conveyor Feeder | 470 x 3000 mm (additional transmission rail is required) | |
| Output Voltage | 25V 11A | 24V 8A |
| Connection Way | USB, Wi-Fi | |
| Support XCS System | Phone: Android & iOS Tablet: iPad Computer: Windows 10 or above & macOS |
|
| Software | XCS, Lightburn | |
| Support File | SVG, DXF, JPG, JPEG, PNG, BMP, TIF | |
| Product Weight | 20KG | |
| Product Size | 765 x 561 x 183 mm (excluding riser base) 765 x 561 x 268 mm (including riser base) |
|
| Price | Check latest | Check latest |
Unboxing
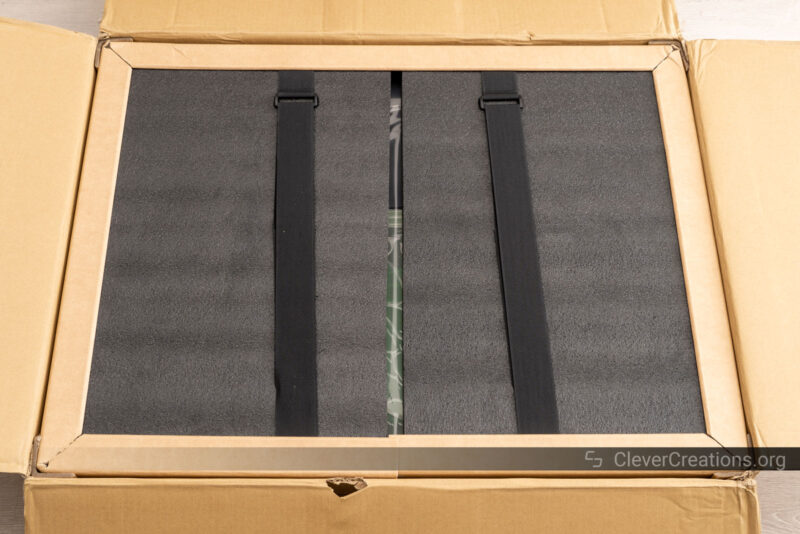
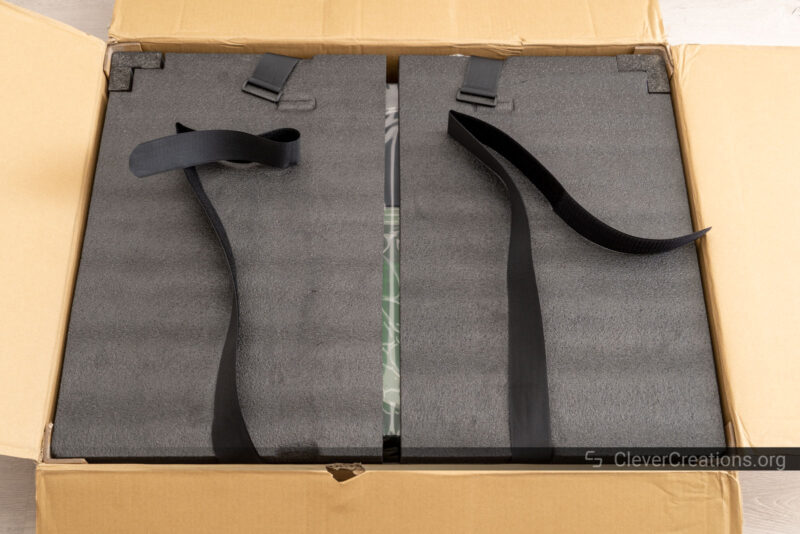
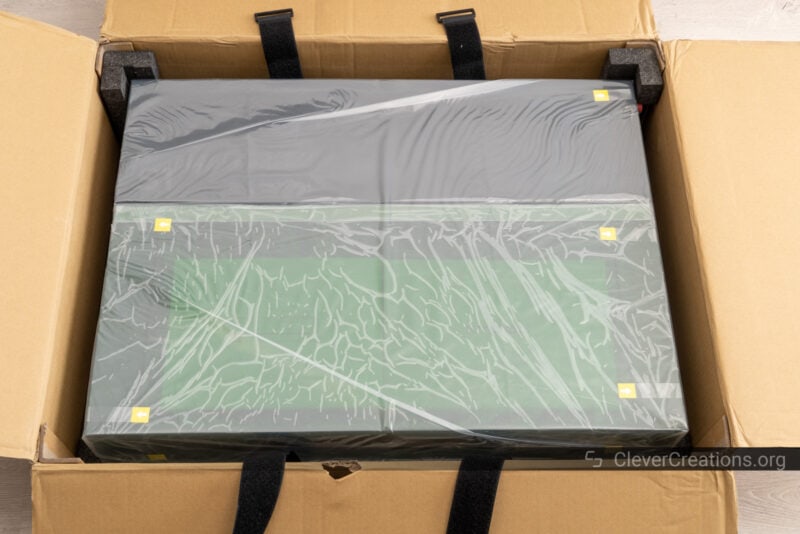
Getting the xTool S1 laser cutter out of the box was a bit of a puzzle. But once you know how it works, it’s not that difficult. You’ll need to remove the carton outer frame, loosen the velcro straps, take out the foam pieces, and finally the machine itself.
We found that the last step is best done with two people. While the machine isn’t that heavy, its size makes it impractical to move around just on your own.
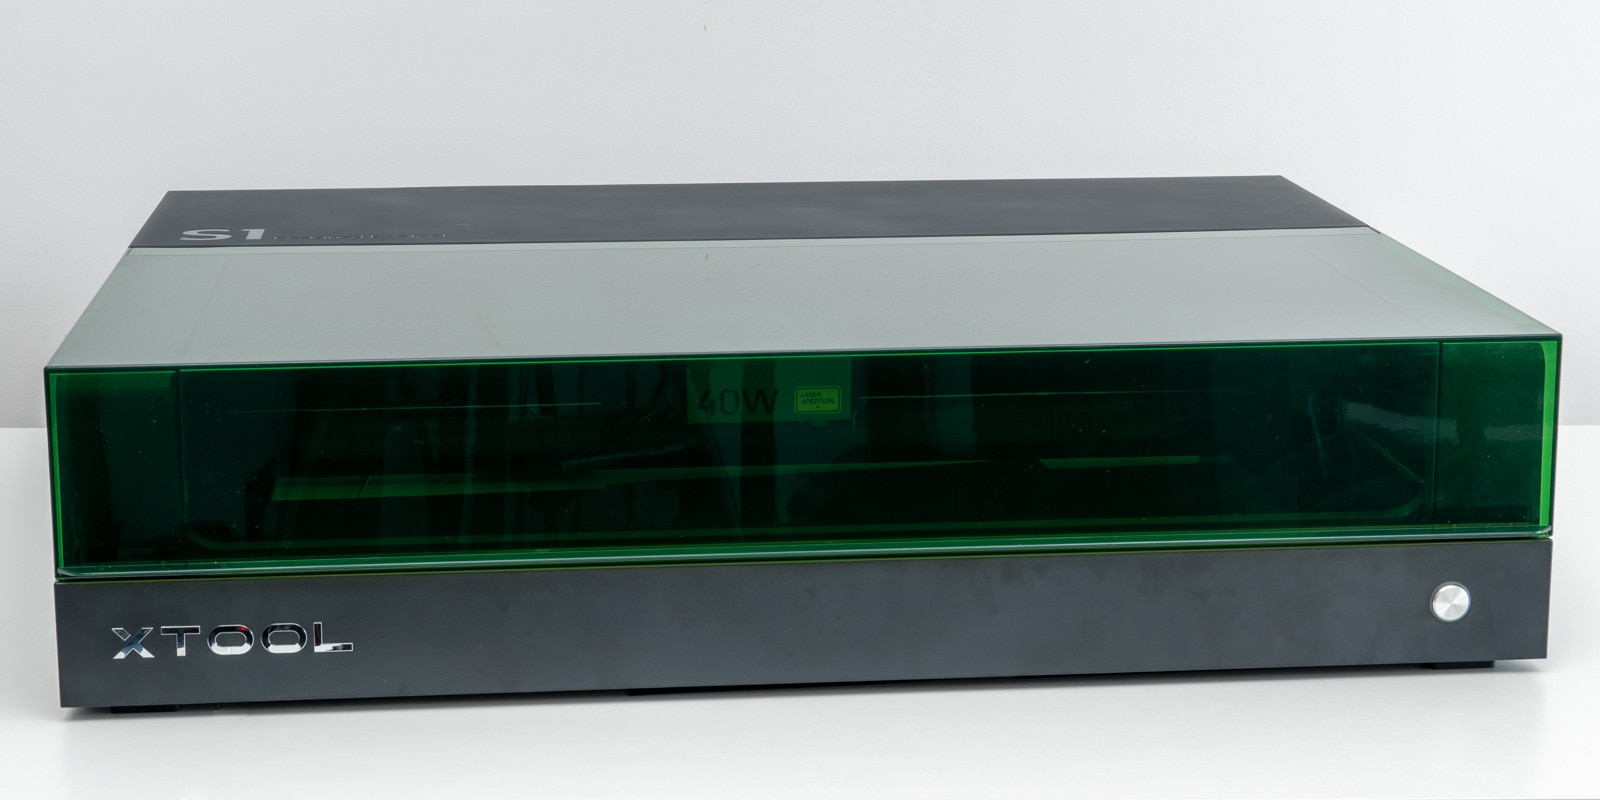
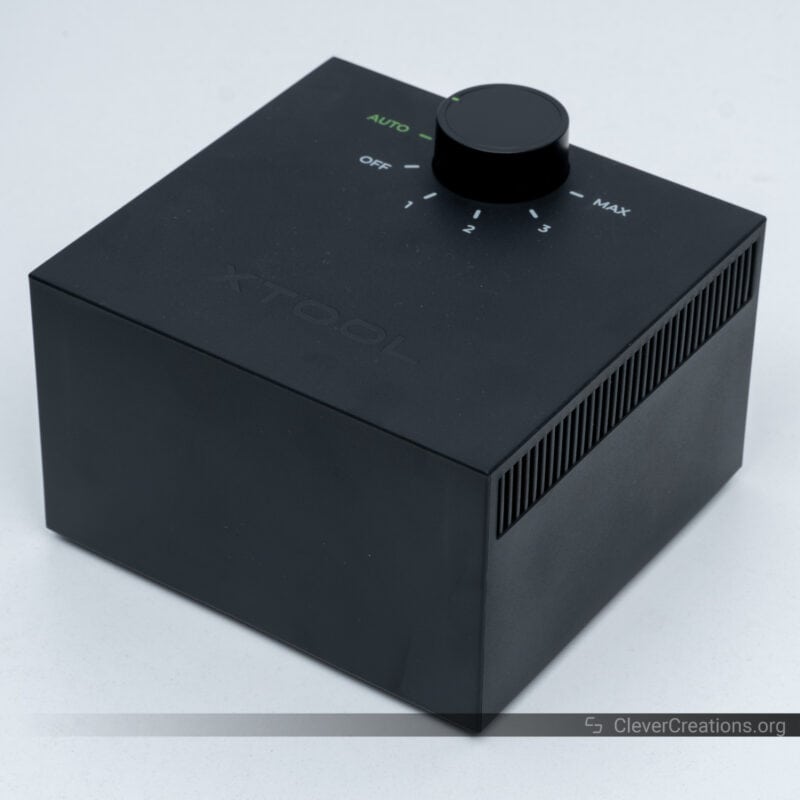
The first thing we noticed about the xTool S1 is that it is surprisingly compact. Because it uses a diode laser, there’s no need for a bulky CO2 laser tube and accompanying cooling system. It’s a big difference compared to other enclosed laser machines.
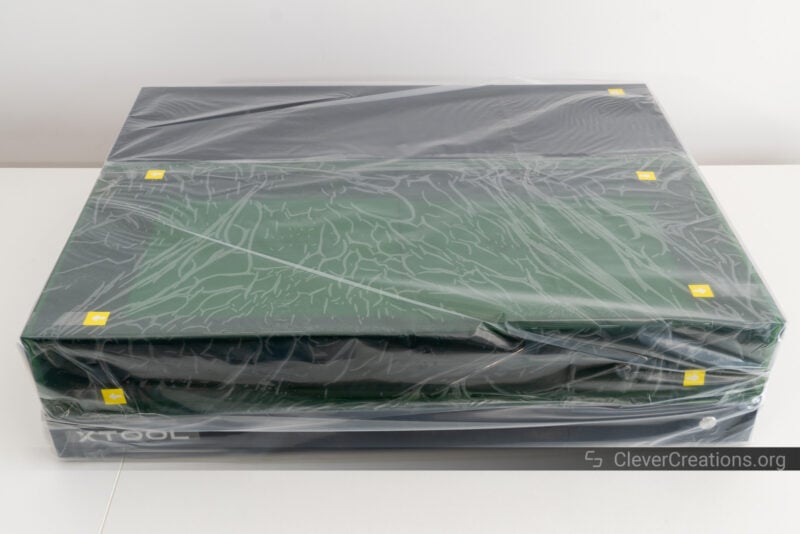
Once you’ve placed the laser cutter on a surface, you’ll have to unwrap it and remove all plastic protection from the panels. You can then open the machine, which gives you access to the accessories and documentation inside the laser.
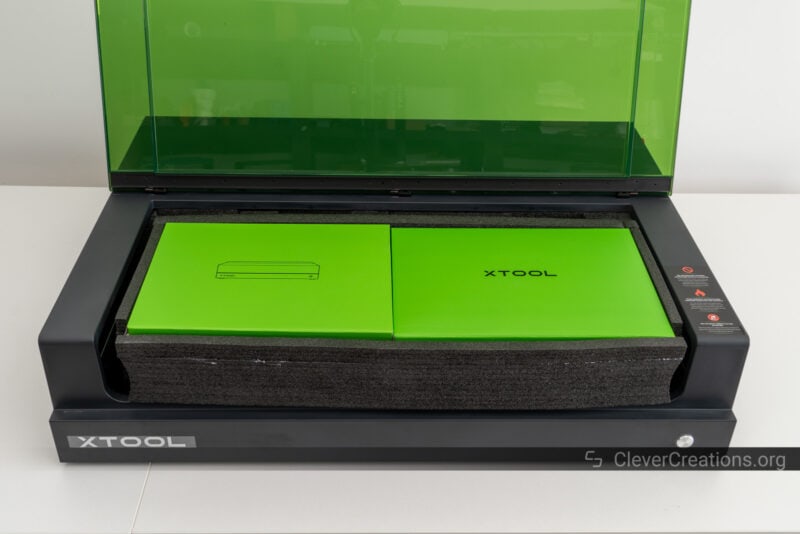
Unpacking the boxes presents you with the following bits and pieces:
- xTool S1
- Laser module
- Distance sensor
- 2x USB Key
- Exhaust hose
- Material pack
- Hex key and various bolts
- Power and data cables
- Documentation
The included materials are a nice addition that lets you get started right away. The materials aren’t as diverse as we saw with the xTool F1, which feels a bit disappointing given the increased capabilities and higher price of the S1.

Getting Started
There’s surprisingly little for you to do to get the xTool S1 up and running. It’s a pre-built machine that is practically ready to go.
The first thing you’ll need to do is remove a couple of small blocks that prevent the Y-axis from moving during shipping.
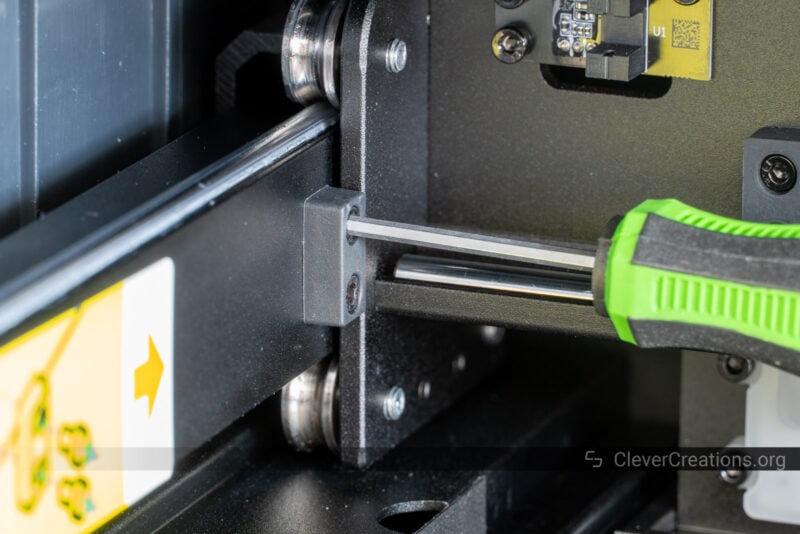
We found this to be a bit tricky. Mainly because the handle of the included hex driver is right next to the lubricated X-axis. If you are not careful, you’ll end up with a bunch of grease on the handle. An L-shaped hex key would work better here.
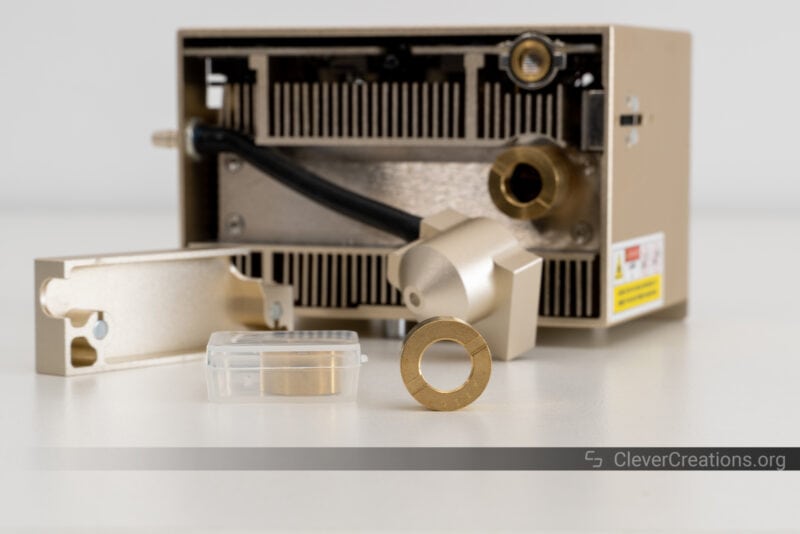
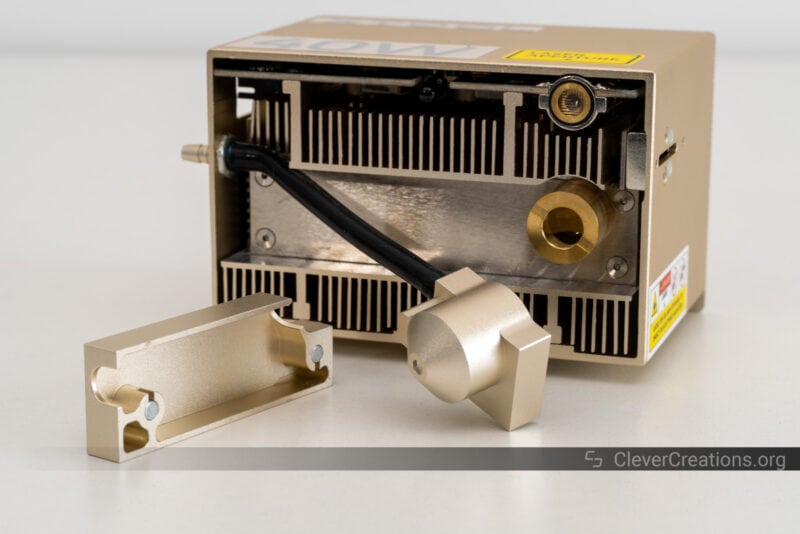
Next is to install the laser module. This step was surprisingly easy. The module slots in place on the laser head carriage and is tightened with two bolts.
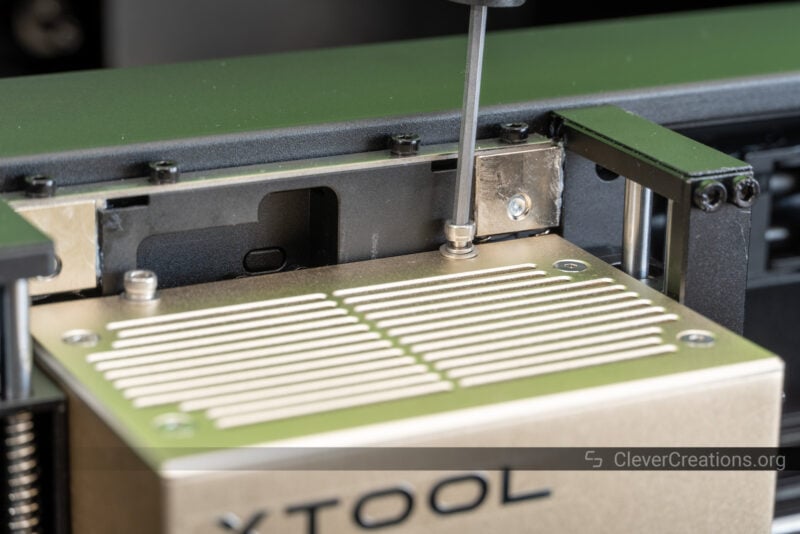
Plug in the laser module cable and air assist tube, and the laser module is ready to go.

After that, you’ll want to install the touch probe. It simply sticks onto the laser module with magnets. It doesn’t get easier than that.
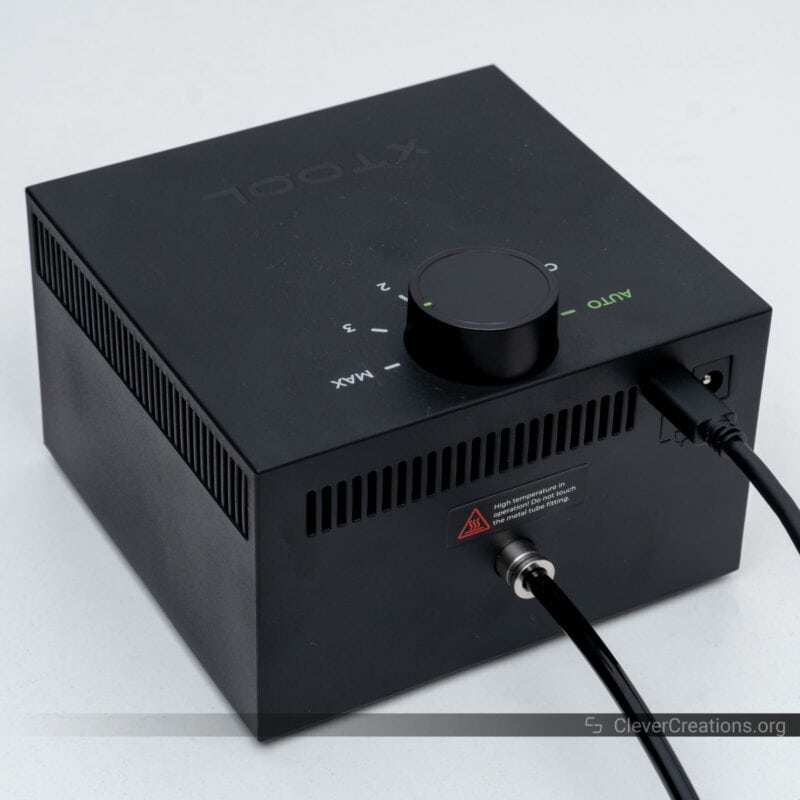
If you want, you can also replace the exhaust louvers on the back of the machine with the included exhaust hose.
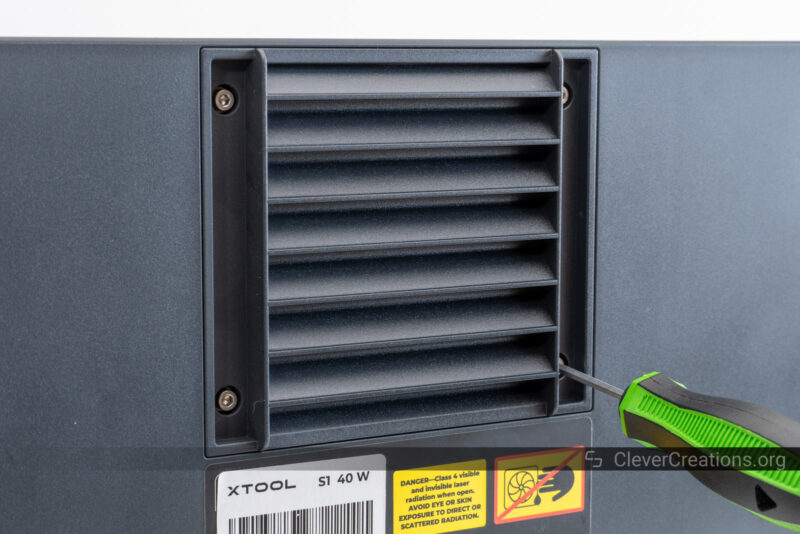
This is what we did, because we wanted to use xTool S1 indoors in combination with the xTool smoke purifier. If you want to vent the laser-cutting fumes outside instead, you’ll need the hose as well.
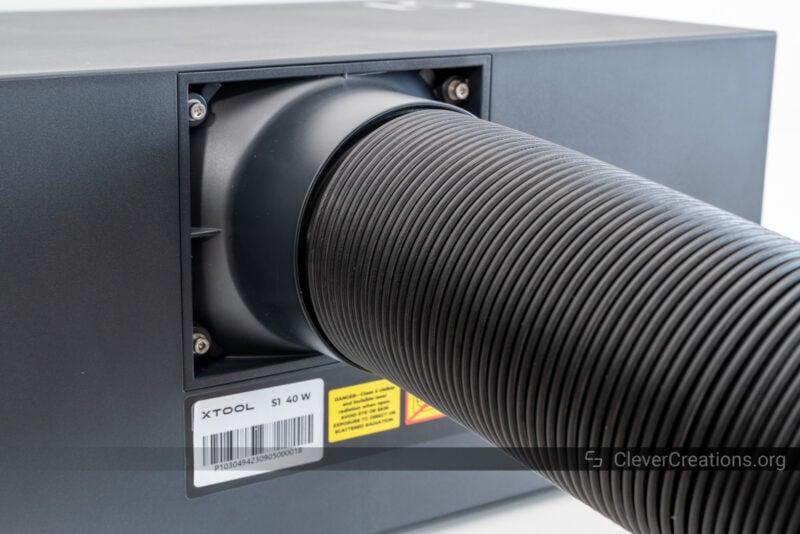
Regardless of your setup, it’s important to mount something in front of the fan. Either the pre-installed louver vents or the hose. If you leave the fan exposed, harmful laser light can escape through the back of the machine.
When you’re done with the exhaust setup, all you need to do is hook up the power, as well as any external accessories you plan on using. For example, the external smart air assist or rotary axis. We’ll show you the accessories further down in this xTool S1 review.
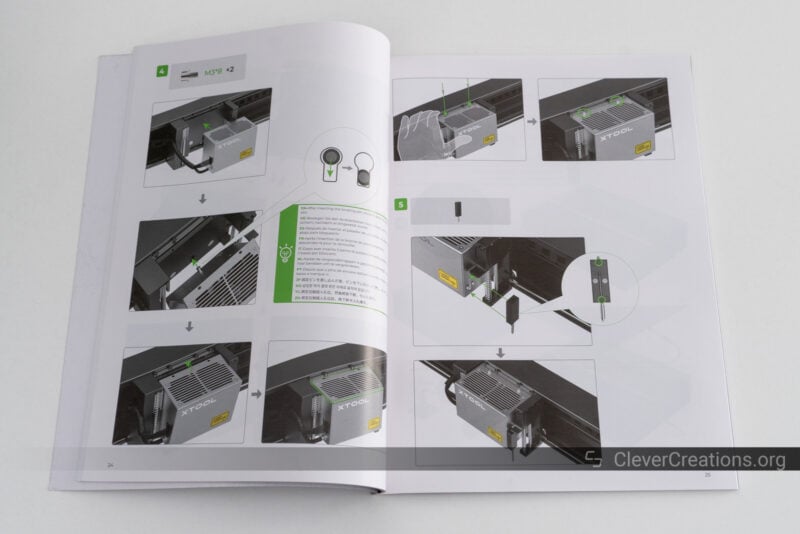
We found the whole experience of getting the S1 up and running a breeze. As we are used to from xTool, the manual is very clear. All the information is there, without it being ambiguous. No matter if you are a beginner or an expert, it’s easy to follow.
xTool S1 Features
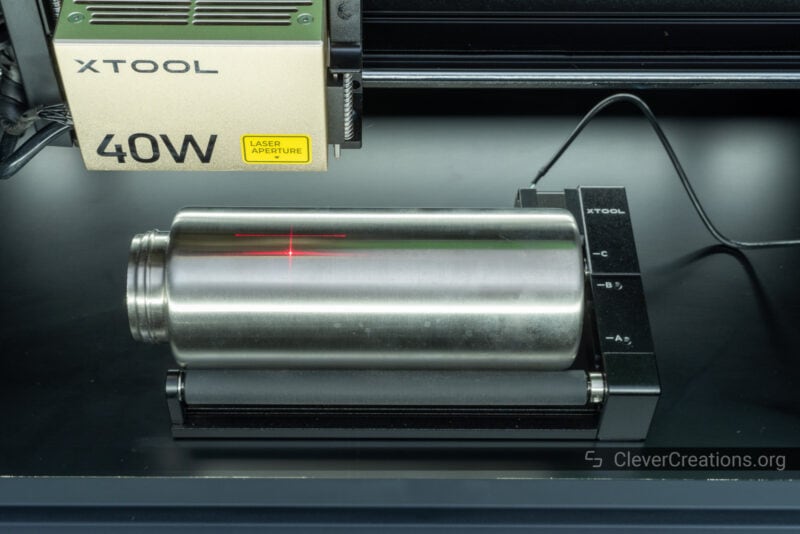
High-Power Diode Laser Stack
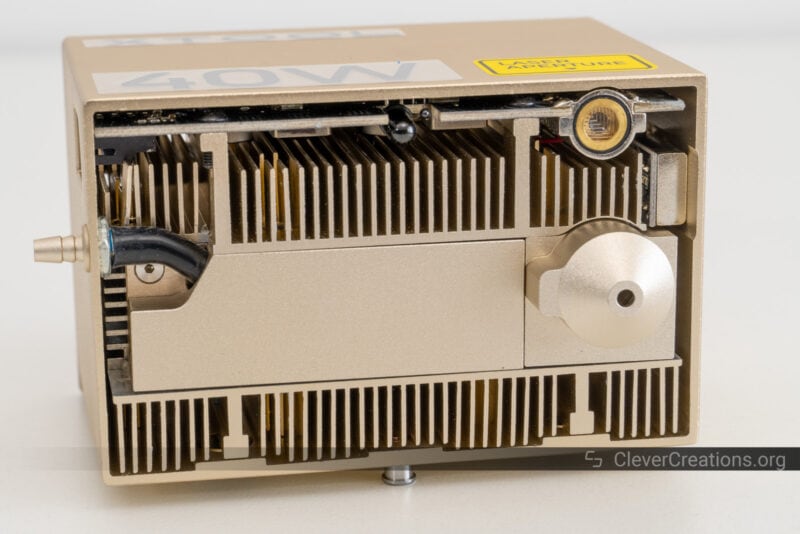
One of the best things about the xTool S1 laser cutter is its laser power. The machine comes in both 40W and 20W versions. The 40W version combines eight 5.5W diodes into a single beam, whereas the 20W version uses half that.
We can’t overstate how impressive that is. Where not long ago 5W and 10W diode lasers were the standard, we’ve quickly moved to 20W/22W and now even 40W diode stacks.
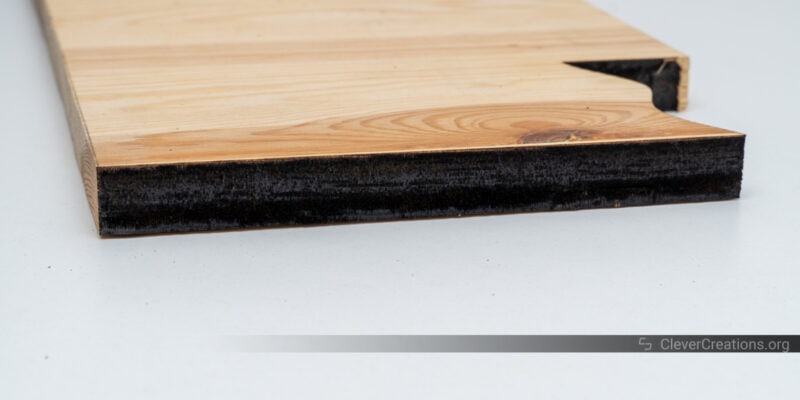
This power allows you to do a lot of things. For example, the 40W version of the S1 is listed as being capable of cutting 20 mm of pine wood in a single pass.
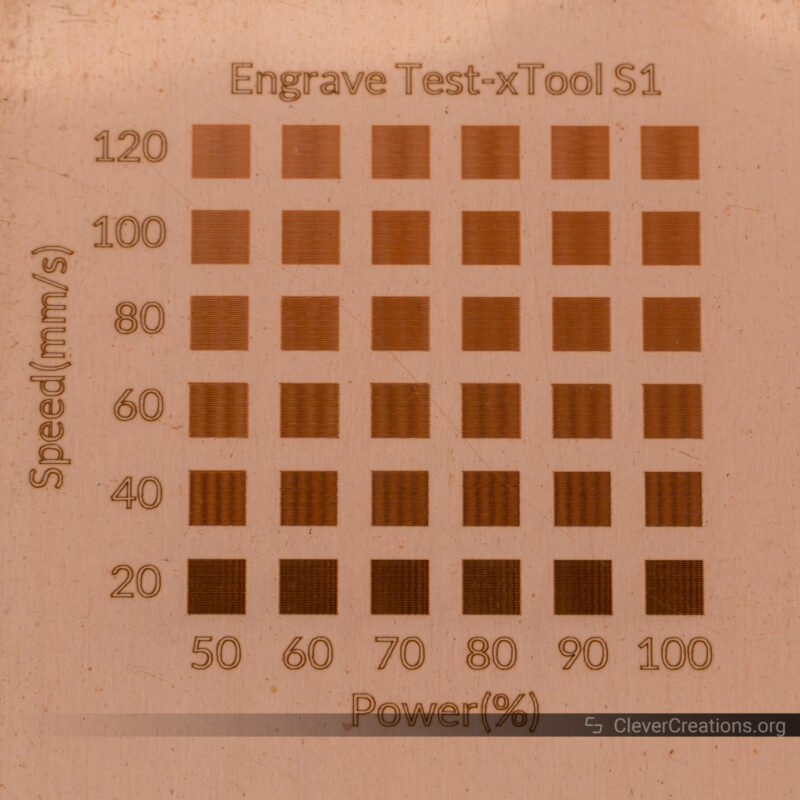
Needless to say, we tested this, and the laser cutter passed the test with flying colors. At 100% power and 1 mm/s speed, it cut through our 20 mm pine wood sample without problems. The end result is a bit charred, but that’s to be expected.
In addition, you can use the 455 nm blue laser beam to color engrave uncoated stainless steel. By varying the laser cutting speed and power, you can oxidize the stainless steel in practically any color of the rainbow.
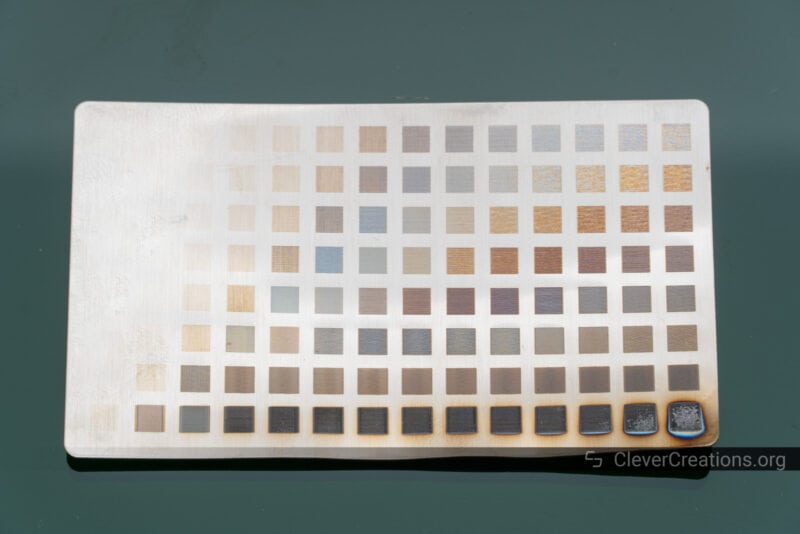
We can’t overstate how cool it feels to have this ability. Common 5W and 10W blue light lasers aren’t powerful enough to let you do this, but with these 20W and 40W lasers, a whole new world opens up.
With great power also comes great responsibility. To clean your laser lens, to be exact. With so much energy passing through the lens, any smoke residue or debris on the lens heats up quickly.
When this happens, the heat starts degrading the lens itself, impacting your results. For that reason, xTool has provided two spare lenses with the machine.
The best way to extend the lifespan of the lenses is to regularly wipe them clean and use an air assist pump. A steady flow of air prevents smoke from approaching and settling on the laser lens.
Because of the design of the xTool S1 laser module, we also found it super easy to reach the lens for cleaning. You’ll see in the next section how that is made possible.
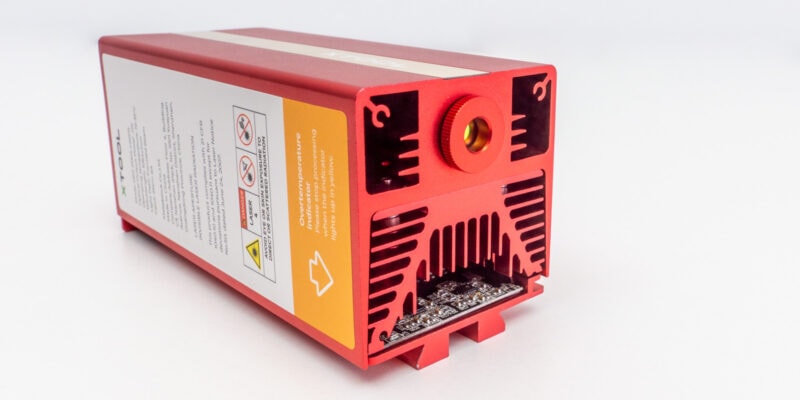
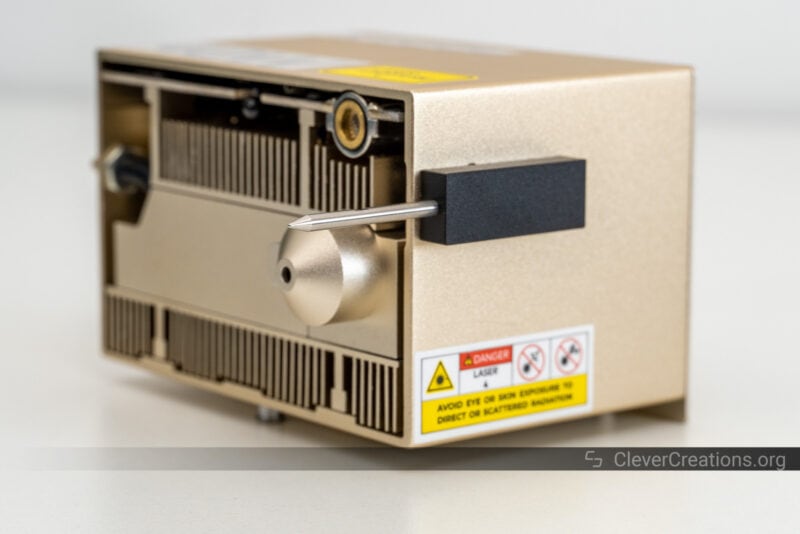
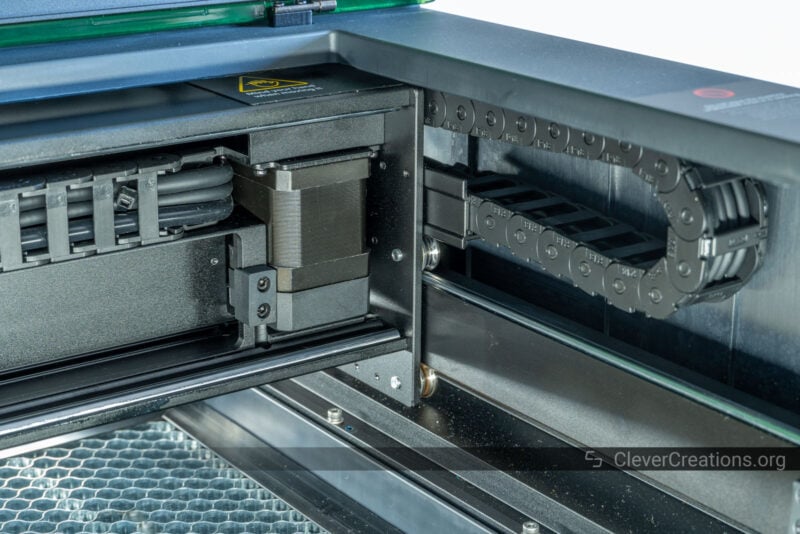
Practical Laser Module Design
We usually don’t spend time covering the design of the laser module, but we encountered some nifty features on that of the xTool S1 that are worth pointing out.
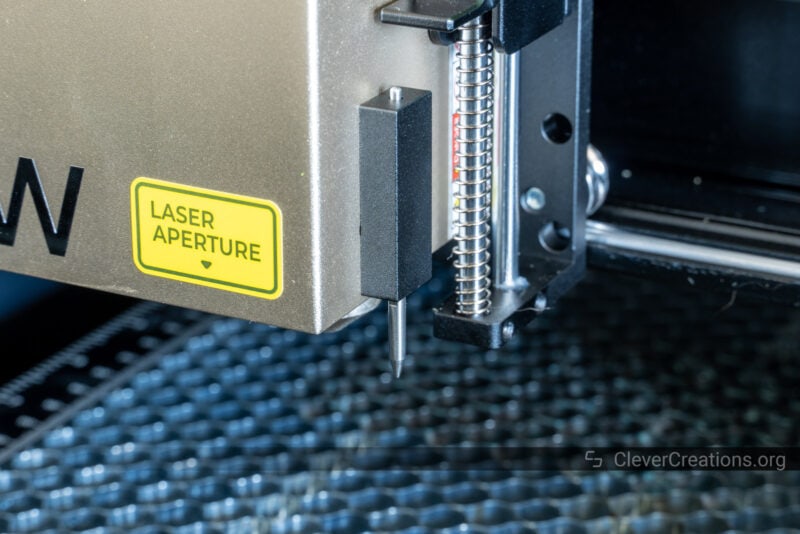
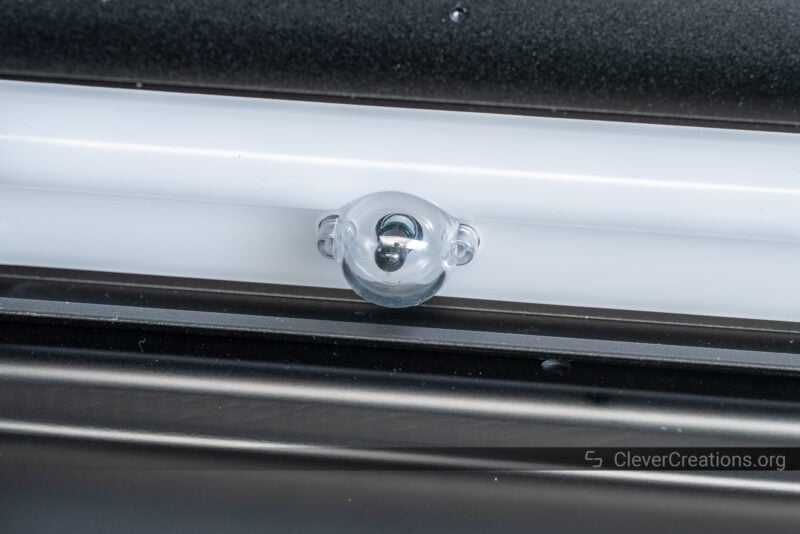
The most notable is the heavy use of magnets throughout. For example, the air assist nozzle and touch probe (more on that later) are both attached magnetically.
It’s something that initially gave us concerns. Compared to bolts, magnets don’t provide the same level of physical security. Bolts are way more reliable and less prone to accidental dislodging.

When we started using the machine, however, we realized that this was a great decision on xTool’s part.
Think about it, if a piece of your workpiece lifts up while laser cutting, do you want the machine to simply plow through? Or do you want the exposed component that comes into contact with it—typically the air assist nozzle or probe—to simply pop off without further damage?
It’s the latter. If something goes wrong, you can stop the laser machine, reattach the part that came off, and restart your job without further issues.
Another benefit of the magnetic construction we found is that cleaning the laser lens is remarkably easy. Pop the air assist nozzle off, give the lens a good wipe, reattach the nozzle, and you’re done.
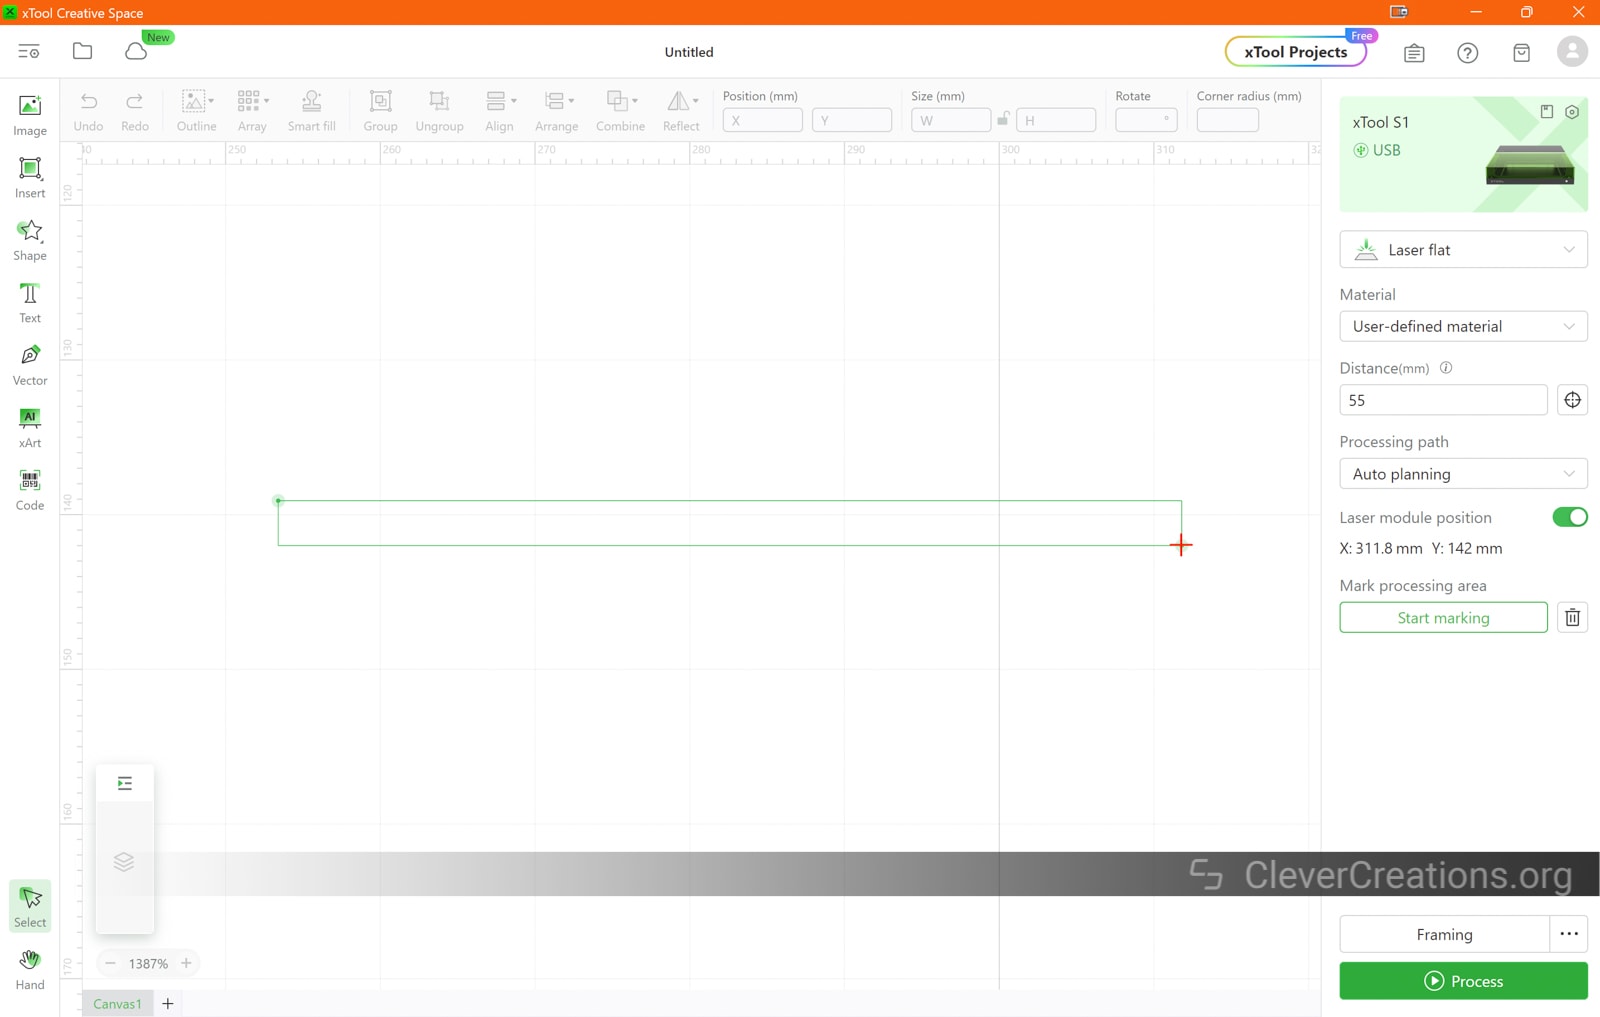
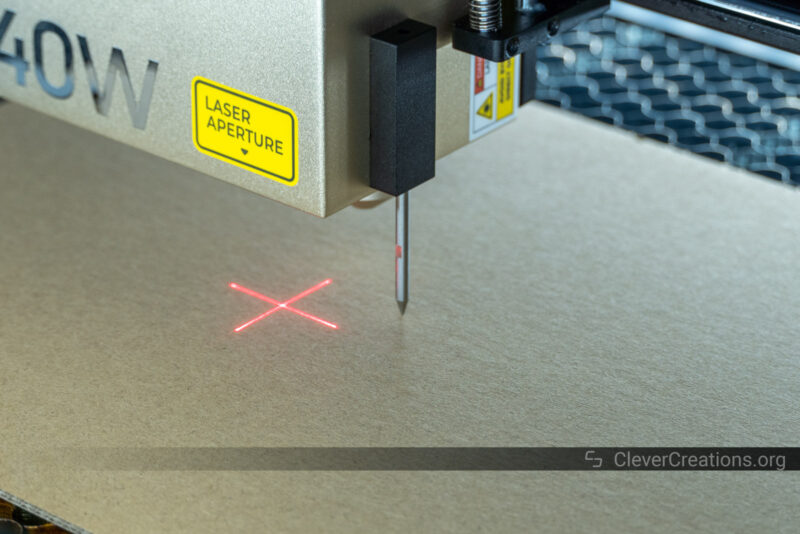
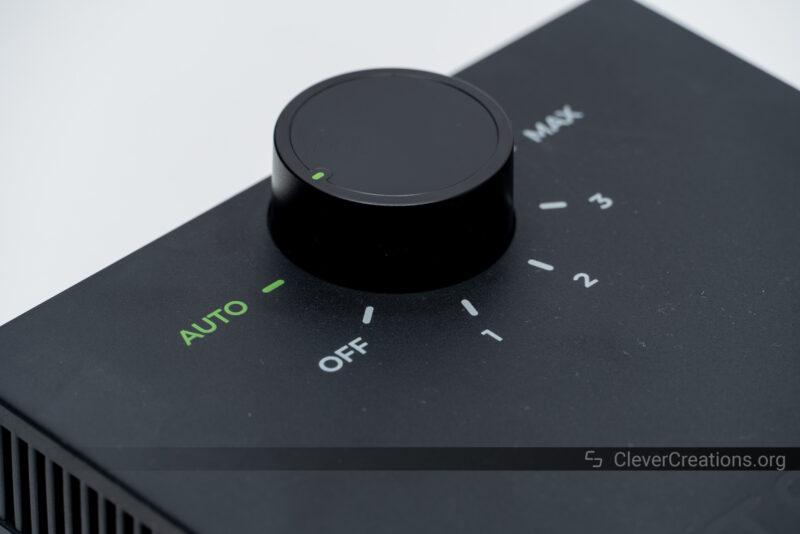
Twin-point Positioning
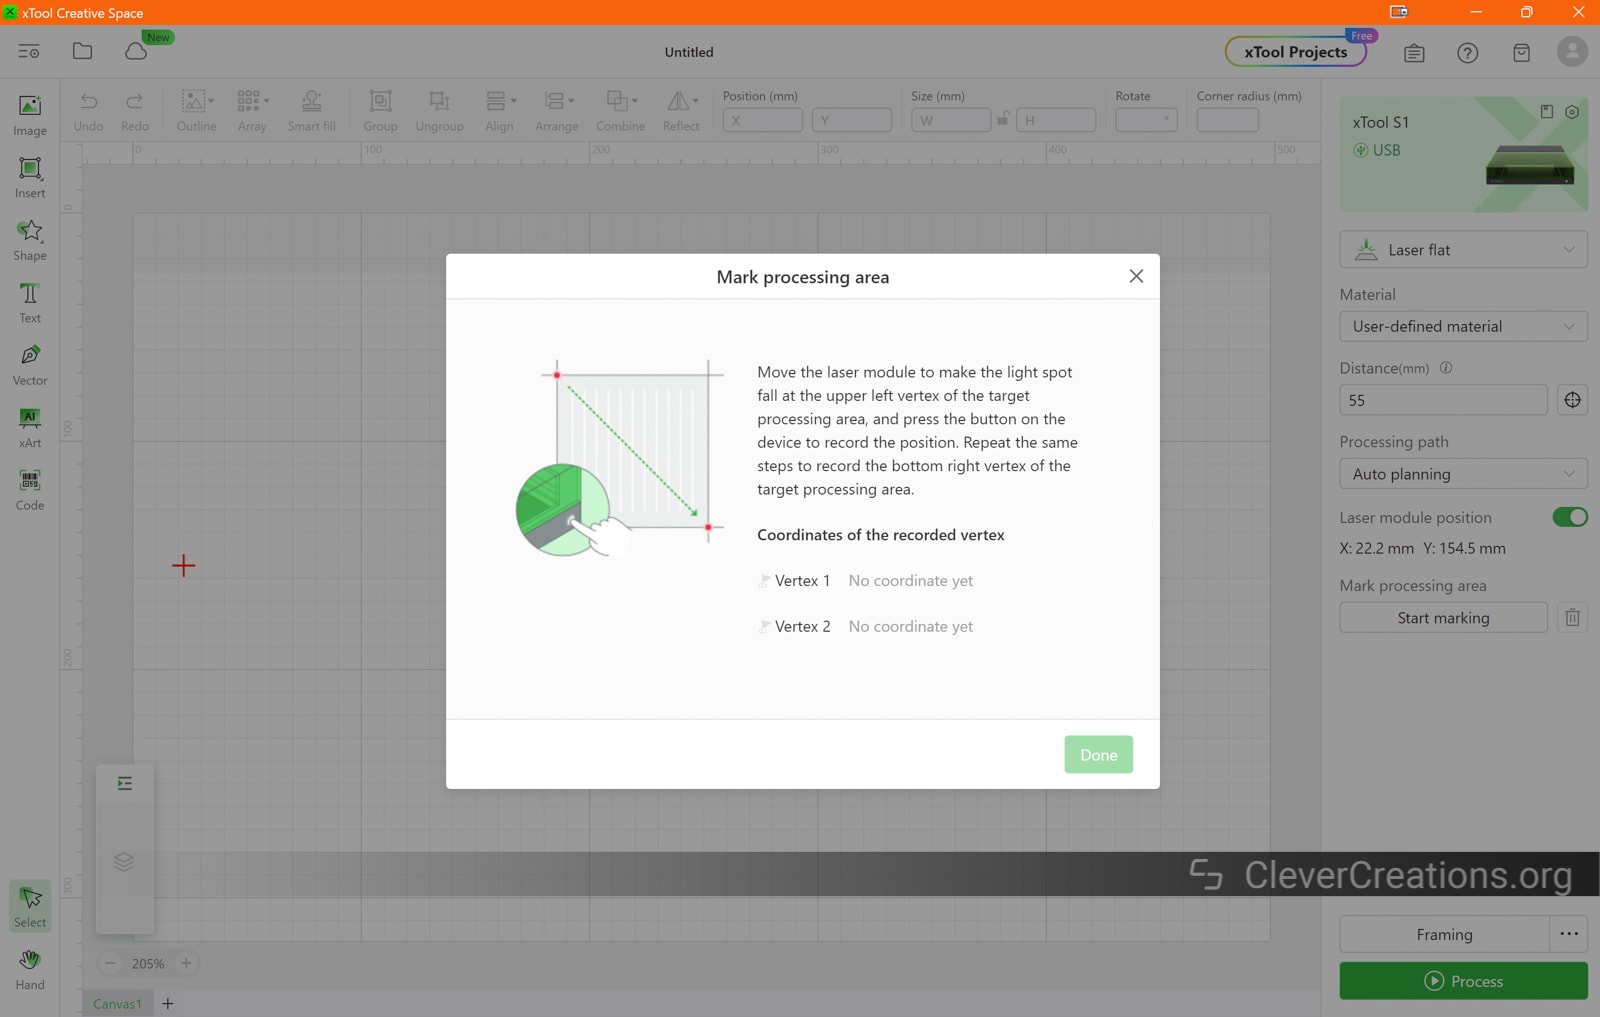
The xTool S1 also comes with a new type of positioning system, referred to by xTool as ‘Twin-point positioning’. It sounds fancy, but the way it works is as follows:
You can move the laser head by hand to mark two locations in the physical work area. The software uses these two points to create a square in the xTool Creative Software that indicates the processing area. Basically, it’s the area on your workpiece that you want to engrave or cut within.
You can then place the engravings and/or cuts into that area in the software. As a result, you are guaranteed to have the engravings and cuts show up in the exact location you marked in physical space.
We found that compared to using a camera, like on the xTool P2 and Glowforge machines, this has a much higher accuracy.
Even with the best laser cutters with a camera, you always have to deal with things like lens distortion, shadows, and difficulty capturing dark surfaces.
With this system, it becomes incredibly easy to align things on your workpieces. Simply designate the processing area on your workpiece by storing two reference points, and you can use the generated rectangle in the software as a reference.
This also proves incredibly useful when you want to precisely center jobs on circular surfaces. It’s something that we have always found challenging with camera-based alignment, but that is quickly done on the xTool S1.
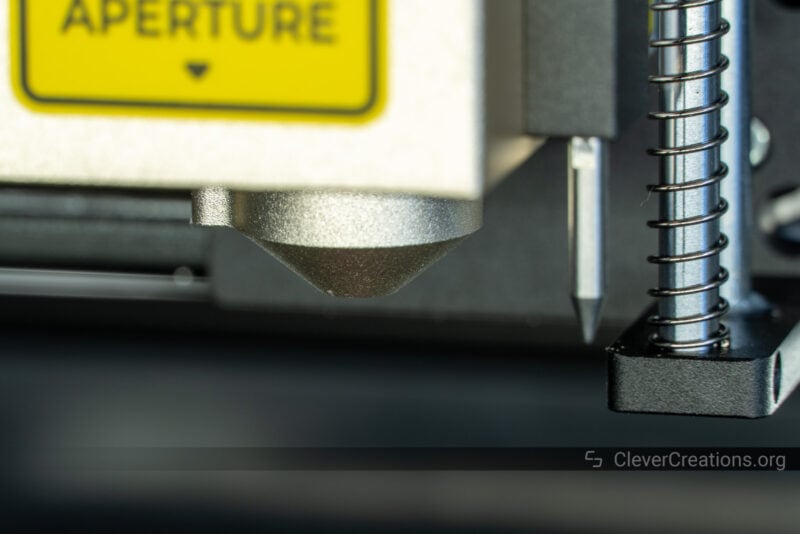
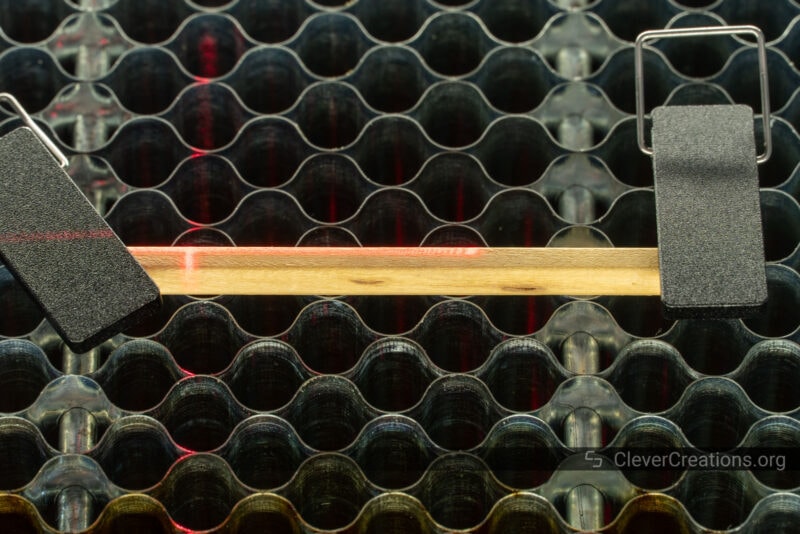
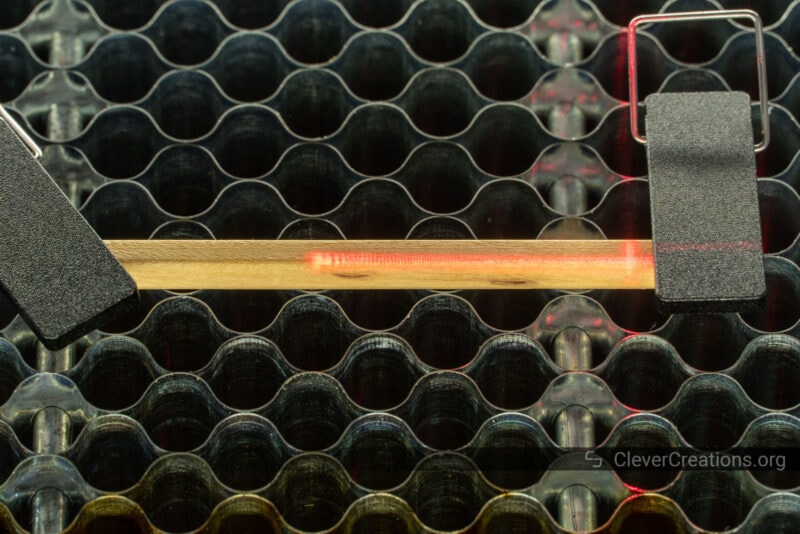
Physical Touch Probe & Autofocus
Other great additions to the xTool S1 laser engraver are its touch probe and autofocus system.
The touch probe simplifies the setup of your jobs by detecting the exact height of the workpiece you are working on. A simple click in the xTool Creative Software lowers the laser module until the probe touches the material.
When the machine detects that the probe touches the workpiece, the software automatically records the height information.
Then, when you start engraving or cutting, the motor on the laser head carriage automatically lowers the module to the right height. Say goodbye to manually focusing your laser ever again.
We really like this feature, as it saves a lot of time and frustration during setup. We can’t tell you how much time we have spent fiddling with thumbscrews and focus jigs over the years.
We also noticed that the probe is sensitive enough to not dent any material. It triggers relatively quickly, without putting unnecessary force on surfaces. The last thing you want is for a probe to dent your workpiece, but you don’t have to worry about that with the xTool S1.
One shortcoming we encountered is that the magnetic probe sometimes deflects or even falls off when probing steep slopes. It’s only something that happens when measuring curved workpieces. To understand how that works, let’s look at the xTool S1’s curved surface engraving feature.
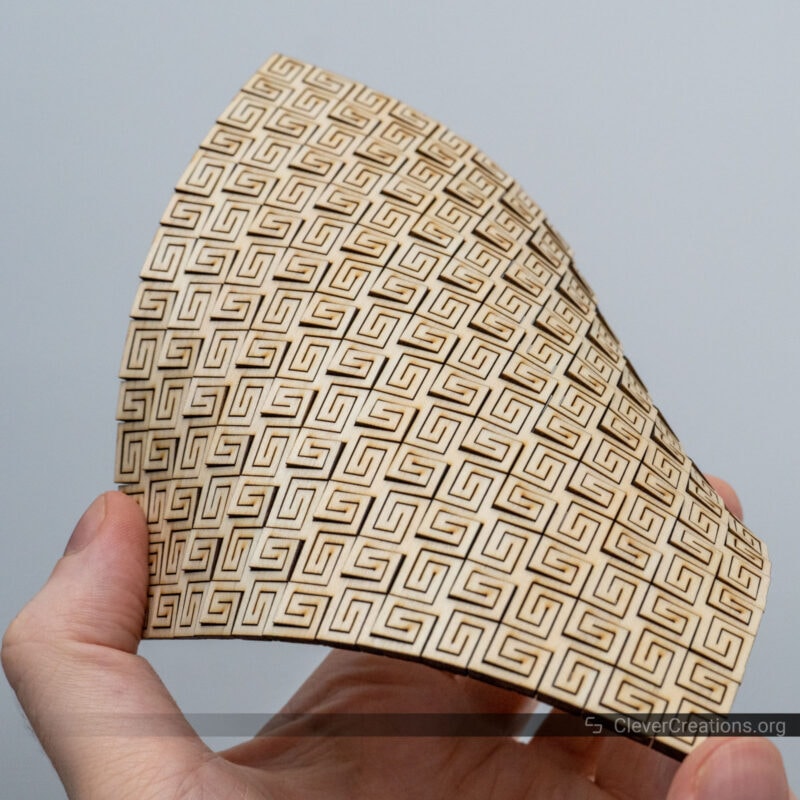
Curved Surface Engraving
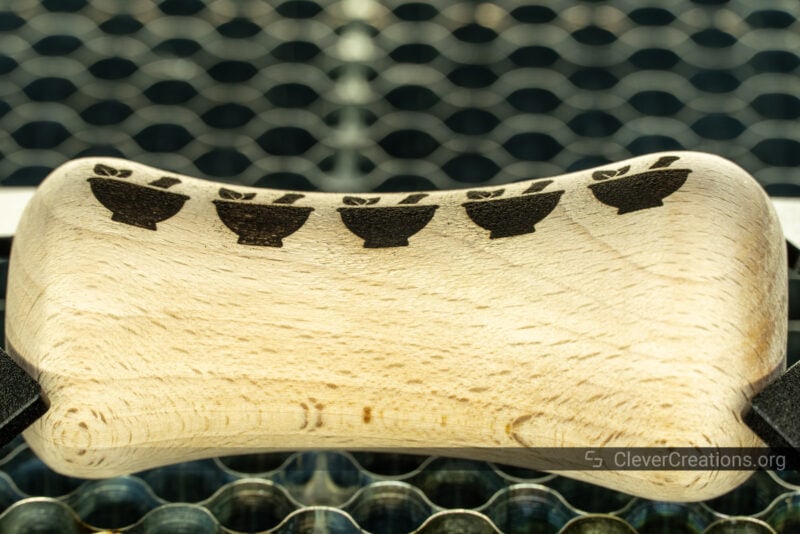
Where the xTool P2 was the world’s first laser machine that offered curved surface engraving, the xTool S1 is the second. We still haven’t seen any other manufacturers jump on this bandwagon, and given how cool this feature is, it’s a shame.
In simple terms, curved surface engraving automatically adjusts the height of the laser module during engraving to maintain a perfect focus distance. Even when the height of your workpiece changes.
This means you aren’t limited to engraving just flat surfaces anymore. Objects with curved surfaces are now also within reach for your projects. Combine this with the xTool S1’s 40W blue light module and the optional 2W IR module, and your possibilities get close to endless.
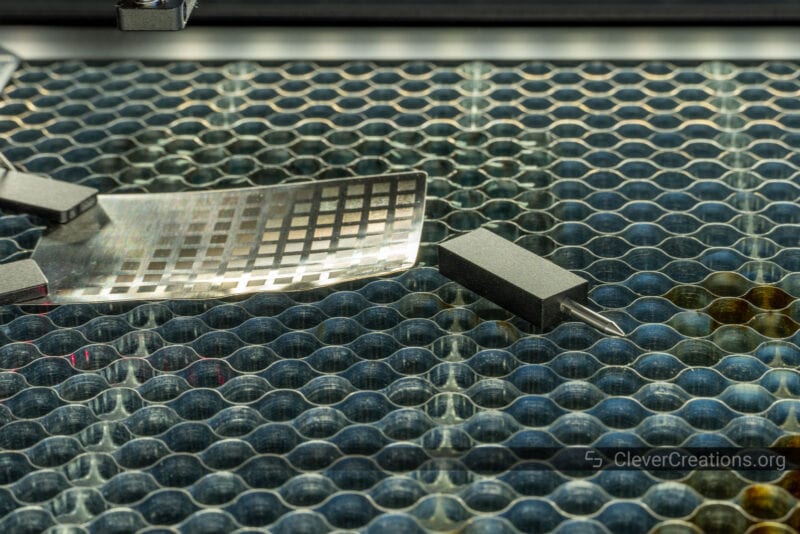
Before starting a curved engraving, it’s important that you first measure the surface of the object you’re working on. You do this by telling the XCS software which points to measure.
The probe then measures the height of the surface you selected across a grid. You can select the number of points in the grid yourself. Generally, the more dynamic and curved your surface, the more points you want.
After that, the software converts these points into a mesh, which the xTool S1 then uses for adjusting the height during engraving.
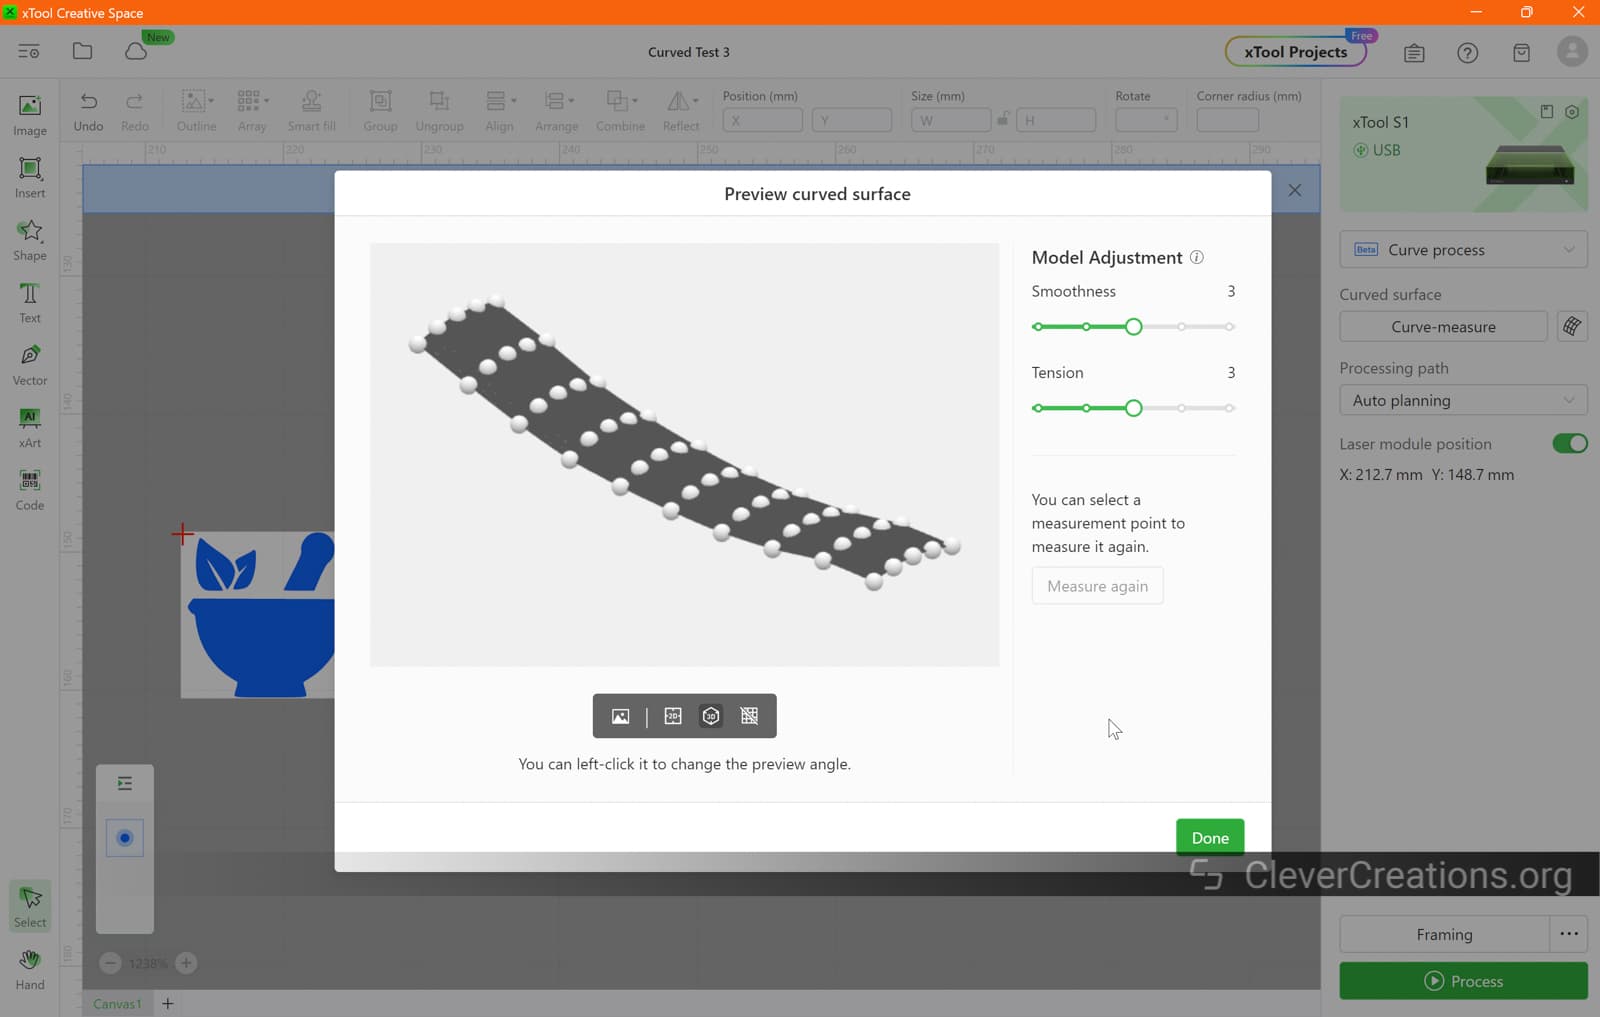
It’s an extremely powerful feature that lets you take your projects to the next level. You can use it to customize instruments, kitchenware, metal components, hand-carved woodwork, you name it.

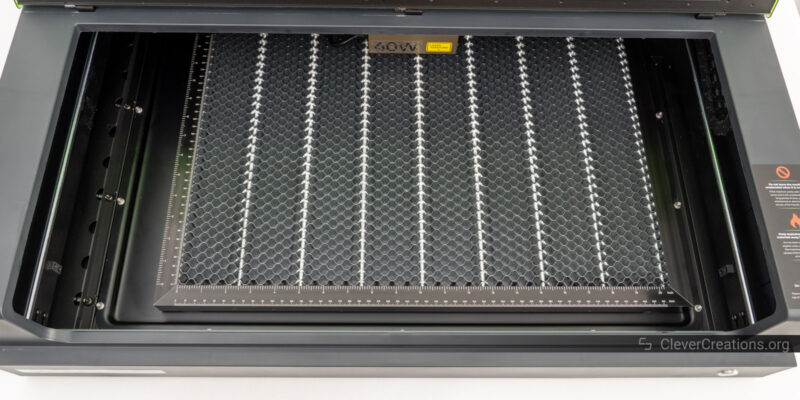
Work Area
The 40W version of the xTool S1 has a 498 x 319 mm work area. On the 20W, that area is a bit deeper at 498 x 330 mm.
It’s a decent size that is similar in surface area to your typical 400×400 mm open-frame laser cutter. The main difference is that the S1 is rectangular with a long side (498 mm) and a short size (319 or 330 mm).
We prefer this format, because it lets us work on wider workpieces. In addition, because the area of the honeycomb panel is slightly wider (515 mm) than the usable area, we can use stock material that is 500 mm wide without cutting it to size beforehand.
As for the usable height, the stock xTool S1 fits materials and objects up to 42 mm in height. With the official riser, you can expand that to 125 mm. It’s more than enough for most users.
If you want to go even further, you could theoretically remove the bottom plate of the machine and place it on some bricks to raise it higher. You’d have to deal with the light leakage (i.e. goggles) and it’s not something that is officially recommended.
Build Quality
Based on our experience, xTool’s products generally score high in build quality and durability. When testing the xTool S1 laser cutter, we found that to be the case once more.
We found the S1 to have a durable, metal construction throughout. No matter if you use the laser machine in a personal or professional setting, we do not doubt that it will hold up well.
The finish of the laser cutter is excellent too. Surfaces have a durable finish, edges are free of sharp edges, and it’s clear that the company has not cut corners to save on production costs.
The only issue we noticed is that the X-axis rods on our machine had a couple of small (~1mm) black particles on them. These caused the laser head carriage wheels to get stuck when moving the carriage across. We fixed it by wiping the rods clean and re-greasing them, so it was only a minor inconvenience.
Our best guess is that the black frame coating was applied too thickly, and the roller wheels came in contact with it and chipped some off.
Given that we received a pre-production unit for this xTool S1 review, we can attribute it to the nature of prototype or early production models. It’s not uncommon for such units to have minor quirks or imperfections that are typically ironed out in the final production versions.
To xTool’s credit, when we reported this issue, the company responded promptly and with seriousness. Always a good sign.
We couldn’t find any other build quality complaints with the S1 laser cutter. With so many new and innovative features packed into this device, that’s nothing but impressive.
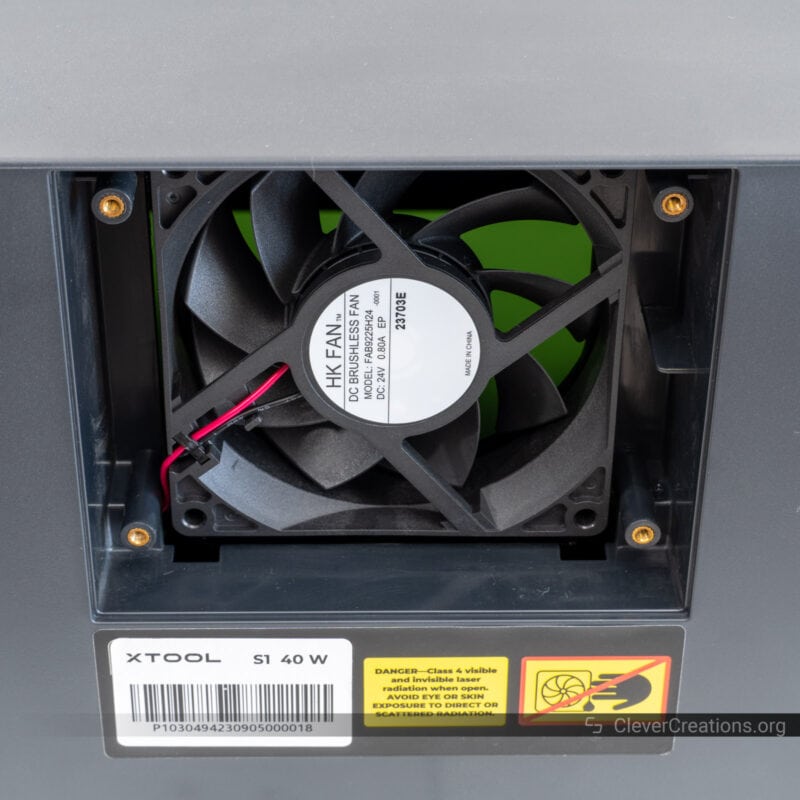
Something else we noticed about the machine is that it is surprisingly silent. There’s no loud CO2 laser tube cooling system, and the fume extraction fan doesn’t make much noise either.
The sounds of moving components are also dampened by the enclosure, so it’s pleasant to be in the same room as the xTool S1 when it is doing its thing.

Safety
Laser cutters are inherently dangerous. Anything that can cut through wood or is strong enough to engrave metal can damage your skin and eyes as well. Let’s see how the xTool S1 ensures that you stay safe.
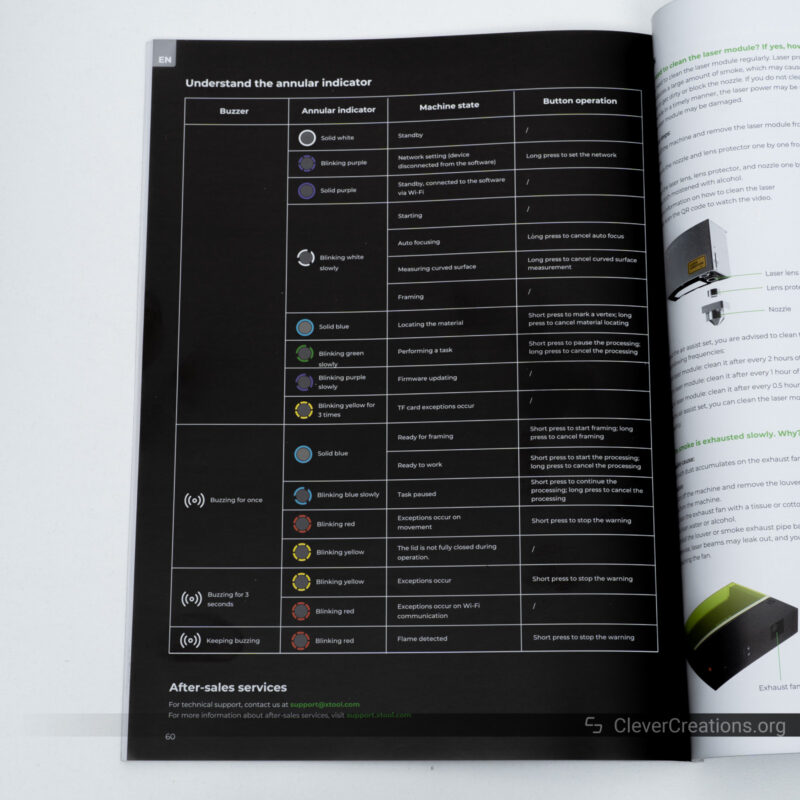
Flame Detection
In terms of safety, the xTool S1 laser engraver has plenty to offer as well. There’s little that can go wrong if you follow the instructions and don’t leave the machine unattended.
For example, the machine comes with five flame detection sensors. Four of them are located near the internal LED bars, whereas the remaining sensor is mounted on the laser module itself.

We have purposefully made a small, controlled fire in the machine to test the sensors, and we can confirm they work as intended. Unlike with the xTool D1 Pro, we did not run into any issues with the sensors being triggered by false positives.
Protective Lid
The see-through lid on the xTool S1 laser cutter lets you see into the machine, but also protects you from laser light. As such, there is no need to wear laser goggles when using the device.
We weren’t able to find any spots where light leaked out of the machine, so we can confirm that the lid seals as it should.
One difference between the lid on the S1 compared to that on the P2 is that there’s no locking mechanism that automatically locks when the laser cutter starts cutting. So it is possible to open the S1 when it is in use.
However, because the lid of the S1 laser cutter uses magnetic sensors, the machine automatically stops engraving or cutting when you open it. So there’s still no risk of exposure to laser light.
We also noticed that there are no pneumatic dampeners on the acrylic lid of the S1 to assist it with opening and closing. There isn’t much need for them, because the lid is much lighter than that of the P2.

Emergency Stop
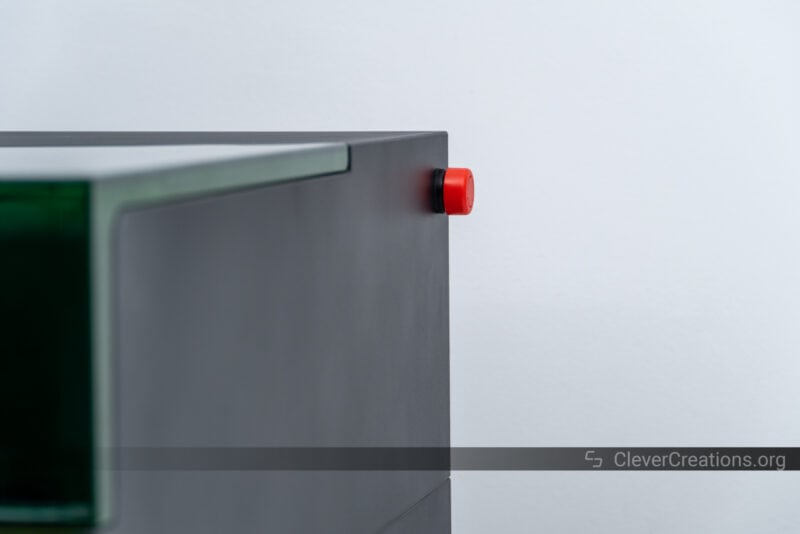
The xTool S1 also has an emergency stop that you can use to, well, stop the laser cutter in case of an emergency. It’s located on the right side of the machine.
One of the complaints we had with the P2 was that its emergency button was hard to reach. Not only was it placed low and all the way in the back, but the button itself was recessed as well.
This has been improved on the S1. You can find the button near the top of the machine, and it sticks out more prominently. A good improvement for safety.
We can report that the emergency button works as it should. It also doubles well as the power button for the machine.

USB Keys
Just like with xTool’s other recent devices, the S1 requires a special USB key inserted in the laser cutter before you can use it. The machine comes with two keys that are specially coded to work with your machine.
We have mixed feelings about this , because we believe it is more of a hassle than it is worth. Lose both keys and you won’t be able to use your xTool S1 ever again. There is no way to get a new key or to bypass the lock feature through firmware.
For that reason, we always keep one of the keys permanently in the machine. This already defeats its main purpose, which is denying unwanted access to the laser cutter.
One scenario in which the USB lock can prove useful (and that we didn’t think of before) is in a shared makerspace where you want limited people to make use of the machine.
User Experience
The user experience of the xTool S1 laser engraver is, for the most part, excellent. There are some things we think can be improved, but these don’t stand in the way of its overall ease of use.
Software

In the software department, the xTool S1 works with both xTool Creative Space software and Lightburn. Since the instructions for Lightburn weren’t available yet during our testing, we’ve only tested the machine with XCS.
The XCS software lets you both prepare engraving and cutting jobs and control the machine. It’s an all-in-one solution that lets you work on your projects from start to finish. You’ll find that it is easy to use, lets you use all the functionality of the S1, and is continuously updated with new features.
For example, one new feature we encountered since our last xTool laser cutter review is the option to automatically lower the machine’s focus when cutting through thicker objects.
With its support of Lightburn, you have another all-in-one option for operating the xTool S1. As mentioned earlier, we haven’t tested Lightburn with the S1. However, if history is any indication, it works well.
One downside that we often encounter with xTool’s machines is that not all features are supported in Lightburn. For example, with the xTool P2, there is no camera support or curved engraving support in Lightburn. We expect that lack of curved engraving to be similar when using the S1 with Lightburn.
It’s not a big problem, as most users will find XCS to be more than sufficient for their needs. The ideal solution—in our opinion—is to use Lightburn for its more powerful design capabilities, and then import those designs into xTool Creative software for engraving and cutting.
User Interface
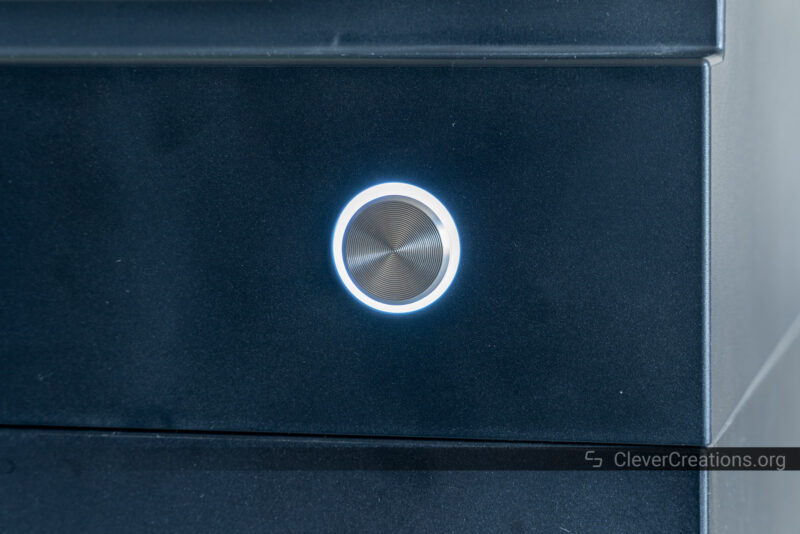
We can be very brief in our coverage of the user interface of the xTool S1. There’s a single button on the front of the machine with an LED ring that surrounds it. That’s about it.
You use the button to start engraving and cutting jobs, as well as to give several other commands. The LED ring, on the other hand, tells you the status of the machine.
There’s no touch or LCD screen on the xTool S1, so using it as a standalone device is out of the question. It’s a similar approach to what we saw xTool take with the F1 galvo engraver.
For us, it’s not something that we miss. We’re used to controlling our machines over USB or Wi-Fi, just like S1 lets you do. If you want to use the laser cutter without an external device, however, this is not the machine you are looking for.
Accessories
There is a plethora of accessories for the xTool S1 you can go with. From our experience, they are of good quality, with solid features and clear documentation. Each of them expands the functionality of the laser cutter for specific purposes.
Some accessories can only be used in combination with others. For example, you can only use the rotary axis in combination with the riser base. Make sure you double-check this if you decide to purchase any of them.
Let’s go over the xTool S1 accessories one by one.
Honeycomb Panel
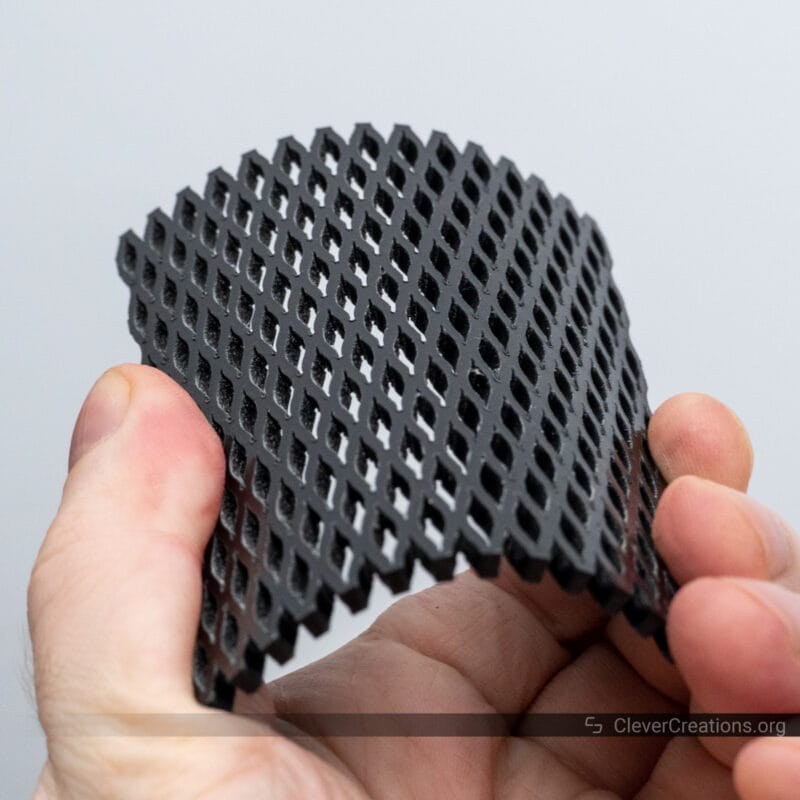
You can use the honeycomb panel if you want support for flexible materials, such as paper and fabric. It prevents sagging or warping during cutting and makes the process much easier.
The honeycomb panel also helps funnel smoke from underneath your workpiece, reduces reflections of the laser beam, and creates space for some smaller debris to fall through.
In our opinion, it’s a must-have accessory for the machine. Not only is it easier to use than the slats that are included with the xTool S1, but you’ll also need the honeycomb panel for use with the riser base.
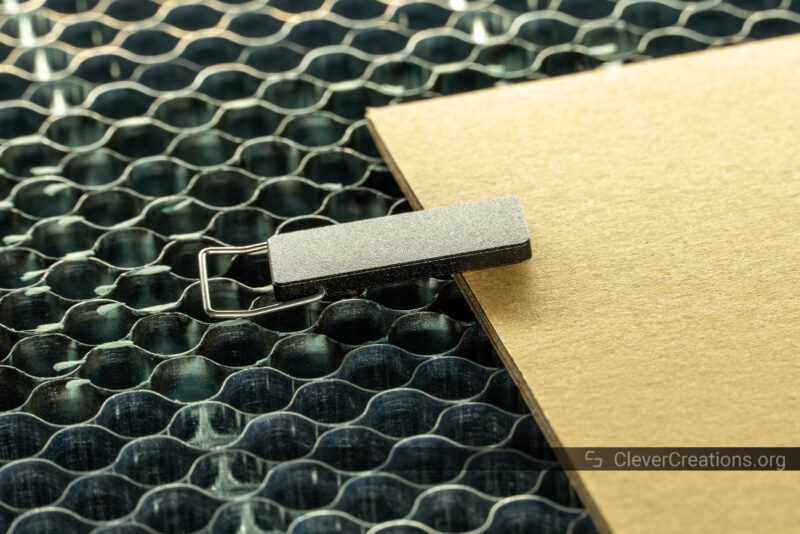
The honeycomb panel comes with four magnetic clips that you can use to hold panels or other workpieces in place during engraving and cutting. We’ve found them to work very well. You can move their metal pull tabs out of the way while the machine is doing its thing, and pull them back up when you want to remove the clips.
Infrared Laser Module
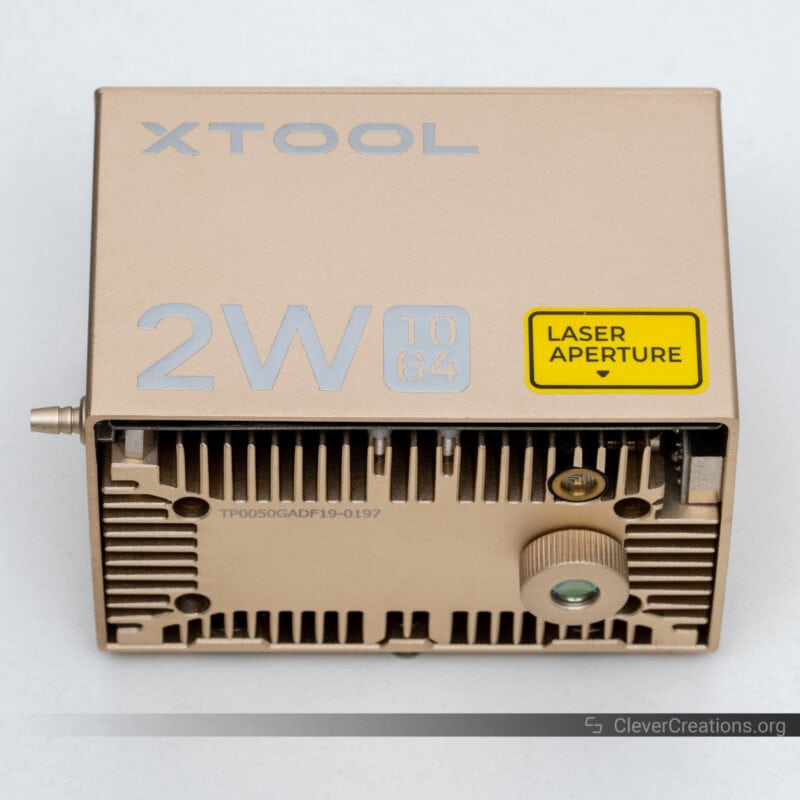
The 2W 1064 nm infrared module of the xTool S1 is another example of an accessory that many users can benefit from. It gives you the ability to engrave metals, such as stainless steel, silver, brass, copper, gold, and more.
When you combine the IR module with the stock blue light laser module, there’s hardly any material you can’t tackle.
The modules are easy to swap out as well. It didn’t take us more than a minute to switch from the 40W blue light module to the IR module, and vice versa.
In terms of power and wavelength, this module is identical to the D1 Pro infrared module we reviewed. Performance-wise, it performs similarly as well.
There were no officially supported material settings for the xTool S1’s infrared module available yet during our testing, but we found the suggested settings for the D1 Pro module to work excellently as a substitute.
Smart Air Assist Pump
With the release of xTool’s S1 laser cutter also comes a newly designed smart air assist pump. It’s much easier to use than the previous version, and, in our opinion, looks better too.
It’s a black box with a rotary knob on it. You plug one end of the included air hose into the pump, and the other end in the air assist input on the S1.
One thing we particularly like about it is that it connects over USB to the S1 laser cutter for both power and data. So when the S1 starts engraving or cutting, it automatically turns the air pump on. It also selects the correct setting (i.e. air volume) for the job.
This means you don’t have to worry about selecting the right setting depending on whether you are engraving or cutting. Or to remember to turn the pump on in the first place. It’s all automatically taken care of for you, provided that you have the knob set to the ‘Auto’ setting.
You also have the option to manually select the air volume output, for those moments you want more manual control.
On top of that, you can power the pump with an external power adapter (not included), so it’s compatible with any other laser cutter as well. Provided that it has an air assist nozzle to hook up to.
We were nothing but impressed by the air pump during our testing of the xTool S1. Its feet dampen the vibrations exceptionally well, so there’s no low-volume droning of the pump that travels through your home or workshop. It’s a 10/10 accessory that is indispensable for cleaner cuts and a longer life span of your laser lenses.
Riser Base
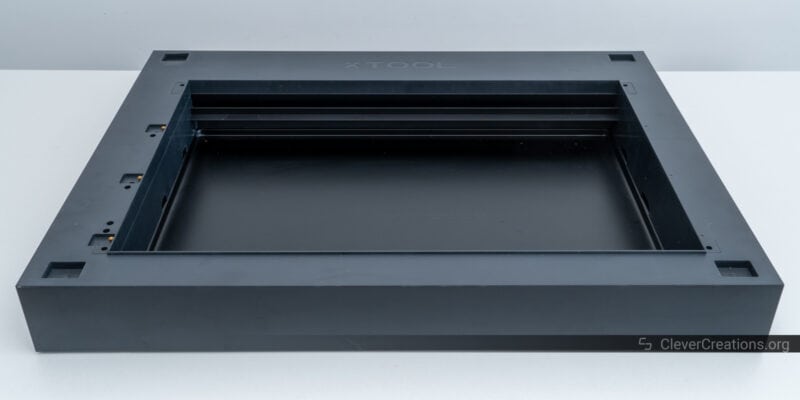
By default, the work height of the xTool S1 is limited to 42 mm. It’s a generous amount compared to other laser cutters in this class, but there are times when you want to engrave taller objects.
For that reason, there’s a riser base accessory available. It increases the supported material thickness to a whopping 125 mm, letting you customize plenty more objects. Small instruments, carvings, you name it.
The riser is also required if you want to use the optional rotary axis. The fourth axis is too tall to fit under the stock S1 and this is what lets you create more space underneath.
Just like the other accessories, we couldn’t find much to complain about. The riser does exactly what it is supposed to do—increase the work height of the machine. It bolts directly to the frame of the xTool S1 and the combination creates a solid unit.
We couldn’t detect any light leakage when using the riser either, the machine is still sealed sufficiently to be safe for the eyes.
Keep in mind that you will need the honeycomb panel accessory for use with the riser. With just the riser itself, you can only work on objects between 70 and 125 mm in height.
To work with flat sheets of material, you’ll need to place them on the honeycomb panel so they are closer to the laser module.
RA2 Pro Rotary Axis
To engrave spherical and cylindrical objects, there is the RA2 Pro rotary axis. Based on our testing, it’s one of the better rotary axes for this purpose. Not only is it incredibly versatile, but it also has a solid construction.
For example, when we directly compared the rotary axis accessories of the LaserPecker LP4 and xTool F1, it was clear that xTool’s solution scored better in build quality.
We find rotary attachments to be a bit of a niche accessory. Or at least we don’t use them often in our workshop. But if you expect to regularly engrave things like Christmas tree ornaments, tumblers, rings, wine glasses, and mugs, they are a must-have.
Automatic Conveyor Feeder Passthrough
Just like the xTool P2, the S1 features an optional conveyor feeder feature. It lets you feed long panels of material into the laser cutter at once to engrave or cut.
The major upside is that the passthrough feeds the material through automatically. There’s no need for you to manually slide it in bit by bit to work on each section, unlike with a Glowforge laser cutter.
It’s a useful feature if you want to create things like large signage. Or, in our experience, if you are too lazy to cut long stock material to size by hand.
We haven’t tried the automatic passthrough on the S1, but if it is similar to the one on the P2, we can recommend it. It increases the total work area of the machine to 470 x 3000 mm (!). This opens up a world of possibilities for tackling larger projects that are otherwise impossible to execute.
Fire Safety Set
In another world first, xTool sells a fully automatic fire safety set. It aims to automatically extinguish detected fires by flooding the work area with (safe) CO2 gas. We haven’t tested it, but if it performs as xTool suggests, it’s a useful addition for safety.
If you decide you buy it, it’s important to not get complacent by leaving your machine unattended. Technology can fail and nothing beats a pair of eyes, a brain, and proper laser safety protocols.
Conclusion: Is the xTool S1 Worth It?
Our conclusion based on thoroughly testing the xTool S1 laser cutter is that xTool seems to have done it again. A brand-new product that not only brings a host of valuable and innovative features to the table, but also does so in a reliable and polished manner.
There’s so much innovation packed into this machine that we have trouble comparing it with similar machines on the market. Frankly, there’s nothing that comes even close at the moment.
The combination of its 40W diode stack, full enclosure, curved engraving, automatic focusing, quality accessories, and accompanying software is immensely powerful. It’s difficult to find a different laser cutter that has three of those features, let alone all six of them.
At $2500 for the 40W model and $2000 for the 20W model, the price of the xTool S1 is not for the faint-hearted. It’s a laser cutter for people who want the best and don’t mind paying for it. If you do, you can rest assured that it is a versatile machine that will last you a very long time.
As of writing this, the 40W version is for sale at $2000, and the 20W version at $1600. Be sure to check xTool’s latest price for the S1, because they regularly offer discounts.
If we missed anything, or you have questions about this machine, let us know in the comments. We feel like we barely scratched the surface in this already lengthy xTool S1 review, so your feedback is much appreciated.