

- Offers quality engravings
- Fast engraving and cutting speeds
- Built-in air assist system
- Well-designed and thought out
- Built-in focus bar
- Support for many accessories
- Good cable management
- Clear instructions
- Relatively low clearance under laser head
- User interface is limited in scope
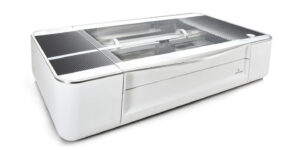
With its Laser Master 3, Ortur has released its long-expected successor to the Ortur Laser Master 2. Its previous version was (and still is) a popular laser engraver due to its quality engraving results, support for many accessories, and overall great value.
The new Ortur Laser Master 3 is an upgrade in several ways. For example, it features a more powerful 10W laser module, is easier to assemble, and has an improved frame for faster and more accurate engraving and cutting.
To see how the OLM3 laser engraver performs, we have put it to the test. In this Ortur Laser Master 3 review, you will find our findings on build quality, ease of use, engraving and cutting performance, as well whether you should buy it or not.
Ortur Laser Master 3 Specifications
| Ortur Laser Master 3 Specs | |
|---|---|
| Price | Amazon | Ortur | AliExpress |
| Laser power | 10W |
| Laser wavelength | 455±5nm |
| Focal length | 50 mm fixed focal length |
| Engraving area | 400×400 mm |
| Engraving speed | 20,000 mm/min |
| Machine size | 580x550x150 mm |
| Spot size | 0.05×0.1 mm |
| Mechanical accuracy | 0.01 mm |
| Motherboard | OLM-ESP-PRO-V2.4 |
| Control software | LaserGRBL/LightBurn/Laser Explorer app |
| Input voltage | 110V-220V (compatible) |
| Power adapter output | 24V/4A |
OLM3 Laser Engraving Technology
The Ortur Laser Master 3 laser engraver uses a 10 Watt semiconductor diode laser. This type of laser is great for basic engraving and cutting, as it offers good power density (i.e. the amount of power that can be focused into a small area) while still being compact and affordable.
If you are looking for a laser machine that can engrave things like wood, acrylic, paper, cardboard, leather, and other non-dense materials, the Ortur Laser Master 3 is a great option.
For denser wood or thicker wood and acrylics, you might want to look at a more powerful machine, like the FSL Muse Core 40W or a Glowforge laser cutter.
Similarly, if you are interested in engraving metal, you will get better results with a specifically-designed laser engraver for metal. A popular example of such a machine is the Triumph Raycus 30W.
For most hobbyist purposes, however, the OLM3 has more than enough power. And as you will see, we think the laser engraver is so good that it currently ranks as the best overall best laser engraver.
For now, let’s crack on with the Ortur Laser Master 3 and see what this machine has to offer.
Box Contents
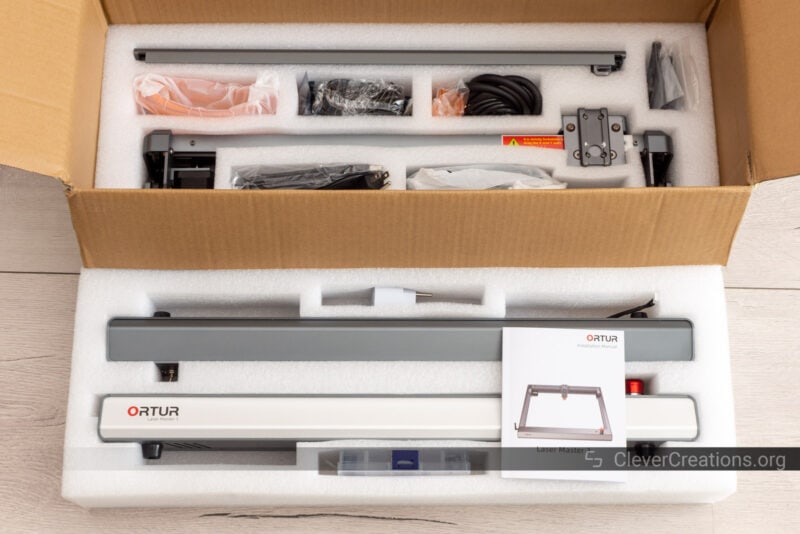
Unpacking the Ortur Laser Master 3 is a standard affair. You can find the machine disassembled into components in the box. This makes the box relatively small and also helps to keep the device well-protected during shipping.
Inside of the box, you will find
- Frame components
- Laser module
- Laser shield
- Timing belts
- Cables
- Air assist components (tube, regulator, pneumatic fitting)
- Wi-Fi antenna
- Laser goggles
- Various screws for assembly
- Various tools for assembly and operation
- Testing materials (wood, acrylic)
- Power adapter
- SD card and card readers
- Locking keys
All of this is enough to get started laser engraving with the Ortur Laser Master 3 right away. After the assembly, of course.
One thing that is missing is an air pump for the air assist. All other components for the air assist are there, but the pump itself is not.
This means that if you want to use the built-in air assist functionality and you don’t already have a pump, you will need to acquire one. A great option for this is the DEWALLIE Air Assist Pump, even though you can find similar models under various brand names.
That said, the Ortur Laser Master 3 also gives great results without the air assist, so it’s up to you whether you want to spend a bit extra to get even more out of this laser engraver.
Also not found in the box is a physical manual for the Ortur Laser Master 3. There is an installation manual included, but that’s mostly for the assembly and setup process.
You can find the manual on the included SD card, however, or you can just download the most recent version on Ortur’s website.
Getting Started with the Ortur Laser Master 3 Laser Engraver
The Ortur Laser Master 3 is easier to assemble than the OLM2. Despite that, it will still take you around 20-30 minutes. The process itself is straightforward, but there are some tricky steps that require extra attention.
The included installation instructions are great, with clear steps, detailed diagrams, and even a QR code that links to a YouTube video in case you need more information. The entire process reminded us of the assembly of the Snapmaker 2.0, which has equally great instructions.
Assembly
We typically show you the assembly process for laser engravers like this, but in the case of the Ortur Laser Master 3, we recommend that you just follow the instructions in the included manual or the video.
A couple of important steps you should pay extra attention to are:
- During the assembly of the frame, pay attention to not pinch the wire between the Y-axis frame and X-axis frame components. There’s a slot for the wire to go through, make sure you use it.

- Looping the Y-axis timing belts around their pulleys can be tricky. Try holding it as in the picture below, inserting it toward the outside of the machine, before moving it inward and hooking it onto the pulley.
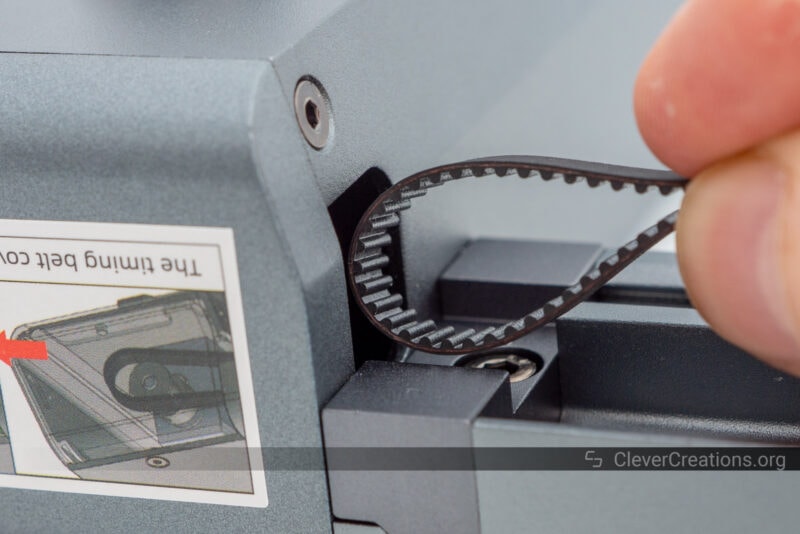
- Make sure to loosen the idler pulley bolt when adjusting the position of the corresponding M4 set screw. This makes sure that the set screw can actually push the idler to its correct position and tighten the belt. If the idler bolt is tightened, the set screw keeps pushing without effect and you risk stripping its threads.
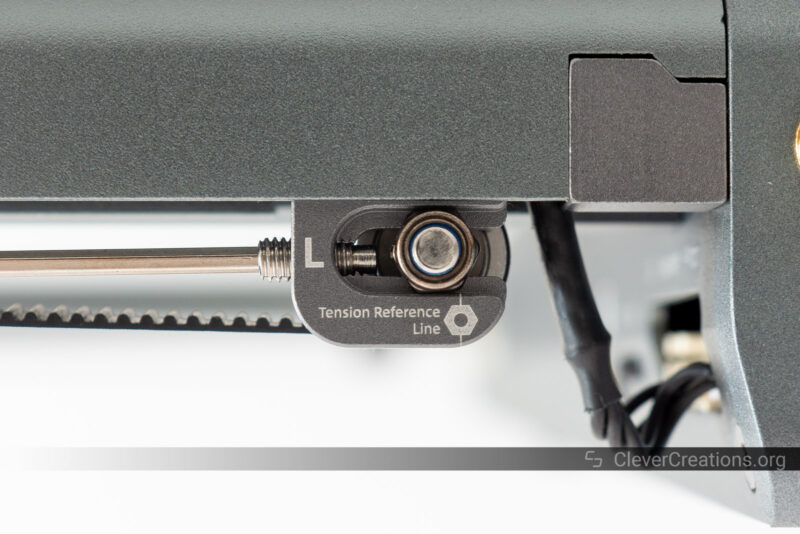
Setup
After assembling any laser engraver, 3D printer, or home CNC machine, you’ll want to make sure that it is set up correctly. In the case of the Ortur Laser Master 3, you only need to adjust the eccentric nuts on the X- and Y-axes to remove any play in the machine.
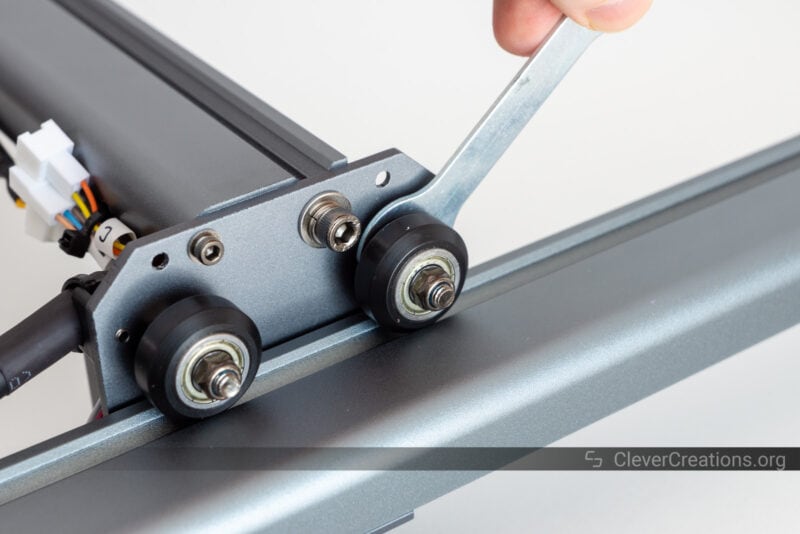
This ensures that the V-wheels make proper contact with the grooves on the aluminum extrusion that they ride on and that the machine can move smoothly in both axes.
Adjusting this is a simple process, but on the Y-axis you do need to remove one cover on each side of the gantry to access these eccentric nuts.
On the review sample that was supplied to us, the eccentric nuts were already adjusted to the optimal position and we didn’t need to make any changes. Regardless, it’s still something we recommend you check.
Another thing that you could do before you start laser engraving is to upgrade the firmware of the Ortur Laser Master 3 to the latest version. This ensures that you have all the latest features and bug fixes.
To do this, you can go to Ortur’s support site to check for the latest firmware and then follow the instructions on how to upgrade it.
It’s fine if you don’t do this, however, as the Ortur Laser Master 3 works great with the firmware that is already pre-installed on the machine.
Ortur Laser Master 3 Features
The Ortur Laser Master 3 comes with a number of great features. Some of these you won’t find on any other laser engravers that are available at this price point. Let’s take a look at the most noteworthy ones.
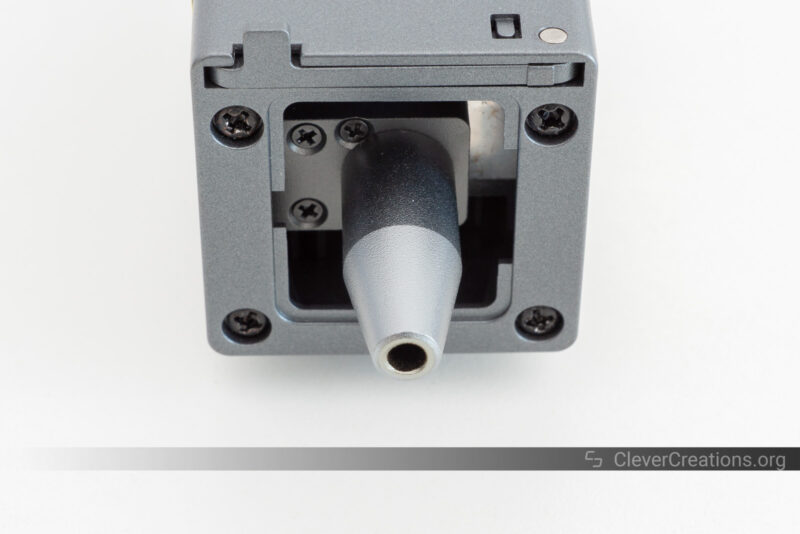
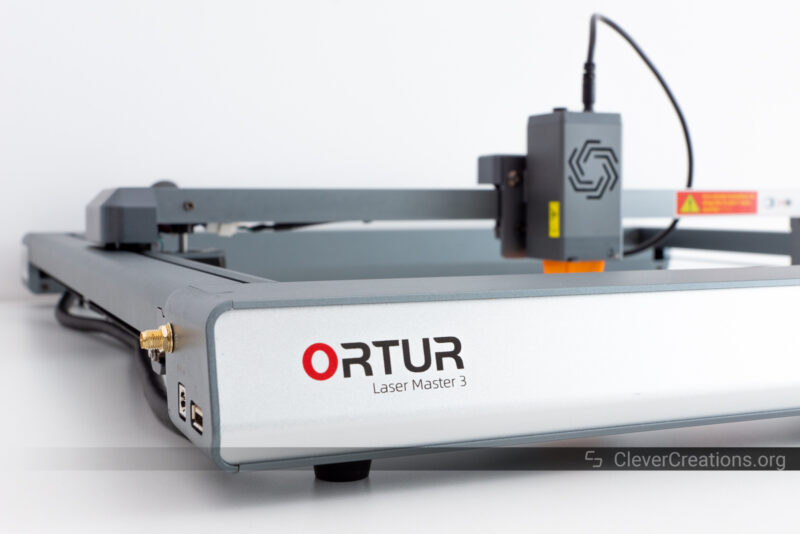
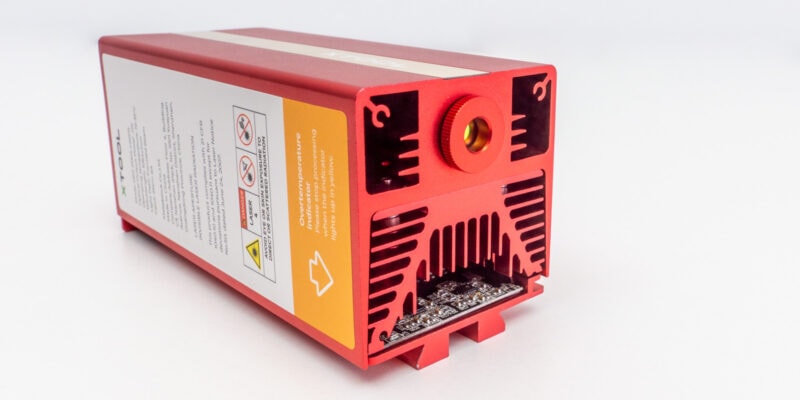
Laser Module
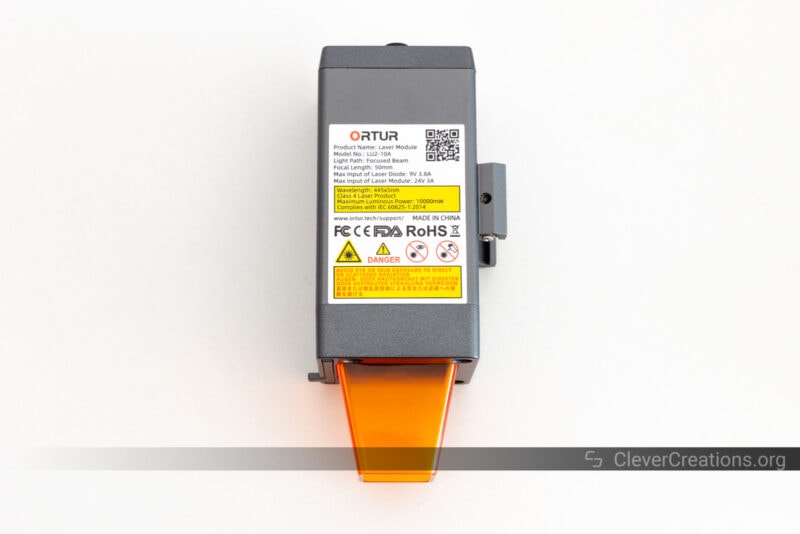
A significant upgrade of the Ortur Laser Master 3 over the OLM2 is its laser module. It engraves and cuts your materials with 445nm laser light and delivers up to 10W of power. This is a big step up from the 5.5W laser module of its predecessor and helps in achieving the faster laser speeds of the OLM3.
Aside from being able to engrave and cut faster, the 10W laser module also comes with the latest laser spot compression technology. This laser spot compression technology basically gives you a smaller spot size, resulting in more detailed laser engraving and faster cutting.
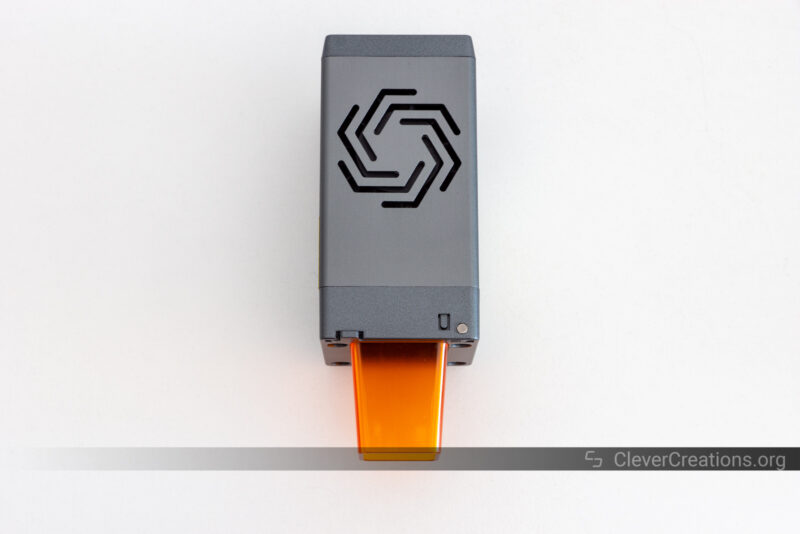
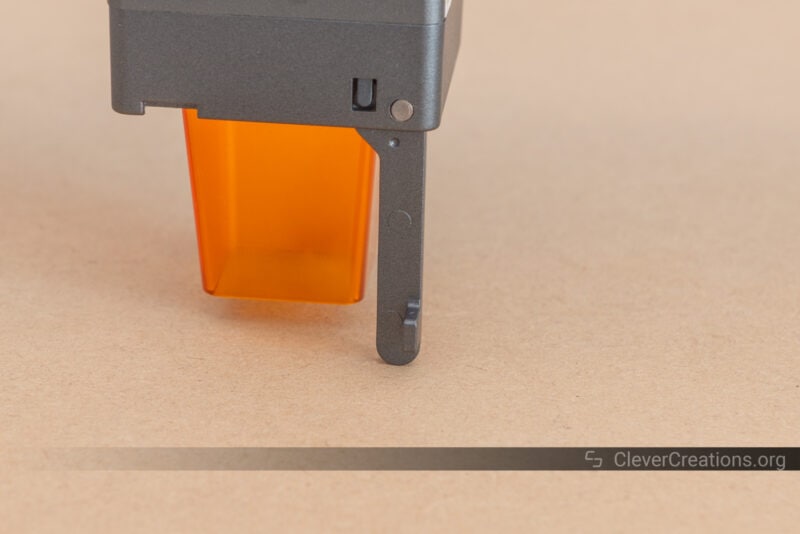
To help protect your eyes from laser light, the laser head comes with a removable clip-on laser shield. This is a cover that blocks a portion of the laser light, but it’s not 100% effective.
For that reason, it is a good idea to wear eye protection when using the Ortur Laser Master 3. This is exactly why Ortur has chosen to include a pair of goggles with the machine.
The clip-on laser shield is something we prefer over a magnetic version because it is less likely to accidentally come off at any point. Plus, as we noticed in our Creality CR-Laser Falcon review, magnetic laser shields can sometimes start resonating and produce annoying sounds.
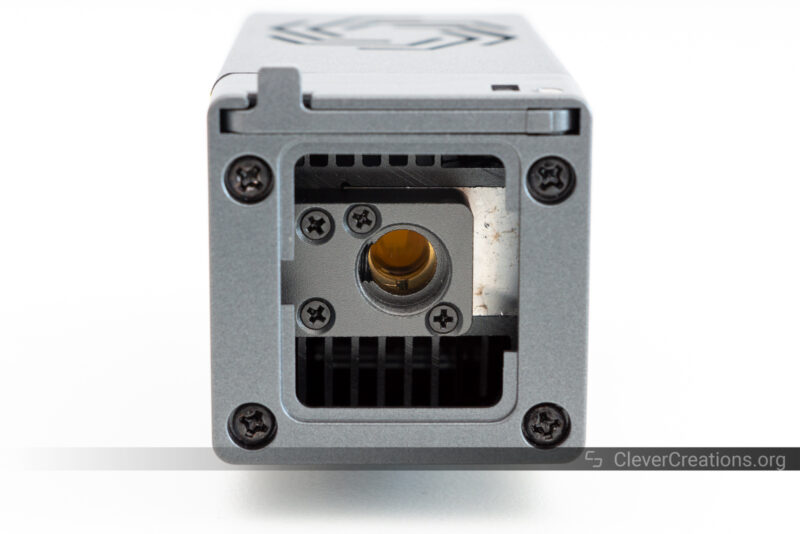
Integrated Air Assist
A cool feature of the Ortur Laser Master 3 that we have also seen in previous Ortur laser engravers, but rarely in those of other manufacturers, is the built-in air assist.
An air assist provides a steady supply of compressed air that helps remove debris from the work area and also cools the material being engraved or cut. This results in cleaner engravings and cuts with fewer burn or scorch marks.
Another benefit is that it reduces the amount of soot that collects on the laser lens. This, in turn, reduces the heat that gets generated on it and extends the life of the laser module.
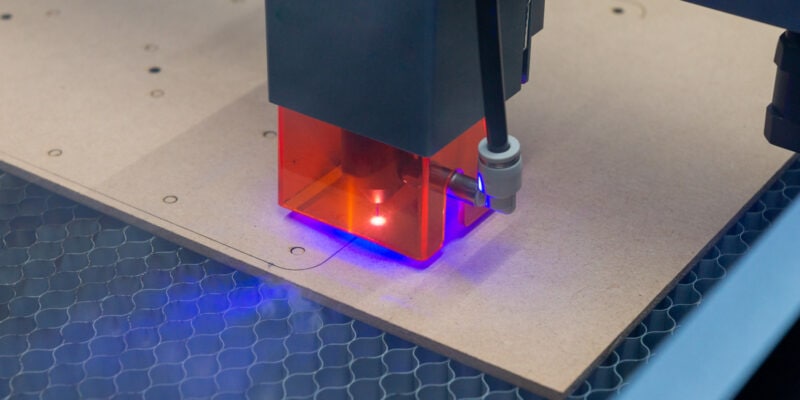
Unlike other air assist solutions, the air assist of the Ortur Laser Master 3 is integrated into the laser head itself. It has an on-axis nozzle that both the air and laser light pass through.
Not only does this result in a compact and efficient design, but it also blows away the smoke better. The advantage of this is that it provides cleaner results than an off-axis air assist.
The disadvantage is that the air comes in through the top of the laser module and has to make its way to the bottom. Depending on the path it takes, this constriction can lead to a loss in air pressure compared to a simpler external air assist tube.
In short, you’ll have to make sure to use a sufficiently powerful air assist pump with the Ortur Laser Master 3.
Air Assist Pump
That leads us to the next topic, the air assist pump. As we mentioned above, the Ortur Laser Master 3 does not come with one included.
There are a number of reasons why Ortur might have chosen not to include one:
- Not everyone wants to use one.
- These pumps can be quite loud.
- It increases the already high cost of the machine.
- Some people already have a pump available from their previous laser engraver.
- The air assist is also not strictly necessary for laser engraving and cutting, it just improves results.
If you want to use the air assist functionality and do not already have a pump, there are a couple of popular options you can choose from.
The first is the DEWALLIE pump, which is a small, portable air pump that can output up to 16 liters at around 8 PSI. This is more than enough for most laser engraving and cutting applications.
The second option is a budget airbrush compressor, like the PointZero 1/5 HP compressor. Generally, you don’t want to pick a compressor with too high pressures for your laser engraver. This can lead to things like condensation and moisture buildup.
Since the Ortur Laser Master 3 does not come with a pump by default and we did not have one at hand, we have done all the test engravings and cuts below without an air assist.
Once we get our hands on a compatible air assist pump, we will update this review with additional test results.
The air assist nozzle on the OLM3 is optional, so if you don’t want to use it, you can leave it off.
Working Area
The Ortur Laser Master 3 laser engraver has a working area of 400×400 mm. This is the most standard size for this type of laser engraver. It is identical to that of its predecessor, the Ortur Laser Master 2.
Some other engravers that we have reviewed recently with similar work areas are the 10 W Creality CR-Laser Falcon (400×415 mm) and the 5W Jinsoku LC-40 (395×365 mm).
You can get nearly everything hobbyist-related done with this working area. It’s more than enough for things like coasters, signs, phone cases, and smaller woodworking projects.
One advantage the Ortur Laser Master 2 Pro series has over the OLM3 is that it has an optional extension kit available. This lets you extend the machine’s working area to an impressive 800x400mm.
Looking at its construction, the Ortur Laser Master 3 is built in a way that supports extending as well. So in theory it is possible that we might see an official extension kit for the OLM3 from Ortur in the future.
Another option you could look at if you need a larger work area is the Jinsoku LC-60A. It comes with an air assist + pump by default but only has a 5.5W version available.
Built-in Wi-Fi
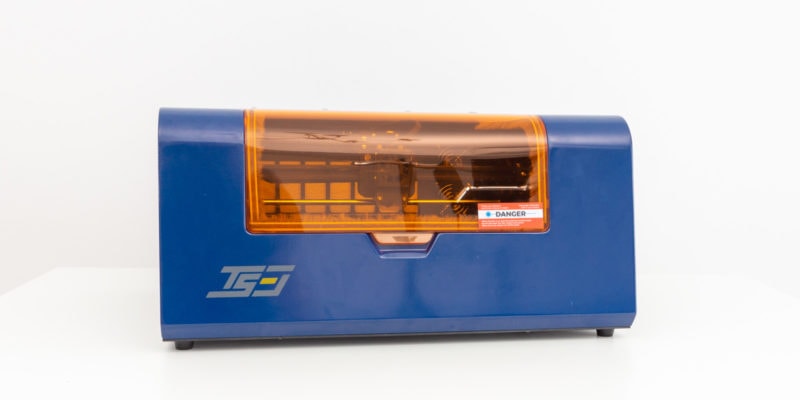
Something that is fairly unique to the Ortur Laser Master 3 is its built-in Wi-Fi. We have seen this before in the enclosed Two Trees TS3, but as far as open-frame engravers go, it is not something common.
The Wi-Fi lets you connect to the Ortur Laser Master 3 via a mobile app. It is called Laser Explorer and it is available both for iOS and Android.
The Laser Explorer app performs similar to what we saw in the app for the Two Trees TS3. You can use it to take simple images or pictures, and turn them into engravings without the need for a computer.
Additionally, you can use it to move the laser head, change laser engraving settings, and start/stop the engraving process.
It’s a nice app if you want to quickly work with the machine without access to a computer, but not more than that.
If you are going to pay the full price for the OLM3, you are likely going to want to make use of its full potential and use Lightburn or LaserGRBL. Lightburn is what we will be using for the rest of this Ortur Laser Master 3 review.
Fast Laser Engraving Speeds
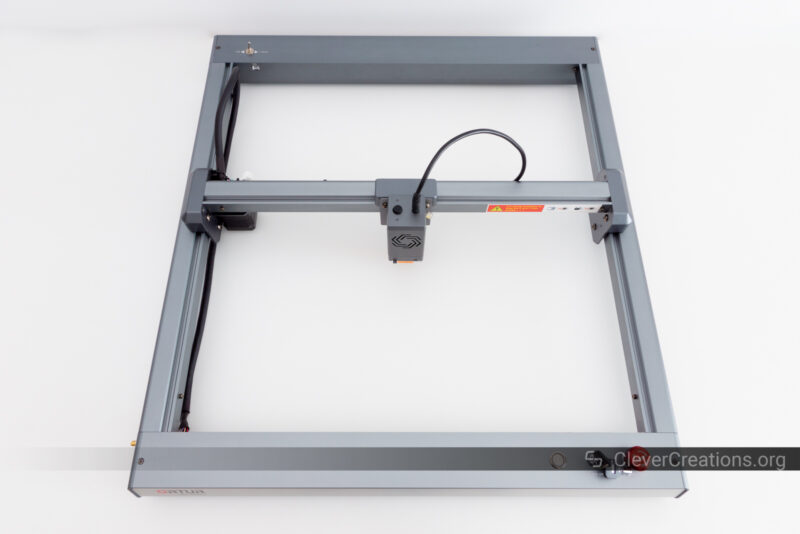
The Ortur Laser Master 3 boasts an incredibly fast laser engraving speed of up to 20,000 mm/min. This is twice as fast as the OLM2, and even more than some of its other competitors.
There are a couple of factors that Ortur has implemented to accomplish this.
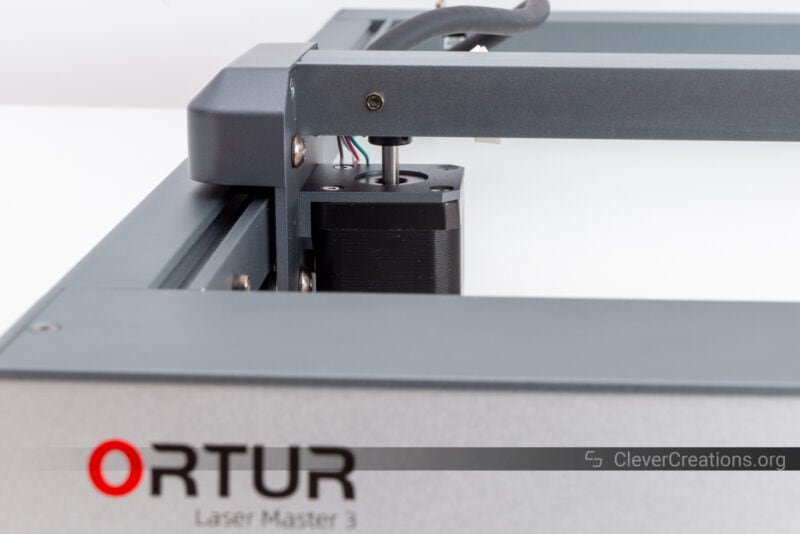
The first is that the machine has a low center of gravity. Compared to other engravers, which have their X-axis stepper motor mounted higher-up, the Ortur Laser Master 3 has it mounted low, inside of the engraving area.
This results in fewer vibrations and a smoother engraving process, which in turn lets the machine work faster without compromising on quality.
A downside of mounting the stepper motor inside the work area is that the area had to be expanded to still give the same amount of usable space. As a consequence, the footprint of the Ortur Laser Master 3 is larger than that of other 400×400 mm laser engravers.
The second reason is that the laser head is lightweight. At 235 grams it is one of the lightest laser heads available. This lets it accelerate and decelerate faster without visual artifacts showing up in your work pieces.
The frame of the device is also stiffer than usual. Not only does it use thick aluminum frame components, but its X- and Y-axis frame elements interlock at their mounting points. This gives extra rigidity to the structure.
Long story short, the Ortur Laser Master 3 is designed to engrave at a blistering pace.
You are unlikely to engrave at speeds close to 20,000 mm/min most of the time, however. Especially if you want to achieve deep and dark engravings, the laser does need to put a certain amount of energy into those areas.
The acceleration of the OLM3 is also faster than that of other laser engravers. This will always help you save time, regardless of the speeds you are engraving and cutting at.
Sensorless Homing
Another cool feature of the Ortur Laser Master 3 laser engraver is its use of sensorless homing.
Most other laser engravers use physical endstops that let the engraver know the position of the laser head. These are often simple mechanical switches that the laser head needs to touch during the homing procedure.
The downside of these switches is that they are subject to wear and tear. This means that over time, they can get damaged and stop working as intended.
The Ortur Laser Master 3, on the other hand, uses the sensorless homing feature that is built into its Trinamic TMC2209 stepper motor drivers. What this essentially does is that it uses the back-EMF of the stepper motors to determine their position.
This is a neat feature of these stepper motor drivers that we have also seen used in the Anycubic Kobra 3D printer. It is a reliable and durable solution for homing. It also keeps the cost of the machine down, as you aren’t paying for physical endstops and their corresponding wiring.
Safety Features
On any laser engraver, safety is of the utmost importance. With these types of devices, it is easy to end up with a fire if things go wrong.
The Ortur Laser Master 3 has a number of features that help keep things safe while using the machine.
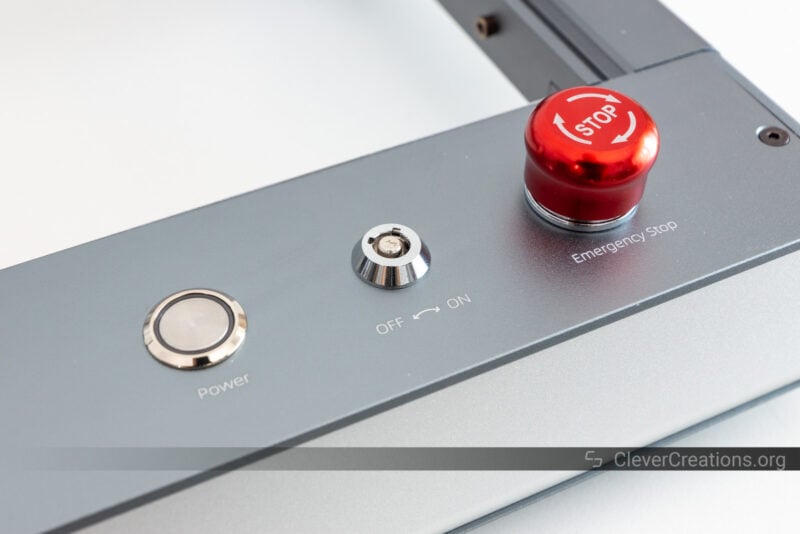
Emergency Stop Switch
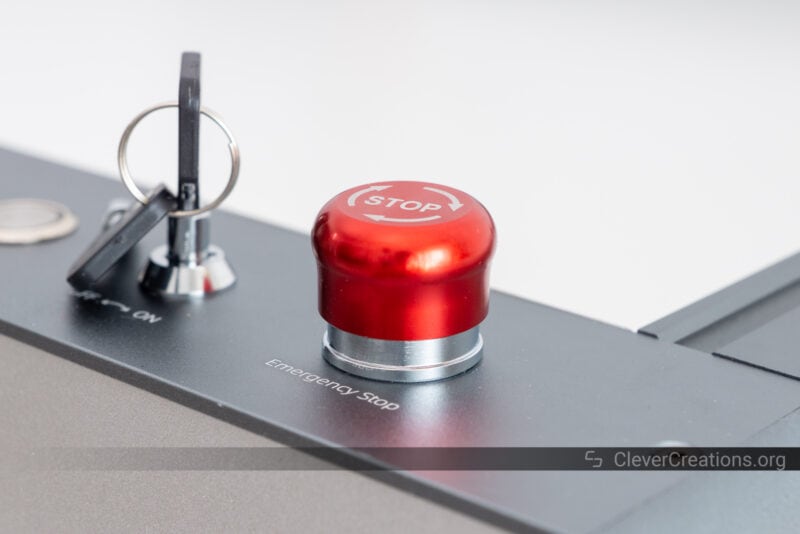
Something that is hard to miss, is the emergency stop switch on the front of the Ortur Laser Master 3. It is a big red button that you can press time to immediately stop the laser from engraving. This is incredibly useful if you need to quickly stop the machine for any reason.
It’s not uncommon to find this on laser machines. For example, the Ortur Laser Master 2 had one too, as does the Jinsoku LC-60A.
We should point out that the emergency stop on the Ortur Laser Master 3 is a software button, so it does not cut the power to the machine.
This means that it is possible for the machine to not halt immediately. For example, if the firmware decides to finish its current action, or if it experiences a catastrophic bug, the emergency stop switch might not work as intended.
Safety Lock

A feature that does immediately cut the power to the Ortur Laser Master 3 is the safety lock. Its main purpose is to prevent unauthorized access to the machine, but you can also use it to turn off the machine quickly in an emergency.
The safety lock is a physical lock that you need to turn in order to disable the machine. There are two keys included with the machine, so even if you lose one, you are still able to use your laser engraver.
Software Safety Features
Ortur has also included a number of software-based safety features in the Ortur Laser Master 3.
For example, the laser engraver comes with active position protection and slope detection. In other words, the machine detects when it is moved around or tilted, and automatically stops laser engraving or cutting.
These are nice features to have if you run your laser engraver in a high-traffic area, like a shared workspace. It helps prevent the machine from accidentally damaging itself or causing a fire when bumped into.
The device also has exposure duration detection. We weren’t able to find too much about this feature, but we assume this means that the Ortur Laser Master 3 automatically detects when its laser has been in a single spot for too long. If it has, it will automatically shut off the laser to prevent fire.
Testing this on our sample of the OLM3 confirms this, as the machine starts beeping and turns the laser off after a few seconds of continuous engraving in a single spot.
Ortur Laser Master 3 Build Quality & Construction
Whereas many sub-$1000 laser engravers follow a cookie-cutter approach of similar construction with a couple of changes, the Ortur Laser Master 3 looks and feels like a completely new device.
Design
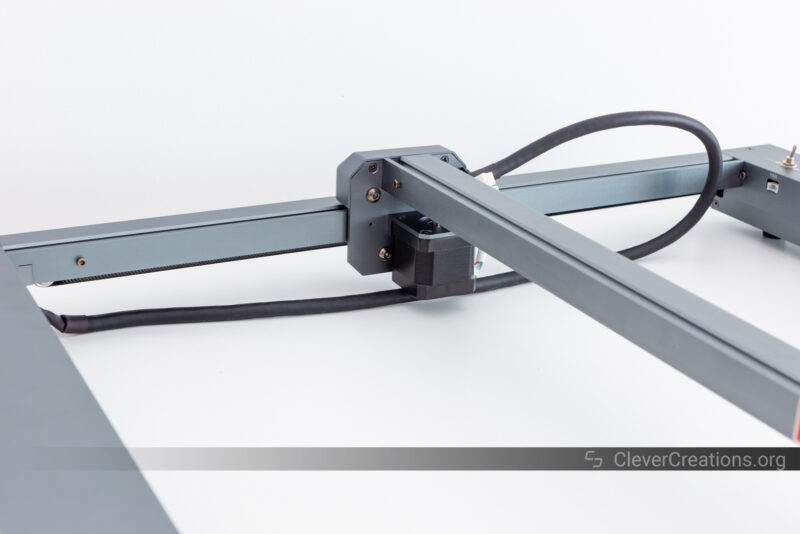
For example, the Ortur Laser Master 3 has a unique, low-profile design. While this is mainly done to lower the center of mass of the machine, it also gives the Ortur Laser Master 3 a very sleek look.
The tradeoffs of this, however, are that the machine has a larger footprint than usual and that there is relatively little vertical space available under the laser head.
So if you want to engrave tall objects or thick materials on a honeycomb bed, you will need to elevate the machine by placing it on a couple of two-by-fours, some kind of other makeshift lift, or get the official lift stands.
Rigidity
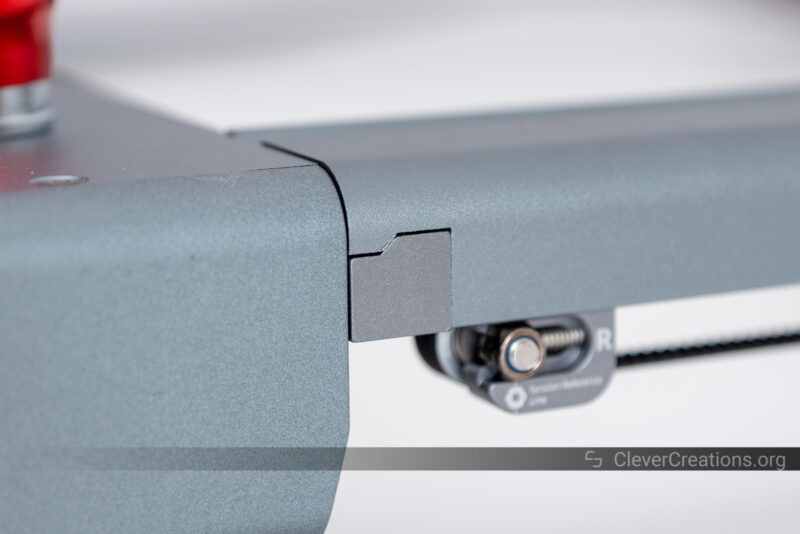
The frame is also more rigid than we typically see. Its beefy X- and Y-axis aluminum sections interlock at their mounting points, creating a frame that is easier to square and is more rigid.
This stands in contrast to other machines that have aluminum sections that are too thin or are mounted in a way where they can slide around relative to each other.
Cable Management
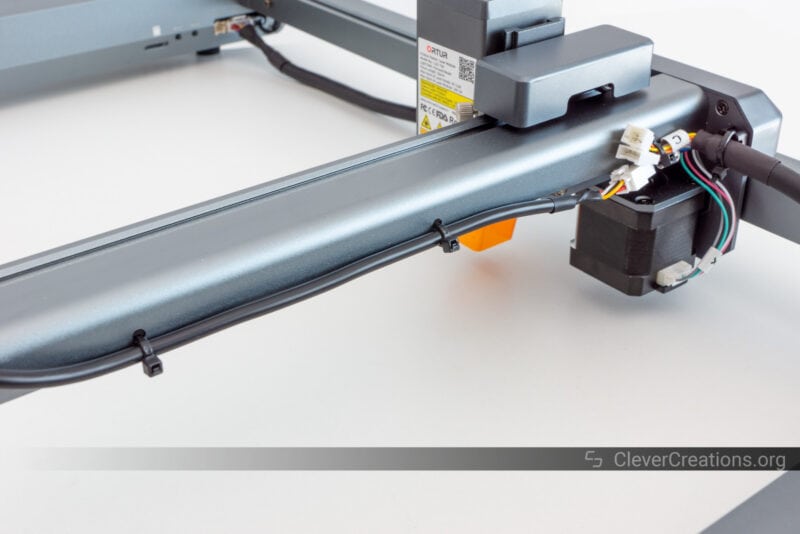
The cable management on the Ortur Laser Master 3 is sufficient. For example, on the X-axis, the cables that lead to the carriage are tied to the aluminum gantry.
This is a big improvement over the Ortur Laser Master 2, which did not have any kind of cable management on the X-axis. This leads to the cable potentially drooping down into your work area, the same issue we encountered on the Creality CR-Laser Falcon.
On the Y-axis, the OLM3 has the wire hanging loose, which is actually a step back from what we saw on the OLM 2 Pro S2. That machine used a cable chain on the outside of the frame to neatly tuck away the Y-axis cable bundle.
Given that the Ortur Laser Master 3 is already wide because of its low-profile design, it is possible that Ortur has forfeited the idea of an external cable chain on the OLM3 to prevent the laser engraver from becoming even wider.
This is not a big issue, because the Y-axis wires move around on a path that doesn’t have any honeycomb bed, rotary roller, or material in it. So the wire won’t get caught on anything as the laser head moves around.
Ease of Use
Focusing
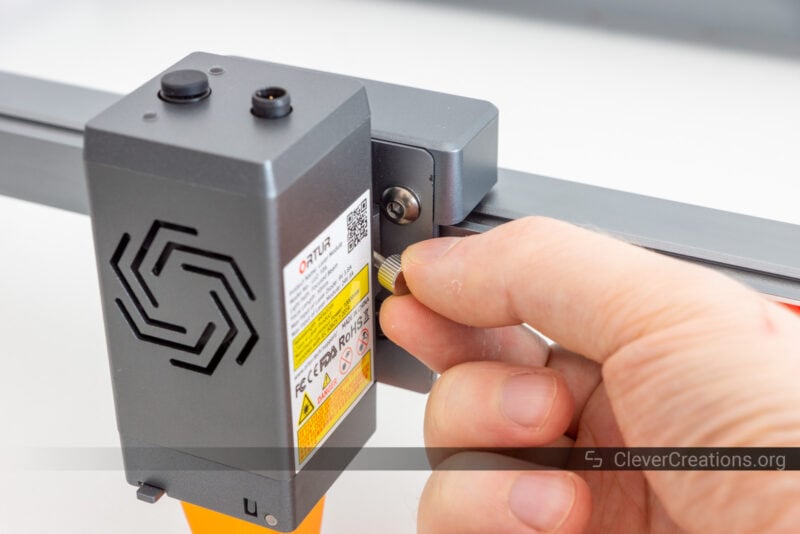
The focusing mechanism on the Ortur Laser Master 3 is similar to that of many other laser engravers, but it has one significant improvement that makes it easier to use.
To adjust the focus, you adjust the thumbscrew on the laser head, move the head up and down, and tighten the thumbscrew again when the focus is where you want it. So far, this is similar to many other laser engravers, even though some use two thumbscrews for extra stability.
What Ortur has done differently is that they have placed a thin metal plate behind the thumbscrew. This creates a larger contact area between the laser head and the carriage, and keeps the head from wiggling around.
This is a small detail, but we really like how it improves the user experience. It essentially gives you the security of multiple thumbscrews (because of the increased contact area), with the convenience of only having to adjust a single thumbscrew. Quite clever!
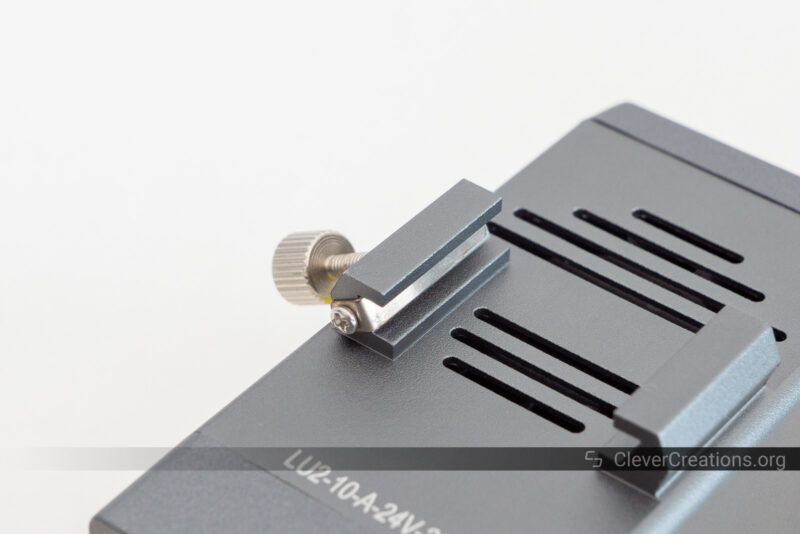
Another convenient addition to the laser head is the focusing bar. This lets you set the focus to the optimal distance for engraving, without having you use spacers or measuring by hand.
The focus bar works very well for engraving, but for cutting you always want the focus distance to be set a bit lower, in the vertical center of the material. So even though the focusing bar is a helpful addition, you will still need to manually set the focus distance when cutting.
To help with that, you could use the Z-height adjuster accessory. Every rotation of the screw of that accessory raises or lowers the height of the laser head by a specific amount. So if you need to lower the focus by 2 mm, for example, you can just count the number of rotations it takes to lower the head 2 mm and then do that every time you need to focus for cutting.
Alternatively, you could use spacers with a known height to set the focus when cutting. This is what we did with our Ortur Laser Master 3. It works well but just takes a bit longer.
User Interface
The user interface of the Ortur Laser Master 3 is limited, but because the device comes with Wi-Fi connectivity, this is not as much of an issue as with other laser engravers.
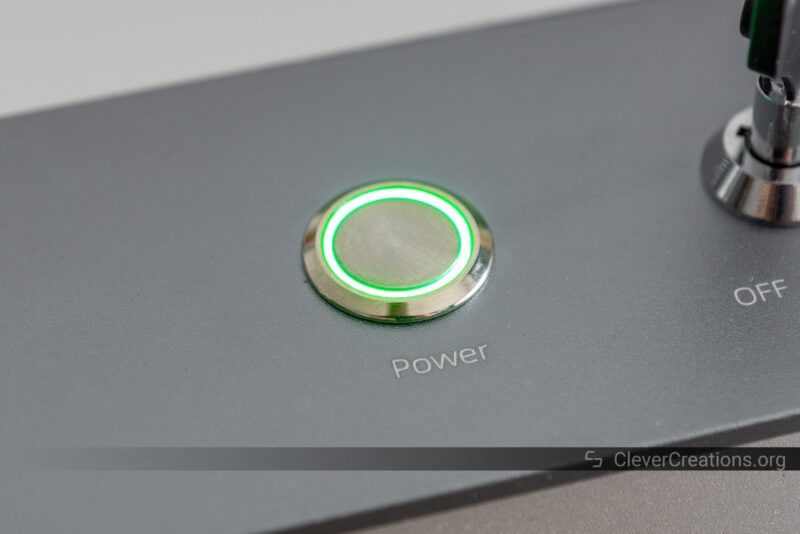
You basically only have a power button on the front to power the machine up and down, as well as the lock to cut the power and the emergency button to stop the machine.
There is no touch screen, buttons to start or stop a laser engraving job, or any other way to interact with the machine without using a secondary device.
The quickest way is to use your phone with the Laser Explorer app (once you have Wi-Fi set up), but you can achieve the best results by using Lightburn or LaserGRBL.
One thing that is nice about the Ortur Laser Master 3 is that the power button on the front illuminates in various colors depending on the mode of the machine. For example, if the machine is homing, the light flashes blue, when it is idle, it alternates between yellow and green, and so on.
It’s a quick and easy way to tell what the machine is doing, but you will need to familiarize yourself with the different colors first to learn what they mean.
For a laser machine with more user-friendly controls on the front, you could take a look at the Atomstack A10 Pro. With its remote touch screen, it is a lot easier to use without direct access to a computer.
Accessories
Ortur is one of the best laser engraver manufacturers when it comes to accessories. Not only do they have a wide range of accessories available, but most of them are actually useful and improve the user experience.
The Ortur Laser Master 3, therefore, has a lot of ways that it can be upgraded and improved. Here are some of the most useful accessories:
Laser Goggles
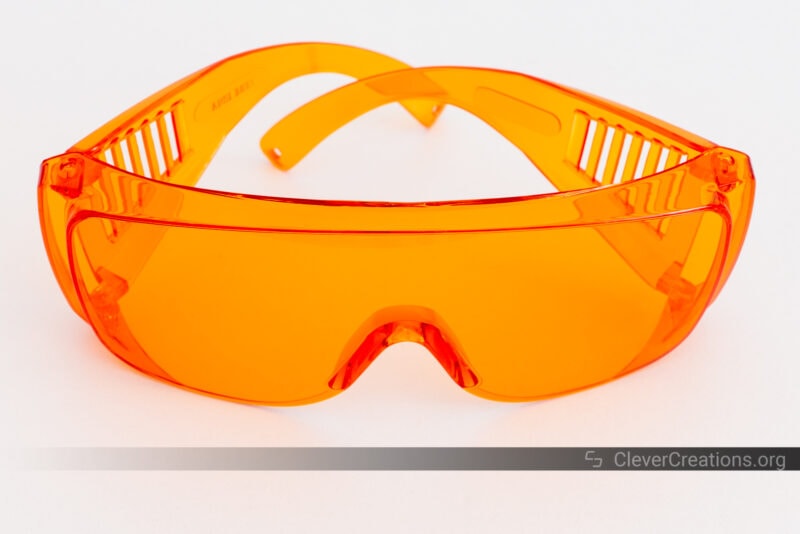
It is important to mention laser goggles when you use a laser engraver. They are an essential accessory in keeping you safe, as you should never look at laser light or even its reflections.
The Ortur Laser Master 3 has a pair of laser goggles included. Unfortunately, they don’t come with documentation or certification that verifies that they sufficiently protect against the wavelength of this laser.
It is certainly better to use them than not to use them, but there is no way of knowing for sure if they will protect you enough. If you are looking for certified laser goggles, the LaserPair laser safety glasses are a popular choice.

Air Assist
With its integrated air assist system, the Ortur Laser Master 3 is a step ahead of most of its competition. But since you do still need to purchase a pump, it is not a complete solution out of the box.
If you don’t have a pump available and want to make use of the Ortur Laser Master 3 air assist, we recommend the DEWALLIE pump. There are many similar models out there, but DEWALLIE is a good brand when it comes to laser engraver accessories.
No products found.
Z-height Adjuster
Ortur’s Z-height adjuster is also compatible with the new Ortur Laser Master 3. If you find yourself frequently having to adjust the focus of your machine, this is a convenient way to do so quickly and accurately.
It saves you from having to fiddle around with the thumbscrew in one hand while you handle spacers or the laser head with your other hand.
It’s more of a quality-of-life accessory than it affects your engraving and cutting results, but if you plan on using the machine a lot, it might be worth it for you.

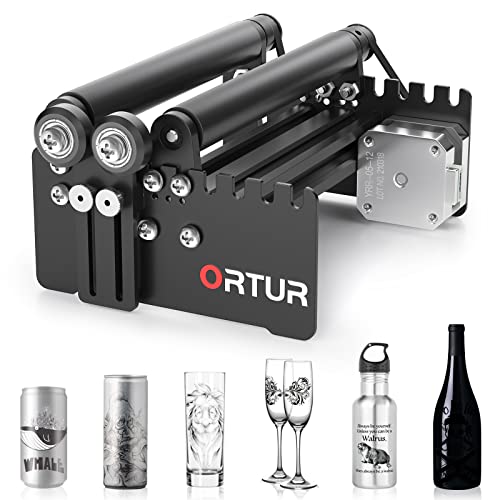
Rotary Roller
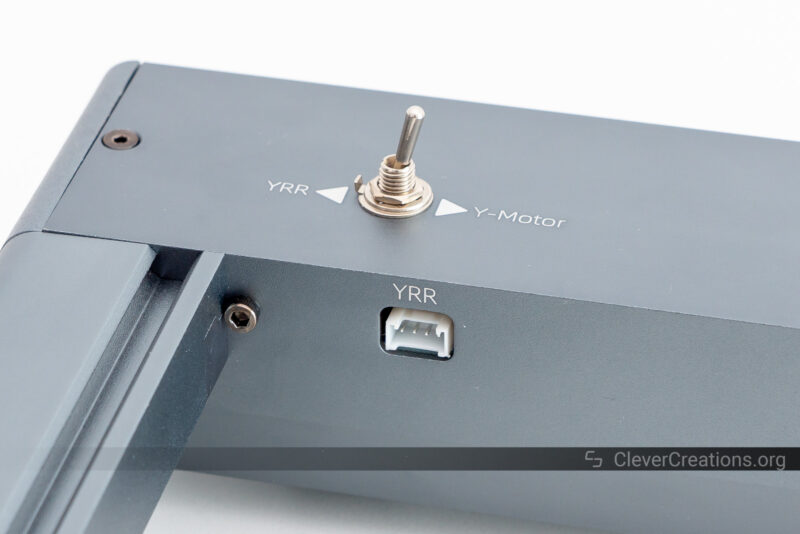
The fourth-axis rotary roller is another optional accessory for the Ortur Laser Master 3. There is a port at the rear of the device to connect it. The firmware has built-in support for it as well, so you only have to plug it and flip the selector switch near the port.
We haven’t tested a rotary roller with the Ortur Laser Master 3, but they pretty much all function the same way. They consist of a set of rollers driven by a stepper motor. Your workpiece rests on the rollers and rotates as you engrave or cut.
It’s a great accessory to use if you want to engrave or cut cylindrical objects, like glasses or mugs. It might be a bit expensive if you want to use it for fun, but if you have a specific project in mind, it could be worth the investment.
Lift Stands
If you want to use the rotary roller or engrave tall objects, you will run into the height limit of the Ortur Laser Master 3. Because of its low profile, there isn’t much space underneath the X-axis gantry.
This problem is easy to remedy by placing the laser engraver on a pair of wooden blocks, beams, or similar. We’ve also seen people use cinder blocks, but Ortur actually sells a set of purpose-built lift stands for their machines.
They are more expensive than a simple set of beams, but they take up less space and their height is easy to precisely dial in.

Engraving Platform
It is recommended to use some kind of honeycomb bed or laser engraving platform to rest your workpiece on. This prevents your table or workbench from being damaged by the laser and creates space for smoke and soot to go under your material.
Ortur’s laser engraving platform is well-designed, but also expensive compared to the other options out there. You can find quality honeycomb beds with protective aluminum plates for about half the price (or less, if you want to compromise on quality).

Ortur Laser Master 3 Engraving & Cutting Results
Here you can see the results we got with the Ortur Laser Master 3. As always, these are presented as-is, right out of the machine, unless otherwise mentioned.
As a result, you will see some scorch or burn marks in some of the results. You can remove these with a light sanding with 200-grit sandpaper. Alternatively, you can cover the material with a layer of painters tape or transfer tape before laser cutting.
Do Not Disturb Sign
We’re happy with how this do not disturb sign came out. The cuts are clean and the engraving has a nice contrast. It’s a straightforward engraving and cutting job, but the Ortur Laser Master 3 handled it well.


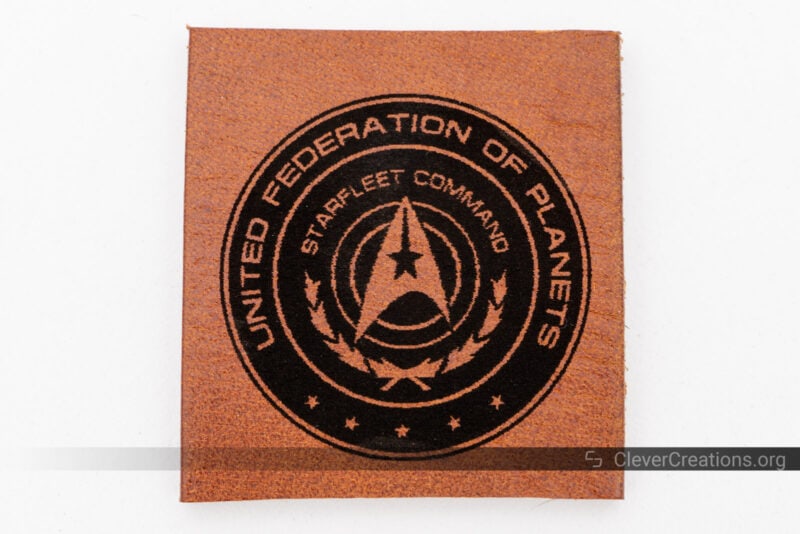
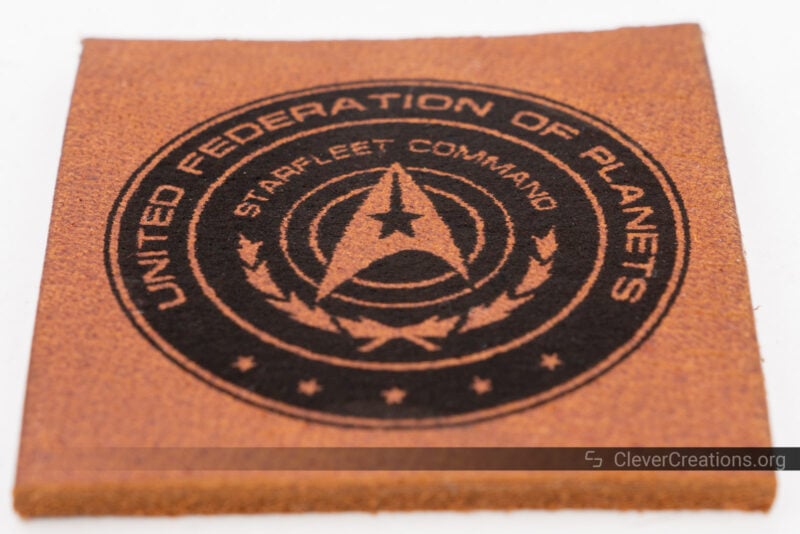
Starfleet Patch
As you can see here, the OLM3 is capable of creating deep contrast on leather. Interestingly, there are some small horizontal misalignments throughout the engraving.
It was our first time engraving leather and these lines did not show up in any other results, so we assume this was caused by the material itself and not by the laser engraver.
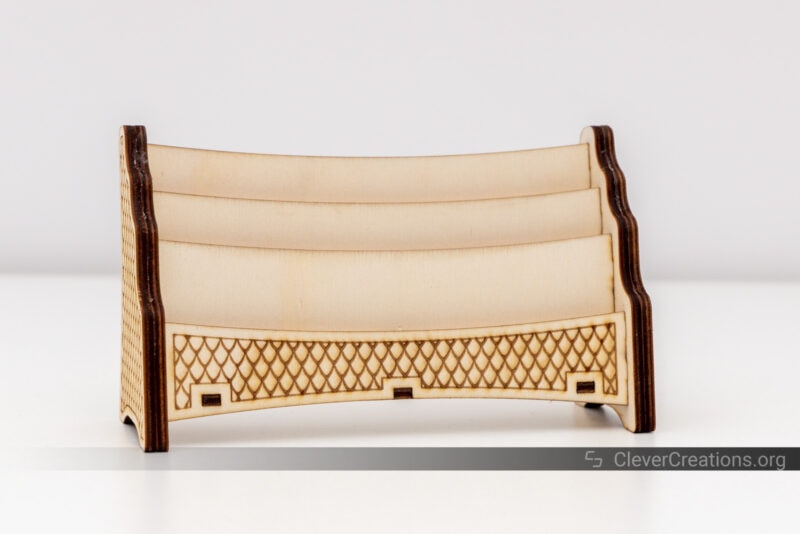
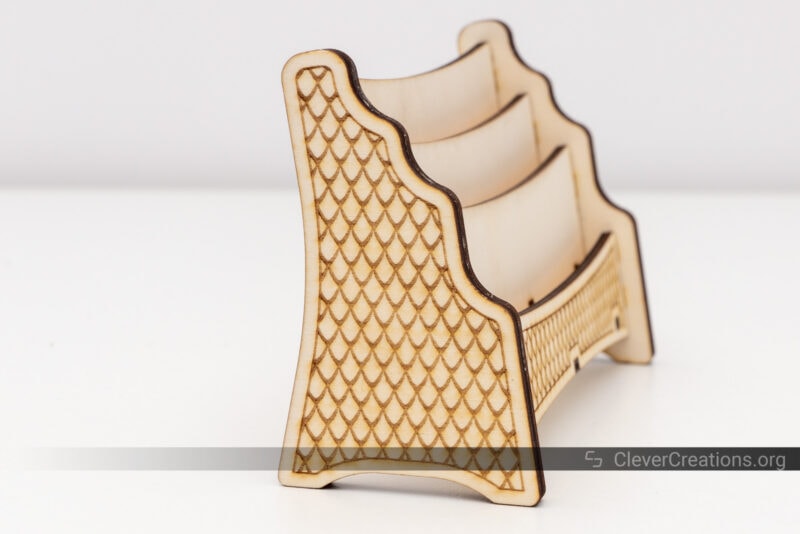
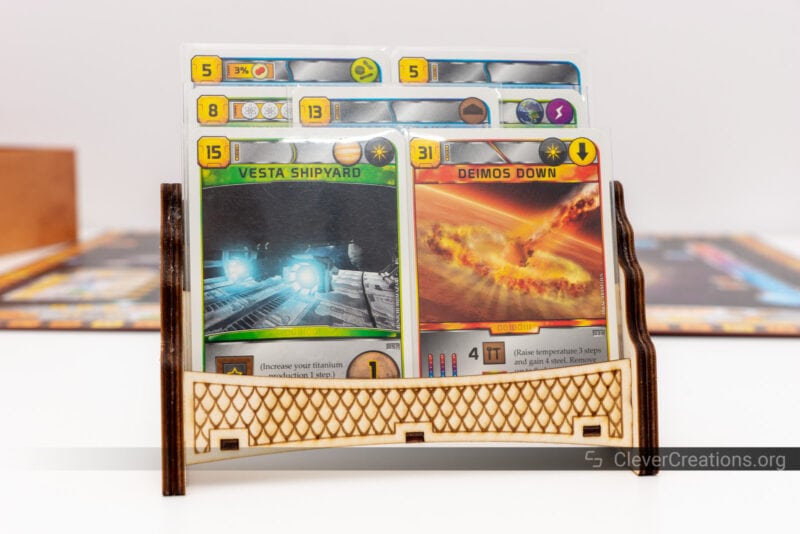
Playing Card Holder
This playing card holder fit together perfectly without sanding any of its features. There are some scorch marks visible that we think could have been prevented if we used an air assist pump. If/When we get our hands on one, we will revisit this test and compare the results.
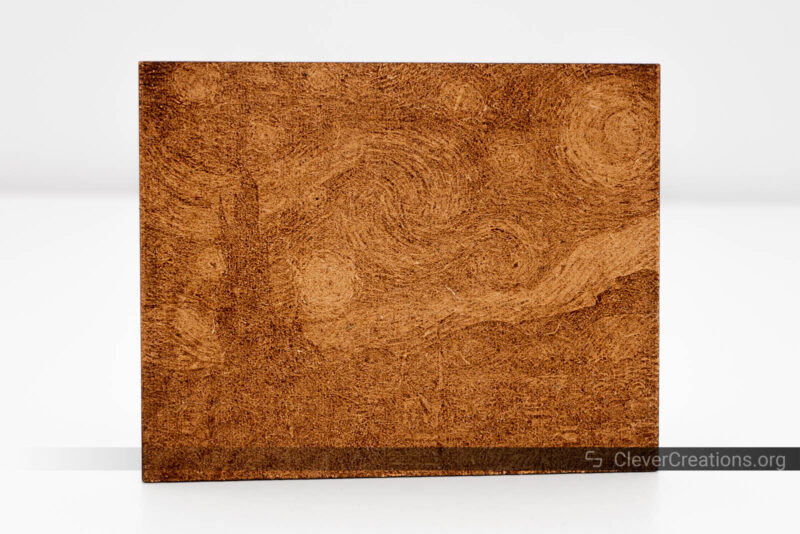
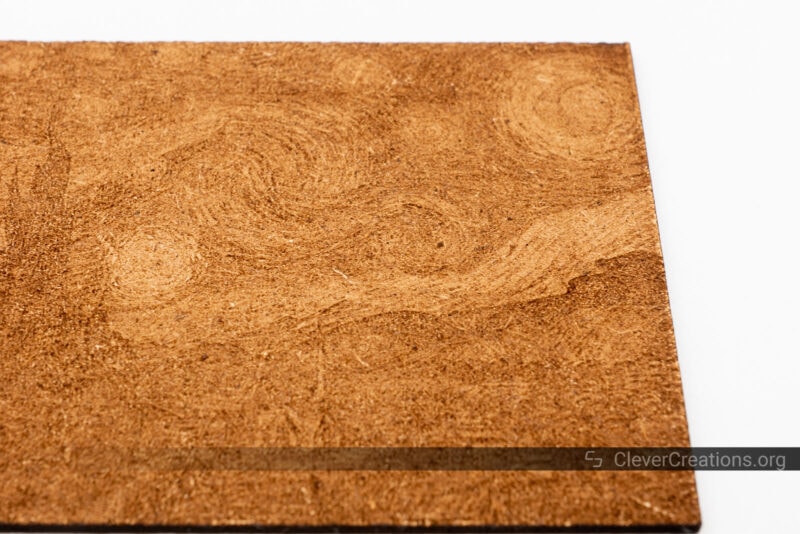
Starry Night
We are super impressed with this recreation of van Gogh’s Starry Night. The detail is amazing and the recreation of the paint swirls by the laser engraver gives a really cool effect.
The overall contrast could have been a bit better, but that’s mainly due to the settings we used. If we were to engrave this with the OLM3 again, we would use a slower speed to get darker blacks.
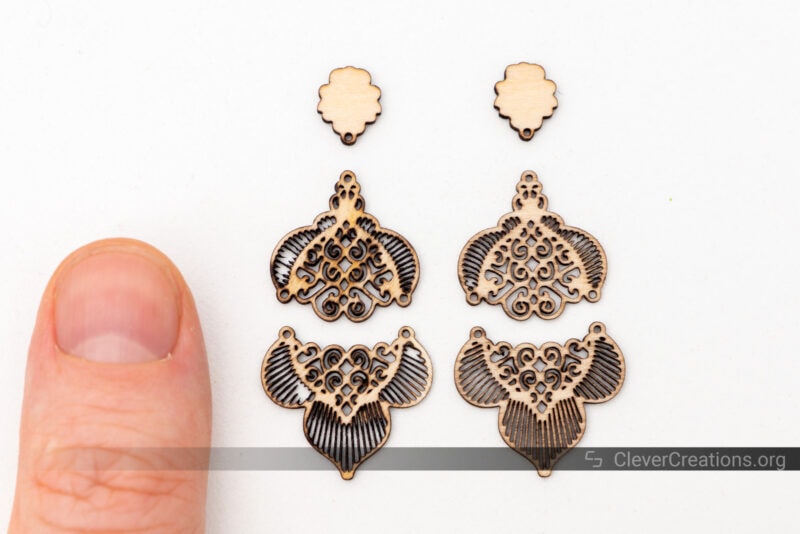
Earrings
We really pushed the Ortur Laser Master 3 to its limit here by asking it to do the impossible. We scaled these detailed earrings down to about 40 mm / 1.5” in height, but somehow the OLM3 managed to produce the super tiny features we asked for.
For reference, the small spokes on the earrings are only 0.25 mm / 0.01” thick! To our surprise, nearly all of them were cut out without issues.
The right earring was thoroughly and carefully sanded, whereas the left one was not. If we would laser cut these earrings at a slightly larger, more realistic size, they would come out perfectly and still have amazing detail.

Alternative Laser Engravers to the OLM3
Ortur Laser Master 3 vs Ortur Laser Master 2
We can’t write an Ortur Laser Master 3 review without comparing it to its predecessor, the Ortur Laser Master 2. Even though the company improved on the OLM2 with the S2 series, the OLM3 brings several extras that take the laser engraver to the next level.
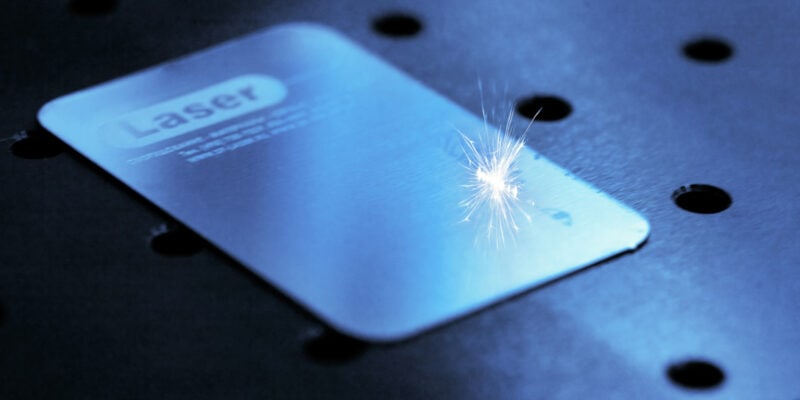
For starters, the 10 Watt laser power is a doubling of the output of the OLM2’s 5W laser. This makes a big difference in terms of laser engraving speed and cutting results. Especially if you want to cut thicker woods and acrylics, the extra power will come in handy.
The increased power also expands the general material compatibility of the machine. The OLM2 could only engrave and cut a limited range of materials, but the OLM3 can do a lot more. For example, with the right approach and enough patience, you can use the Ortur Laser Master 3 to engrave certain metals.
The stiffer, heavier, and lower frame also helps with the laser engraving speed and quality. The Ortur Laser Master 3 can engrave at speeds of up to 20,000 mm/min, which is a doubling of the OLM2’s engraving speed. While you won’t always need these speeds, it’s still a benefit to have the option when you do.
Other things that stand out in the Ortur Laser Master 3 vs Ortur Laser Master 2 comparison are the Wi-Fi connectivity, better cable management, and improved electronics of the OLM3.
At double the price, however, the Ortur Laser Master 3 isn’t for everyone. If you don’t need the extra laser power or engraving speed and are happy with the OLM2’s capabilities, there’s no reason to upgrade. The same goes if you’re on a budget and the Ortur Laser Master 3 is too expensive.

Creality CR-Laser Falcon 10W
The CR-Laser Falcon is Creality’s latest laser engraver. It is similar to the Ortur Laser Master 3 in terms of laser power and performance but lacks the extra features and attention to detail.
The Ortur Laser Master 3 is capable of engraving and cutting faster, has more accessories available, and has an integrated air assist system in its laser head.
On the other hand, the CR-Laser Falcon is a bit easier to assemble and currently about $100 cheaper. So if you are on a budget, want a 10W laser engraver, but don’t care much for the extra bells and whistles, the 10W CR-Laser Falcon is a laser engraver that can give you similar results as the OLM3.
No products found.
Atomstack A10 Pro 10W
The Atomstack A10 Pro 10W is currently one of Atomstacks top-of-the-line diode laser engravers. It is similarly priced to the Ortur Laser Master 3 but differs in several ways.
The Ortur Laser Master 3 has a stiffer and heavier frame, while the Atomstack A10 Pro has a lighter one. This gives the Atomstack A10 Pro a smaller footprint and makes it easier to move around, but also affects its rigidity and maximum laser engraving and cutting speeds.
The Atomstack A10 Pro does come with a touch screen that lets you control the machine without any PC or app. If you plan to use your laser engraver in a basement or shed with poor Wi-Fi connectivity and no computer, this can be a big benefit.
Both machines have similar laser power, software support, working areas, and connectivity options. So in the end, it depends on your specific needs which one is better for you.

Bottom Line: Who should buy the Ortur Laser Master 3?
The new Ortur Laser Master 3 is a great choice for anyone who needs a ~400×400 mm open-frame laser engraver with sufficient power to engrave and cut most materials.
Compared to similar laser engravers currently on the market, the OLM3 is able to cut faster, provide better quality, and is more user-friendly. It also has some features that let you further expand its capabilities, like its integrated air assist system.
Its support for accessories is great too, but the only thing still missing is an enclosure. Based on the additional mounting points on the underside of the machine, it wouldn’t surprise us if Ortur comes out with one in the future, as they did for the Ortur Laser Master 2.
All of this does come at a cost. At its current $700 price, the Ortur Laser Master 3 is one of the more expensive open-frame 10 Watt laser engravers on the market.
For that price, you do get what we think is the best 10W laser engraver on the market right now, with plenty of expansion options that let you upgrade its capabilities in the future. For hobbyist purposes, we there isn’t anything better out there right now.
Hi Tim,
I am new to laser technology and 3D printing stuff, but work with an older version of Corel Draw (8) so am familiar with how vectors work. I would like to do some ply wood cutting and engraving on metal, but also mostly want to cut paper for pop up cards and other paper craft, and cut out paper and plastic patterns for my puppets. It would be great to be able to cut eva foam for the puppet foundation as well. Is there one machine that will do all of these things? Hope you can give me some advice. Dan the Puppet Man
Oh, by the way, thanks for the very informative article above. I have bookmarked it to read again a few times as I become more familiar with the terms. (I’m 73 years old)