
Cura has an extensive library of high-quality infill patterns to choose from. Each infill pattern has its own advantages and disadvantages. Some are better for strength, while others have a superior appearance. Some patterns use less material, while others cut down on the amount of time it takes to print.
Cura has benefited a lot from the fact that it is open-source slicing software. Users can make suggestions for patterns and improve on them, which helps everyone in the community. The Gyroid infill introduced in Cura 3.6 is a great example of this.
In this article, we’ll demonstrate all Cura infill patterns in simple English. We’ll look at each pattern in-depth and talk about where and why you should use it, as well as brush over some of the interrelated points on this topic.
Time to fill in those 3D prints!
What Is Infill?
In 3D printing, infill allows you to adjust the amount of material inside of your objects. It’s a percentage number that shows how much plastic and how much empty room your parts have. For example, a 10% infill means 10% of your print is solid plastic, with the remaining 90% of the part’s inside structure left empty.
Infill is one way in which 3D printing is set apart from other manufacturing methods. By changing your model’s internal density, you have the option to change its weight, strength, and manufacturing time. That gives you a lot of control over the final 3D-printed model.
Along with the amount of infill, the type of pattern also matters. For example, some patterns use less material but give the parts more strength. Some infill patterns are just for looks and have nothing to do with the strength of the part.
The Cura slicing software is in charge of all of this. Cura has a lot of different patterns and settings that let you fine-tune every part of your prints’ infill. If you know the best infill patterns to use and when to use them, you can save a lot of print time and material without hurting the strength and print quality of your parts.
What Infill Patterns Does Cura Have?
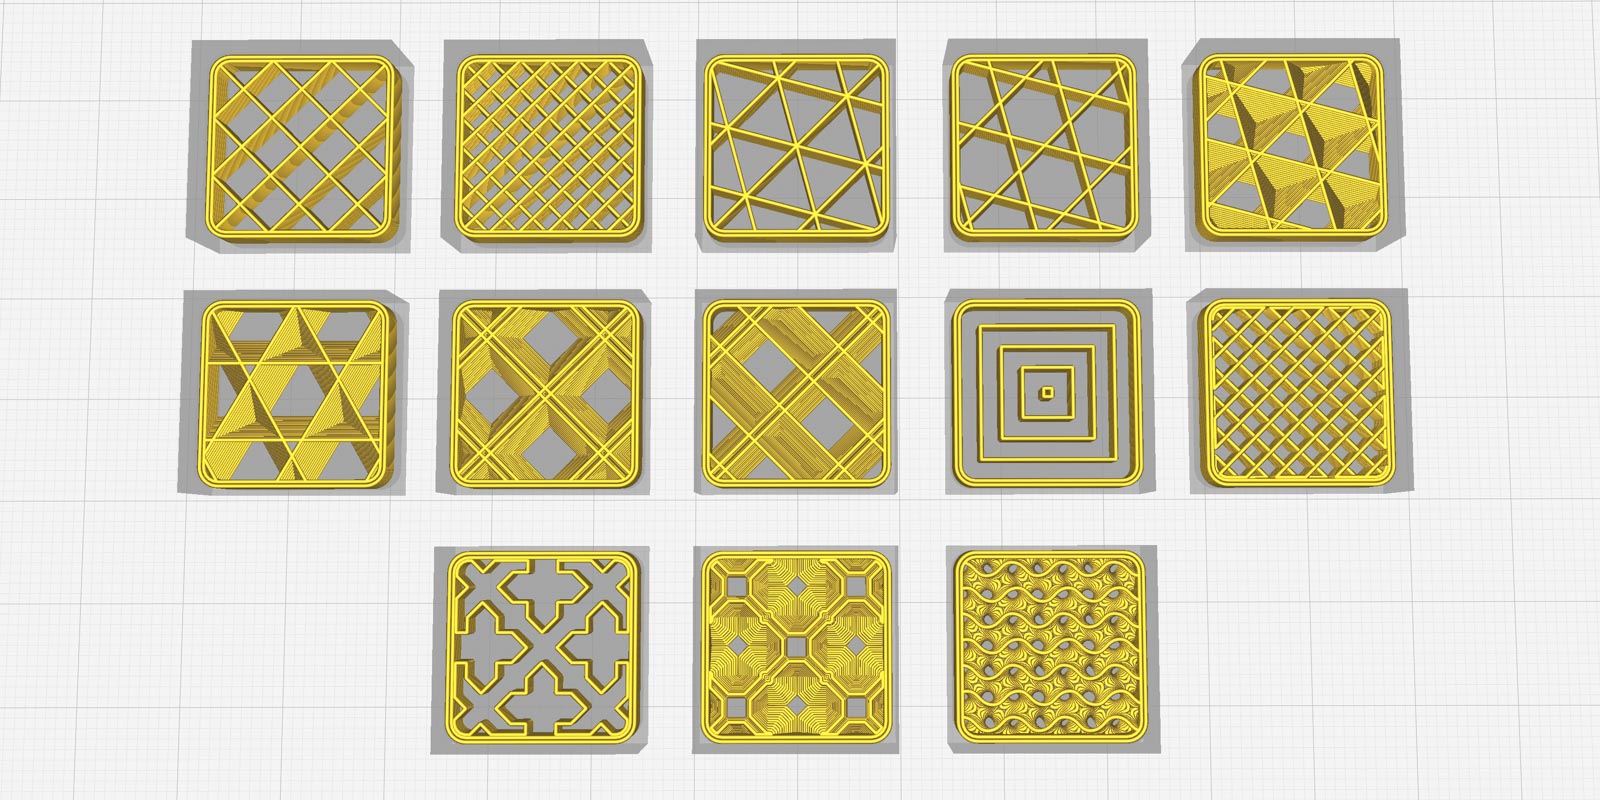
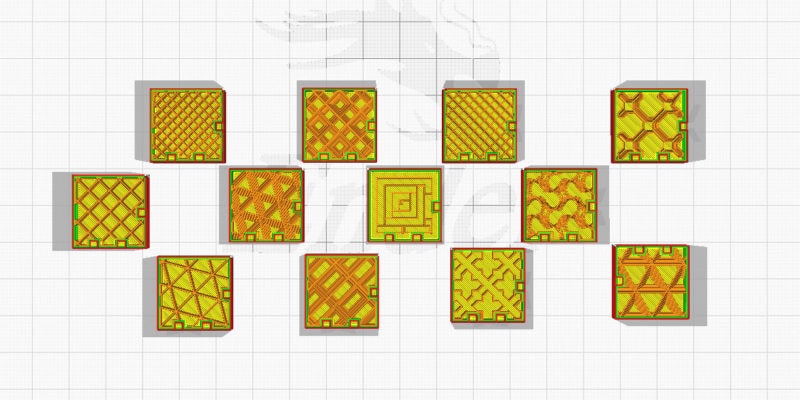
In Cura 5.4.0, there are 14 different infill patterns that are each built for different use cases. Let’s take a look at each of these 14 patterns and figure out which ones are the strongest, fastest, and best infill patterns.
Grid Pattern
The Grid infill pattern has a grid-like appearance on all layers. The nozzle essentially moves in a crisscross path to make a grid pattern. It’s one of the most popular infill patterns because it’s easy to print and gives decent print strength.
With the grid pattern, your 3D prints have adequate resistance to both horizontal and vertical forces. It’s not the strongest infill pattern, but it’s not the weakest either.
The shape of the pattern stays the same all the way through the print, giving your parts similar strength in all directions. In Cura, you also have the option to set unique infill line directions for this infill based on the shape of your parts.
- Advantages: Efficient use of material, balanced print speed and time, provides uniform support for the top surface.
- Disadvantages: Doesn’t support high structural loads.
Lines Pattern
The Lines infill pattern has similarities to the grid pattern, but also differences. Instead of being at different angles in a single layer, the infill lines are 3D printed at a 90-degree angle from each other at each successive layer.
If the infill lines on layer 1 are at a 45-degree angle, all the lines on layer 2 will be at a 135-degree angle. The lines pattern on layer 3 will be at 45 degrees, and so on.
If you look at it from above, it still looks like a grid pattern, except that each grid consists of two layers instead of one.
The lines infill pattern is great because it is easy to 3D print and uses little material. As you can imagine, the compromise is on the strength of your parts. Therefore, it’s the best infill pattern for decorative prints and small items that don’t undergo much force.
- Advantages: Fast to print, uses little material, easy for the slicer to calculate.
- Disadvantages: Weak strength in both horizontal and vertical directions.
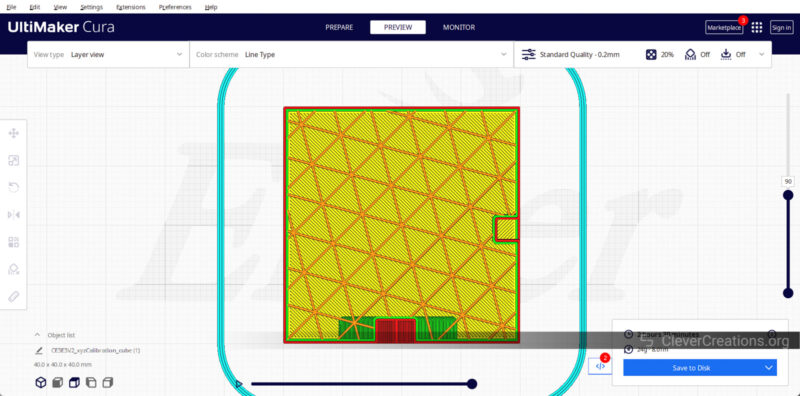
Triangle Pattern

The Triangle pattern forms triangle pockets inside your 3D prints. This is one of the best Cura infill patterns for strength. The triangle shape is strong when faced with pressure from any direction and can take a lot of weight before it breaks.
Cura’s default setting is for the triangles to all face in the same direction. You can change the direction of the infill lines at each stage to give your parts more strength. For example, change the numbers in the Infill line direction from [] to [0,45] and see how the infill changes.
- Advantages: Withstands significant loads, good shear resistance, prints fast.
- Disadvantages: Its many direction changes can lead to interrupted filament flow.
Tri-Hexagon Pattern
The Tri-hexagonal design is a hybrid of the more common triangle and hexagonal patterns. The infill lines are set up like the triangle pattern, but they are a little bit offset. At each layer, this makes a unique pattern of triangles and hexagons that looks like a five-pointed star.
It’s also one of the infill patterns that has good strength. The triangles and hexagons work well together to support loads from all directions. It takes almost the same amount of time to print as the triangle pattern and works well for 3D prints that need to be strong.
- Advantages: Equal strength in vertical and horizontal direction, A good alternative to triangle infill, supports top layers well.
- Disadvantages: We aren’t able to find any. Let us know in the comments below.
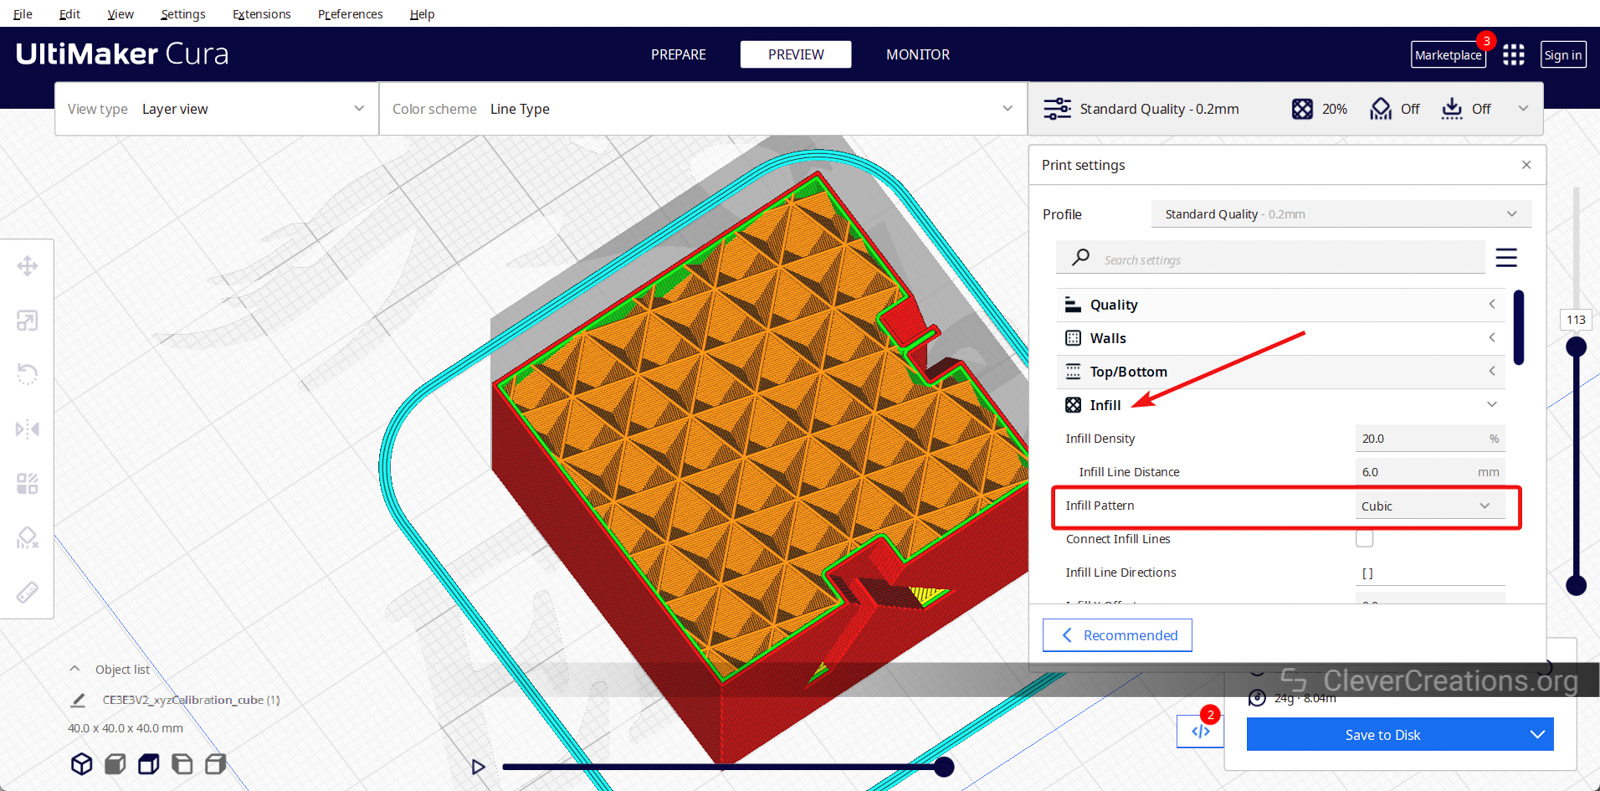
Cubic Pattern
The Cubic pattern was designed with both form and function in mind. It’s a 3D pattern that makes cube shapes. The pattern of the cubes is made so that each cube stands on one of its corners.
At first glance, it looks like a triangle pattern, but if you look at all layers, you’ll see that it consists of many tilted cubes. The unique design of the cubic pattern also reduces the chances of pillowing—the top layers of your 3D print puffing up due to trapped heat.
- Advantages: Good strength in all directions, small vertical pockets reduce pillowing issues, mesmerizing to watch.
- Disadvantages: We aren’t able to find any. Let us know in the comments below.
Cubic Subdivision Pattern
The Cubic Subdivision pattern is an expansion of the Cubic pattern. It creates similar cubes, but the middle area of your prints is mostly left hollow. You’ll find larger cubes in the center of your 3D print, and smaller ones at the edges.
This design saves on materials and cuts the time it takes to print by a lot. Keep in mind that with a low infill percentage, the center of some 3D prints can end up completely empty. To avoid unnecessarily weak prints, make sure to use a slightly higher infill density.
- Advantages: Cuts down on print times and material, excellent strength-to-weight ratio.
- Disadvantages: A low infill can cause a sagging top layer, slicing takes longer, not suitable for heavy loads.
Octet Pattern
The Octet infill pattern is cleverly made up of both tetrahedrons (triangular pyramids) and 3D cubes. This gives the infill structure great strength where the two shapes meet. As a result, the components show excellent shear resistance in all directions.
However, if there is too much bridging in the gaps, the quality of the top layer may suffer. Use a higher top layer count and slightly increase the density of the infill pattern to prevent this.
- Advantages: Strong internal structure, reduces pillowing, excellent strength.
- Disadvantages: Longer infill lines can cause bridging and sagging issues.
Quarter Cubic Pattern
The Quarter cubic infill pattern may seem complex at first, as it features a combination of tetrahedrons and truncated tetrahedrons that create a unique design. However, it provides superb strength in all directions and creates slightly smaller pockets compared to the Octet infill pattern.
You can use it as an alternative to the Octet infill. It’s useful for both functional assemblies and aesthetic pieces.
- Advantages: The unique infill design disperses weight effectively, gives good strength with less wall thickness.
- Disadvantages: Similar bridging issues like the Octet pattern, needs extra layers at the top to reduce pillowing.
Concentric Pattern
The Concentric infill pattern is a type of infill that is not connected and follows the outline of your 3D-printed object. For example, if you are 3D printing a cube, the infill structure will consist of many vertical squares. When 3D printing a sphere, you’ll find smaller circles inside the object.
This type of infill is not meant to provide strength but instead to add flexibility to your parts. Because the infill matches the shape of the object, it flexes easily. The concentric infill pattern is especially useful when printing with flexible filaments.
- Advantages: Can control the stiffness by altering the density, great for flexible models, easy to slice, uses less material.
- Disadvantages: One of the weakest infill patterns, top layers sag with infill densities.
Zig-Zag Pattern
The Zig-zag infill pattern is a type of infill where all the lines on a single layer are connected to each other. This pattern reduces the need for retractions and limits interruptions in filament flow.
It’s a convenient and time-saving alternative to the standard line infill, and you can customize the direction of the lines to suit your needs. The infill pattern changes direction with each layer, creating a neat and efficient result.
- Advantages: Needs fewer top layers due to the small gaps, good for reduced print times and less material use.
- Disadvantages: Weak in the vertical direction.
Cross Pattern

If you’re using flexible filaments, the Cross infill pattern is worth considering. Due to its structure, it is one of the more flexible infill patterns. As you can expect from such a pattern, it has large gaps between the infill lines and offers very little structural support.
The design resembles a decorative cross when viewed vertically. This can make the cross pattern useful for 3D printing projects with clear filaments.
Another advantage of this infill pattern is that it requires very few retractions, resulting in faster printing times.
- Advantages: Withstands loads well on the Z-axis, offers a unique shape suitable for flexible models and aesthetic prints, prints quickly.
- Disadvantages: No strength in the horizontal direction, doesn’t offer flexibility in the vertical direction.
Cross 3D Pattern
This type of infill pattern is a 3D version of a cross pattern, which solves the problem of vertical flexibility that the original Cross design had. Its 3D cross pattern enables the part to flex uniformly from all directions.
Although the pattern is a bit more complicated and takes slightly longer to slice, it has a great appearance, particularly when using transparent filament.
- Advantages: Equal strength in all directions, minimal retractions, uses less material.
- Disadvantages: Longer slicing times.
Gyroid Pattern

The Gyroid infill pattern is inspired by a shape study conducted by MIT. It has the best strength-to-weight ratio among infill patterns. Using this pattern allows you to reduce infill density in your parts without sacrificing their strength.
Its curvy design is often featured in 3D printing videos for its distinctive appearance. This infill pattern is suitable for mechanical structures, functional assemblies, and aesthetic models alike.
- Advantages: Equal strength in all directions, mesmerizing and aesthetic pattern design.
- Disadvantages: Longer slicing times, 3D printers can vibrate violently during printing at high speeds.
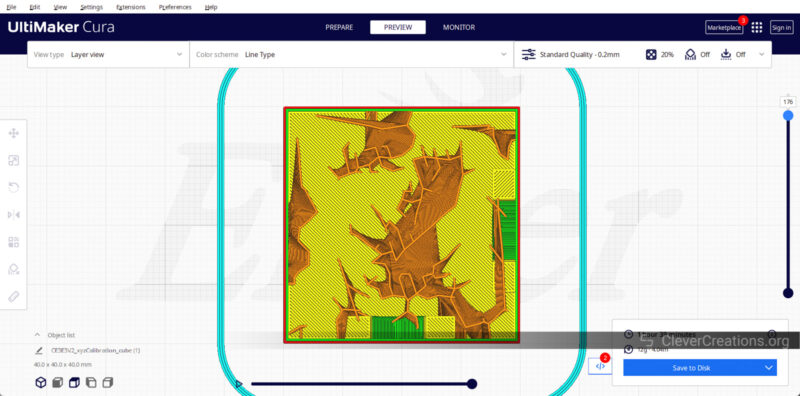
Lightning Pattern

The Lightning infill is a recent addition to Cura’s infill patterns. This pattern is similar to the sparse pattern of a lightning strike, and as such, it’s not intended to add strength to your parts. Instead, its primary purpose is to provide support for the overhangs and top layers in your prints.
Lightning infill consumes significantly less material than any other infill pattern, saving you both print time and material costs. If you require a fast 3D print for demonstration purposes, this is an excellent option.
- Advantages: Faster print speeds and times, great for prototypes and decorative pieces.
- Disadvantages: Not for load-bearing parts, needs a higher infill density for a good top layer quality.
How Do You Change Your Cura Infill Patterns?
Changing the infill patterns in Cura is an easy task. There are two ways to do it: either modify the infill pattern directly from the recommended print settings tab, or customize the infill parameters in the Custom settings. Let’s check both methods.
Recommended Print Settings
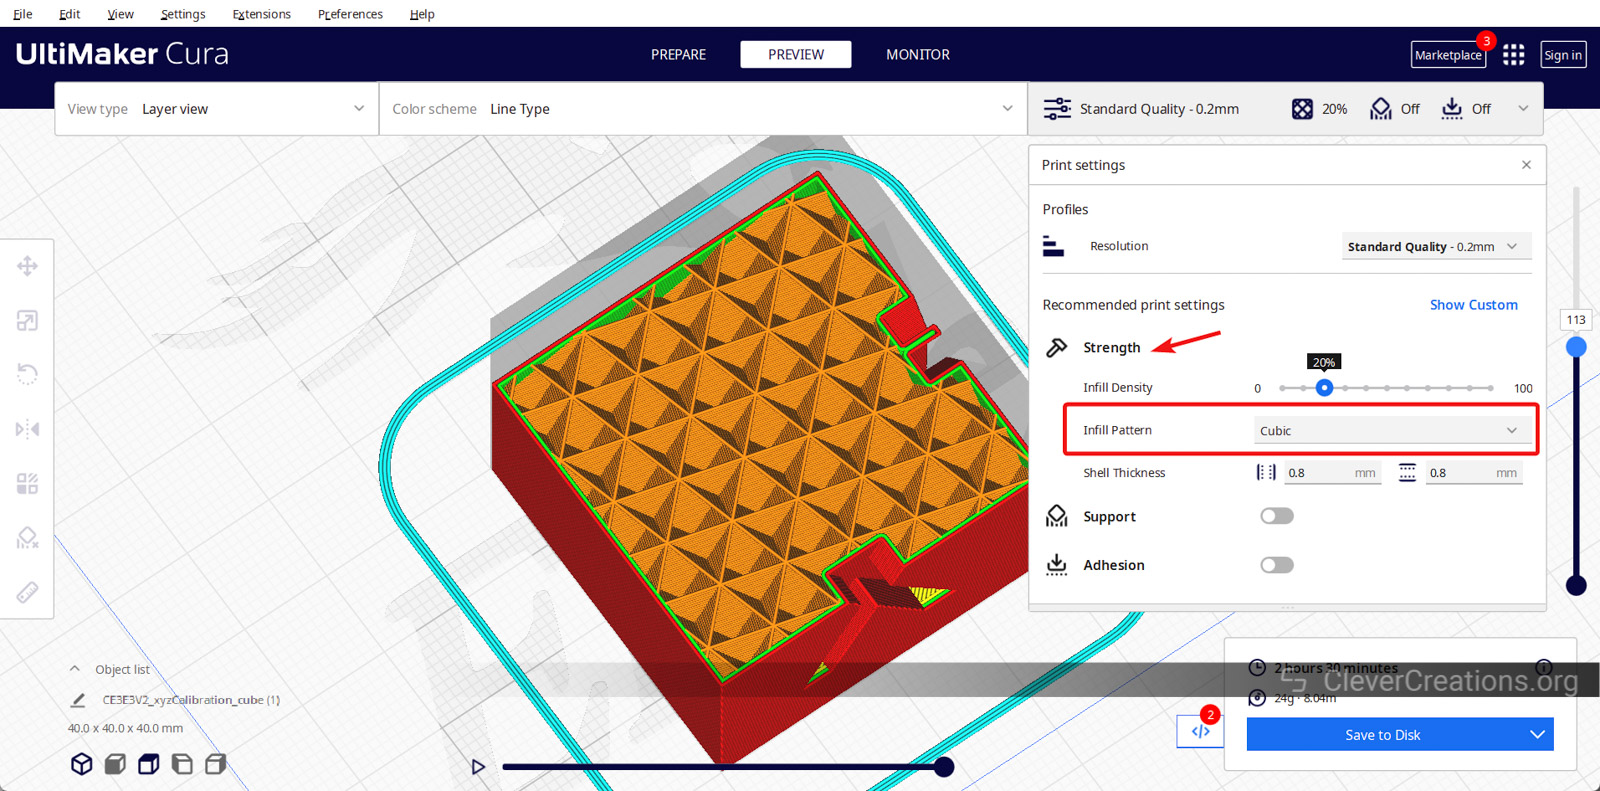
When looking at the “Strength” section in Cura’s recommended print settings, you will find two boxes that control the infill settings. The first box allows you to adjust the infill density by using the slider to select the percentage you want.
By default, the infill pattern is set to “Cubic,” but you can change this by clicking on the downward arrow to access a dropdown menu. This menu will show you all the different types of infill patterns that are available, so you can choose the one that best suits your needs before slicing your model.
Custom Print Settings
To adjust the Cura infill pattern from the custom print settings, you’ll first have to click on the ‘Show Custom’ button in the main window. Then scroll down till you find the Infill Section.
From there, click on the down arrow button for the infill pattern tab. Choose the infill pattern that best suits your 3D print(s) and set any of the other parameters. Hit slice, and you’re ready for 3D printing!
What Is the Strongest Cura Infill Pattern?
Cura’s strongest infill pattern type is the triangle. It distributes forces effectively and can withstand loads better due to its three sides. In a scientific study on infill pattern strength, the triangle consistently ranked second to the Honeycomb pattern.
Unfortunately, Cura has yet to introduce the Honeycomb infill pattern in its options. So the triangle infill pattern remains the top choice in Cura. Because triangle infill balances print time and speed better than the Honeycomb pattern, it’s not that big of a compromise.
What Infill Density Should You Use in Cura?
Research conducted in 2019 reveals a clear link between infill density and a part’s strength. Specifically, higher-density infill leads to increased strength, but only up to a certain point.
For optimal results in Cura, the ideal range of infill density is between 10-60%, depending on the type of 3D model being printed. If you’re creating decorative items or small figurines, an infill density of 10-30% is sufficient and will speed up the printing process while saving on materials.
However, if you’re printing functional items that will be subject to mechanical loads, a higher infill pattern density of 40-60% is recommended to provide the part with a very strong internal frame.
While it’s possible to use an infill density of 100%—a perfectly solid part—this will not significantly affect the part’s load-bearing capacity. Instead, it results in longer printing times and more material usage than any benefit is worth.
If print strength is of particular importance, switching to a stronger filament or modifying the part’s design will do more than switching to an infill percentage between 60% and 100%.
What Infill Pattern Is the Fastest in Cura?
Cura’s lightning infill is made specifically to optimize print speed and is hands-down the fastest infill pattern. Its sparse structure and thin lines allow for significantly faster 3D printing than other infill patterns.
However, it is only intended for supporting overhangs and top surfaces. Forget about having any resemblance of strength in your prints, aside from that created by the wall thickness.
For slightly more strength than lightning, the line infill pattern is a great alternative. It also prints quickly, requires little material, and is fast to slice as well.
What Is the Best Cura Infill Pattern?
Finding the best Cura infill pattern depends on your specific needs. There is no one-size-fits-all solution. Different infill patterns have different advantages. Lines and lightning infills are fast to print, while triangles, cubic, octets, and gyroid infills are great for strength. For flexible 3D prints, concentric and cross patterns are recommended.
Ultimately, the best infill pattern is the one that meets your specific print requirements, whether it’s speed, time, material use, flexibility, or strength. All infill types offer a combination of these factors, but there is no single infill pattern that offers it all.
Conclusion
Cura offers a vast selection of infill patterns, ensuring that you can find an infill type suitable for every 3D print. Some of the most commonly used infills, like Lines, Grid, and Triangle patterns, can be used for most 3D printed parts.
Moreover, there are several other unique patterns available, including Gyroid, Lightning, and Cross. These patterns are perfect for transparent filaments and boast a distinctive design.
Have you tried any of these infill patterns before? If so, what were your experiences with the different types? Feel free to share your thoughts in the comments.
Keep 3D printing and experimenting; the possibilities are infill-nite!

No mention anywhere about which infill patterns are the “Fastest” or slowest