
One of the worst things as a photographer is finding out that your gear does not work in a crucial moment. An example of this is discovering in the middle of a shoot that your lens has sticky or stuck aperture blades.
Sticky aperture blades usually occur when the blades become oily. Oily blades cause the iris diaphragm to close too slowly, resulting in overexposed photos.
In bad cases the aperture blades can get completely stuck and can not stop down at all. Usually when this happens, the blades are stuck wide open.
Stuck aperture blades are not only caused by oily blades, but also by mechanical problems in the lens.
In this article I will explain the possible causes of sticky and stuck aperture blades, how you can identify the cause, and how you can fix and prevent the problem.
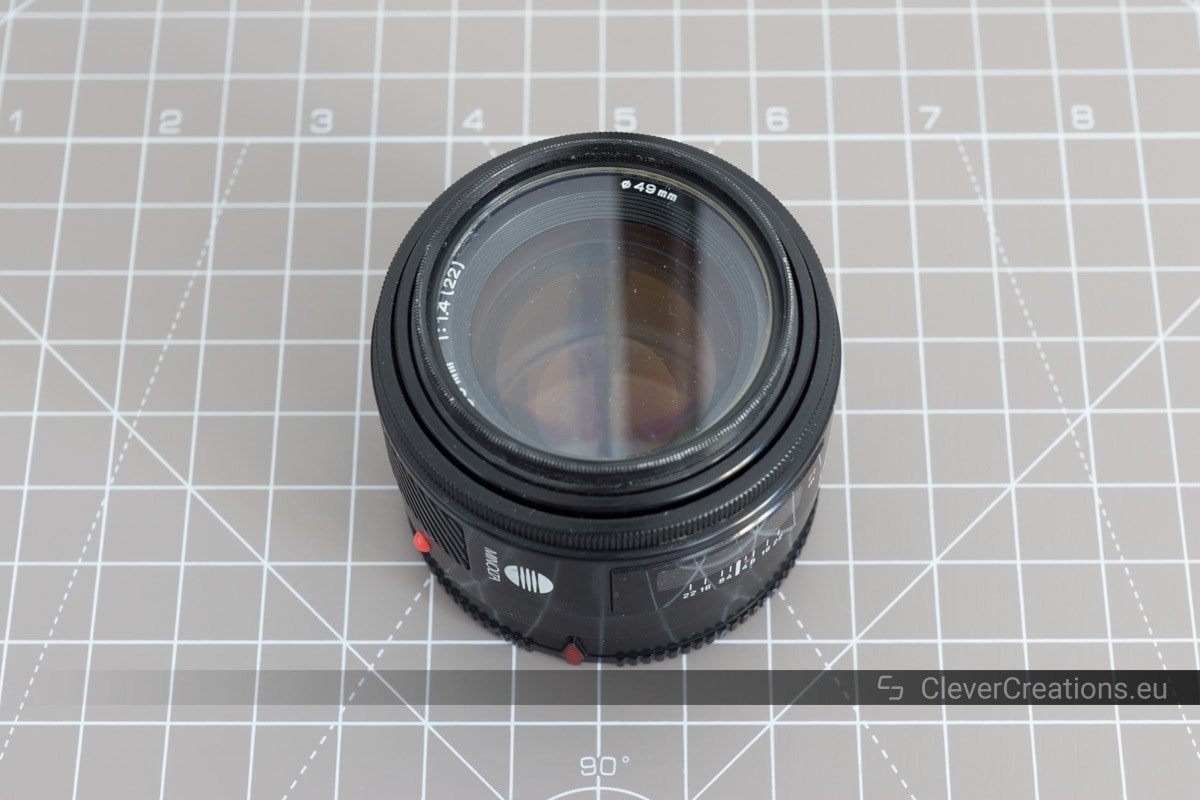
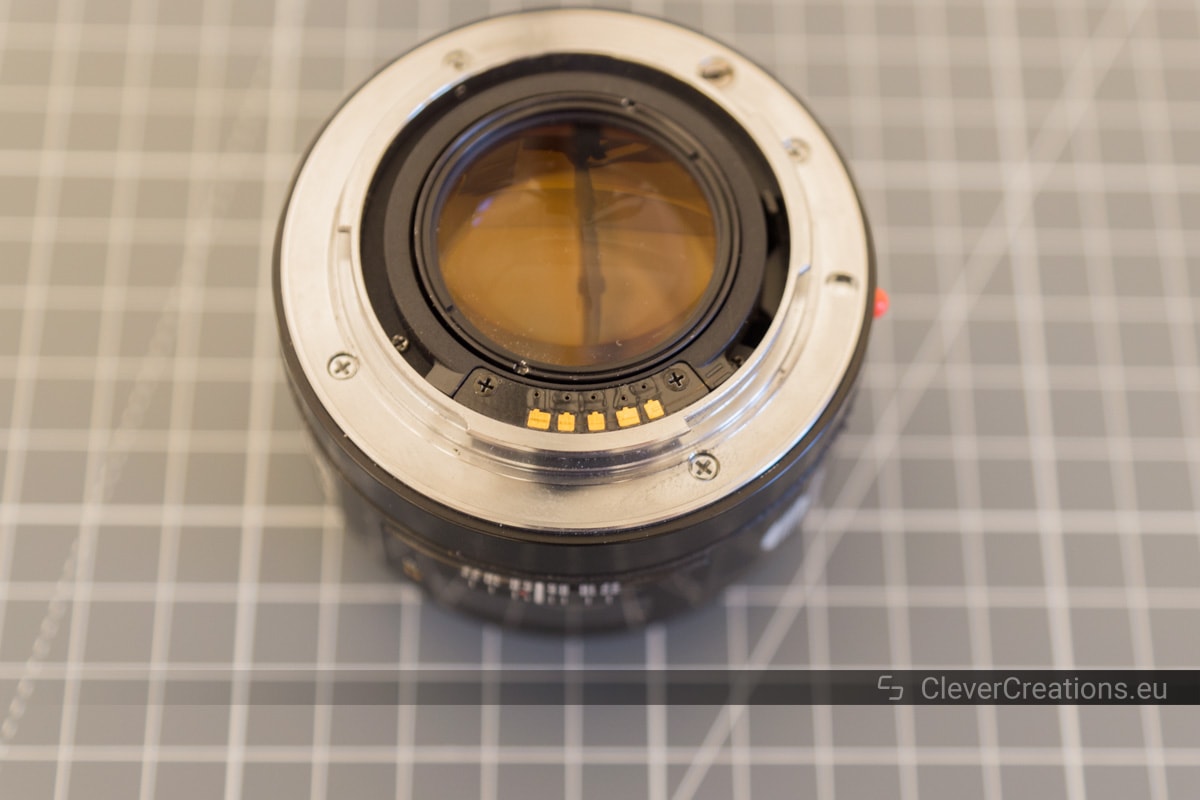
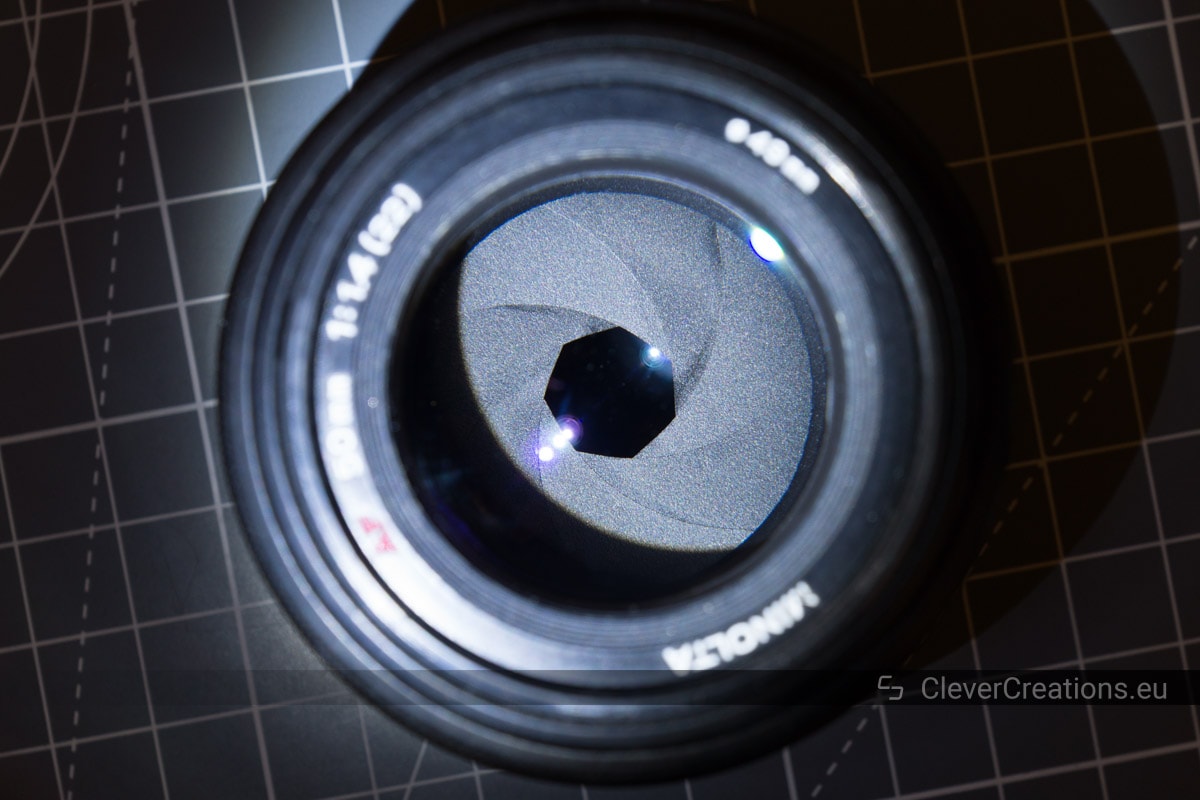
I will also take you through the step-by-step process of cleaning oily aperture blades. For this I will clean the blades on a Minolta 50mm F1.4 as example.
Before showing you how to clean oily aperture blades, I will first give more information on the problem and answer some frequently asked questions:
How Does an Iris Diaphragm Work?
The goal of a diaphragm in a camera lens is to block all light, except for the light that travels through the hole in its center. This hole is called the aperture.
Most modern camera lenses have an adjustable diaphragm, which is able to change the size of the aperture. It gets referred to as an iris diaphragm or iris, because of its similarity to the iris of an eye. In this analogy, the aperture can be thought of as the pupil of the eye.
The iris diaphragm uses movable blades to change the aperture size. These blades are also known as aperture blades.
The aperture blades can stop working properly due to a variety of reasons. In this article I will help you fix them.

Why Do Aperture Blades Get Sticky or Stuck?
There are a variety of reasons why aperture blades can get sticky, or even completely stuck. These are the most common ones:
- Oil on the aperture blades.
- Damage to the aperture mechanism.
- A disconnected or worn out return spring.
- Faulty or dirty electrical contacts.
Oil on the Aperture Blades
The most common cause of sticky aperture blades is oil on the blades. This happens when the grease on the focusing helicoid breaks down, either due to age, or due to exposure to high temperatures. The solid and liquid components of the grease separate, and the liquid oil component makes its way to the aperture blades and causes them to stick together.
This is usually a slow gradual process caused by the natural degradation of the grease. However, because lubricants generally have a lower viscosity at higher temperatures, regular exposure to high temperatures can accelerate the degradation.
Aside from frequent exposure to high temperatures, a one-time exposure to extreme temperatures might also be sufficient to cause the grease to separate.
The oil can flow or evaporate onto the aperture blades, but it can also end up on the glass elements or other internal components or the lens.
Some lenses are more prone to this than others. For example, the Minolta 50mm f/1.4 I will clean in this article is known to develop sticky aperture blades. The same goes for Minolta 35-70 f/4, 70-210 f/4 and 50 f/1.7 lenses. I am sure that Canon and Nikon have their own troublemakers as well.
The likelihood of a lens developing oily aperture blades depends on several factors:
- The type of grease used in the lens.
- The amount of grease used.
- The lens’ internal structure.
- Exposure to heat.
Only of those factors is controllable by the user of the lens, so it makes sense that this problem can be hard to prevent for some lenses.
A Bit of Oil is Okay
It is important to note that oil on the aperture blades is not necessarily a problem. Up to a certain point, the blades will work fine with oil on them, even though it is not ideal.
Your camera lens has too much oil on the aperture blades if:
- The diaphragm closes too slowly and your photos regularly end up overexposed.
- The aperture blades are not able to move at all. This can also have a different cause however, more about this later.
- Oil from the blades is starting to move to other lens components, such as on the glass elements.
In these situations you will need to address the problem and clean the aperture blades and other lens components affected by the oil.
Damage to the Aperture Mechanism
A less common reason for sticky or stuck aperture blades is physical damage to the aperture mechanism. Examples of this are bent or damaged aperture blades, or damage to the aperture linkage. For simplicity’s sake I will also include other mechanical problems in this category, such as a bent or broken aperture control lever.
These problems are usually caused by a sudden shock to the lens, or by improperly handling it in some other way.
Another cause for damage to the aperture mechanism is an incorrect repair attempt.
If the lens has always been in your possession, you would obviously know if your lens has been improperly repaired. However, if you bought your lens second-hand it is possible that the previous owner did not mention this to you.
Repairing damage to the aperture mechanism is possible, but it is likely that you will need some replacement parts. More on this further down the page.
A Disconnected or Worn Out Return Spring
The return spring is a spring that snaps the diaphragm back to its smallest aperture after the control lever has been released. It is possible that a shock to the lens disconnects the spring from its mounting points, or that the spring wears out over time.
The spring wearing out due to fatigue is fairly unlikely though, as the stress during normal operation on it is small, and the springs are expected to last a long time.
Therefore, any problems with the spring are most likely due to it disconnecting. In the next section I will explain how to tell these two issues, and other possible causes for sticky aperture blades, apart.
Faulty or Dirty Electrical Contacts
Sometimes the aperture blades do not operate properly because the camera has problems sending the correct signal to the lens, or the lens reports back incorrect data about its position. This is often caused by faulty or dirty electrical contacts on either the lens, the camera body, or both.
Naturally this only applies to lenses that have the aperture electronically controlled by the camera, and not lenses with manual aperture rings as the only means of controlling the diaphragm.
How to Tell What is Causing Sticky Aperture Blades
All right, so you know that your camera lens has problems with the aperture blades, but how can you tell what exactly is causing it? Luckily, all possible causes have different symptoms. I will lay them all out below, so that you can identify the cause and take the necessary steps to repair the lens.
How to Identify Oily Aperture Blades
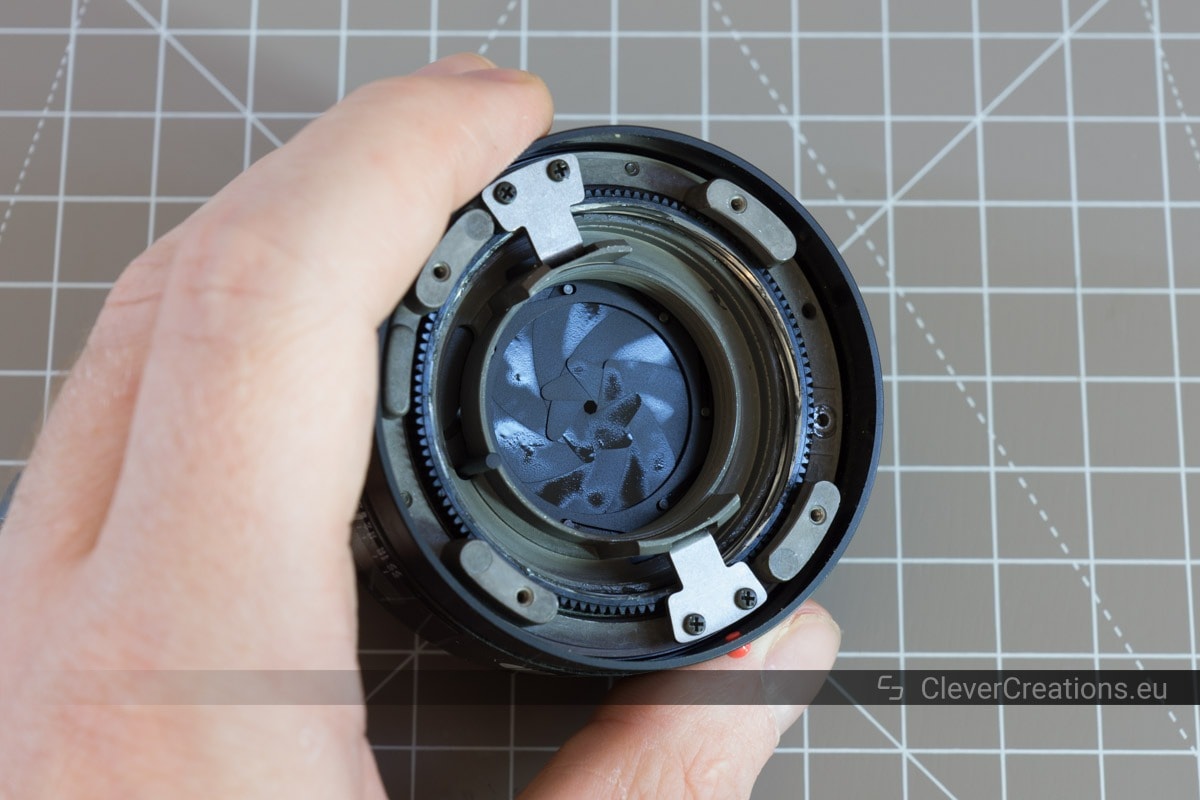
If you are still able to close the diaphragm, you can shine a light into the front and back of the lens, and check if there is any oil on the surface of the aperture blades.
If there is no oil on the lens’ aperture blades, or only a minimal amount, then the problems are likely not caused by oil. It is a concern if you see a significant quantity of oil however.
To check whether the oil is actually causing problems, you can use the aperture control lever on the rear of the lens (assuming that your lens has one). Actuate the lever to open the diaphragm, and then swiftly release it.
- If everything works as it was designed to, the aperture blades should snap shut quickly to the smallest aperture.
- If the diaphragm closes slowly, the oil on the blades is likely slowing things down.
When you actuate the control lever, you should be able to easily move it and only feel some spring resistance.
If the diaphragm does not close or move at all (but the control lever still has its natural springy movement), then this might be caused by excessive oil on the blades. However, it is also possible that the blades are stuck due to one of the other causes below.
How to Check for a Damaged Aperture Mechanism
Just like when checking for slow aperture blades caused by oil, the easiest way to identify a damaged aperture mechanism (or other mechanical issues) is by using the aperture control lever.
Try to open the diaphragm by actuating the lever and check what happens.
- If the aperture lever and diaphragm do not move at all, then there is likely some kind of damage or obstruction in the linkage mechanism, damaged aperture blades, or something else that prevents movement altogether.
- If the aperture lever moves with normal spring resistance, but the aperture blades stay in place, then it is likely that the lever or some part of the aperture mechanism has disconnected.
In both these cases you might need to open up the lens and investigate further to see what is broken or out of place.
If the aperture arm itself is broken or bent, then that is likely the cause of the problems.
Further down the page I have explained how to repair all of these issues.
How to Identify a Disconnected or Worn Out Return Spring
If you are able to open and close the diaphragm by moving the aperture lever, but the lever stays in place once you release it, then it is likely that the return spring is disconnected from one or both of its mounting points.
In this case, the lever feels very loose and has almost no resistance when you move it.
If the aperture blades close slowly when you let go of the control lever, it is possible that the return spring doesn’t have the tension that it is supposed to have, because it is worn out.
A worn out spring is not likely to occur, and usually when dealing with slowly closing aperture blades the problem is caused by oil. However, if there is no oil visible, and the aperture mechanism has no problems either, then the return spring is the likely culprit.
How to Check for Faulty or Dirty Electrical Contacts
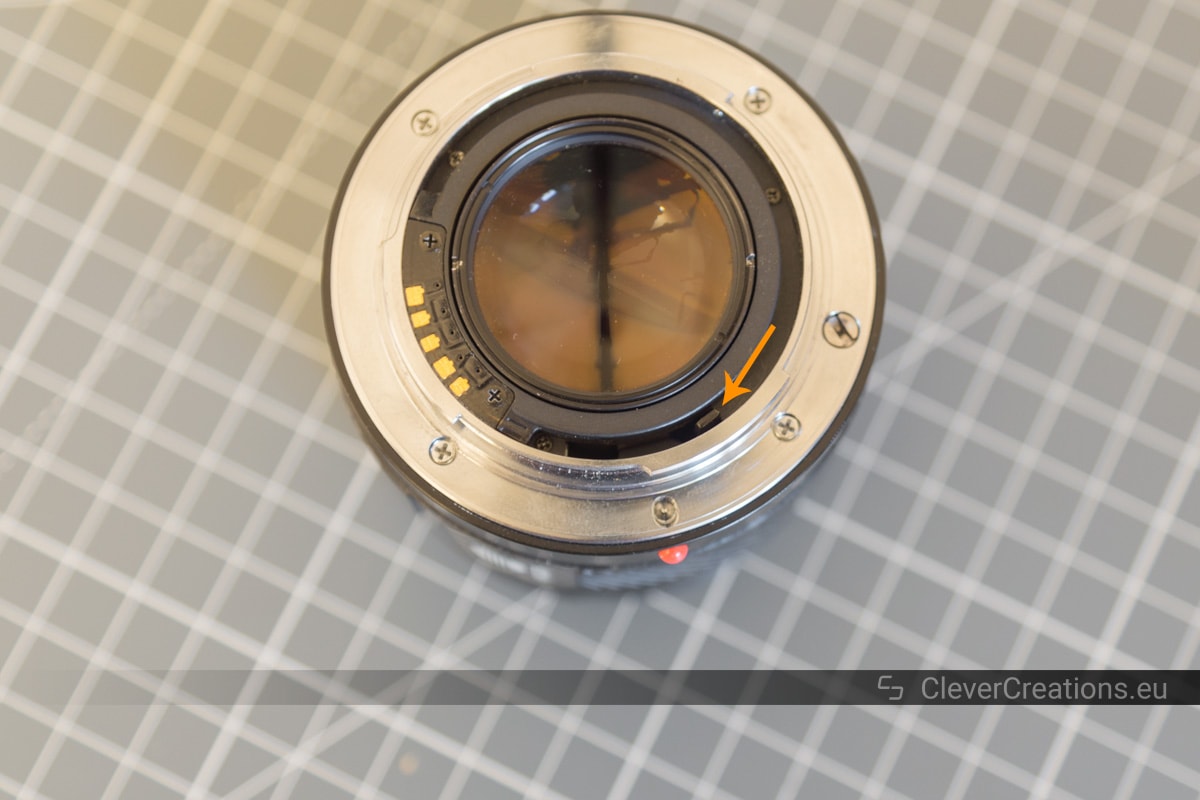
Identifying faulty electrical contacts is fairly easy. The clearest indicator of improperly working electrical contacts that the iris diaphragm operates correctly when the lens is removed from the camera body, but has issues when the lens is operated and controlled by the camera.
To check whether the lens or the camera is causing the problems, you can try the lens on a different camera, or different lenses on the same camera.
- If the lens works fine on a different camera, or other lenses have the same issue on the original camera, then the problem is with the electrical contacts of the original camera.
- If other lenses work fine on the original camera, or the original lens does not work on other cameras, then the problem is with the electrical contacts of the original lens.
You can also visually inspect the lens and camera for faulty or dirty electrical contacts. Damaged contacts or contacts with dirt or corrosion on them can cause problems with the signal, and need to be either repaired or cleaned.
Putting It All Together
| Problem | Oil on blades | Aperture blades | Aperture lever |
|---|---|---|---|
| Too oily aperture blades | Lots | Stuck/Slow | Spring resistance |
| Damage to the aperture mechanism | No/Minimal | Stuck/Slow | Stuck/Spring resistance |
| Disconnected return spring | No/Minimal | Working | Loose |
| Worn out return spring | No/Minimal | Slow closing | Looser than usual |
| Faulty/dirty electrical contacts | No/Minimal | Working | Spring resistance |
Can You Prevent Sticky Aperture Blades?
For some lenses it is possible to prevent sticky aperture blades, but for other lenses that have a tendency to develop this problem it might only be possible to slow the process down. Regardless, there are many things you can do to keep your lenses in good condition for as long as possible:
- Prevent exposure to heat. To prevent oil from appearing on the aperture blades, lens elements or other internal components of the lens, it is important to avoid exposure of the lens to heat.
This means keeping the lens away from things like radiators, avoiding placing it in direct strong sunlight, and making sure to take your lens out of a hot car, instead of leaving it there. - Handle the lens with care. You can avoid a broken aperture lever, internal damage or damage to the electrical contacts of the lens by handling the lens carefully.
While chances are that you are already careful with your stuff, it might be useful to remind anyone who borrows gear from you once in a while. - Avoid exposure to excessive moisture and water. Exposure of the lens to moisture or water can cause a variety of problems. Most notably mold formation on the internal elements of the lens, but also cause problems with the external electrical contacts or any electronics inside of the lens.
![wisedry 50 Gram [6PACKS] Rechargeable Silica Gel Desiccant Packets Fast...](https://m.media-amazon.com/images/I/417k6sdnzzL.jpg)
How to Check for Problems When Buying a Second-Hand Lens
When buying a second-hand camera lens, make sure to inspect it thoroughly. Check whether the aperture blades look oily and if they snap open and shut fully and rapidly. Asking if any repairs have been done on the lens can’t hurt either. If you see anything you don’t like or trust, it is better to walk away. Especially if the price seems too good to be true.
There also other things to check for that do not pertain to sticky aperture blades, but that is beyond the scope of this article.
Storing the Lens With the Aperture Blades Wide Open
I have seen some people advocate for storing lenses with the diaphragm wide open. The reasoning behind it is that when the oil evaporates, it won’t end up on the aperture blades, because they are in a retracted state where they are not exposed.
It is possible that this method works in preventing the oil from getting on the blades, but I haven’t tried it myself.
The way I see it, even if the oil does not evaporate onto the aperture blades, it would still end up on the glass elements, aperture mechanism or elsewhere where it could cause problems. It can also still find its way to the aperture blades by creeping through the lens in liquid form.
I think that at the point where enough oil makes its way through the lens to cause problems, it is already too late.
There are more experienced people out there that can shed more light on this. That said, while I don’t know if storing the lens with the diaphragm open is beneficial, I also don’t think it can hurt much.
How to Fix Sticky Aperture Blades
Fixing sticky or stuck aperture blades can be easy or difficult, depending on the cause of the problem. Cleaning dirty electrical contacts takes less than a minute, but cleaning the oil from the aperture blades requires a lot more time and patience. Regardless of the method you need to apply to repair the lens, I will explain how.
Cleaning Oily Aperture Blades
The only way to completely remove all the oil from the aperture blades is to take out the iris diaphragm. And to do that, the lens needs to be opened up. Not the most comfortable thing to do, but it is the only way the aperture blades and mechanism can be thoroughly cleaned. There is no easy fix.
Opening the Lens and Taking Out the Iris Diaphragm
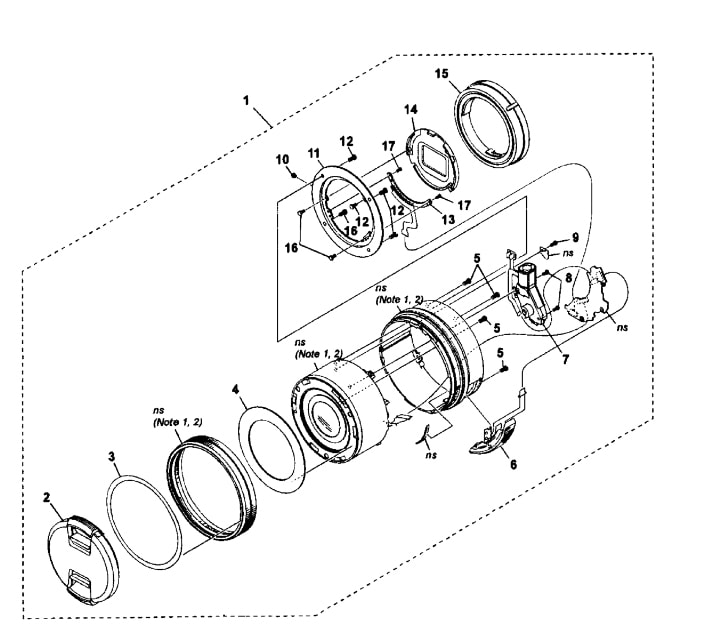
The exact steps to open up the specific lens that you want to repair depend on the lens. It is useful to find the service manual or some kind of guide online that disassembles the lens. This will show you which parts you need to remove in order to access the iris diaphragm.
The level of complexity depends on the lens. Some lenses need to have both the front and rear elements removed, others might only require one to be taken out.
If you are not able to find the service manual or a guide for the exact lens you have, you can try to find one for a similar lens from the same manufacturer.
Once you know what steps you take, you can start removing elements of the lens to reach to the iris diaphragm, and then remove it.
Alternatively, you can just wing it and improvise, without the help of manual or guide. Needless to say, this comes with more risk. Make sure that if you go this route, you keep track of what you are doing. That way you can put the lens back together correctly at the end.
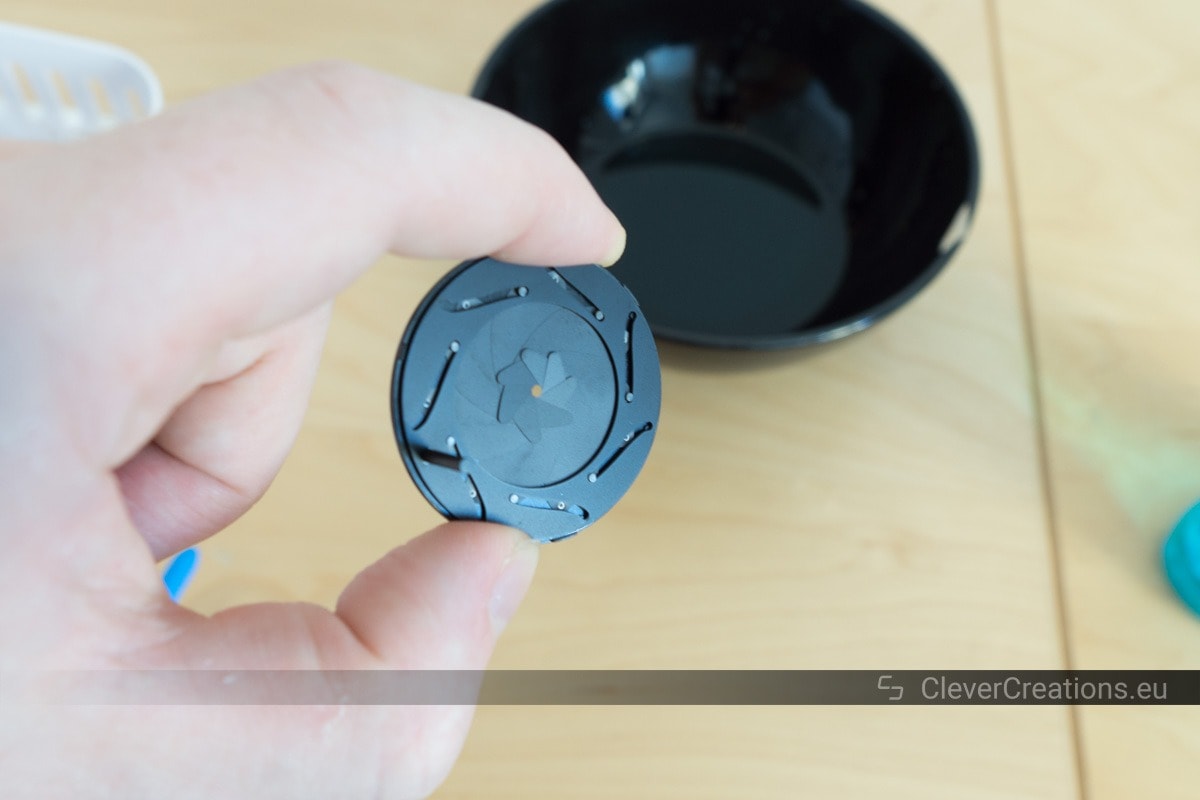
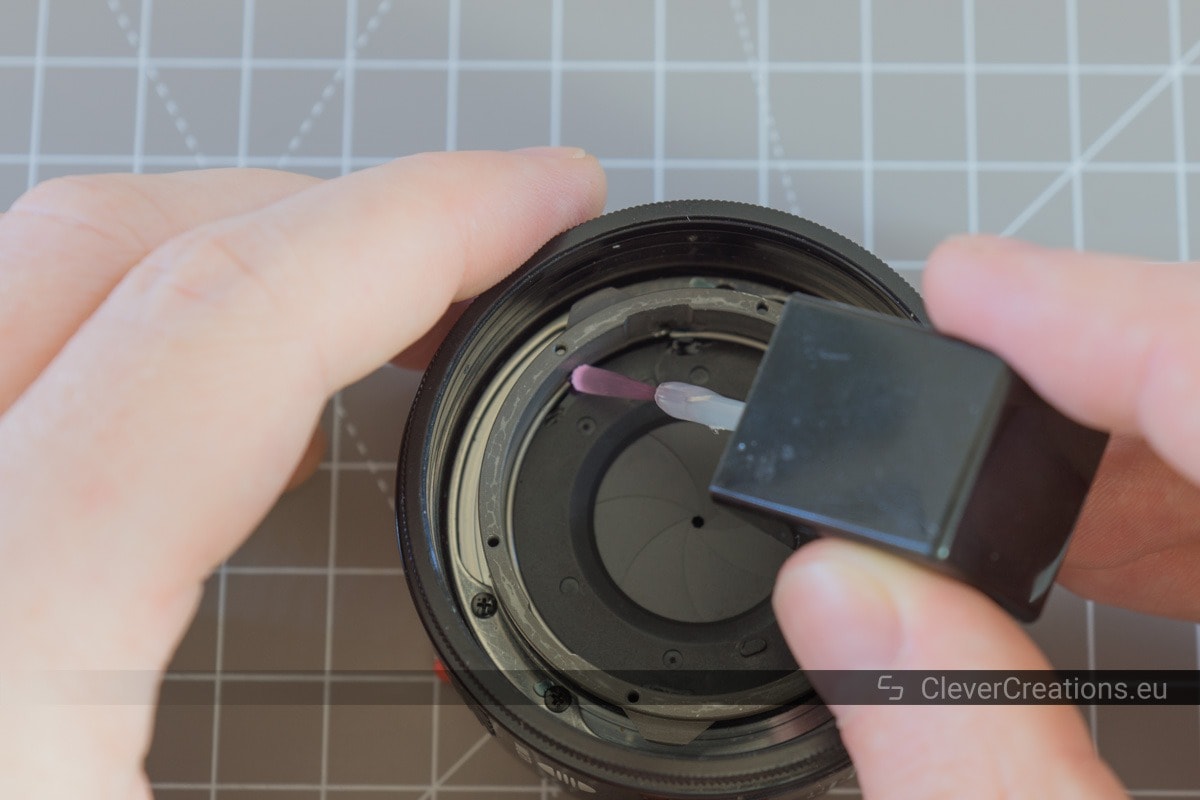
Removing the Oil From the Aperture Blades
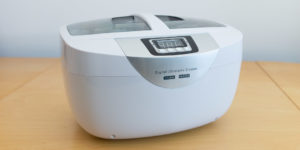
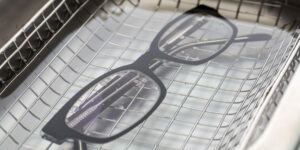
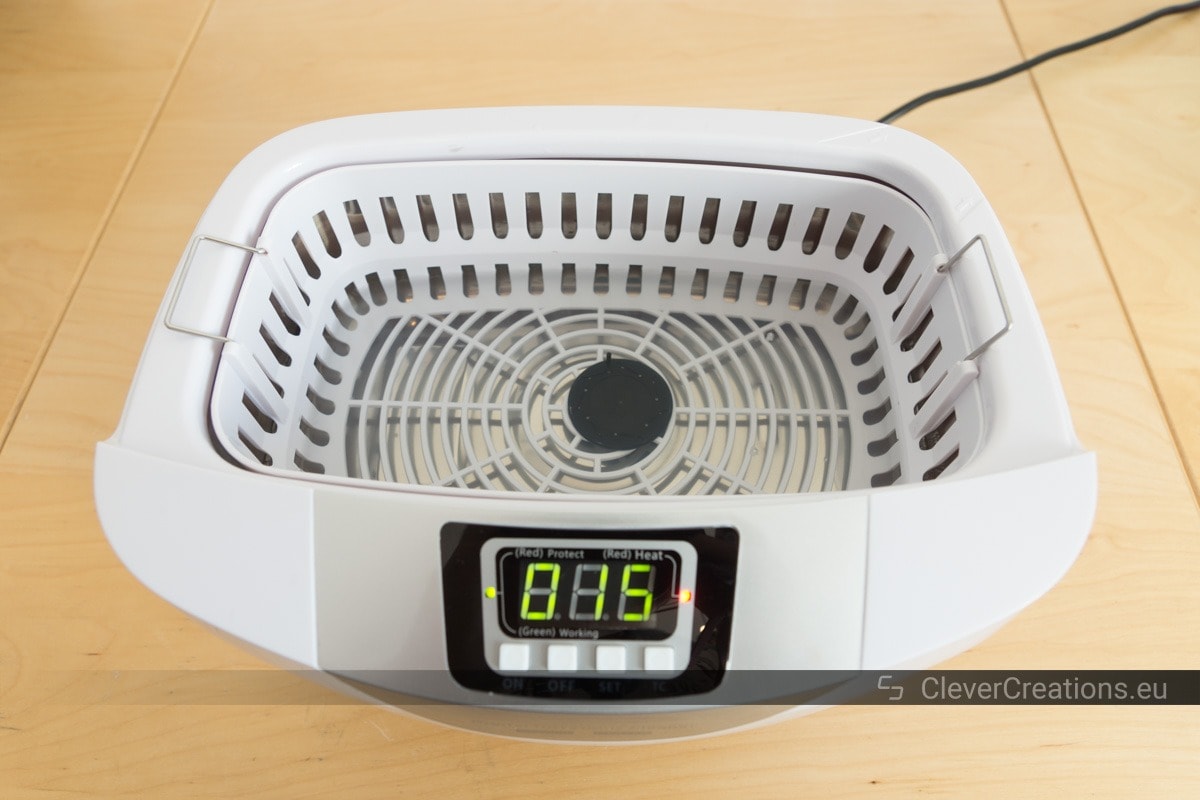
Once you have removed the iris diaphragm from the lens you can clean it. In order to do this thoroughly and remove all oil from the aperture blades, it is best to use an ultrasonic cleaner. You can also clean the oil by wiping the blades by hand, but this is less thorough.
To Clean the Aperture Blades Using an Ultrasonic Cleaner:
- Fill the ultrasonic cleaner with distilled water and a bit of mild soap.
- Manually close the iris diaphragm.
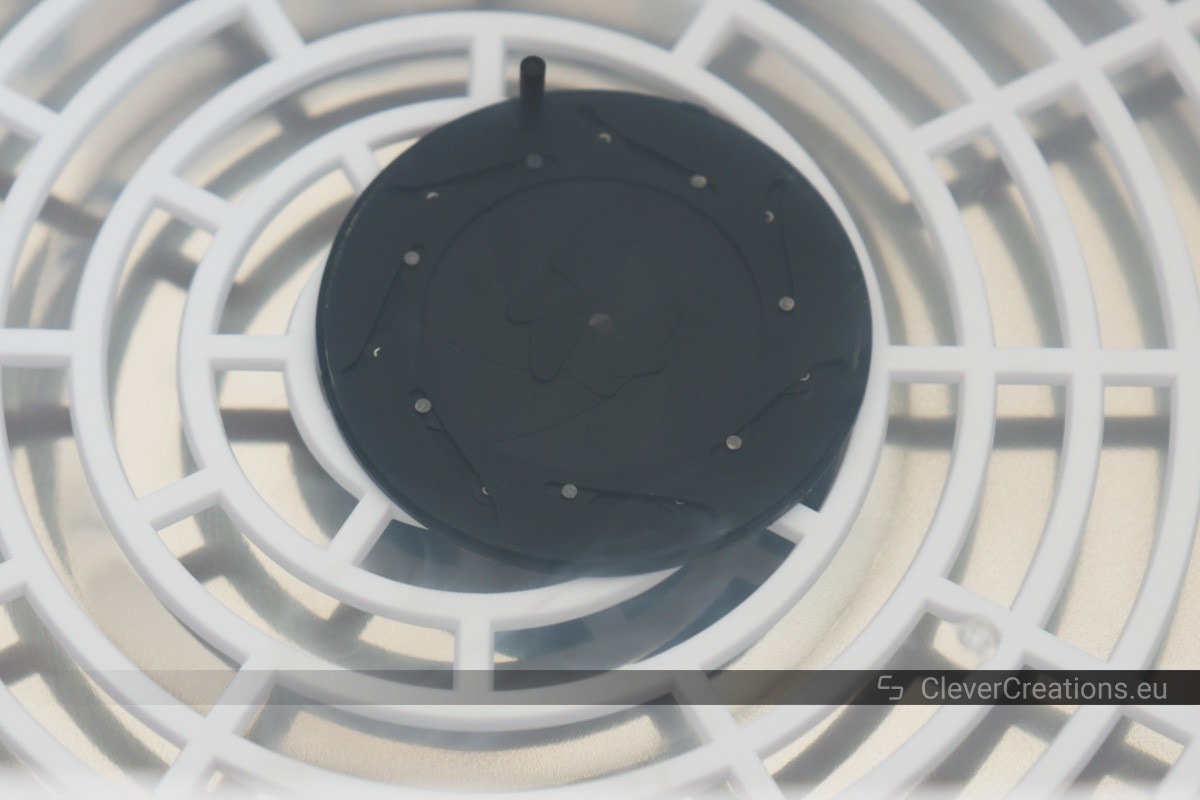
- Place the diaphragm in the ultrasonic cleaner.
- Turn the ultrasonic cleaner on. Do not run it for longer than 45 seconds.
- Remove the iris diaphragm from the cleaner and briefly submerge it in a solvent like isopropyl alcohol or Naphtha. This will displace any remaining water from the iris.
To Clean the Aperture Blades by Hand:
- Take a microfiber cloth, lens cloth or other type of cloth that does not leave any fibers behind.
- Apply some isopropyl alcohol or Naphtha to the cloth.
- Manually close the diaphragm.
- Gently wipe the surface of the aperture blades. Do not apply a lot of force, to avoid bending the aperture blades or dislodging them from the iris diaphragm.
- Continue wiping the blades until you have removed all visible oil. Use a new section of cloth whenever the cloth starts to get too oily.
- Make sure to also wipe the other side of the aperture blades.
Depending on the construction of the iris diaphragm, you might have to do this without flipping it over. Often when the diaphragm is outside of the lens, nothing is holding it together. Flipping it over could cause it to fall apart.
Ultrasonic vs Manual Cleaning
Cleaning the aperture blades by hand is easier and faster than cleaning it in an ultrasonic cleaner, but it is also a lot less thorough.
While manual cleaning does remove the oil from the surface of the blades, a lot of oil can remain on the inner parts of the iris diaphragm.
To be sure that you don’t have to open up and clean the aperture blades again in the near future, it is best to use an ultrasonic cleaner to remove the oil. An ultrasonic cleaner has the ability to remove oil from the hardest to reach components of the diaphragm.
An added benefit of this method is that there is no risk of bending or dislodging the blades while they are being cleaned.
So if you have the possibility, I recommend using an ultrasonic cleaner to clean the aperture blades instead of wiping them down by hand.
Reassembling the Lens
To reassemble the lens with the clean diaphragm you can basically do the disassembly steps in reverse. If you kept track of the steps you took, this should be fairly straightforward. Make sure to reassemble the lens with all elements in the same position and orientation as you found them.
I have added some more tips for reassembly in the cleaning guide with pictures further down the page.
How to Repair a Damaged Aperture Mechanism
Repairing the aperture mechanism or other mechanical problems involves either bending or re-setting misaligned components, or replacing any defective parts with working ones. This also means you have to take the lens apart, just like when you clean oily aperture blades. If necessary, these two things can be done in the same procedure.
Any components of the lens that can not be put or bent back into place needs to be replaced. Gluing broken pieces together is theoretically possible, but they likely won’t hold up for long.
Fixing Dislodged Aperture Blades
Aperture blades that somehow ended up out of position in the iris diaphragm can be fixed by carefully taking the diaphragm apart and re-seating the blades correctly in their slots.
Fixing Bent Aperture Blades
If one or more of the metal leaf blades are bent, you could try bending them back to their original straight form. In order for them to perform well you will have to get them close to their original flat shape. Especially at high shutter speeds it is important that the blades have minimal friction resistance.
Note that some lenses have the tips of their first and/or last shutter blades bent outward. This is by design, and you should leave the bent tips as-is.
Solving Aperture Lever/Arm Problems
On lenses with a mechanical lever that controls the aperture, the lever can break or bend and cause problems.
You can fix a bent aperture arm by gently bending it in the opposite direction until it does not ‘stick’ anymore. This realigns the lever and should resolve friction caused by the misalignment.
A broken aperture arm will need to be substituted with an intact replacement.
How to Get Replacement Parts for Your Lens
There are two good ways you can get replacement parts for your lens. The first method is to buy the exact components you need from an online store that specializes in repair parts. The second is to buy a second-hand damaged lens that has the required components.
To find out more about the parts that you need, it is best to get your hands on the service manual of the lens. In it, you will find the names of the components, and more importantly their serial numbers.
Putting the serial numbers in Google will show you the online stores that can sell you what you need.
Alternatively, you can buy a sacrificial second-hand broken lens to get the required parts. Depending on what you need, it might be a lot cheaper to go this route.
Broken lenses can be found for very low prices. They might be worthless for someone else, but they can still provide a lot of value to you for their components.
Just make sure that the sacrificial lens has a different problem than the one that you are trying to fix. That way you don’t end up with two sets of the same broken parts.
You might not need an identical lens, a slightly different one can also have the right components (e.g. a Minolta 50/f1.7 instead of a Minolta 50/f1.4). Checking its service manual will give you the answer. If the parts of the sacrificial lens have the same part numbers as the ones from your original lens, then you are good to go.
How to Fix a Loose Return Spring
Fixing a loose return spring can be easy to fix, provided that nothing is broken. In this case, simply reattach the loose end of the return spring to its mounting point.
If the mounting point where the return spring has to be connected is broken however, then that part will need replacing.
How to Clean Dirty Electrical Contacts
Problems caused by dirty electrical contacts on the rear of lens or front of the camera body are one of the easiest things to fix. Simply wipe down the contacts with a lint-free cloth and isopropyl alcohol.
If dirty contacts were the problem then the lens should now work as intended when it is attached to the camera body.
How to Repair Damaged Electrical Contacts
Damaged electrical contacts on the lens need to be replaced with intact contacts. The easiest way to do this is by replacing the entire circuit board that contains the electrical contacts.
This will take a bit of disassembly, but because the contacts are located on the rear of the lens, they are often easy to access.
Depending on the construction of the lens and the electronics, replacing the circuit board might involve some soldering.
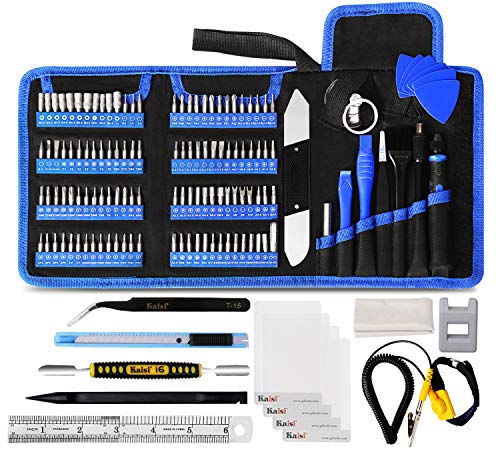
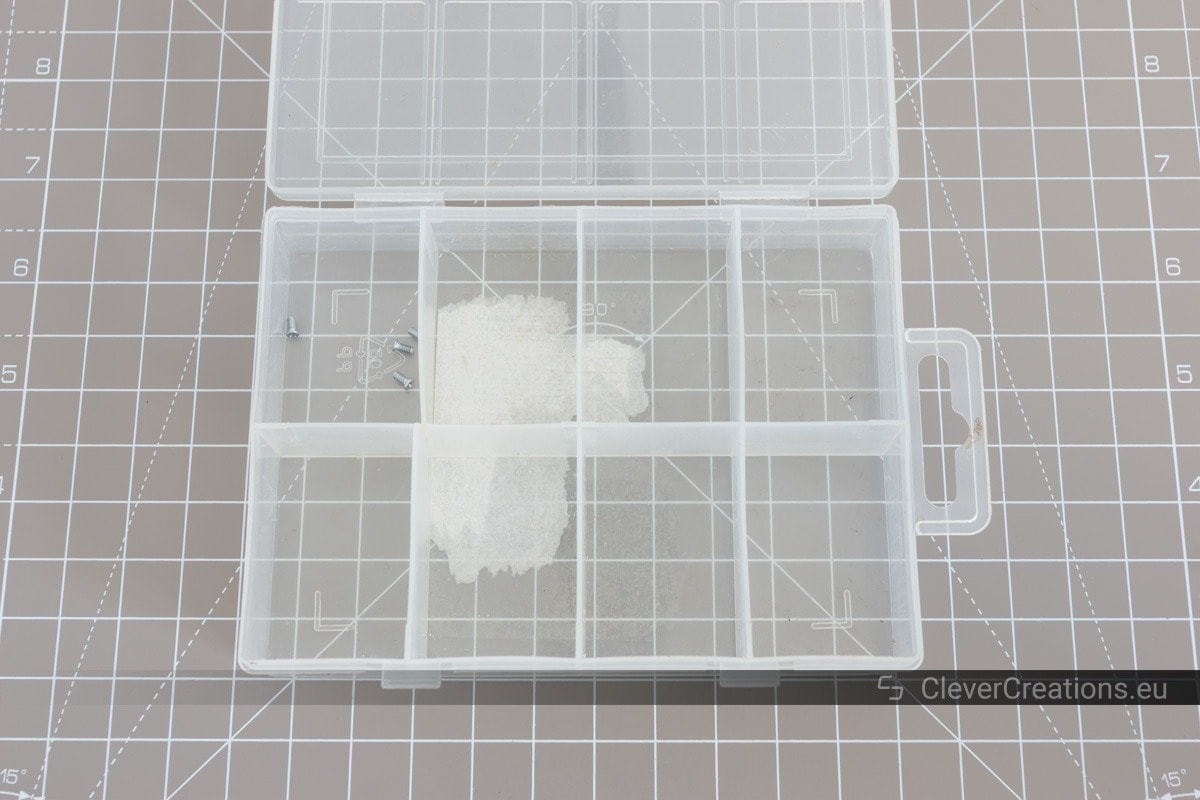
What Do You Need to Fix Sticky Aperture Blades?
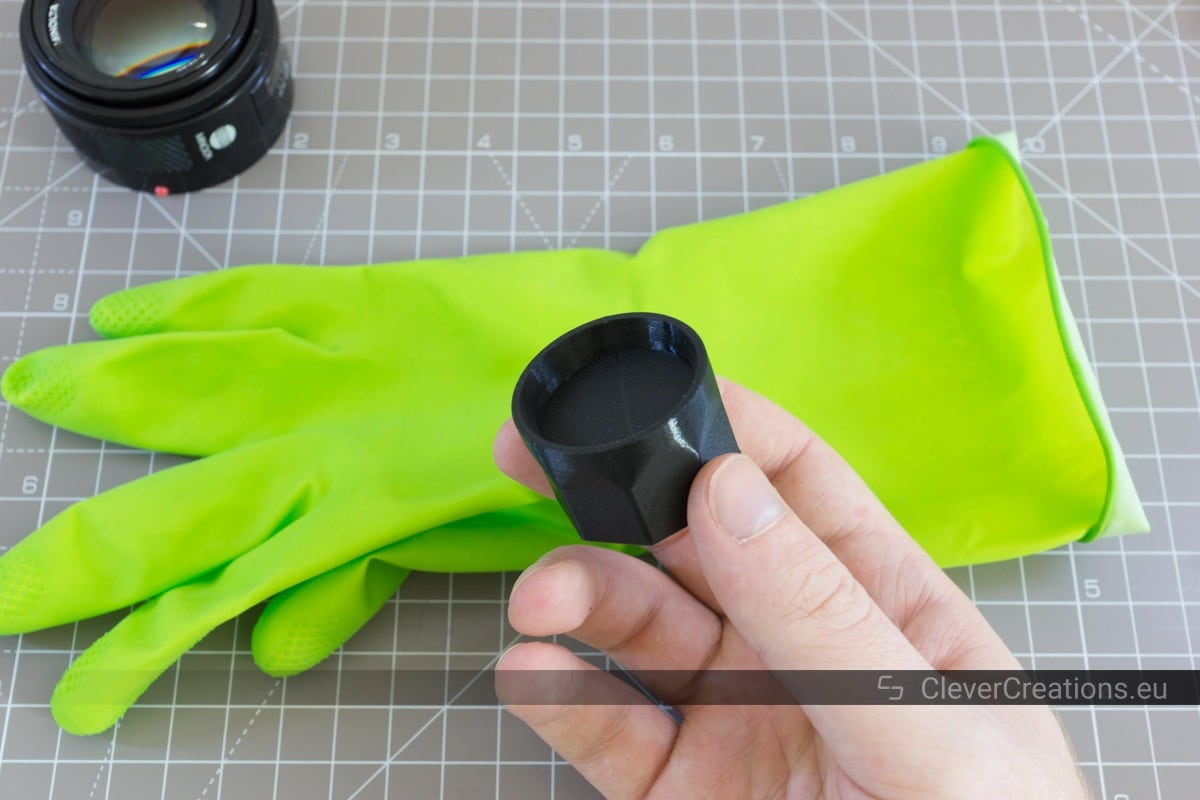
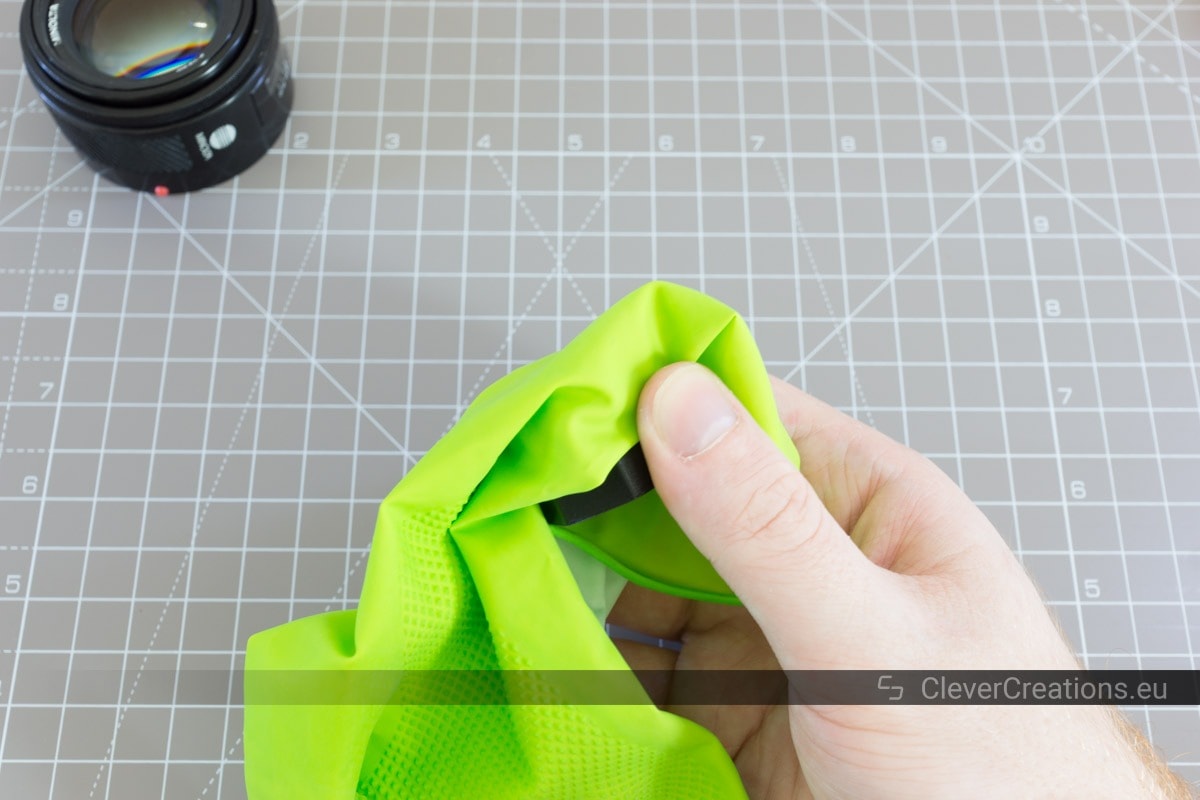
Aside from the materials and tools listed below, it is important that the environment that you repair the lens in is dust-free. When the lens is open, it is vulnerable to dust and other particles entering. So to prevent debris from entering the lens and showing up in your photos, it is critical to clean your repair area first.
It is also important to have enough time and patience available. While repairing sticky aperture blades is not difficult, it can be tedious work. Some of the inner components of the lens are fragile and need to be handled with care.
Is It Worth Repairing the Camera Lens Yourself?
Whether it is worth repairing the lens yourself depends mostly on the value of the lens. If a new (or quality second-hand) replacement lens would cost you a lot more than what a repair service charges to fix the sticky aperture blades, then it might be worth to have a professional repair the lens.
If the repair service costs a lot more than what a replacement lens costs, then you might as well give cleaning or repairing the lens a shot yourself.
Even if repairing the lens yourself does not work out, it still provides good practice and valuable experience in repairing things yourself. Personally I found that it is also a great way to get a better understanding of the inner workings of a camera lens.
But given that the most common cause for sticky aperture blades is oil, which usually takes a while to degrade, it is likely that most lenses with sticky blades are not covered by warranty anymore.
Does the Guide Below Only Work for the SAL50F14?
Following the exact steps for cleaning oily aperture blades lined out in the step-by-step section below works best for the Minolta/Sony 50mm F1.4 and Minolta/Sony prime lenses with similar construction. Examples of these are Minolta/Sony 50mm f/1.7, 35mm f/2.8 and 28mm f/2.8 lenses.
However, if you want to repair your Canon, Nikon or different brand lens, you can still use this guide to get an idea of what to roughly expect, and find out the rough steps that are involved.
Something else that will help you a lot is the service manual of the lens you want to repair. It usually has an exploded view repair diagram that tells you how the components are put together. It will show you exactly how to get to the parts that you need to clean or replace.
The amount of effort involved to get to the internal components varies from lens to lens.
When disassembling the lens, make sure to take photos and keep track of the steps you are taking.
How to Clean Oily Aperture Blades
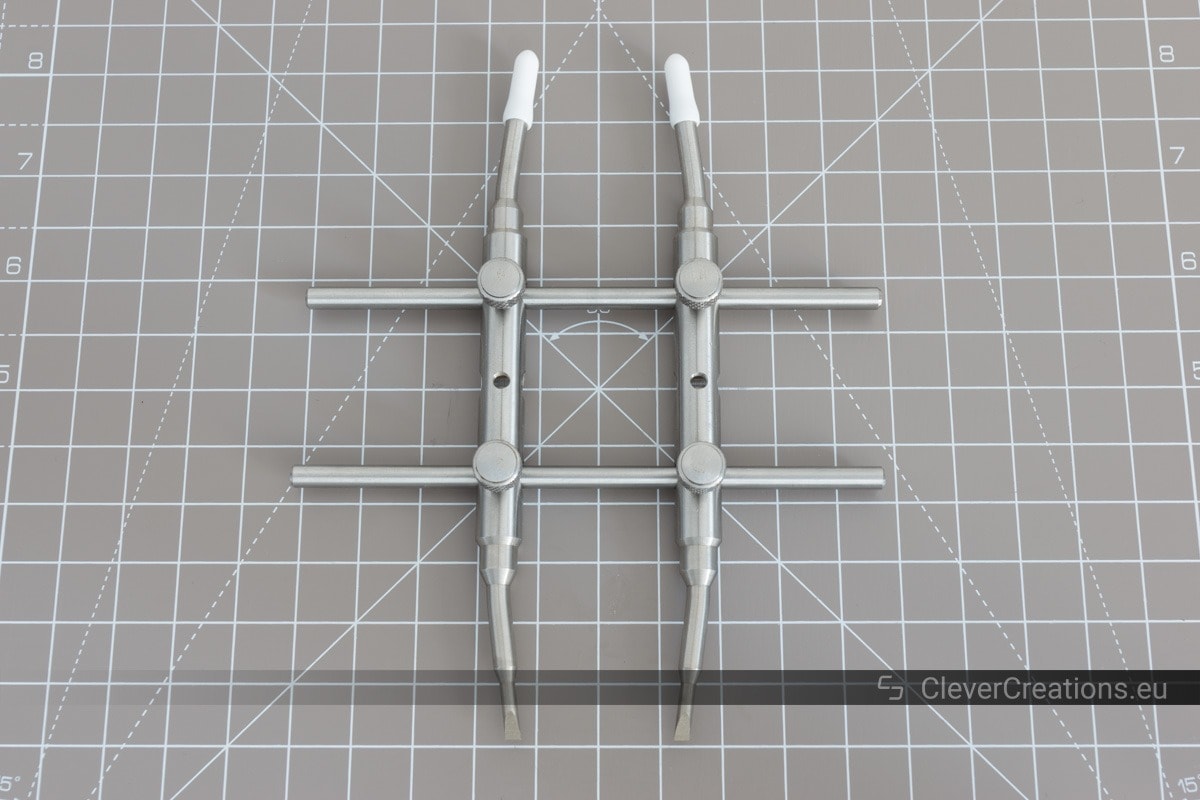
What You’ll Need
|
|
Tools | ||
|---|---|---|---|
|
Check Price | ||

|
Check Price | ||

|
Check Price | ||

|
Not strictly necessary, but it does make cleaning easier, faster and more thorough.
|
Check Price | |
|
|
Parts | ||
|---|---|---|---|
|
Naphtha or Isopropyl Alcohol
|
|||
This guide is the most useful for the Minolta/Sony SAL50F14 or similar lenses. But even if you intend to fix oily aperture blades on a different lens, this should give you a rough idea of what to expect.
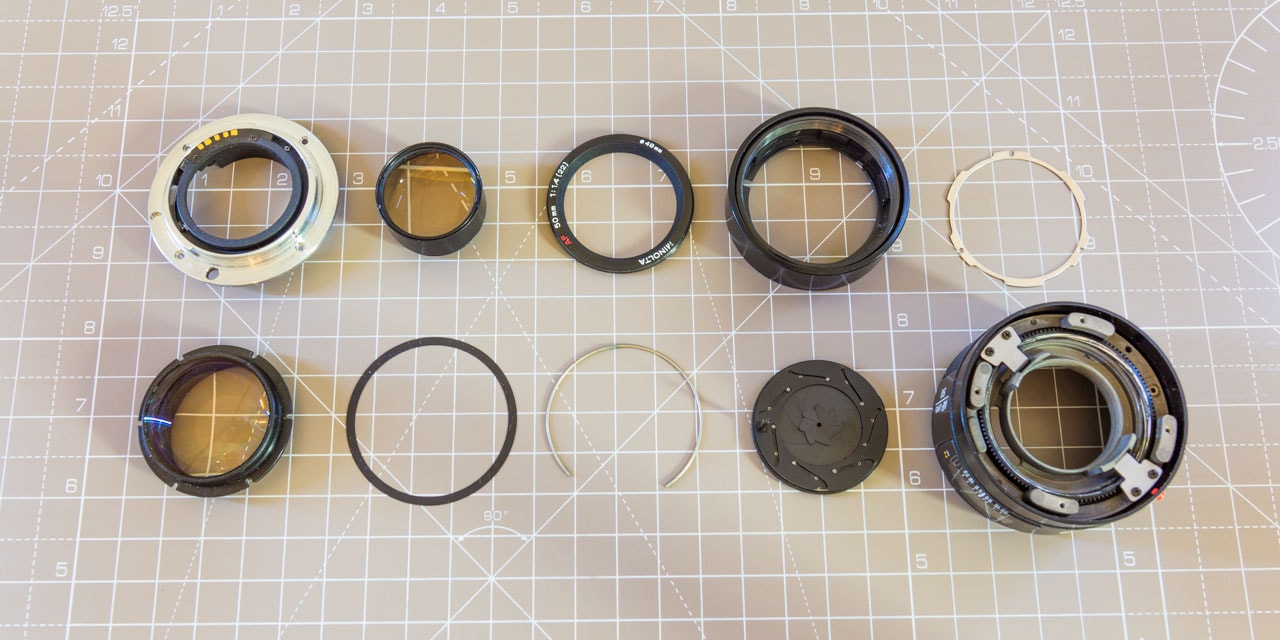
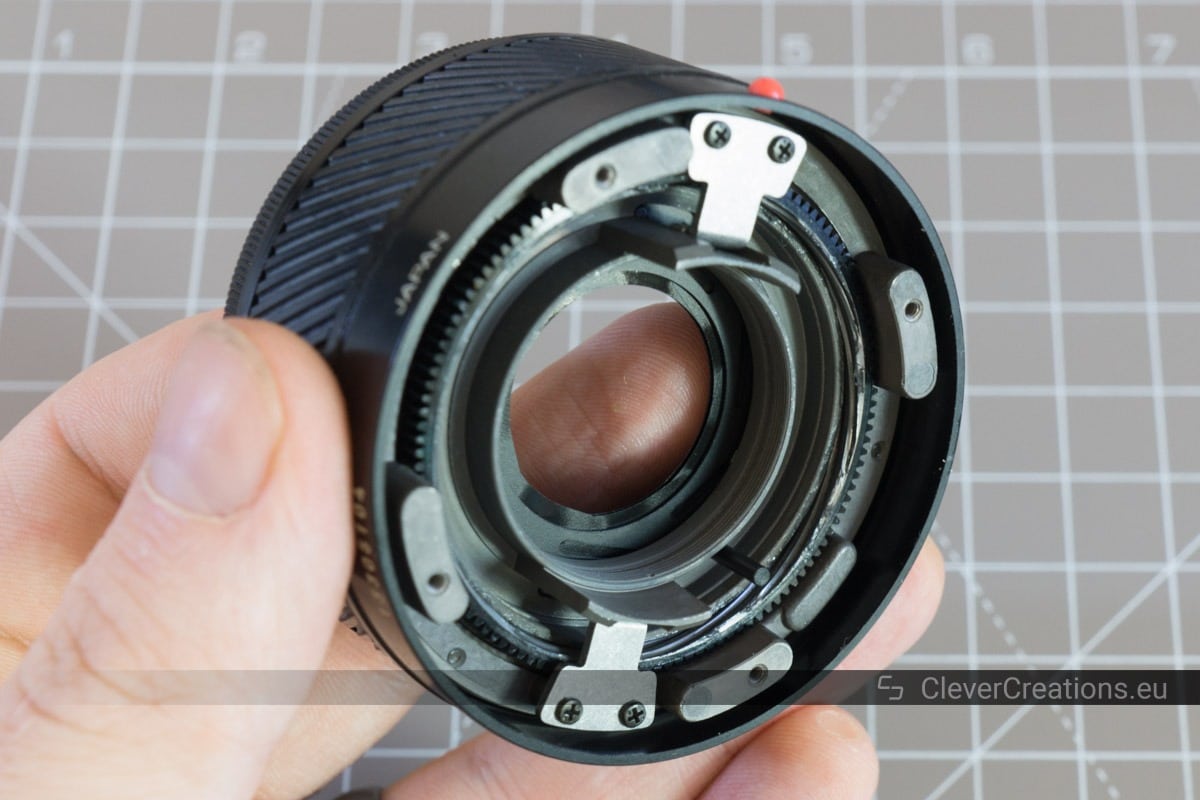
Removing the Lens Mount Riveting Block
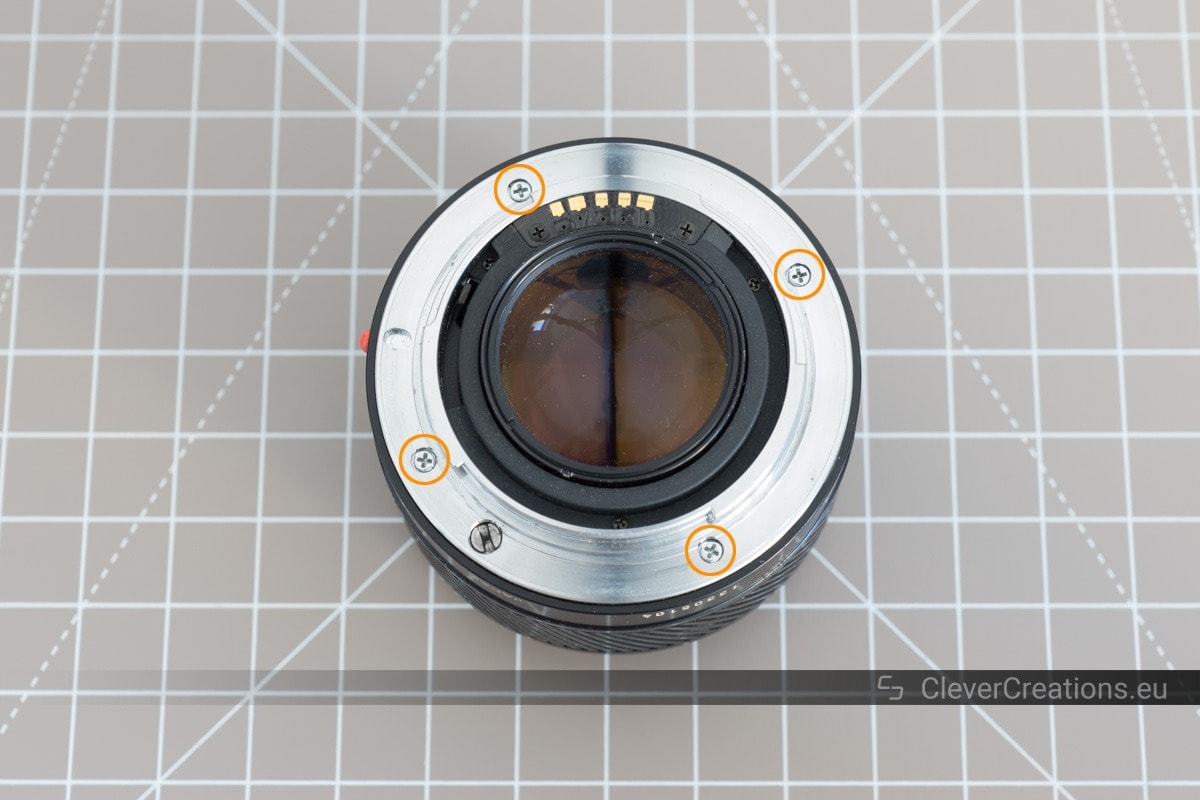
Removing the Rear Ball Lens
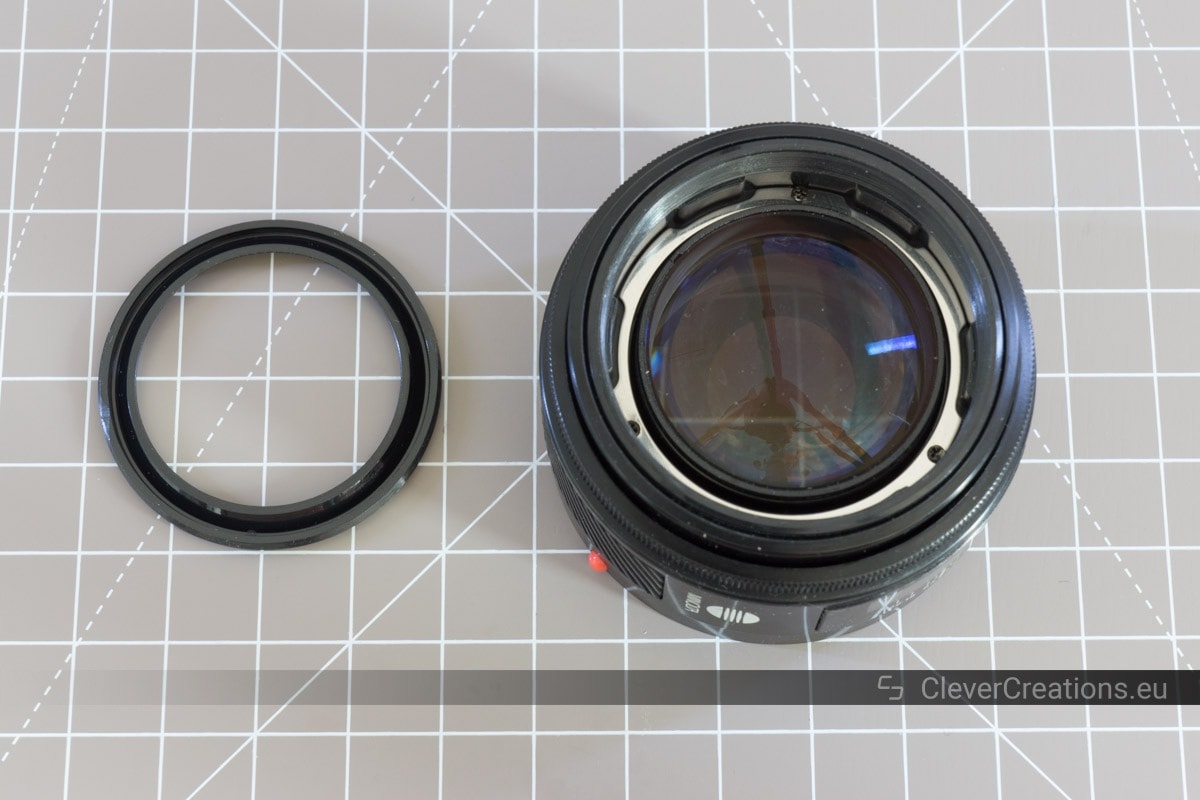
Removing the Front Decoration Ring
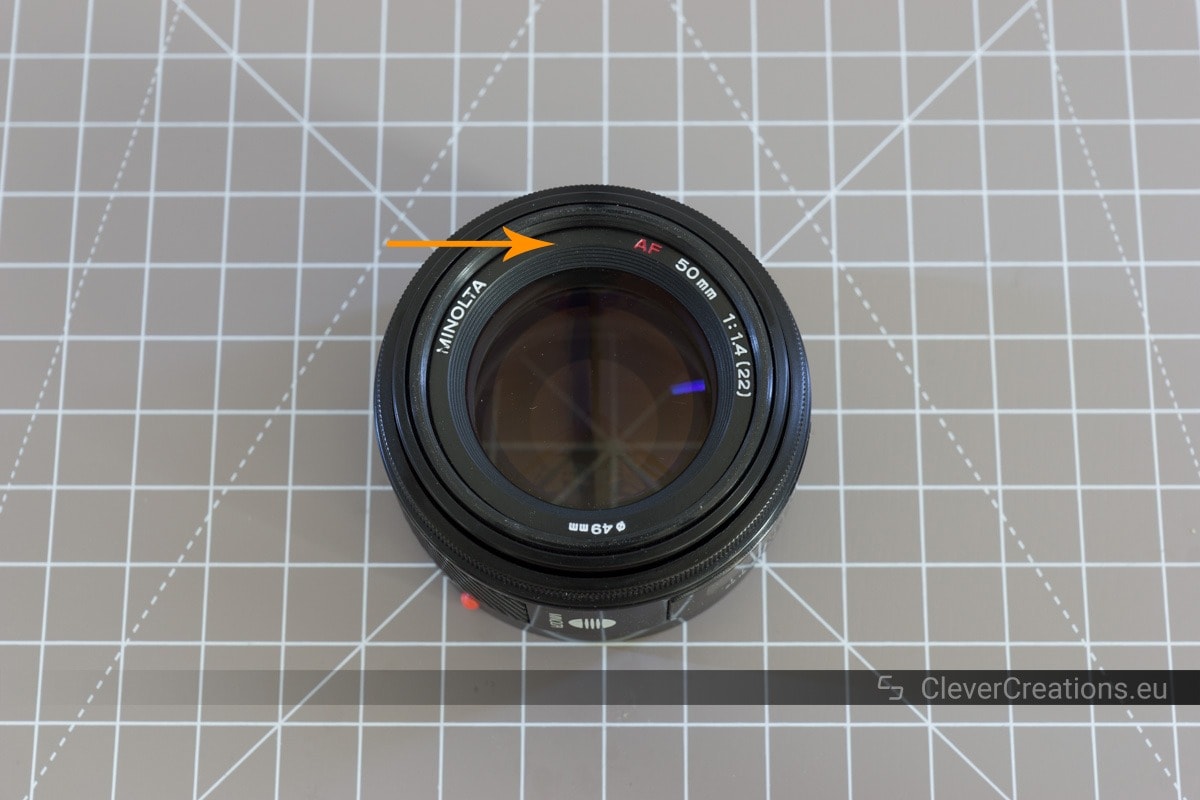
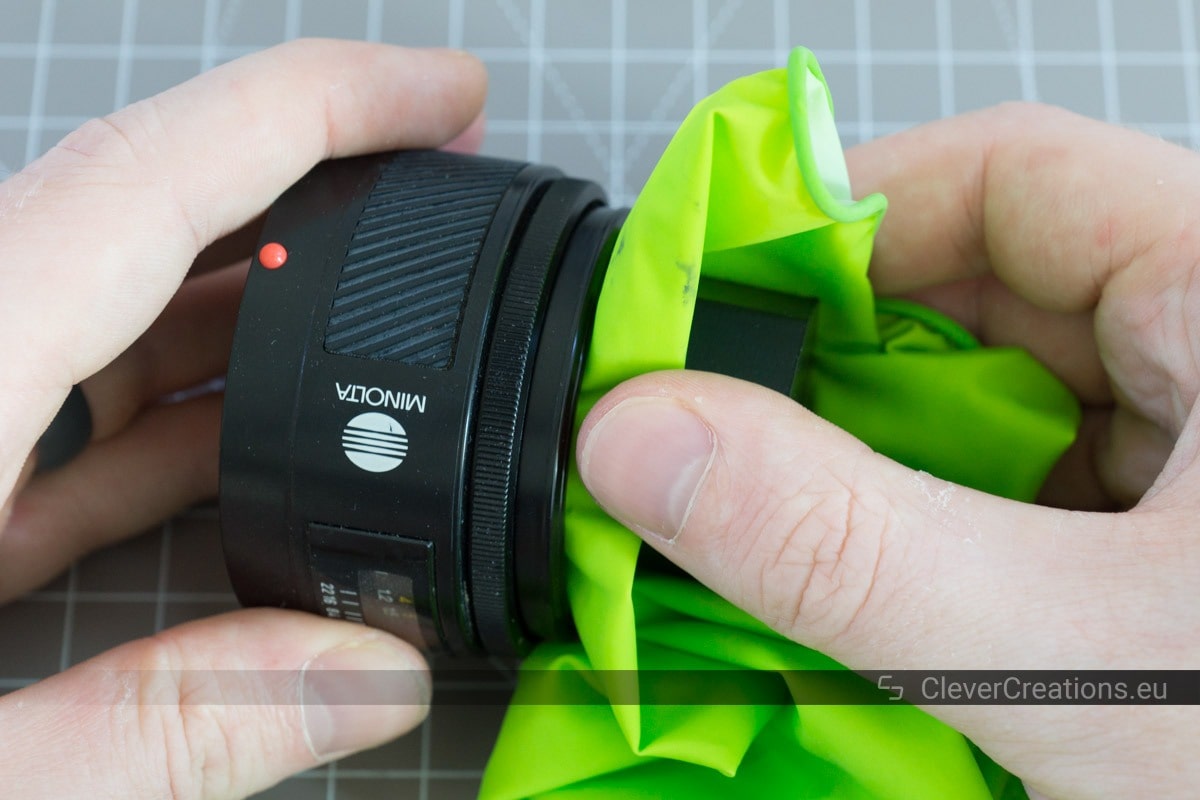
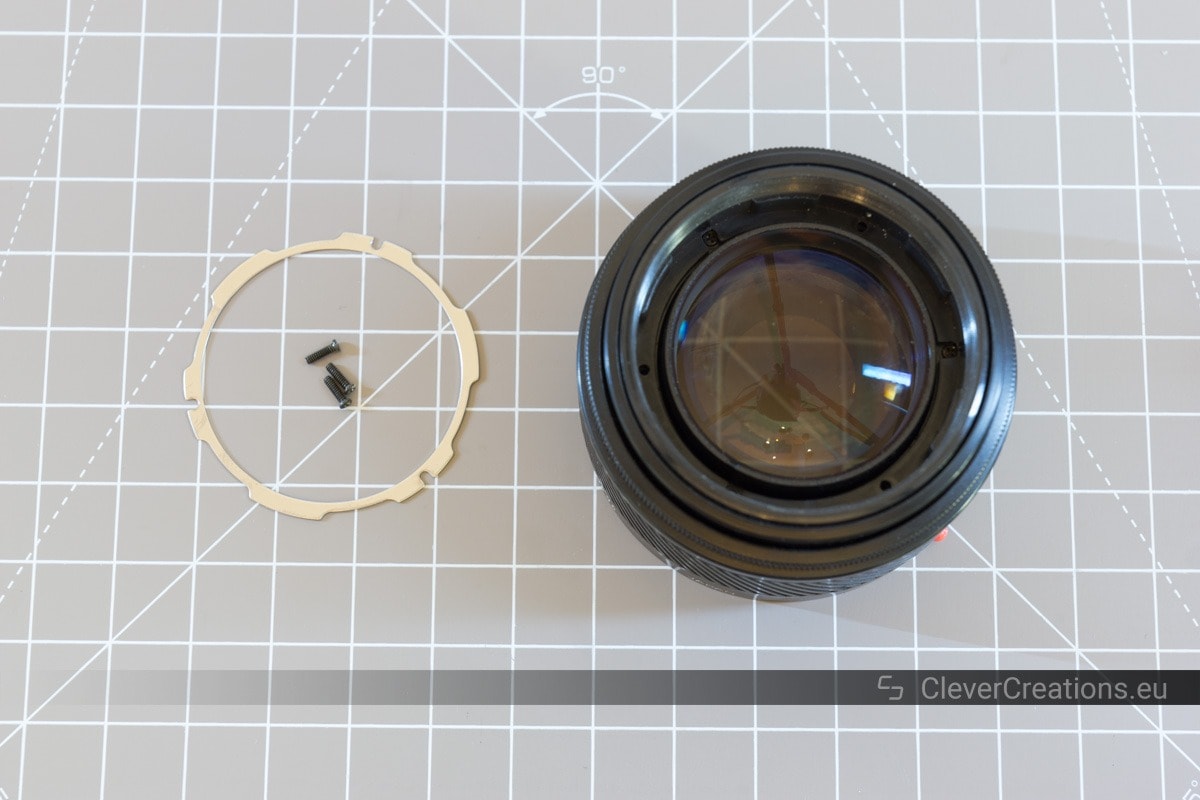
Removing the Front Lens Barrel Hold Plate

Removing the lens hood
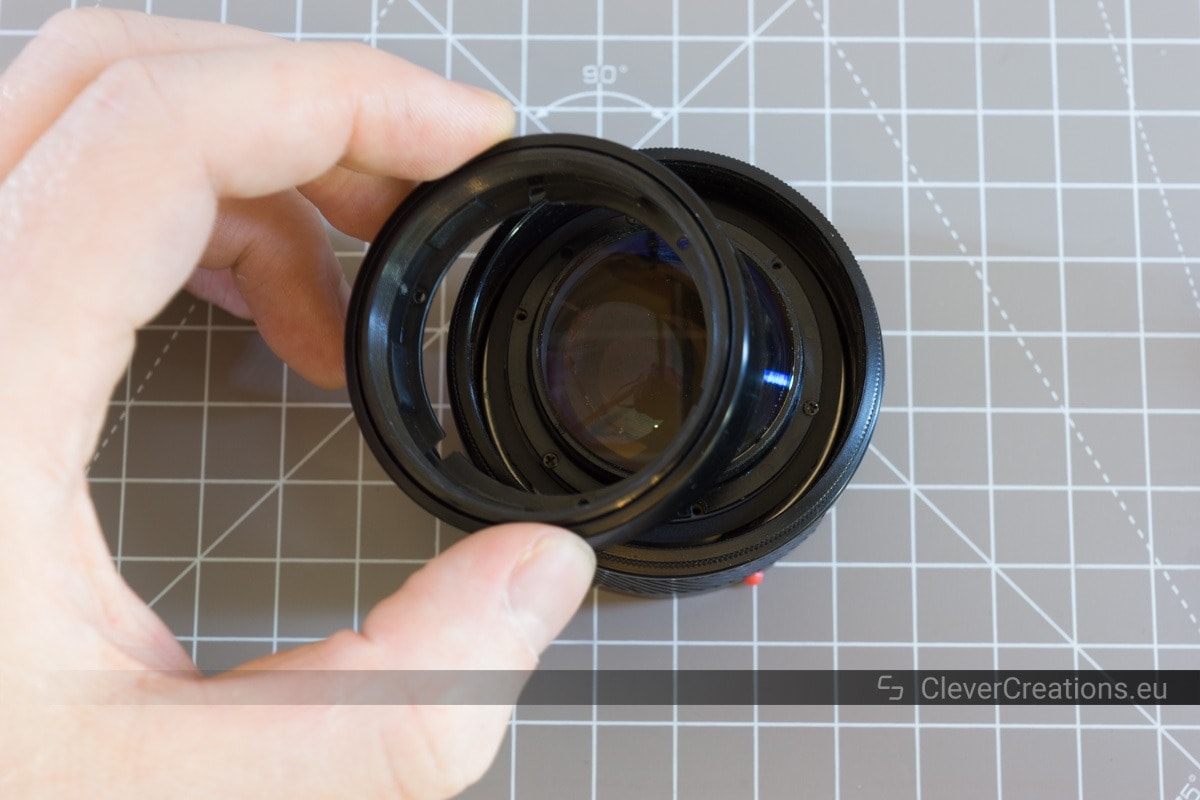
Removing the front ball lens
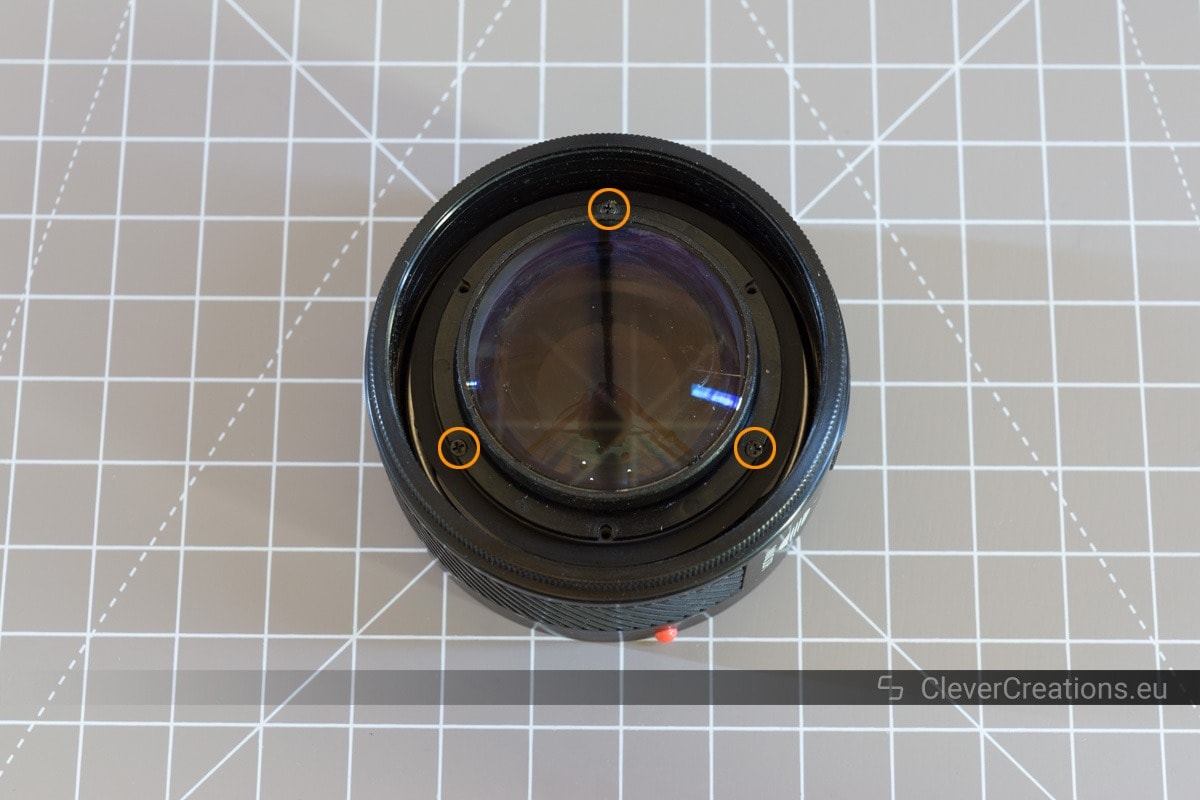
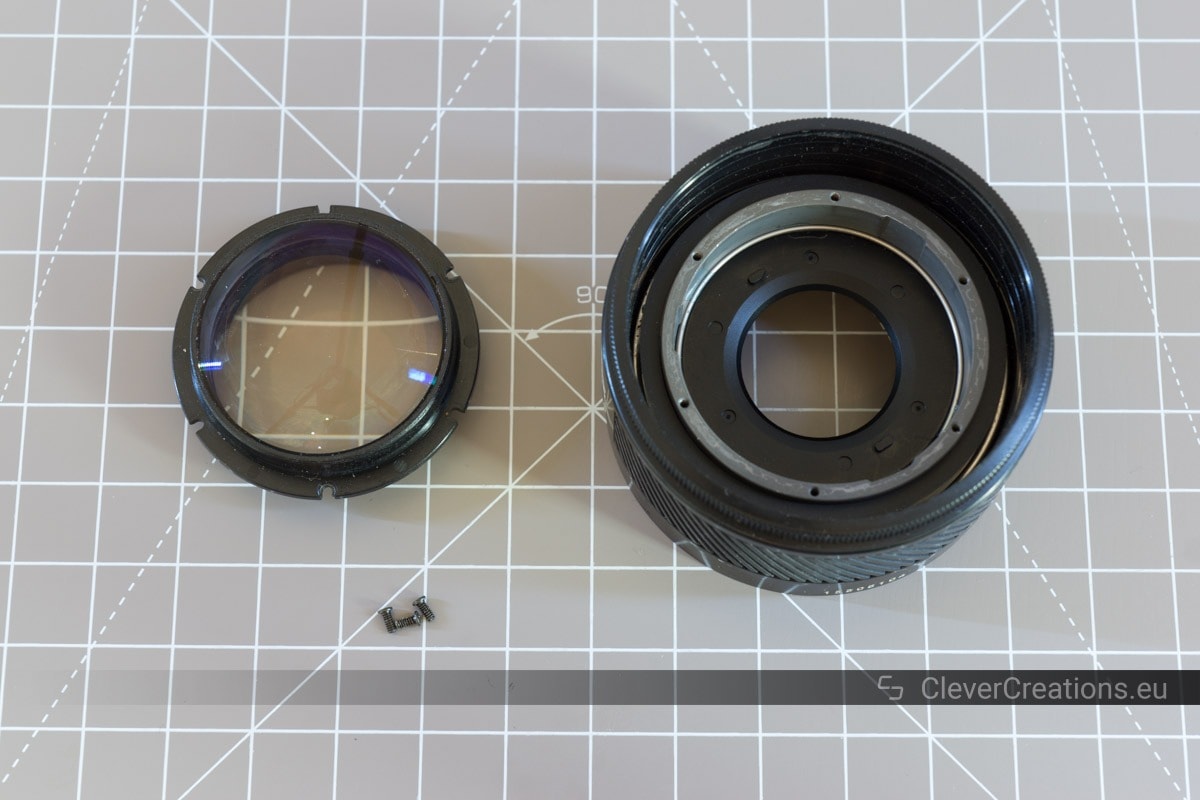
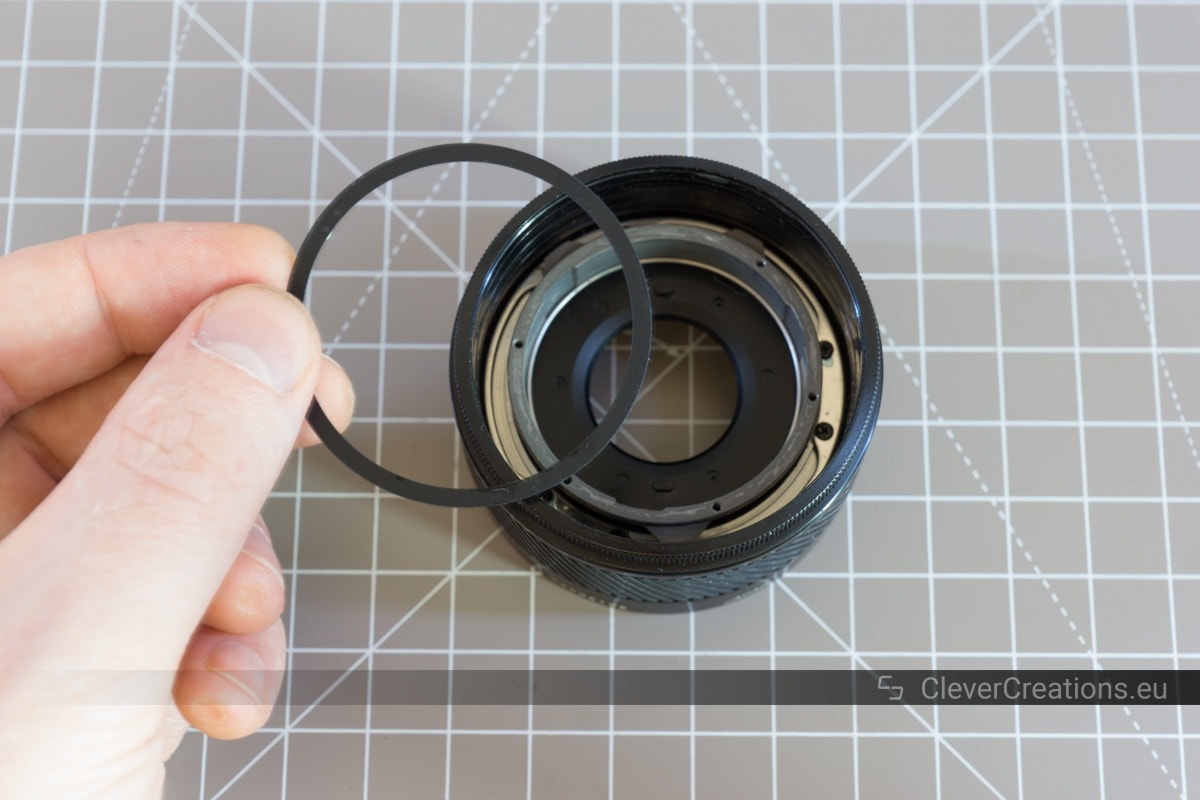
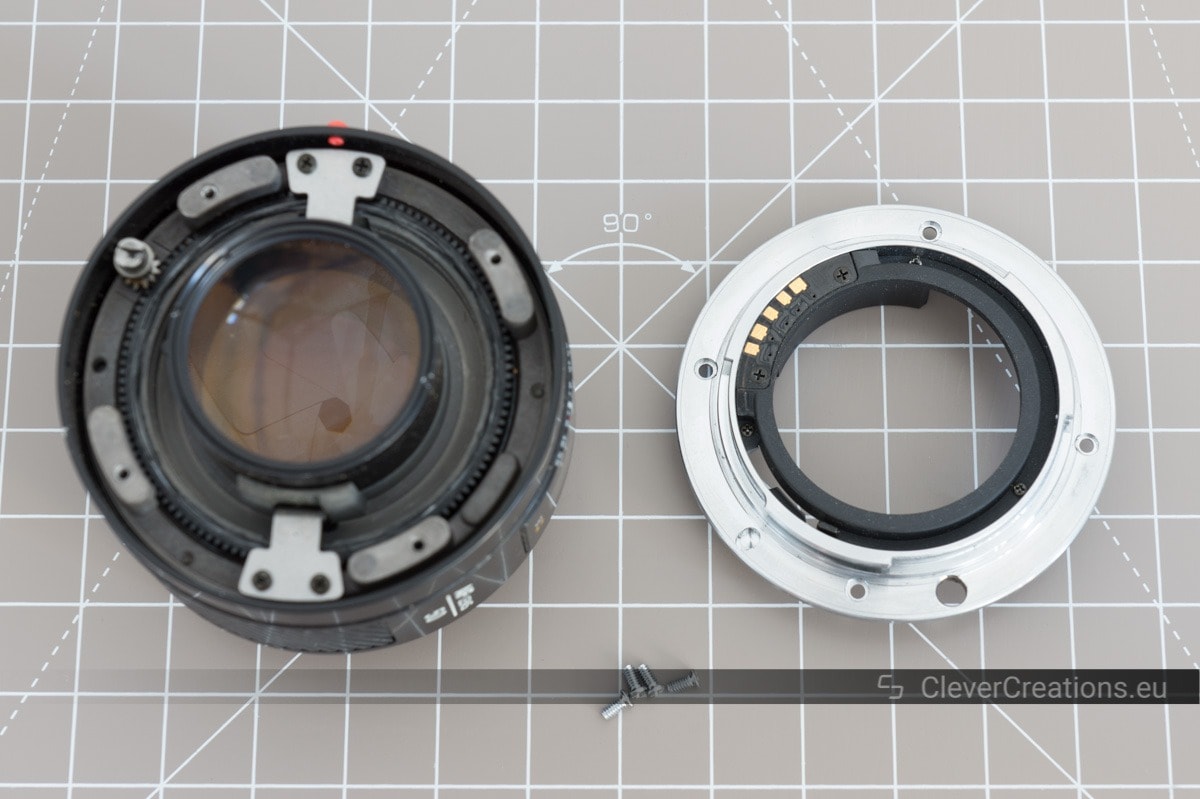
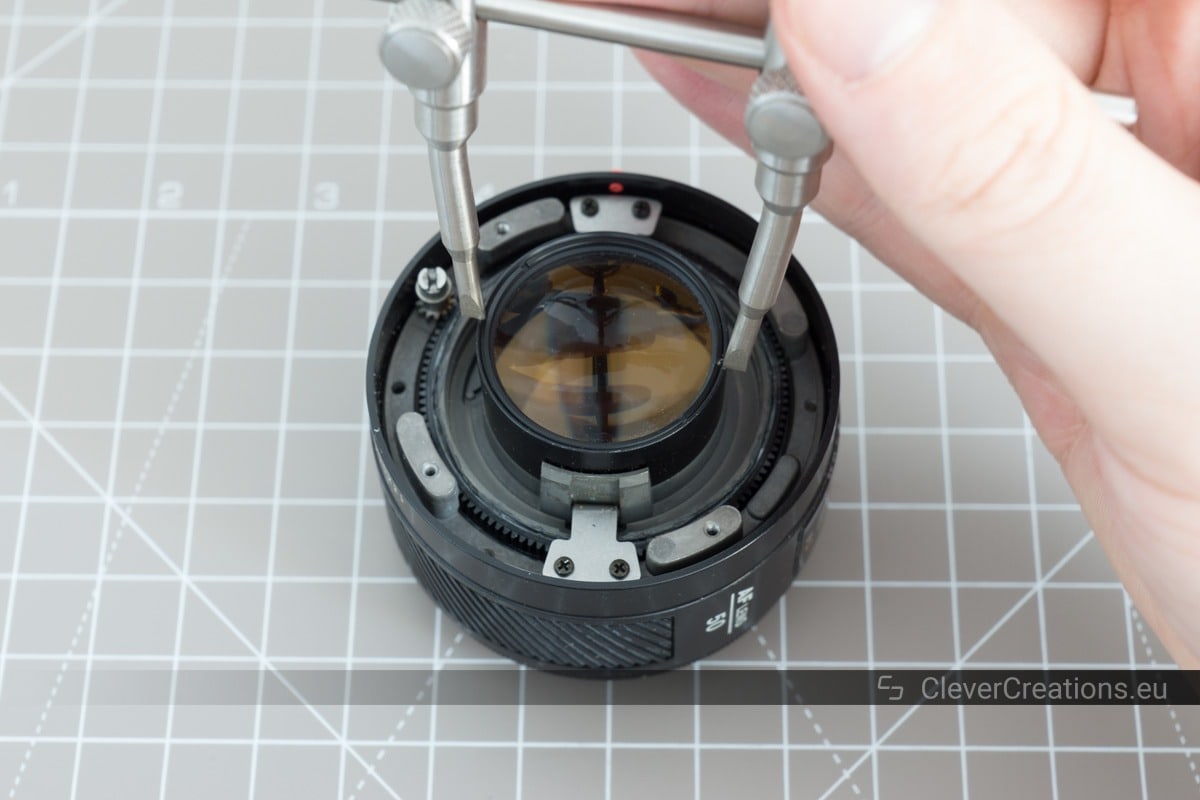
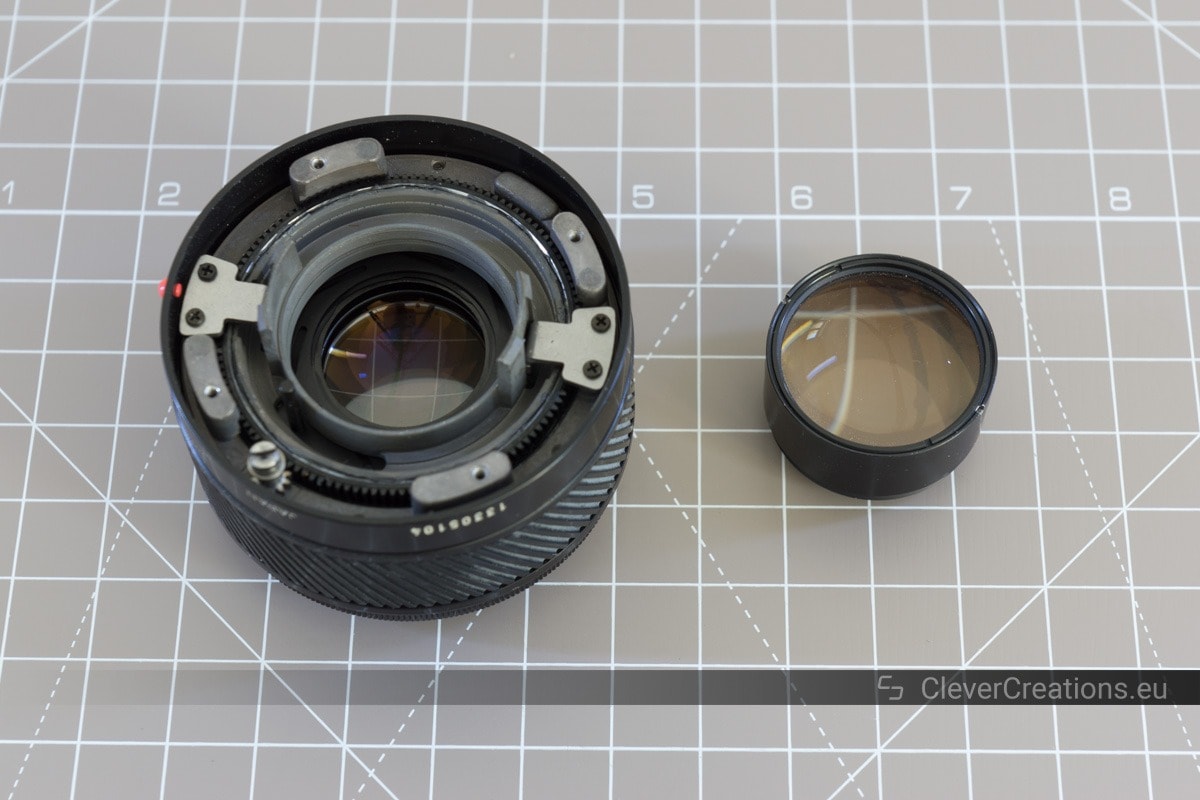
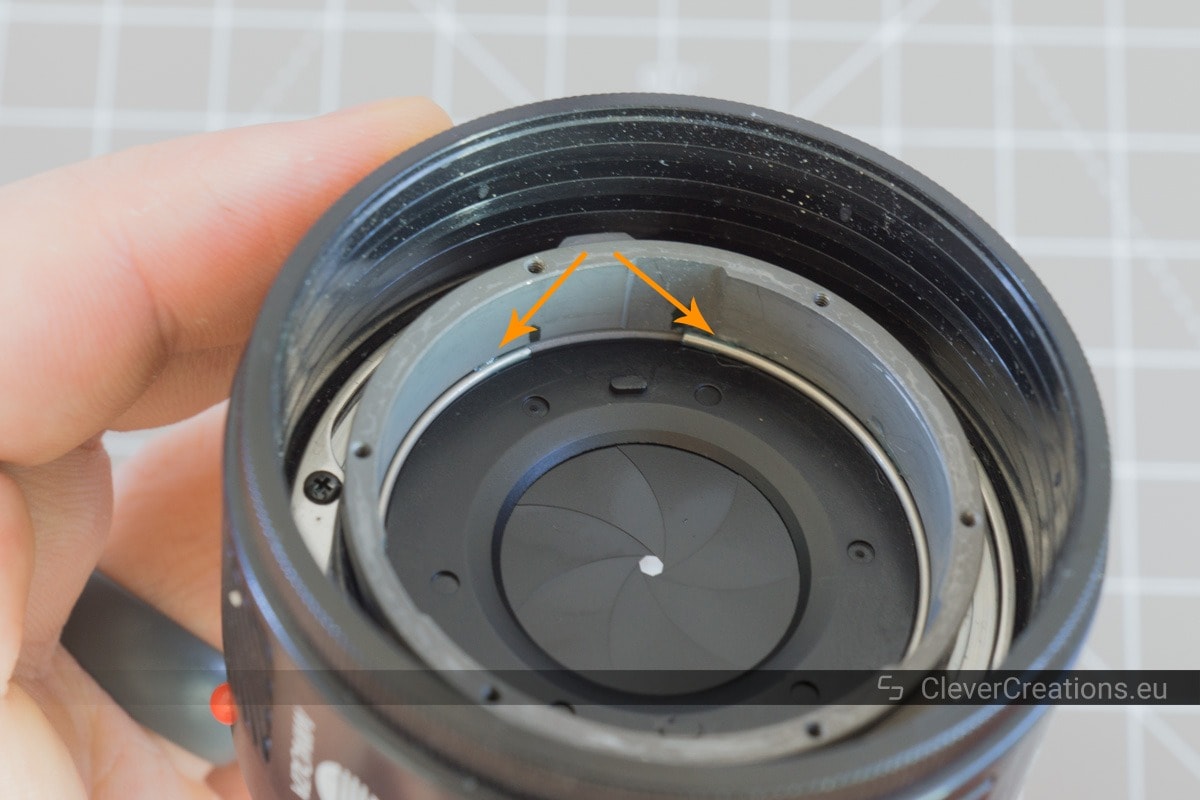
Removing the Iris Mechanism
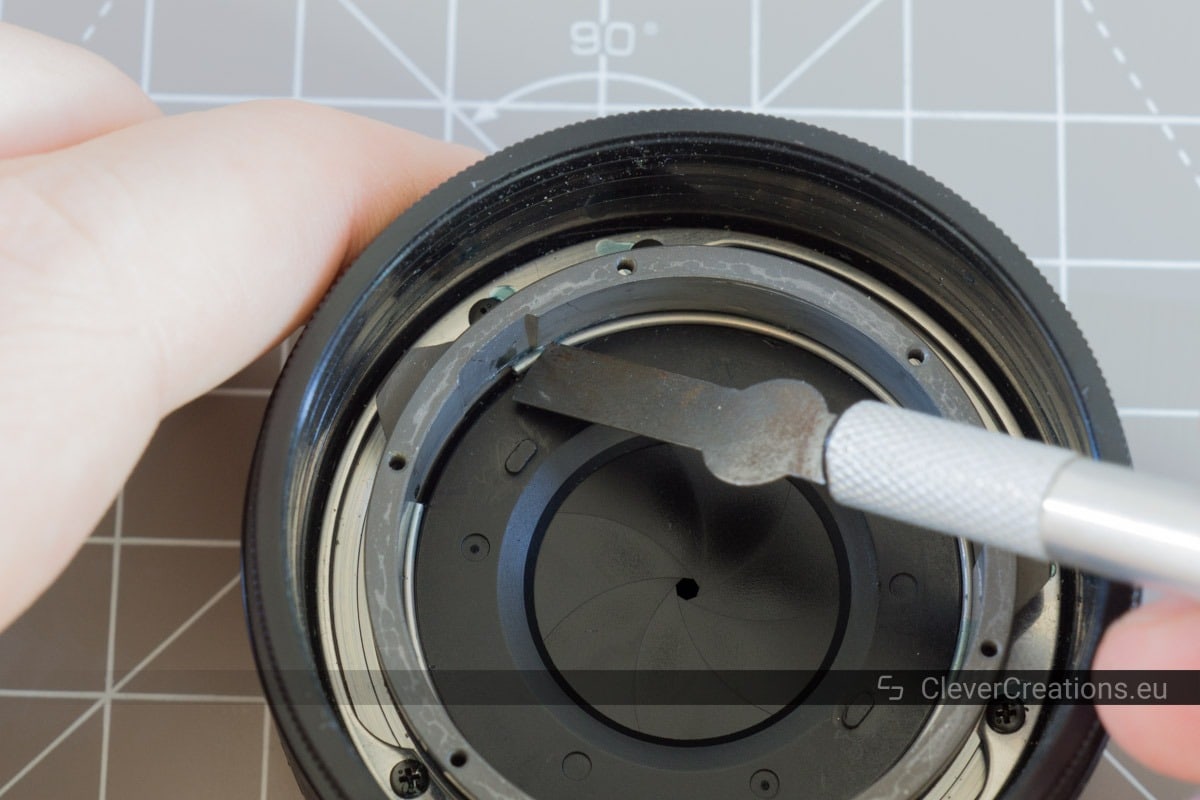

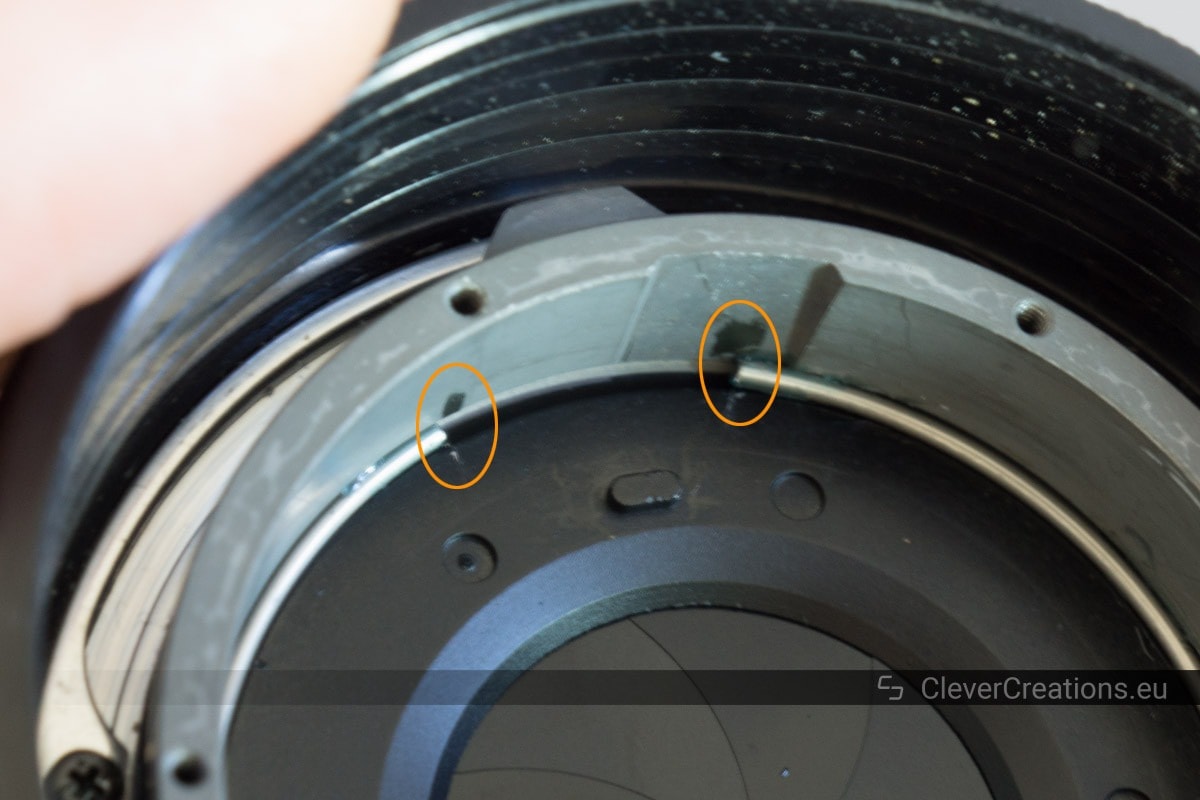
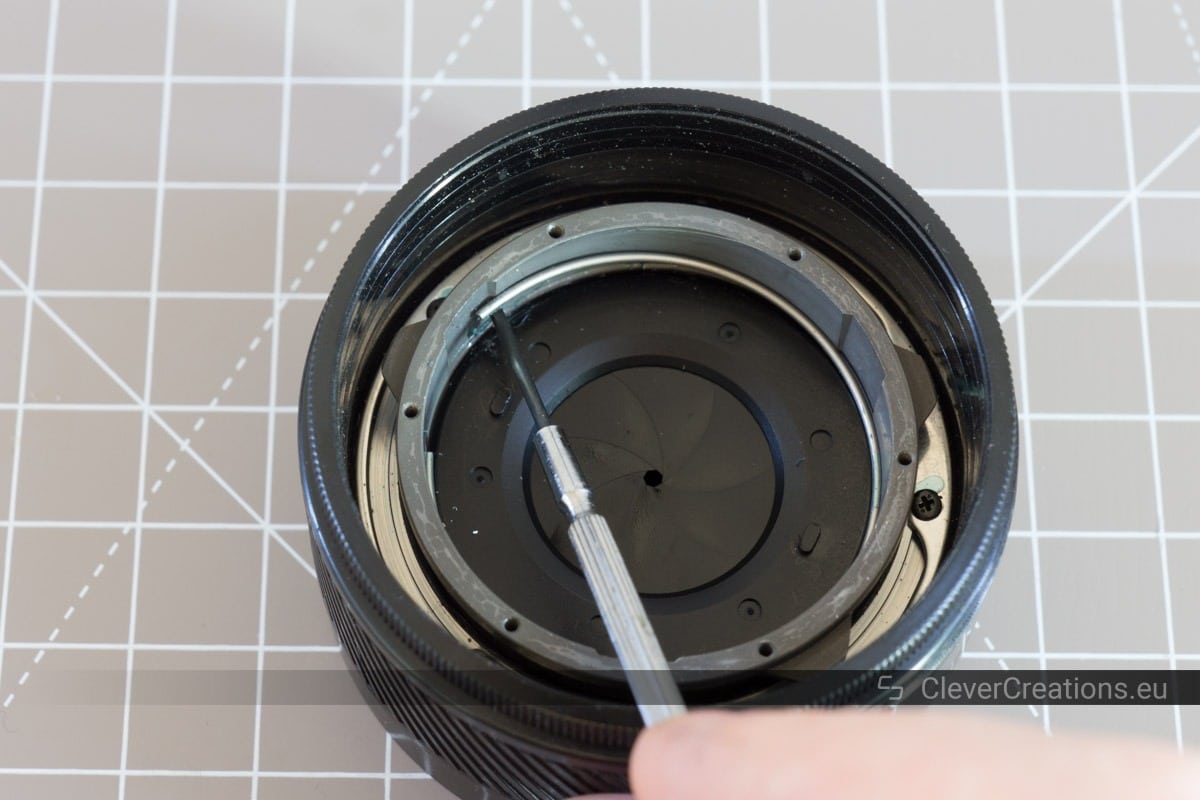
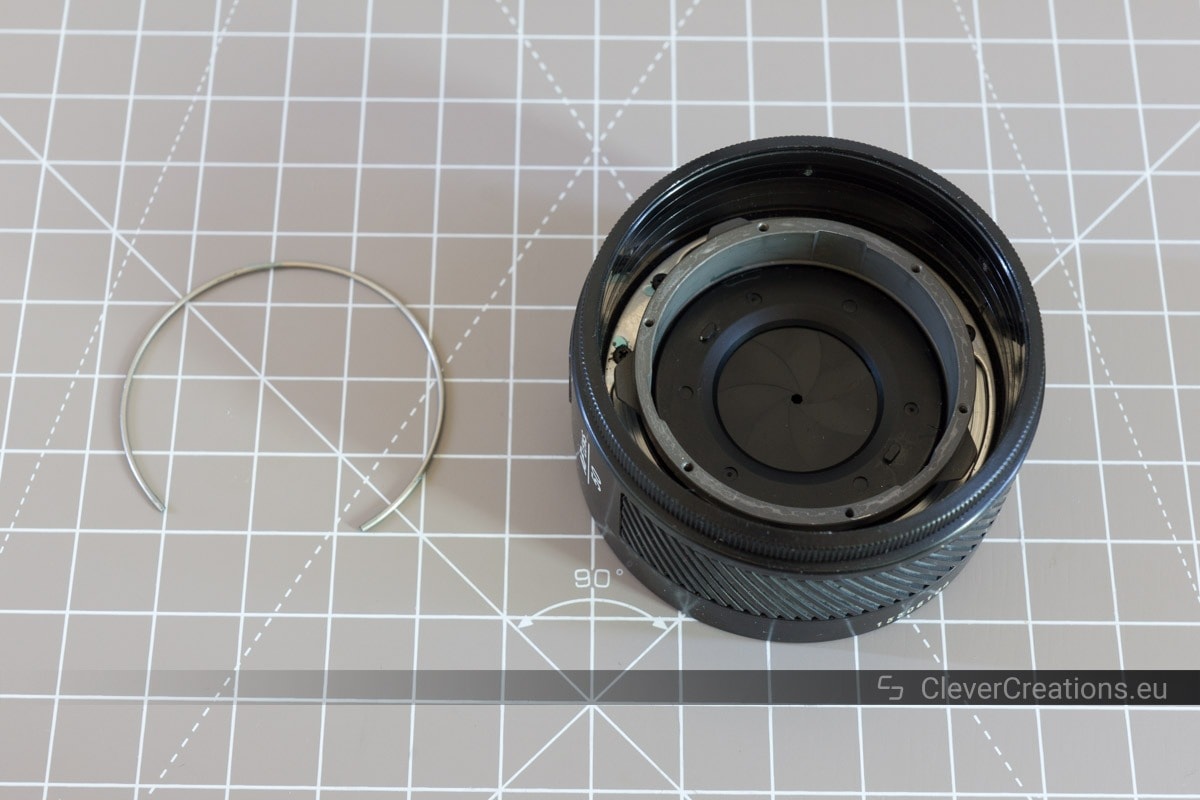
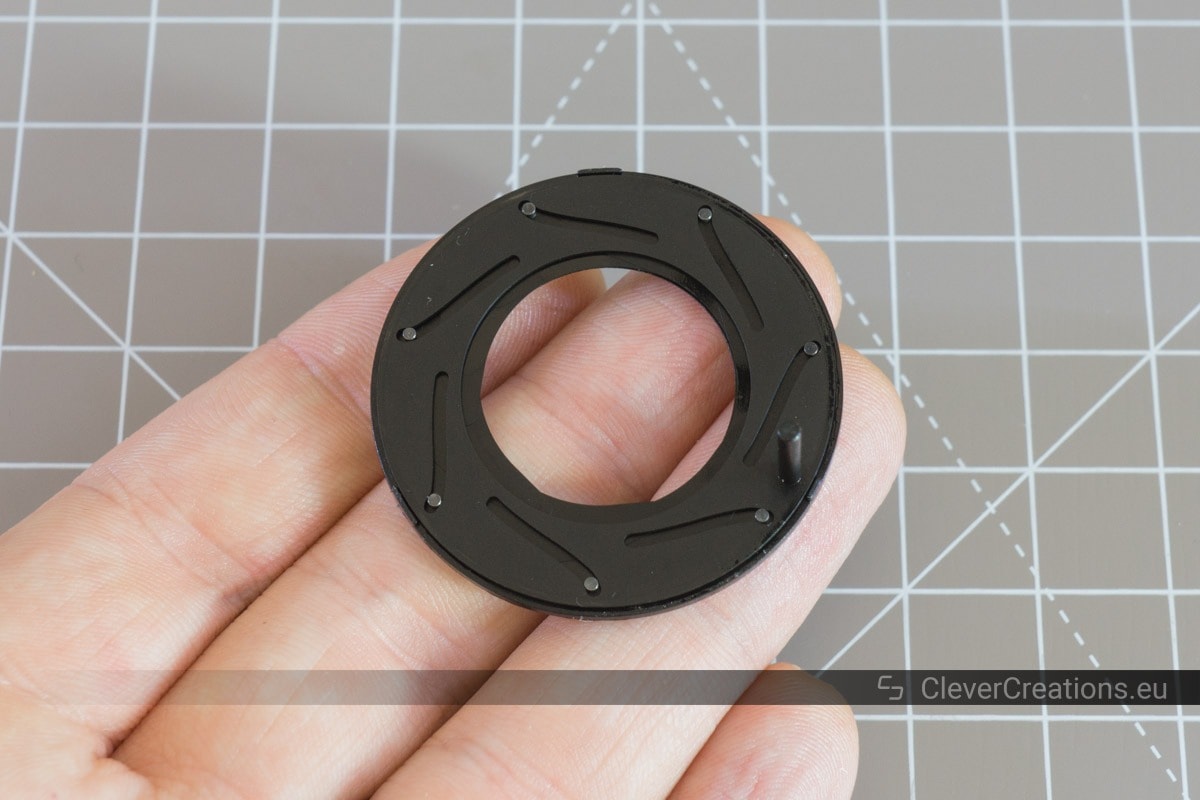
Cleaning the Oil From the Aperture Blades
If you do want to wipe down the blades, make sure to use something that does not leave any fibers behind. A microfiber or lint-free cloth is good for this, Q-tips and a paper towel are not.
Reassembling the Lens
You can do the above steps in reverse to reassemble the lens. Don’t reverse the cleaning steps of course.
Tips for reassembly:
- There is no need to lubricate the aperture blades, so don’t apply any grease or even dry lube to them. They don’t come with lubricant when they roll out of the factory and are designed to work that way.

A Summary of the Cleaning Process (For All Lenses)
- Remove components of the lens until you are able to access the iris diaphragm. Make sure you keep track of the original position and orientation of the components.
- Take the iris diaphragm out of the lens barrel.
- Clean the oily aperture blades either by using an ultrasonic cleaner, or by wiping down the blades by hand.
- Reinsert the the clean iris diaphragm back into the lens.
- Reassemble the lens by doing the previous steps in reverse. When reinserting the lens elements, make sure to give them a wipe to remove any dust.


Conclusion
After cleaning the oily aperture blades, the lens has been working like new.
Just like with repairing the Sony A77, repairing it yourself is not as hard as it seems, and is definitely worth a shot. Especially when the alternative is paying a lot of money for a repair service or for buying a replacement lens.
Just be patient, careful and have fun!
Awesome work! Now I know that I should not leave my camera in a car.
wish Id found this site earlier. ive been caught out a few times but theres good advice here well done
Thanks, Robert! Glad to be of help.
a really great and useful article, you know what you are writing about, thank you
mike