PrusaSlicer’s support structures stand out as some of the most versatile among all slicer software. While the Grid support style with default settings works well for most prints, complex models and surface-quality-critical parts demand a deeper understanding of the advanced support options.
This guide walks through PrusaSlicer’s support features, from basic settings to advanced techniques like custom supports. Whether you’re battling with hard-to-remove supports or trying to perfect those tricky overhangs, you’ll find practical solutions here.
Let’s give your prints the support they need!
Which Support Styles Does PrusaSlicer Have?
PrusaSlicer has three different styles of support, which you can customize in three distinct patterns. Let’s explore each one in detail.
Grid Supports

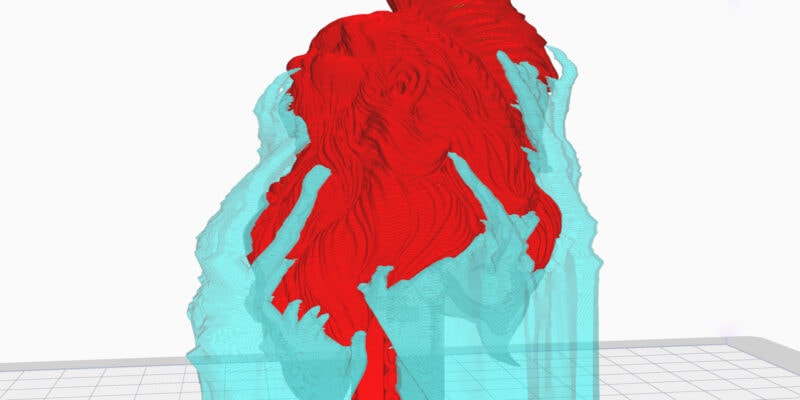
Grid Support is the default support style in PrusaSlicer. It is easy to print and sturdy enough to stand well on tall prints. It’s also lightweight to process for the slicer and doesn’t require much computing resources.
However, grid support structure has a tendency to extend beyond the overhangs at times. You can clearly notice the extended support structures in the image above. While this ensures the strength of the support, it slightly increases the print times and material usage.
Snug Supports

The Snug supports are an upgrade over the grid support styles. They are similar to grid supports, except they do not extend beyond the boundaries of the model. This makes the model look clean and reduces the risk of unsightly marks or imperfections on the surface of the print.
However, the snug fit of this support structure poses a challenge for tall and slender support pillars. It compromises their stability which can lead to a print failure. Notice in the image how the Snug supports do not cross the boundary of the overhangs.
Organic Supports

Organic Supports are a recent addition to PrusaSlicer, inspired by Cura’s Tree supports. The organic support style is unique in its application and appearance.
It avoids touching the model, and the support structures grow similar to the branches of the tree from the side of the model instead. These branches then get dense as they reach the overhangs, forming a sturdy base layer underneath them.
The organic support structure is visually appealing, and apart from its aesthetics, offers excellent stability and reduces the material usage as well. Furthermore, organic supports print fast and are especially useful for models where the surface quality of the print is essential.
Support Patterns in PrusaSlicer
The support patterns customize the style of supports in PrusaSlicer. There are three patterns that work only with Grid and Snug support styles. Let’s take a look at them.
Rectilinear

The rectilinear pattern is the default pattern type for both grid and snug support styles. It’s a zig-zag line pattern which prints fast and easy. This support pattern is easy to remove and supports large overhangs well.
Rectilinear Grid

This pattern is similar to the rectilinear one, except it’s more of a grid-like structure than zig-zag lines. The grid pattern offers more strength to the support structures, which makes it useful for tall prints with large overhangs. However, it’s difficult to remove post-print and increases the print time and material.
Honeycomb

The honeycomb pattern resembles the honeycomb structure and is the sturdiest of the three patterns. It’s excellent for rigid supports and is less prone to breaking while printing. However, it is challenging to print due to the extra movements and can be tough to remove due to its rigidity.
How To Set Up Supports in PrusaSlicer
Setting up supports in PrusaSlicer is a straightforward process. Follow these steps to confidently set up supports for your 3D prints.
- Open PrusaSlicer and import your 3D model.

- In the Print Settings section, go to Support Material settings.
- Click on the top-right corner of the Expert Settings button.
- Check the “Generate Support Material” and “Auto-generated Supports” boxes.
- Set the Support Style to Grid and leave the other support settings at default.
- Choose if you want the supports to be generated only on the build plate or everywhere on the model.
- Go back to the slicing window and slice your model.
- Preview the support settings and evaluate if they support the overhangs as desired.
- If satisfied with the support generation, export the G-code and send the file to printing.


Recommended PrusaSlicer Support Settings
Understanding key settings is crucial for fine-tuning the support quality of your prints in PrusaSlicer. While the default supports are often good enough, let’s explore the best support settings for print quality.
Overhang Threshold

This parameter decides the horizontal slope angle in your model for which PrusaSlicer will not generate the support structure. For instance, if you set the threshold value to 40°, PrusaSlicer will not generate any overhangs lesser than this value in the XY plane.
Keep this value between 40-55° based on your printer settings. You can maintain a higher value if your printer has great part cooling and you print slowly.
Top and Bottom Contact Z Distance

This parameter controls the vertical distance between your 3D model’s surface and the support material. A higher value makes it easy to remove the supports but negatively impacts the quality of overhangs. Meanwhile, a lower value can make the supports stick too well to the model’s surface, making the removal process challenging.
Start with a value similar to the print’s layer height. You can later experiment with different values based on the printing results.
Top and Bottom Interface Layers

Interface layers are denser layers of support material printed between the support pillars and the part’s surface. These layers give the overhangs a larger surface area to print upon, reducing the sagging and improving the print quality of the model. They also make it easy to separate the support structure from the model.
Three to Four interface layers on the top and bottom result in good overhang quality and make the support removal process easier. Remember, the bottom interface layer prints only when the support pillar starts from the model’s surface.
XY Separation

This setting controls the distance of support pillars from the model in the XY (horizontal) plane. A higher value makes it easy to remove the support structure; however, it reduces the contact area of support with the overhangs.
Set the value between 60-75%. This percentage is calculated based on the value of the external perimeter width you’ve set for the model.
How To Add Custom Supports
PrusaSlicer offers plenty of customizability with custom supports. It provides a simple user interface, and you can paint the overhang areas where you need the support pillars. Here’s how:
- Open PrusaSlicer and load your 3D model.
- In the left-hand sidebar, click on the “Paint-on Supports” option, which is the third option from the bottom.
- Use the slider to highlight the overhang areas in your model. Set the value in between 40-50°. This will help you quickly recognize the areas where support is most needed.
- Select the “Tool Type” to Brush and choose the desired brush shape. Sphere and circle work well for most models, while the triangle option is best for large-plain overhangs.
- Choose the brush size that suits your needs. A smaller brush size provides more control over the support placement, while a larger brush size is more efficient. The default brush size is 2.00, which you can try first.
- Check the “Split Triangles” box. This divides the large triangles in the STL file, enabling precise support placement.
- Use the left mouse button to paint the supports onto the model. You can erase the supports using the Shift+Left Mouse button if you make a mistake.
- Open the “Print Settings” section and enable the “Generate Support Material” option.
- If you only want custom supports to show, disable the “Auto-Generated Supports” option. If not, PrusaSlicer will generate both the custom and automatic supports.
- Adjust the support styles, patterns, and density according to your preference. You can leave them at their default settings if you’re unsure.
- Open the slicing window and slice the model with supports.
- Preview the custom support structures and examine if they meet your requirements. If everything looks good, send the file for 3D printing.


Useful Features
PrusaSlicer offers a few valuable features that enhance the usability of the support structures and help you get a better print quality and experience. Let’s briefly understand them.
Support Blockers

Using Support Blockers in PrusaSlicer, you can designate specific areas of your model where support structures should not be generated. By strategically placing support blockers, you prevent PrusaSlicer from generating unnecessary support material in critical areas of the prints.
For instance, if the geometry is too complex, it can be challenging to remove the supports later on. Or, in the case of a head bust or aesthetic models, support blockers help you reduce the use of supports generated in the final 3D print.
To use Support Blockers, simply right-click on the model name in the right-hand sidebar, select “Add Support Blocker” and add the desired shape. You can either choose from PrusaSlicer’s gallery or load your custom shape as well.
Place and adjust the support blocker at the desired location as per your needs. Set your support settings as usual and slice the model. You’ll notice in the preview image above how the support structures are missing in the blocked area.
Support Enforcers

In contrast to blockers, Support Enforcers ensure that supports are generated in specified areas of the 3D print. This feature makes sure that PrusaSlicer adds support in the critical areas of the model and strengthens its weak points or delicate features.
Support enforcers allow you to quickly customize support structures and placement in your model. You can use them as an alternative to paint-on supports and save time as well. Additionally, due to their quick customization, you can place supports in difficult areas that are easy to remove.
To use Support Enforcers:
- Right-click on your model
- Choose “Add Support Enforcers”
- Select preferred shape
- Place the enforcer block where needed
- Set Supports to “For Support Enforcers only”
- Slice and verify
Per Model Supports

PrusaSlicer lets you customize the support settings for individual models on your build plate. This gives you the flexibility to use supports in models based on their applications.
For instance, you may need a showpiece where surface quality is a top priority, along with a functional part where you can compromise on surface finish.
Using Per Model settings, you can set different overhang thresholds for both parts. You can choose the support and interface pattern and also enforce or block the supports based on your print’s needs. These small customization options allow you to print multiple parts, with different support requirements at once.
To use Per Model Supports:
- Select model name on right-hand sidebar
- Right-click and choose “Support Material”
- Adjust available support settings for your particular piece
Conclusion
PrusaSlicer is a highly versatile and customizable slicer for generating support structures. You get three different support styles, three different support patterns, and plenty of settings, all of which you can use to generate pristine support for your models.
The custom supports make adding supports to prints a breeze and give you complete control over the final result. The per-model settings, support enforcers, and blockers further enhance the user experience and provide you with tools to customize the support structures to your liking.
This guide covers everything from basic support generation to advanced features, but mastering supports requires experimenting with different parameters. Try these settings on your next print and see the difference they make in your results.
May the Supports be with You!