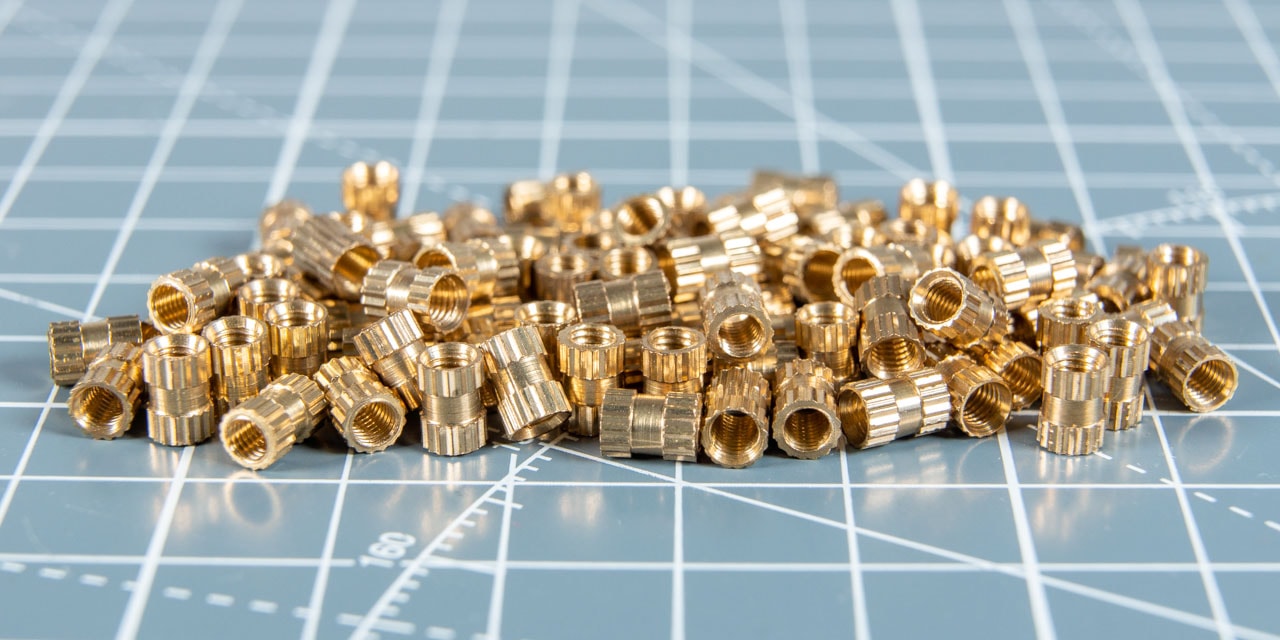

Threaded inserts are a great way to add strong and long-lasting threads to 3D prints. While it is possible to tap screw holes directly in 3D printed parts, these threads often wear down quickly. This is because the thermoplastics that we use for 3D printing are rather soft. To create durable threads in plastic, we can use brass threaded inserts instead.
In this article I will share how to install threaded inserts in 3D prints, their pros and cons and how to design for them.
Let’s dive in!
What is a Threaded Insert?
Simply put, a threaded insert is a type of fastener element that lets us add a threaded hole to an object. It is used for various reasons, for example to skip the step of machining thread, to repair a hole with stripped threads, or to add thread to material that is too thin to be tapped.
In our case of 3D printing, we use threaded inserts to add durable threads to 3D prints. The plastics that we typically print with are not very durable, and as a result plastic threads do not last very long. This is especially the case with parts that regularly get assembled and disassembled. Threaded inserts provide a solution for this problem.
Brass is the most used material for threaded inserts, but you can also find them in other materials like aluminium and stainless steel. Aluminium inserts are beneficial because of their low weight, whereas stainless steel inserts have better corrosion resistance. Brass is the cheapest option and has good properties for most applications.
How Do Threaded Inserts Work?
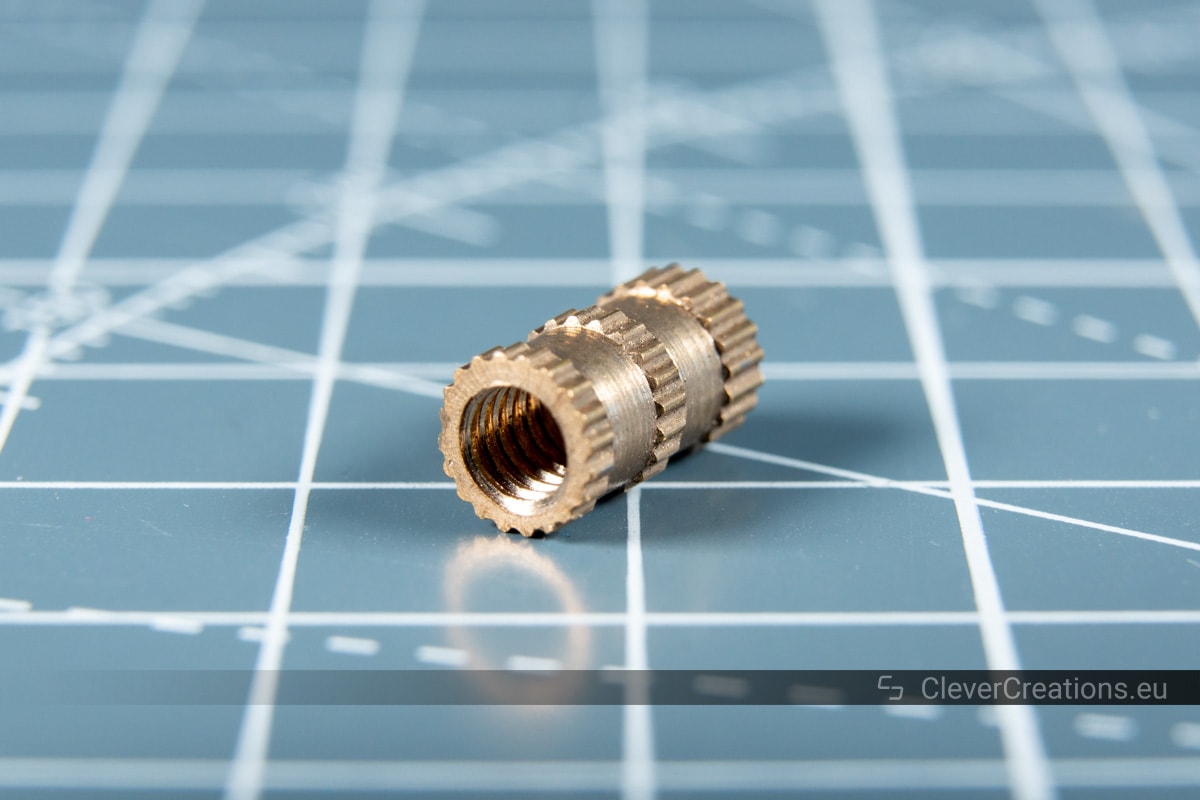
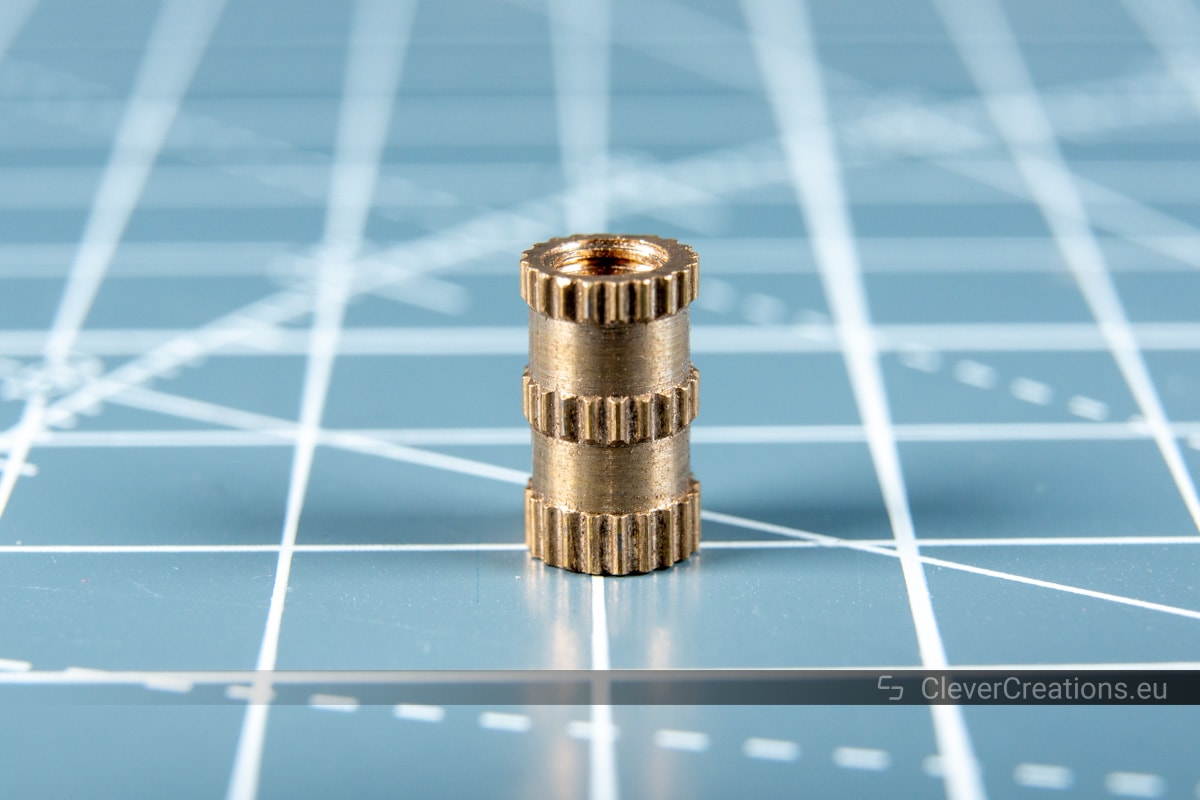
Threaded inserts come with ribs and edges on the outside. These are referred to as knurling. The knurling allows the inserts to ‘grab’ onto the plastic and makes it harder for them to be twisted or pulled out. On the inside of the brass inserts we find the durable thread that we are using them for.
What are the Advantages of Using Threaded Inserts?
Using brass threaded inserts has multiple advantages compared to other threading methods:
- The threads are more durable and last longer than threads that are tapped in plastic.
- The stronger threads allow for higher clamping forces than tapped plastic threads.
- They allow us to work with tiny threads without problems.
- They are easier to design for and print than embedded nuts. The latter need nut-shaped pockets that can create overhangs.
- Threaded inserts take up less space than a regular nut in a nut trap/pocket.
What are the Disadvantages?
Of course, brass inserts also come with disadvantages:
- Extra component costs (for the inserts) compared to tapping or printing screw holes directly into the plastic.
- In order for the insert to have a good fit, you need to be able to 3D print accurate holes. An alternative is to print an undersized hole and to drill it after printing. This always gets you the right diameter hole, but it does introduce an additional step.
What Types of Inserts are There?
Threaded inserts come with different knurling patterns on the outside. The knurling pattern is one of the factors that dictates how well the insert holds on to the plastic. It does this by providing resistance to pull-out force (the force of pulling the bolt out) and resistance to torque (rotational force).
There are different types of knurling patterns:
- Straight knurls. These knurls run parallel to the insert. They provide a lot of grip to rotational force, but do not do much when it comes to pull-out force.
- Diagonal/helical knurls. These knurls, often labeled as either left- or right-hand knurls, do a good job at providing resistance to forces in both directions.
- Checkered/diamond pattern knurls. This is the type of knurling that you are probably used to seeing most often. Its complicated geometry creates good resistance in all directions.
Some inserts come with grooves in-between sections of knurling. This gives extra resistance to pull-out forces.
Which Type of Knurling is Best?
Out of the different types of knurling, the checkered/diamond pattern knurls provide the best overall resistance. This geometry is harder to manufacture however, and as a result threaded inserts with diamond knurling tend to be more expensive than the simpler alternatives.
When to Use Threaded Inserts
There are several situations in which you might want to pick threaded inserts over tapped plastic threads.
- If you work with part assemblies that need to be disassembled regularly. Removing and adding bolts can cause plastic threads to wear out.
- When working with small threads (M2/M3/M4). These are often easily stripped when made out of plastic. The metal threads that inserts provide do not have this problem.
- For parts that are exposed to various forces and vibrations. Needless to say, these parts need to have threads that can stand up to some abuse. One example is threads in 3D printed RC parts.
For larger threads (M5 or bigger) you can get away with tapping them directly into the plastic, or even printing the threads. Obviously they won’t be as strong as metal threads, but they will still hold up as long as they are not stressed too much.
Methods for Installing Threaded Inserts in 3D Prints
There are several methods that can be used to install threaded inserts in plastic, but not all of them are relevant to us 3D printing hobbyists. For example, ultrasonically inserting threaded inserts can only be done with industrial equipment, and molding threaded inserts in plastic is also not possible with 3D printers.
There are two methods that we can use; heat-setting and press fitting threaded inserts.
Heat-Setting
The most common way of installing brass inserts in 3D prints is through heat-setting. This is why they are also referred to as heat-set inserts. Heat-setting involves melting the plastic that surrounds the insert, in order to insert it.
As the thermoplastic melts, gently pressing the insert causes it to descend into the pilot hole. The plastic reflows around the insert and when it cools it forms a strong bond with the knurling.
One downside of this method is that it is easy to accidentally misalign the insert when heat-setting by hand. When using a soldering iron for example.
Press Fitting
Aside from heat-setting threaded inserts, it is also possible to simply press-fit them into 3D prints without any heat. This does create a weaker bond between the insert and the plastic because the plastic does not melt and reflow around the knurling.
The advantage of this method is that it uses less tools and is generally faster than heat-setting.
You can use different tools and techniques to heat-set and press-fit inserts into plastic. There are also some tricks that you can use to make sure that the inserts are aligned and have the right orientation. You can find all this information further down the page.
How to Design for Threaded Inserts
There are several important things to keep in mind when designing parts that use threaded inserts:
Hole Diameter
In order to get a strong bond between the insert and the plastic, the hole for the threaded insert needs to have the right diameter. If the hole is too small, you can’t push the insert in properly. If it is too big, the insert does not grip the plastic that well and it will come loose more easily.
Some manufacturers of brass inserts, like Ruthex, provide a diagram with their product that tells you exactly which diameter hole you need to use. When buying cheaper inserts, you might have to figure out through trial and error which hole size works best.
A good way to figure out the best diameter hole for a specific threaded insert is to use your favorite CAD software to design a part with a bunch of different sized holes. The holes need to be around the same diameter as the threaded insert, each about 0.1mm bigger or smaller than the next hole. So if the insert is about 4.0mm (excluding the knurling), you might end up with holes with diameters of 3.8mm, 3.9mm, 4.0mm, 4.1mm and 4.2mm.
Next, print the part and install the inserts. When all holes have inserts in them, you can test the bond strength by inserting a bolt in each insert and pulling it out. Whichever insert is the hardest to pull out, that diameter hole is the one you want to use in your designs.
When you are finished, you can simply reuse the inserts in future parts.
3D Printing Hole Accuracy
Keep in mind that the holes you design in your CAD software always come out smaller when you 3D print them. This happens for various reasons. Most notably, after the plastic is laid down, it cools down and shrinks. But there are also other things that affect this, like faceting errors and segment pausing.
Long story short, if you want accurate holes when 3D printing, you need to size up the hole diameters a bit in CAD. I usually add 0.2mm extra. This is a good place to start, but it can vary depending on the slicer that you use and how well your printer is dialed in.
Insert Placement
One way to use brass threaded inserts is to install them on the top face of an object. By this I mean the side that the bolt gets screwed in from. If the plastic reflows properly around the knurling, this provides good resistance to pull-out stresses.
The amount of resistance it provides before the insert pops out is still limited however. For applications where you need more strength it can be useful to install the inserts on the opposite side of the part, at the end of a through-hole.
This causes the bolt to pull the insert into the part, instead of out of it. As you can imagine, the pull-through loads required for failure are a lot higher than the pull-out loads.
What Length of Threaded Inserts to Use
In general when working with brass threads, the recommendation is to use at least a thread length of 1.5x the diameter of the bolt. So if you are working with an M5 (5mm) bolt, you would use a section of thread of at least 7.5mm (5*1.5) or longer.
When it comes to brass inserts in plastic 3D printed parts however, the plastic is more likely to fail than the thread itself. Especially when dealing with pull-out forces as opposed to pull-through forces.
If you are using threaded inserts to simply have durable threads that are not exposed to a lot of forces, you can get away with using a shorter threaded insert, say 1x the diameter of the bolt, or even less.
If you are dealing with parts that endure a lot of stress, especially when the threaded insert is placed on the front face of the object, the longer the insert is, the better. This gives the plastic more knurling to bond with and allows it resist stronger forces before failure.
How to Install Threaded Inserts in 3D Printed Parts – Step-By-Step
There are several ways to install threaded inserts in your 3D prints. Not only can you heat-set or press-fit inserts, but there are different ways to do each of those as well.
For the best results it is recommended to use heat-set inserts for heat-setting and special press-fit inserts for press-fitting. In my experience, press-fitting heat-set inserts works just as well.
Heat-Setting Threaded Inserts
Using Only a Soldering Iron
|
|
Tools | ||
|---|---|---|---|

|
Check Price | ||
|
|
Parts | ||
|---|---|---|---|

|
Check Price | ||
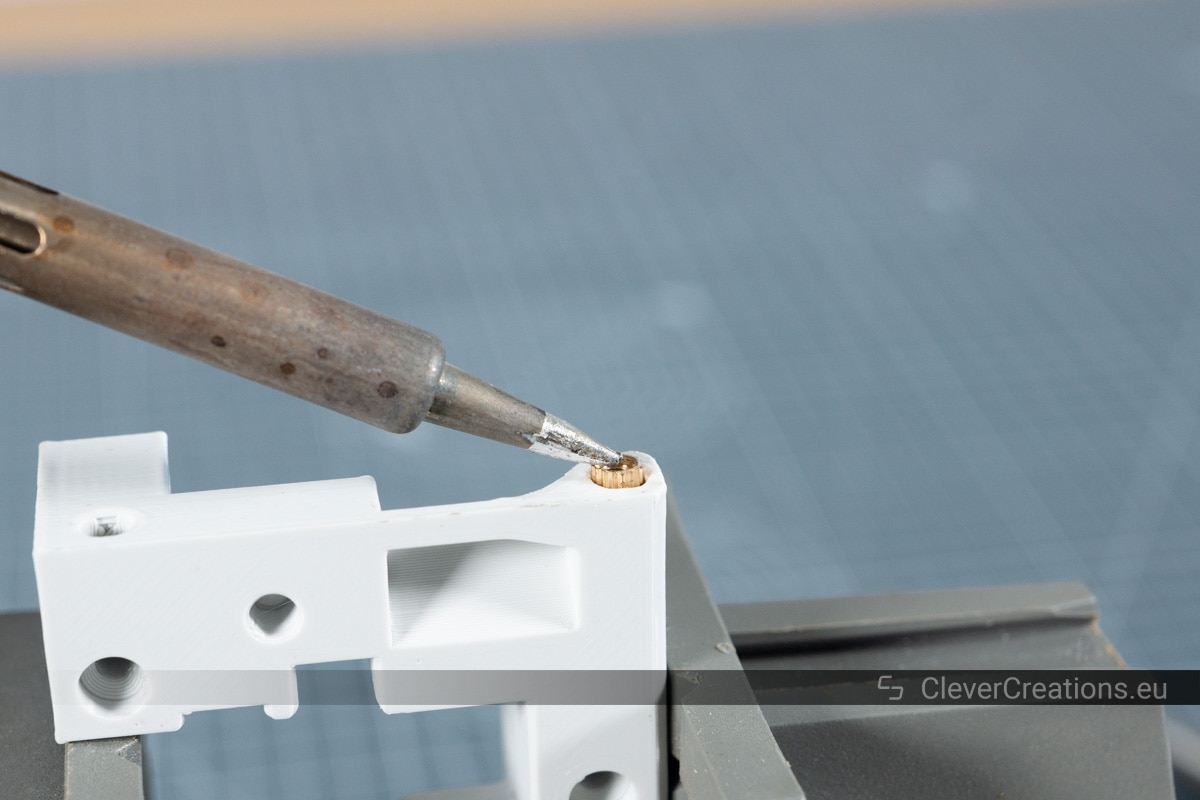
A common method to install threaded inserts in plastic is to use a soldering iron. It is straightforward and fairly easy to do, but there is risk of overheating and damaging the plastic.
- Get the soldering iron up to temperature. Finding the right temperature might take some trial and error. It is important that it is low enough not to overheat the plastic, but high enough that the threaded insert still heats up relatively quickly. Somewhere around 200-220 °C (392-428 °F) is a good temperature to start.
- Place the threaded insert on the hole. Make sure that you have done any necessary pre-drilling at this point.

- Place the tip of the soldering iron on or into the insert. As soon as the insert is hot enough, the surrounding plastic will melt.
- Press the insert in place by applying a minimal amount of force with the soldering iron. Do this until the insert is flush with the surface of the object. It is important to keep an eye on the orientation of the insert. It is easy to misalign it and end up with the thread non-perpendicular to the surface.
- Remove the soldering iron once the insert is in place. Once again, be careful not to misalign things. This easily happens by accident when the surrounding plastic is still molten and the tip of the iron catches on the threads.


The main downside of using a soldering iron to install threaded inserts is that it is difficult to properly align the inserts. Plus if the tip of the soldering iron is not clean, you can end up with solder or other debris in the threads of the insert. The next method solves these problems.
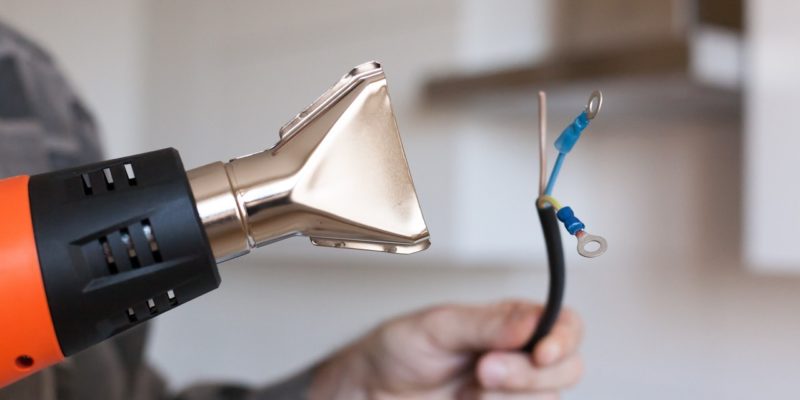
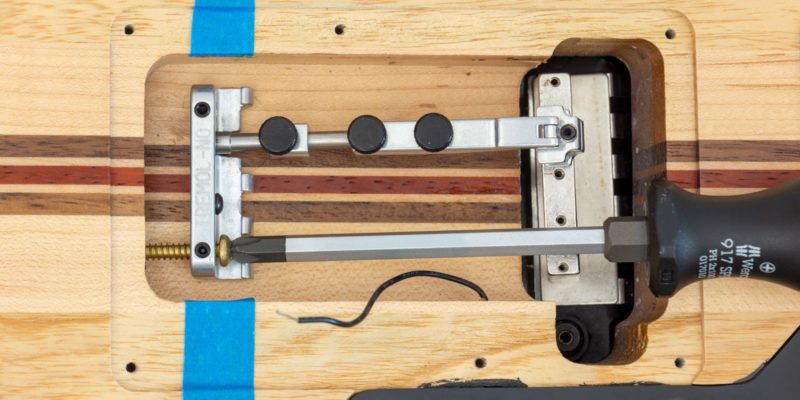
Using a Bolt and a Heat Source

By screwing a bolt into the threaded insert you can control the orientation of the insert more precisely during installation, and make sure that it is aligned properly.
With an added bolt there is more thermal mass to heat, so in order to not wait too long for things to get up to temperature it helps to use a butane torch to heat the bolt & insert, instead of a soldering iron.
- Screw the bolt into the threaded insert. This doesn’t have to be all the way, just a couple of threads deep is okay.
- Use needle-nose pliers to hold the bolt and the insert on top of the hole. If pre-drilling of the hole is required, do it before this step.
- Use your butane torch to heat up the bolt. Because the stainless steel bolt transfers heat well, it also heats up the threaded insert.
- When the brass insert is hot enough (once the surrounding plastic softens), gently press the bolt down to install the insert. Continue until it is flush with the surface. You can use the bolt to check and correct the alignment of the insert.

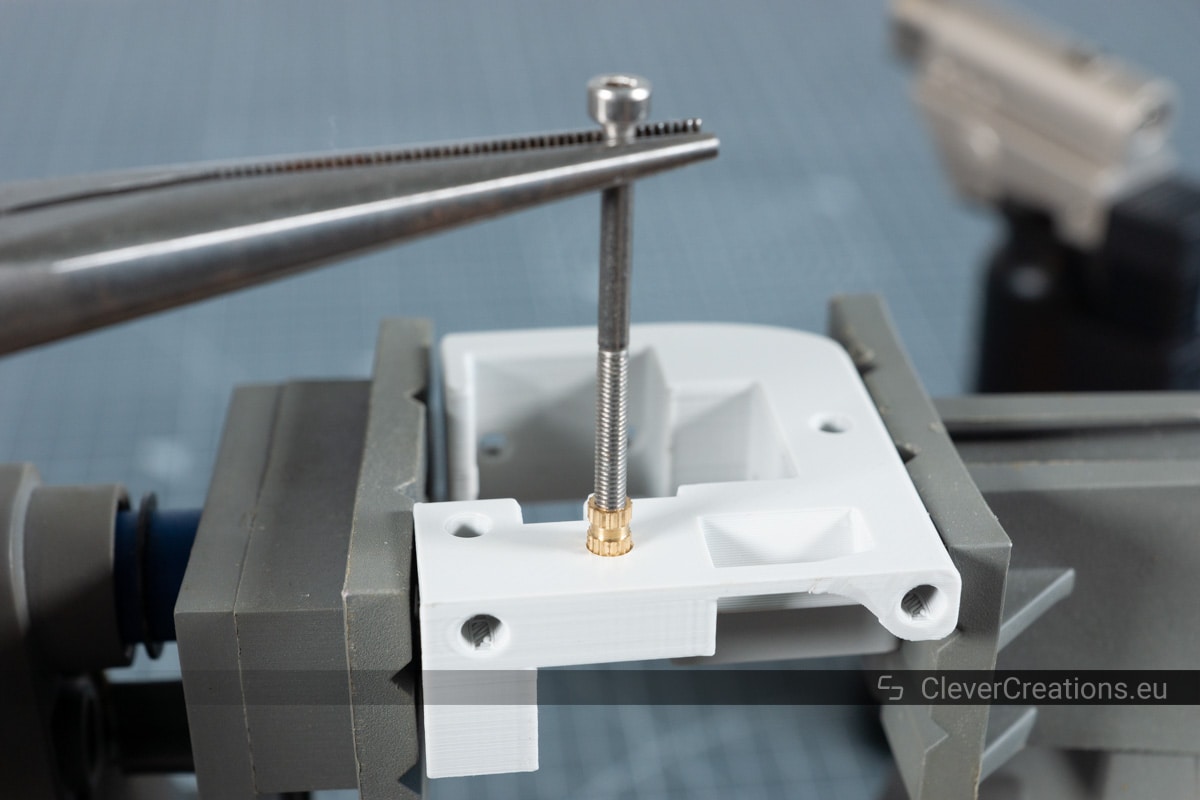
- Unscrew the bolt and wait for the area to cool down. If you want the plastic to cool down more quickly, you can use canned air to speed up the process.
Cold Methods
Aside from heat-setting threaded inserts, it is also possible to install when without heat. This doesn’t create as good of a bond as when working with heat, because the plastic does not reflow around the knurling.
This method still provides great strength when the insert is located on the opposite side of the part, as it will only deal with pull-through forces as opposed to pull-out forces. The process without heat is also a lot faster.
There are multiple ways to install threaded inserts without heat:
Tapping Threaded Inserts In
|
|
Tools | ||
|---|---|---|---|

|
Check Price | ||
Tapping threaded inserts in is fairly straightforward:
- Screw a bolt into the threaded insert.
- Align the insert with the hole.
- Carefully tap the insert with a hammer until it is flush with the surface. Adjust the orientation of the bolt when necessary to make sure that the insert remains properly aligned.
- Unscrew the bolt.
Using a Drill Press
|
|
Tools | ||
|---|---|---|---|

|
Check Price | ||
You can also use a drill press to press the threaded insert into the hole. This is an efficient method that gives you precise control and lets you install many inserts in little time.
- Place the 3d printed part on the drill press table.
- Screw a bolt into the threaded insert.
- Place the insert on the hole.
- Gently lower the drill press chuck onto the bolt head and keep lowering it until the insert is flush with the surface of the object.
- Lift the chuck and unscrew the bolt.
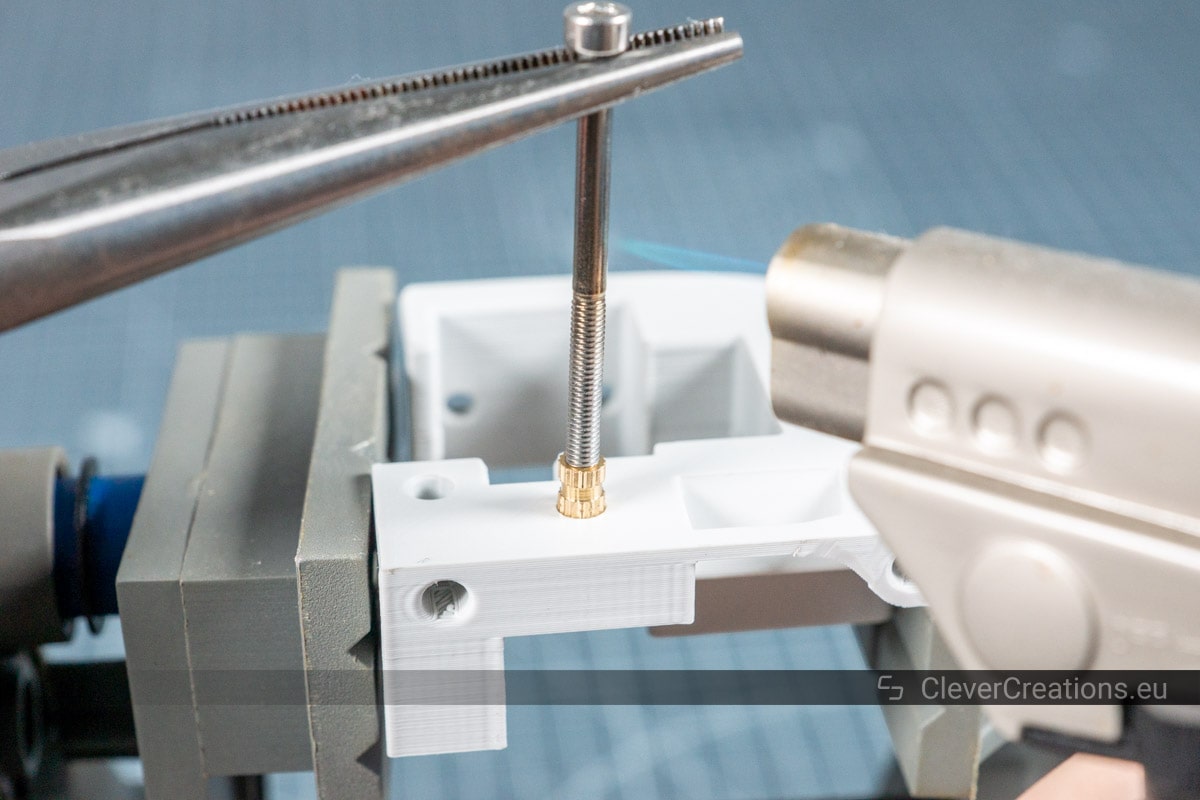
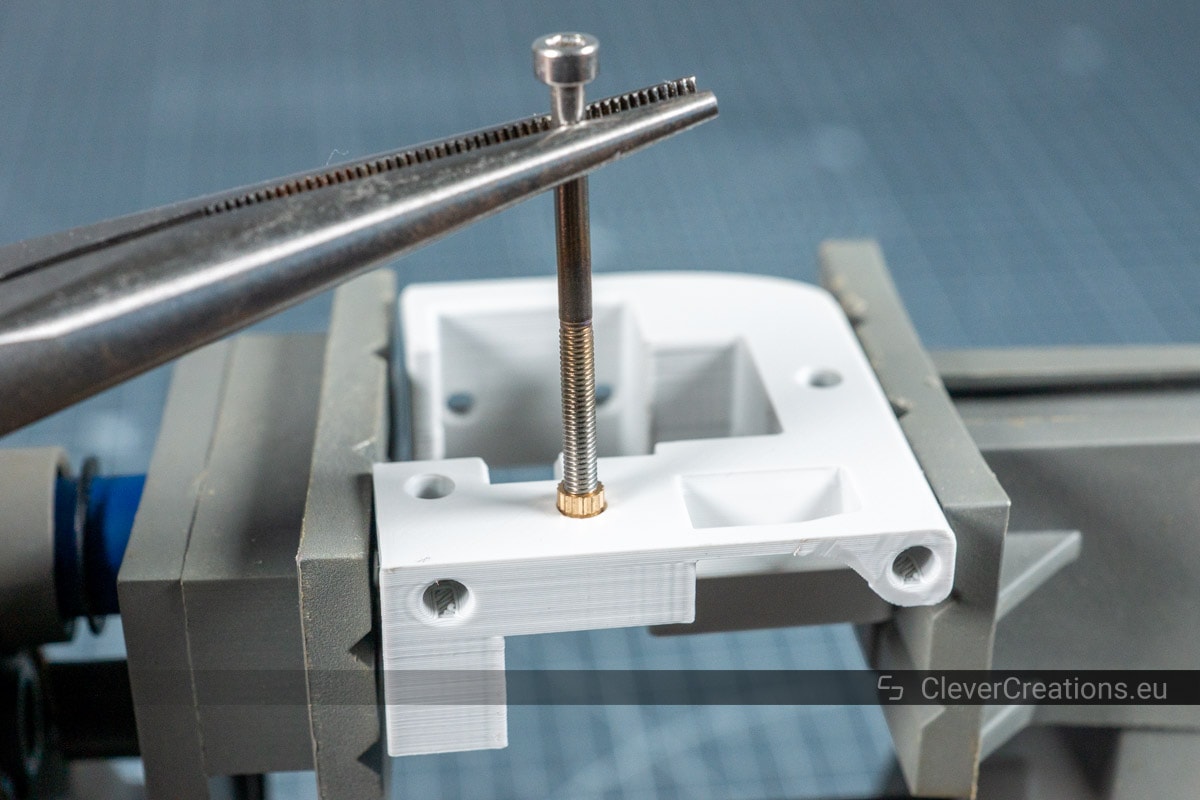
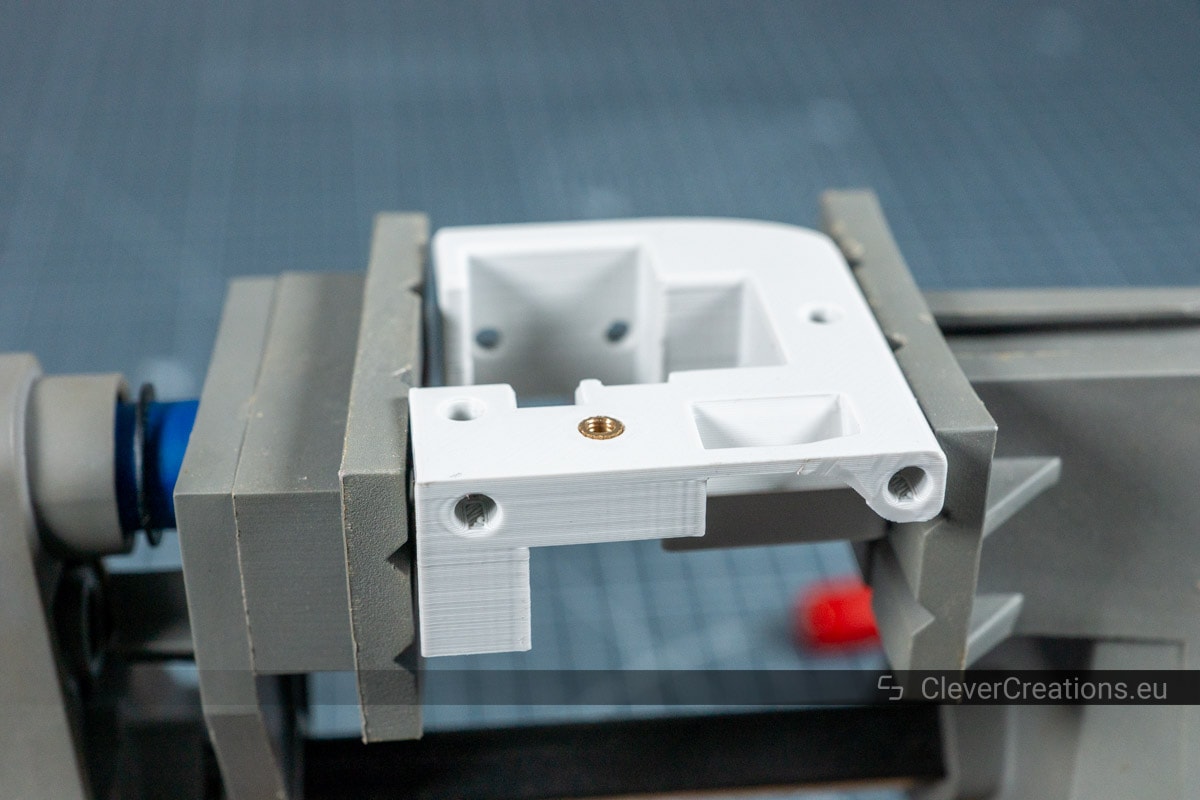
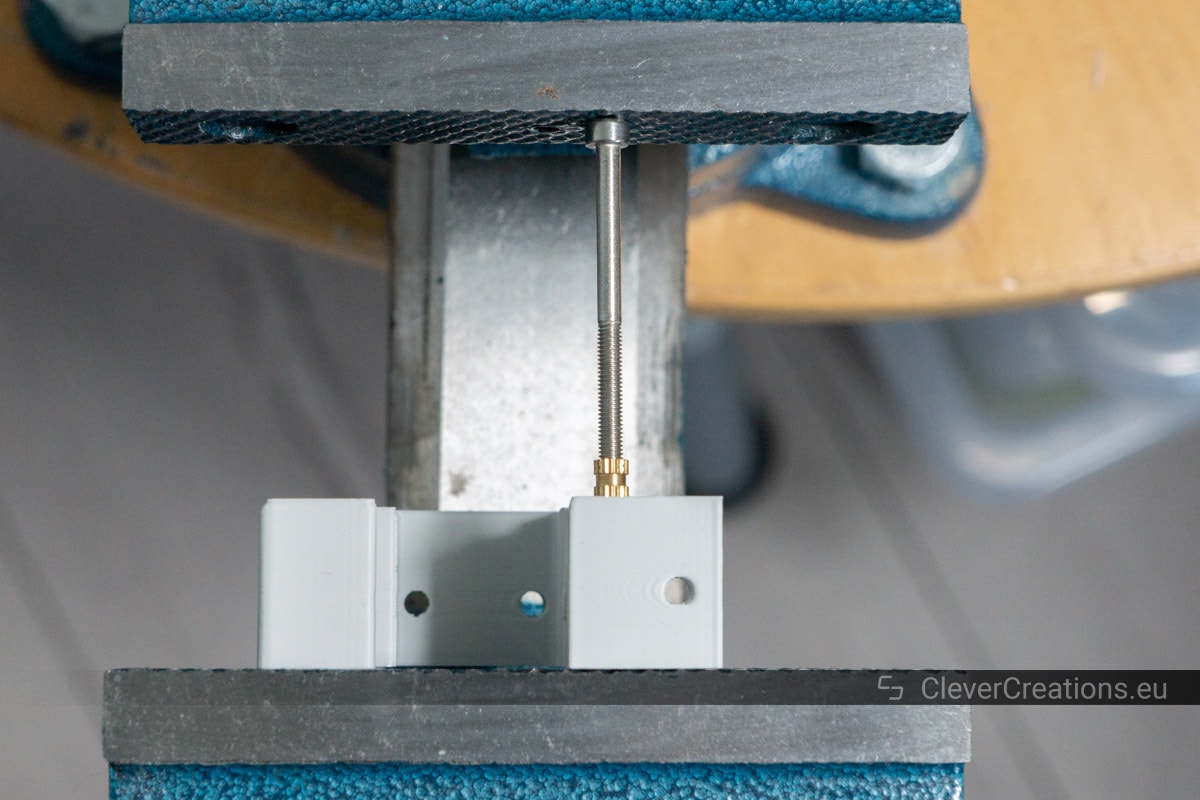
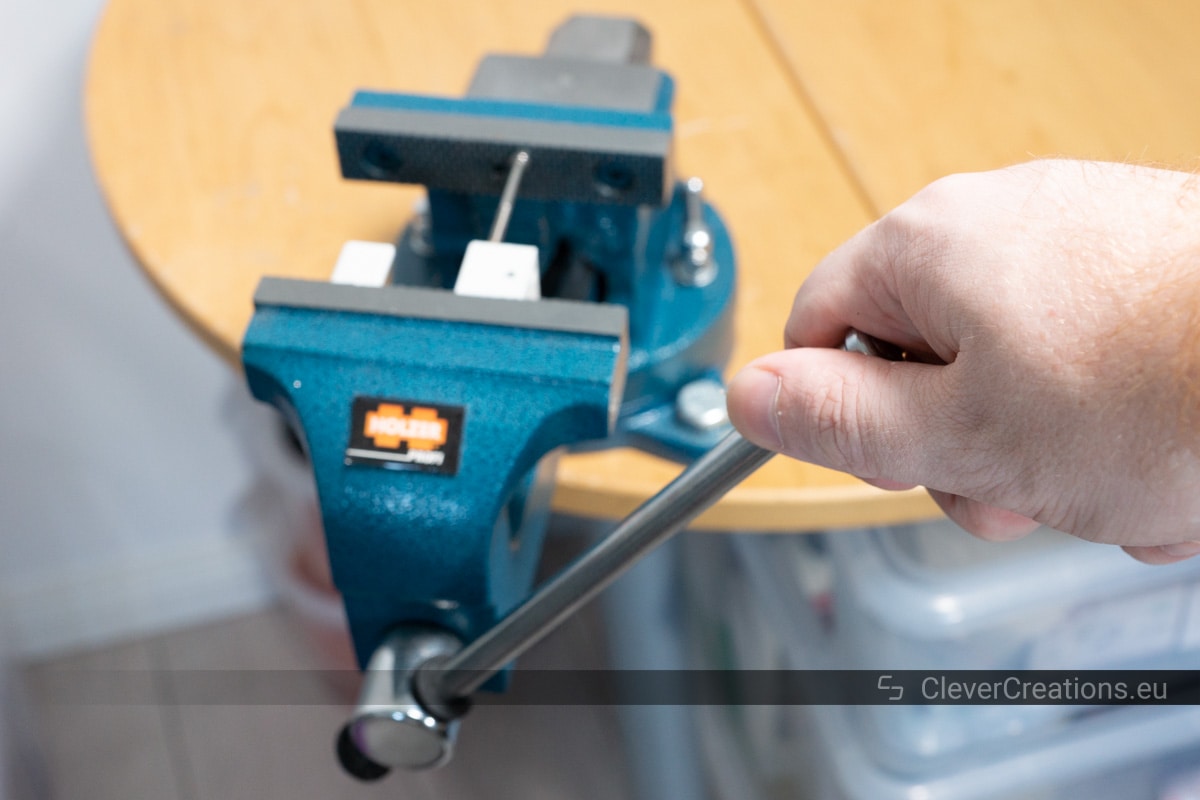
Using a Vise
|
|
Tools | ||
|---|---|---|---|
|
Check Price | ||
Using a vise to press the brass insert in works too. It takes more time to set up than when using a drill press and it is a bit harder to align the insert, but it still works. I would not recommend it for production runs though.
- Screw a bolt into the threaded insert.
- Line the insert up with the hole and place the assembly in the vise jaws.
- Use the handle of the vise to close the jaws.
- Once the insert is flush with the surface, stop closing the jaws and unscrew the bolt from the insert.

Conclusion
Threaded inserts are a great way to add strong and long-lasting threads to your plastic 3D printed parts. There are various ways to use them in your parts, and various methods that you can use to install them. They are not only great for one-off parts, but are also suitable for small production runs.
You learned:
- What threaded inserts are and when to use them.
- How to design for threaded inserts.
- How to install threaded inserts in 3D printed parts using various methods.

Great article, very detailed. Thank you for sharing.
Hello Tim, I intend to use inserts that mount mechanically. Do you have experience with this type of insert? Can I send you a picture of this insert?
Regards,
Gert