
Sometimes, you just need a dash of color in your 3D prints. Other times, maybe you want to mix and match two different materials in a single print. Changing filament mid-print can add a whole new dimension to your 3D-printed models.
Cura makes it simple by giving you tools using which you can change filament mid-print. In this article, we will explain how to make mid-print filament changes in Cura and elaborate on the settings you need.
Ready to unlock a world of creative possibilities? Let’s discover the art of blending colors and materials with the Cura filament change feature.
Why Change Filament Mid-Print?

Before we delve into how to change filament mid-print in Cura, it’s essential to understand why it can be useful. Let’s take an example to illustrate this point.
Suppose you want to 3D print a QR code. For the best results, QR codes use contrasting colors that make it easier for the phone camera to differentiate between the background and the square matrix.
However, if you were to 3D print the QR code with a single filament color, the camera would most likely be unable to recognize the pattern, rendering the print useless.
On the other hand, a QR code with a white background and a black pattern would work correctly. This is where changing to a new filament mid-print comes in handy.
Instead of printing the pattern and background separately in two colors, you can easily print them in a single process. This saves you time and effort and also gives your prints a more uniform look.
This is just one example. By changing filaments mid-print, you can also combine materials like PLA and TPU for improved characteristics. You could also use the color change to highlight a particular part of your 3D print. The possibilities are endless.
How Do You Change Filaments at Layers in Cura?
Now that you have all sorts of creative ideas popping in your head, let’s begin changing filaments in Cura.
For easy understanding, we will use the previous QR code as an example. The steps apply to any 3D model, however. If you want to follow along, you can quickly create an STL QR code using this website.
Step 1: Load and Slice the Model
The first step is to use Cura to slice the 3D model. Aside from the layer height, the exact print settings don’t matter much at this point. We’ll just use the sliced 3D model to figure out the correct layer where you want the change in filament to happen.
Step 2: Determine the Filament Change Height
Open the preview mode in Cura and set the color scheme to line type. Use the layer height slider to pinpoint the exact layer where you want to change to the new filament.
In the above QR code example, you can observe that the pattern starts printing at layer number 16. The filament change needs to occur before the nozzle starts printing this layer.
Step 3: Add the Filament Change Script in Cura
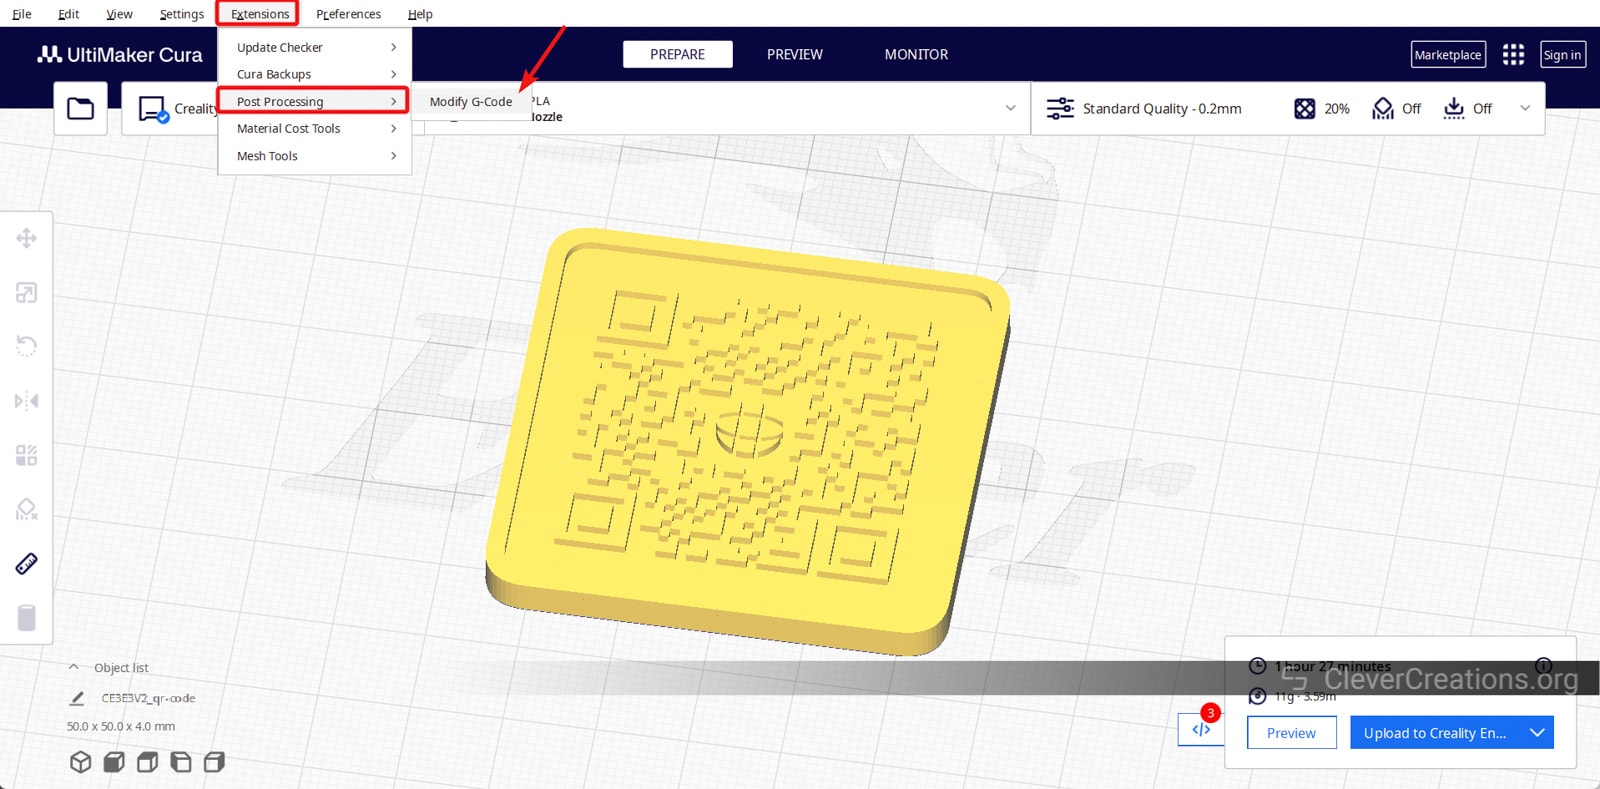
To add the filament change post-processing script, first click on the Extensions tab in the Menu bar at the top. Then however over the Post-processing option and click on the Modify G-code option. This feature gives you a set of predefined custom G-code commands that you can add to your 3D print.
Step 4: Adjust the Settings
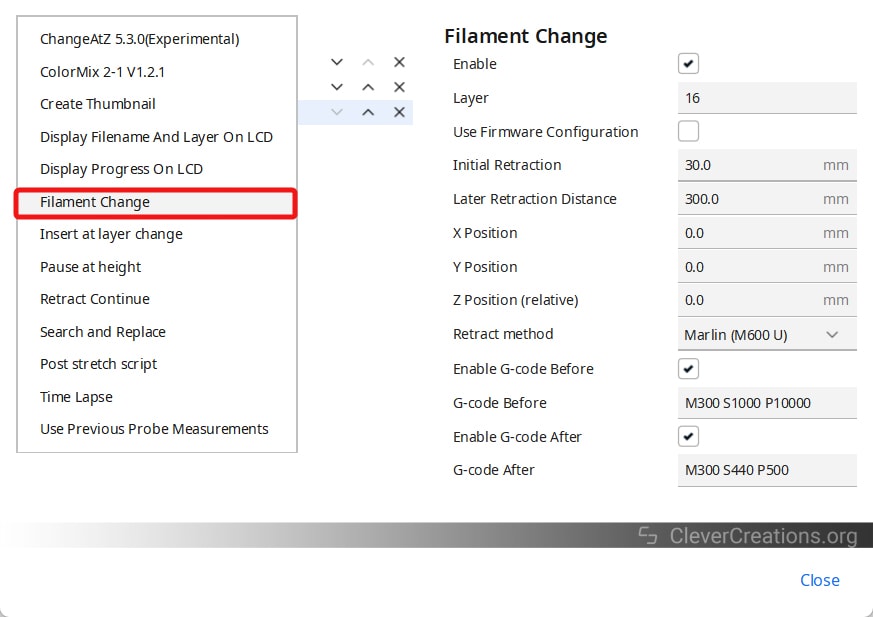
In the menu tab that opens, click on Add a Script and Select the Filament change option. This will open up a settings tab where you can configure the filament change settings of the post-processing script.
This step is the most crucial one. The script settings here determine how effective changing filament mid-print will be for your models. Let’s quickly go over each setting.
Layer

The ‘Layer’ parameter determines the layer number before which the filament change will take place. In our case, we’ll input the layer number as 16. You can also add multiple filament changes in a single print by adding commas between the different layer numbers.
Use Firmware Configuration

A few 3D printer firmware have predefined settings for filament change.
If you enable this option, you’ll notice the retraction distance and XY position settings disappear. Because the 3D printer will now use the process set in its firmware configuration.
If you’re unsure about this option, it’s best to leave the box unchecked.
Initial Retraction

The ‘Initial Retraction’ setting indicates the distance by which the old filament retracts from the nozzle. The retraction will occur before the print head moves to a park position.
A higher retraction value reduces the chances of any blobs or unnecessary filament oozing onto your 3D prints. The default value works fine for most 3D printer extruder configurations.
Later Retraction Distance
The ‘Later Retraction’ option specifies how far you want to completely retract the old filament out from the printer. Ideally, the distance should be from your nozzle end to the extruder exit.
This value will vary based on your printer’s configuration. Bowden printers will have longer distances, while direct extruders will have shorter ones. Use the default value for now; you can adjust it later with a more accurate distance if necessary.
X-Y Positions

Using the X and Y position settings, you can set the exact position of the hot end when you want to change filaments. This XY position is the “park position” of your print head.
The 0,0 position is a good option for most 3D printers. This is typically the front left point of the print bed. Here, the print head is far away from the 3D print, and you limit the chances of bumping into the print.
Z Position (relative)
The Z-position is set relative to the paused layer height. If you set this value to 1 mm, the print head will move 1 mm above the current printing layer.
This setting can reduce blobs and ooze, but the default 0 value works well, too. Try the default setting first and increase the distance by 2 to 3 layer heights if necessary.
Retract Method
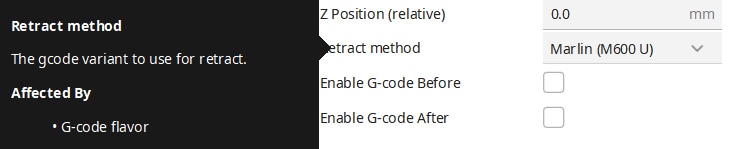
The ‘Retract Method’ option sets the G-code command based on your 3D printer firmware. Select the Marlin option if you’re running Marlin firmware and RepRap if you’re running RepRap firmware.
Enable G-code After/Before
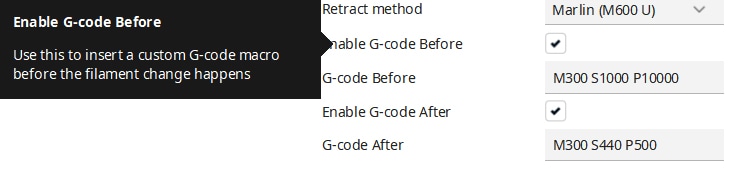
Using this setting, you can add custom G-code macros before and after the filament change happens.
By default, Cura gives you the option to sound the beeper (if your 3D printer has one) before the filament change occurs and to purge the material once you load the new material.
It’s an optional setting that can be useful if you don’t want to continuously monitor your 3D printer for the filament change moment. If you know how to write code or find a script, you can also use it in combination with a RasPi to give you a notification (email, SMS, etc.) when you need to insert the new filament.
Once you’re finished setting everything, close the script window.
Step 5: Reslice the Model
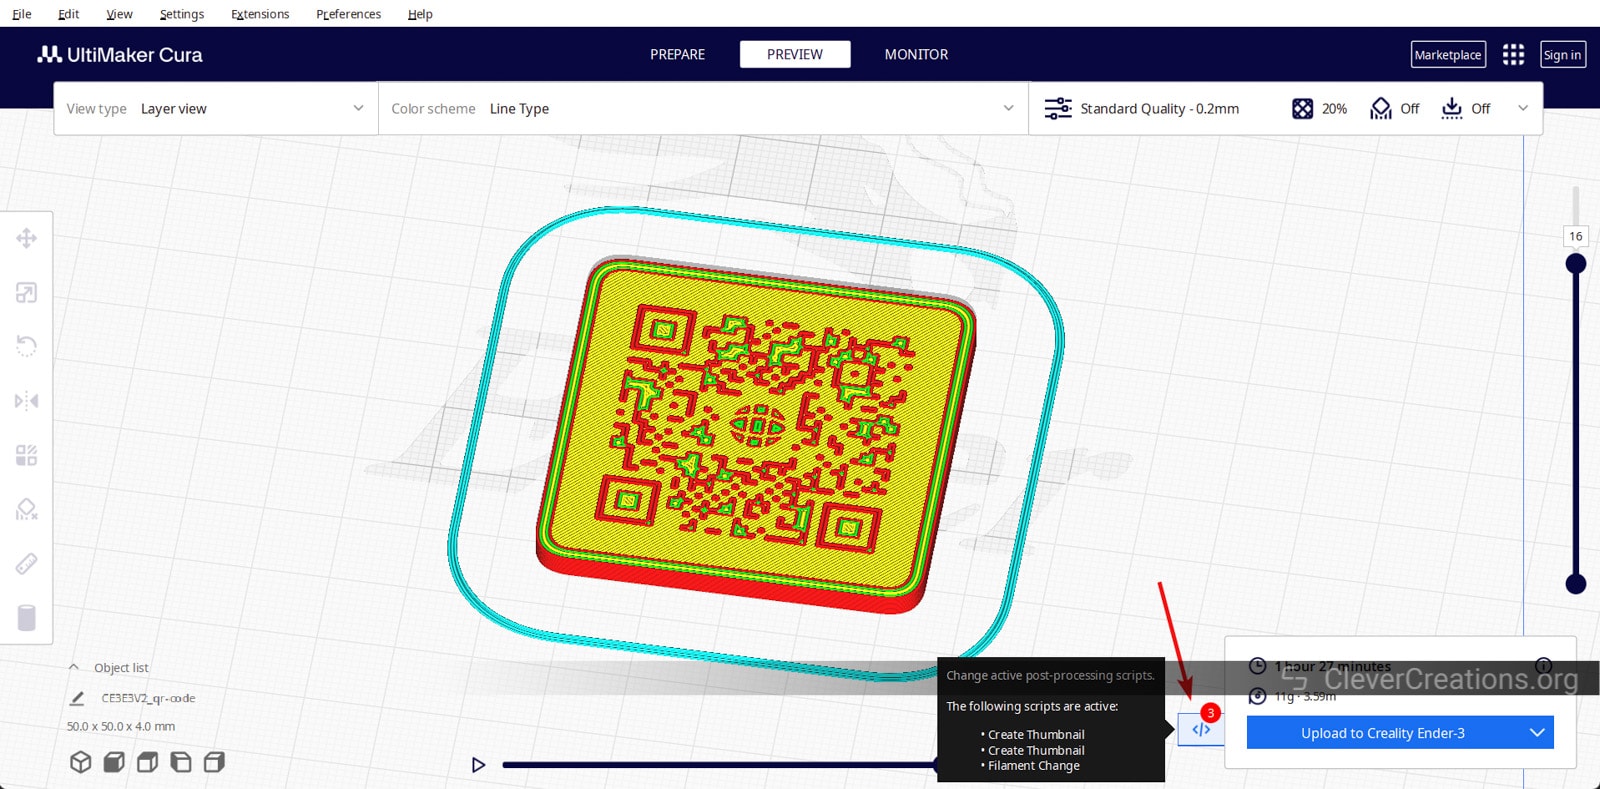
Slice the model again with the same layer height and optimal print settings. You’ll notice a Symbol next to the print time window at the bottom. This highlights the filament change script that you’re using in the model.
That’s it. When you print the file, the printer will pause at height of the specific layer(s) you set so you can swap filament.
What Is the G-code for Filament Change at Layer?
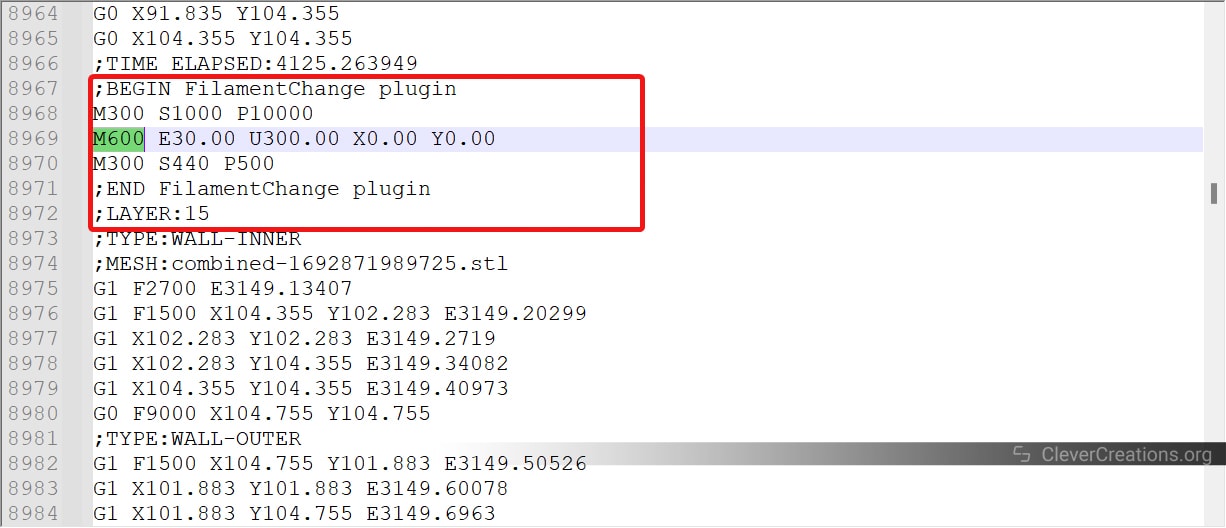
M600 is the G-code that initiates the filament change process as the model prints. This command pauses the printer, retracts the filament, moves the nozzle to a park position, and waits for you to load the new material.
When you open up the sliced G-code file in a Text editor, search for M600. You’ll notice it shows up one layer before what you’ve set in Cura. This is because the Gcode file starts printing from layer 0. In our case, layer #16 in Cura is layer #15 in the Gcode text.
Resolving Issues
Filament change can be a tricky procedure. A lot of small things have to go right for you to get the expected results and print quality. Let’s look at a few common issues that can arise as you change filaments mid-print.
Blobs and Zits
Blobs and zits are a result of excess material oozing out of the printer nozzle. There are two instances when a blob can occur. First is when the print pauses, and second is when you resume printing.
To prevent blobs during the pause phase, the initial retraction setting is crucial. If you observe blobs, try increasing the retraction distance a bit. This will pull back the material in the nozzle and reduce the likelihood of extra filament oozing onto the print.
However, if you notice a blob after the print resumes, make sure that the printer completely extrudes the material before it begins printing. There should be no excess filament oozing out of the nozzle after the extrusion process is complete.
Print not Sticking to Print Bed
When swapping out filaments, it’s important to be aware that your print bed may cool down. This could be due to faulty scripts or a firmware issue. If the print bed cools down while printing, it could cause adhesion loss or warping in the initial layer of your print.
To prevent this, it’s recommended to always keep the heated bed on when changing filaments. Keep an eye on the print bed temperature as you carry out the filament swap and ensure that it remains heated and maintains a constant temperature. If it doesn’t, find what is causing this in the slicing or 3D printer firmware settings.
Poor Layer Adhesion
When your printer pauses to change filament, the previous layer cools down. As a result, there may be poor adhesion between the two layers when the print head starts extruding the new filament on the cool layer. This can result in failed prints, gaps, or even complete print failure.
To avoid this issue, it is best to print the new filament at a slightly higher temperature. This will cause the last layer to melt a bit, improving the adhesion between the two filaments.
This is especially important when using different materials. For example, if you are switching from ABS to PLA, you should keep the PLA print temperature close to the ABS print temperatures. This will result in stronger and better layer adhesion between the two materials.
Layer Shifting in X and Y Direction
If you accidentally move the print bed or hot end, it can cause layer shifts. This will knock the stepper motors from their parked position, and the printer won’t know where the new position of the print head is.
When the printer resumes printing, it will assume the print is in the same position as before. To prevent this, avoid touching the print head or bed while changing filament mid-print.
If a layer shift occurs, it’s often a good idea to restart the print. You can also try homing the X- and Y-axis before resuming the print. This does not work with all 3D printers and also isn’t guaranteed to give perfect alignment of the new filament with the last layer. Given that the alternative is starting over, you have nothing to lose by trying.
Conclusion: How Hard Is Changing Filament Mid Print with Cura?
As you can see, it’s relatively simple to change add Cura filament change to your workflow. All you do is include a G-code script for post-processing, adjust the settings, and hit the print button. Then you just wait for the correct layer to swap to the new filament.
Use this guide as your instruction manual, follow the steps meticulously, and let your creativity flow. Try experimenting with multi-material prints, vibrant color transitions, and intricate designs. There’s no limit to how often you can change filament mid-print!
If you found this post to be useful, please leave a comment below. In case we overlooked something or if there’s anything else you would like to know about doing a filament swap in Cura, let us know in the comments.

The Cura filament change instructions you provided are so well defined and easy to follow. Thank you so much!
I have a Monoprice MP10. I followed these instructions, but it appears that it doesn’t want to restart after the filament change. There is no option in the display for “print” to restart. Any ideas on this problem? Thanks for your help.