If you work in engineering or the automotive industry, do your own maintenance or use the repair guides on this site, you might have come across the term “witness mark” before.
In this article, I will explain what they are, why you might want to use witness marks, and show you the best tools to make them with.
What is a Witness Mark?
A witness mark is a scratch or other mark that is used to position a part in its correct location. Typically, two parts in an assembly each have their own witness mark. When these marks are lined up, it tells you that everything is in the right position.

Some people consider any physical evidence of how pieces are supposed to fit together a witness mark. For example, impressions or scratches made by components when they were assembled, or discolorations that formed over time.
Most commonly, however, a witness mark refers to a mark that has been intentionally made. This is definition I will be using for the rest of this article.
You might also see witness marks referred to as matchmarks, registration marks and indexing marks.
Why Use Witness Marks?
Witness marks are typically used to reassemble things exactly as they are meant to be, or as a monitoring tool to check whether a fastener has come loose over time due to vibrations.
Accurate Reassembly
When reassembling devices, for example after repairing them, witness marks tell you exactly how components were positioned when you took the device apart.
Usually you make witness marks yourself during disassembly on the components that are important to the overall functioning of the device. Sometimes, however, parts come with witness marks that were made in the factory or during manufacturing or quality control.
Lining up the sets of matchmarks on the various components makes sure that everything is able to function exactly as intended. This prevents inserting a component in the wrong orientation or alignment, which often creates bigger problems than whatever you were fixing in the first place.
Torque Monitoring
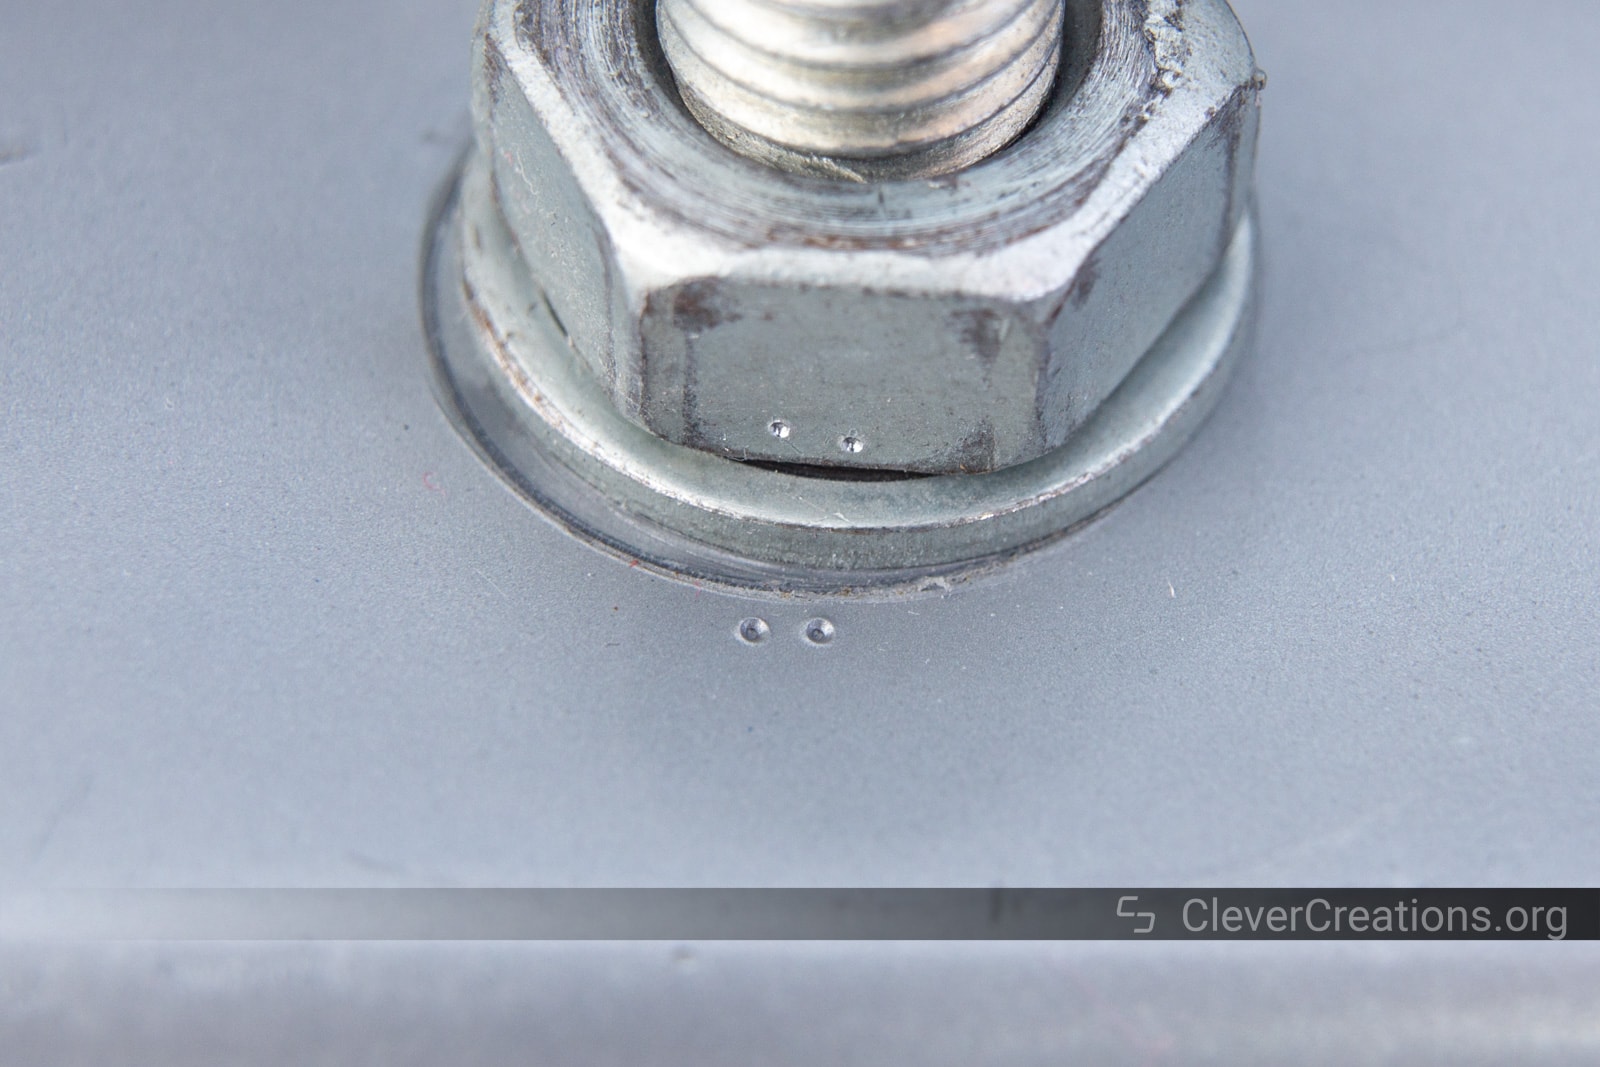
Other situations in which witness marks are useful is when dealing with bolts or screws that need to be tightened to a specific torque (rotational force). An extra quarter turn of rotation can make a big difference in certain applications.
Unlike the previous example, here you make the witness mark during assembly instead of disassembly. Usually after you tighten a bolt or screw to its torque specification with a torque wrench.

If the next time you check the bolt, the witness mark has moved, then know that torque on the bolt is incorrect and needs to be corrected.

Fasteners (and their witness marks) typically move because they loosen up over time, and not because they tighten further. This can happen because of vibrations, tampering, or when components settle after installation.
In this context, witness marks are also referred to as torque striping.
When to Use Witness Marks
Witness marks for reassembly are important when working on complex devices that involve a lot of precision. For example, things with optical elements (e.g. microscopes, camera lenses, rifle scopes), devices with small components (e.g. clocks, watches), and lathes and mills that need to be perfectly realigned after maintenance.
When repairing items that are imprecise and uncomplicated, there is typically no need to mark anything.
Witness marks for torque monitoring should be used on anything that you are worried about moving. Here you can think about bolts and nuts of engines, brake systems, clamps, etc. Basically any critical component on potentially dangerous equipment like mountain bikes, motorcycles, cars and other machinery.
Another situation in which witness marks are useful is in plumbing. Dry fitting pipes, making sure that sections fit well together and then making witness marks is a great way to prevent alignment problems during the final gluing process.
How to Make a Witness Mark
Making witness marks is very easy. Simply make a set of aligned marks on the parts in an assembly that need to be aligned.
The best tool for witness marks depends on the components that you are dealing with.
If you have parts that stay dry and that do not see a lot of abuse, the simplest way is to use a Sharpie. Alternatively, if you want your matchmarks to have better visibility (e.g. for quick inspection), there is DYKEM’s Cross-Check Torque Seal.
No products found.
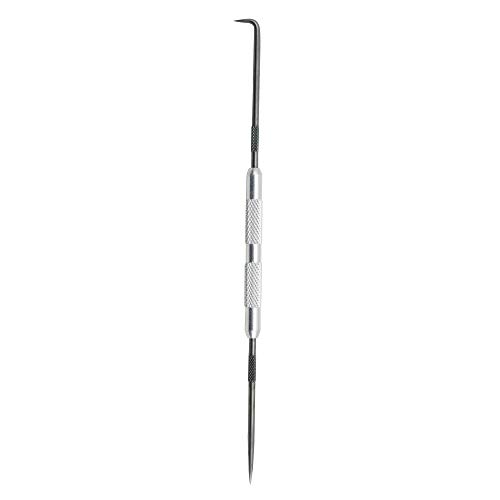
For witness marks that see a lot of oils, grease and/or abrasion, it is better to go with a different option than one based on ink, paint or lacquer. These come off too easily to be a good long term solution in those situations.
Instead, a discrete scratch or indent will work better. For these methods you can use a scriber or prick punch respectively. These are capable of leaving permanent marks on practically any material. Aside from never coming off, they also offer more precision than a marker or torque seal does.
Conclusion
Witness marks, or matchmarks, are crucial in both assembly and disassembly work. Not only do they provide an easy way to check whether fasteners and other parts have moved, they also give crucial information on how components are supposed to go back together.
You are likely to encounter or need witness marks in the automotive industry, in plumbing and in engineering. While you don’t need to make them on every single fastener you work with, it is considered good practice to do so.
There are many different tools that let you create matchmarks. For non-permanent marks you can use quality markers or cross-check torque seal. If you need something more durable/permanent, it is better to use a scriber or prick punch instead.