
- Provides clean scans without much effort
- Good accuracy for its price
- Excellent ergonomics
- Comes with quality hard-shell case
- No color scans without add-on
- Misses start/stop button on scanner body
- Occasional software crashes
The Mole is the newest 3D scanner release from 3DMakerPro. Promising accurate NIR structured light 3D scanning at a sub-$1000 price point, the Mole sounds like a great handheld scanner on a budget.
In this 3DMakerPro Mole review, we will put the device through its paces. We’ll look at the hardware, software, and compare it to other 3D scanners in its price range to see if it is worth your money.
By the end, you’ll know exactly whether this is the right 3D scanner for you.
Let’s get scanning!
3DMakerPro Mole Specs
| 3DMakerPro Mole Specifications | |
|---|---|
| Price | 3DMakerPro |
| Light Source | Near infrared (NIR) |
| Accuracy | 0.05 mm |
| Resolution | 0.1 mm |
| Minimum Scan Volume | 15 x 15 x 15 mm |
| Single Capture Range | 200 x 100 mm |
| Work Distance | 150 – 400 mm |
| Framerate | 10 fps |
| Color Capture | With accessory |
| Output Formats | OBJ, STL, PLY |
| Weight | 380 grams |
Unboxing the Mole 3D Scanner

The first thing you’ll notice when unboxing the 3DMakerPro Mole 3D scanner is that it comes in a rigid Pelican-style case. Inside, the scanner and its accessories are well-protected by a layer of dense foam that is custom-cut for the Mole.
Aside from ensuring that the Mole doesn’t get damaged when you transport it, the hard-shell case also gives an impressive feel and sense of quality to the entire package.
One thing to note is that the inner foam has a strong chemical smell to it. It’s similar to the smell of some memory foam mattresses. It’s not a pleasant smell to be around, but it fades over time.
Inside the case, you’ll find the following:
- 3DMakerPro Mole 3D scanner
- Tripod
- Turntable
- USB stick
- All required cables and adapters
With our version of the Mole, there was no physical manual included. There was a digital version included on the USB stick, however.
The USB stick also comes with the required JMStudio 3D scanning software, a manual for that software, and a calibration file for the individual Mole scanner that you have. Once you load that file in the software, the Mole is properly calibrated and ready to scan right.
Unlike Revopoint’s 3D scanners, there’s no small object included that you can use to start scanning. It’s not a huge deal, but it’s always nice to have a specific object that can be used repeatedly over time to check the performance of the scanner.

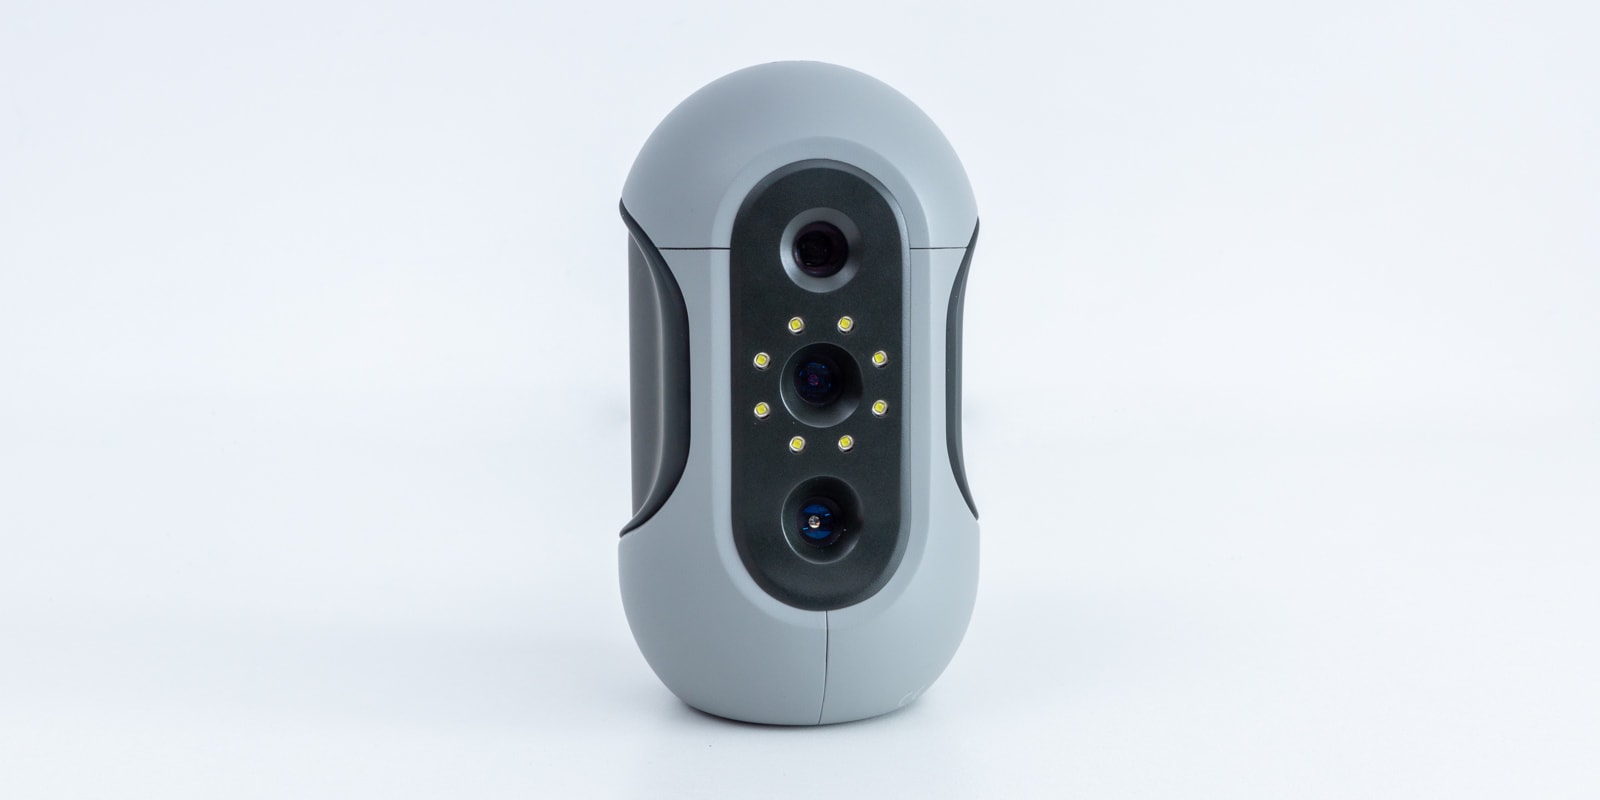
3DMakerPro Mole Features
The 3DMakerPro Mole boasts a couple of features that distinguish it from other scanners in its class. We’ll go over them quickly with some of our thoughts and experience.
High Precision Scanning

First and foremost, the Mole claims to have a 0.05 mm scan accuracy with a 0.1 mm resolution. If you are anything like us, those numbers may not mean a whole lot to you.
In addition, it’s easy for companies to overstate these claims. Plus these single scan accuracy numbers rarely provide the whole picture. So we prefer to take them with a grain of salt and rely on our hands-on experience.
So how did the Mole perform? We scanned several objects (that you can find below), and we found that the scanning accuracy was quite good.
For comparison, the accuracy of the 3DMakerPro Mole about the same that of the Revopoint POP 2 ($699) but worse than the Shining3D Einscan SP ($2200). Considering that the Mole is cheaper than the POP 2, that’s not a bad first impression.
We should point out that you will be able to get more precision with blue light scanners, like the Revopoint MINI. But because those are designed mostly for capturing small objects, they don’t make for a fair comparison.
It won’t surprise us if 3DMakerPro brings out its own blue light scanner for small objects in the future. When that happens, we’ll be sure to compare it to the Mole and other blue light scanners in its price range.
In practice, you’ll find that the Mole works best for medium-sized objects. Here you can think of vases, shoes, mugs, and items of a similar size.
For things like jewelry making, we would not recommend it. Its accuracy, resolution, and 15 x 15 x 15 mm minimum scan volume are not small enough for that type of work.
Markerless Scanning
The 3DMakerPro Mole is the first scanner that we’ve come across with ‘AI visual tracking’. It means that the scanner can scan without using markers.
Because the ‘AI’ moniker is slapped on everything nowadays, we suspect that this feature is just an algorithm that cleverly aligns the captured data within the 3D scanning software.
It seems to be the same markerless scanning technology that is featured on 3DMakerPro’s higher-end Whale 3D scanner, as well as the recent 3DMakerPro Lynx we reviewed. Even though that scanner is more geared towards large objects, the same principles (and algorithms) apply.
In our testing, the markerless scanning worked relatively well. That said, you should not expect wonders from it.
On featureless objects or objects with many repeating features, you will run into the same problems that you have with any other 3D scanner if you don’t use markers.
You’ll also need to use roughly the same object preparation methods as you usually would. Transparent objects or reflective surfaces won’t scan well unless you use 3D scanning spray.
Being a near-infrared scanner, the 3DMakerPro Mole will do better at 3D scanning in daylight than other, non-IR 3D scanners. It’s not a feature that most users need on a regular basis, but it’s still nice to have.
Easy to Use Software

3DMakerPro includes the JMStudio software to capture scans with the Mole. It’s a software package that handles the whole pipeline. From 3D scanning to converting point clouds, to generating and exporting 3D meshes.
This stands in contrast with Revopoint’s software, which consists of multiple separate programs. We prefer the single-program approach, as it makes the overall experience much more streamlined.
Because the software is such a big part of a 3D scanner’s experience, we have a separate section below that dives deeper into the JMStudio software.
There’s stuff we like about it, but also things that need to be improved, so we recommend reading that section if you’re interested in buying the Mole.
Color Textures*
The 3DMakerPro Mole is capable of capturing color textures, but only in combination with the ColorKit accessory. It’s the same accessory that is included with the high-end package of the CR-Scan Lizard 3D scanner.
It works by connecting a DSLR camera that captures data alongside the scanner. The camera takes pictures from multiple angles that are then combined with the 3D scan data to create a textured 3D model.
Without using the ColorKit, you can only create grayscale 3D models without any color.

If you mostly want to create STLs for 3D printing, that’s not an issue. But for other purposes that require full-color scans, you’ll need to invest in the ColorKit. And a DSLR camera, if you don’t have one.
The Revopoint POP 2 comes with built-in color capture functionality, which is one of the few advantages of the POP 2 over the 3DMakerPro Mole we could find. In most other aspects, the Mole comes out on top.
Since we didn’t have access to the ColorKit accessory, we haven’t tested its performance. The idea behind it is solid, however.
Handheld Stabilizer
The retail version of the Mole 3D scanner comes with a handheld stabilizer called the 3DMakerPro connect. Its main idea seems to be to provide an option for you to scan without being connected to a PC.
It does this by letting you connect the Mole to your phone and powering the scanner from a battery pack. It’s similar functionality to what you get with the Revopoint POP 2 and POP Mini.
If it does what it claims, then it is a great feature to have. Especially when 3D scanning larger objects, not being tethered to a PC can make a huge difference in user-friendliness.
Because we tested a pre-release version of the Mole, this feature is also something we haven’t tested. We might at a later point, at which point we’ll update this review.
Scanning with the 3DMakerPro Mole
As is typical with these types of 3D scanners, there are two ways you can go about scanning with the 3DMakerPro Mole. For smaller objects, it’s best to use the included turntable. This lets you capture the smallest details without being affected by the movement of the 3D scanner itself.
For large objects, you can scan them in freehand mode. This is also where the Mole’s ‘AI’ alignment feature will come in the handiest.
The two methods have some distinct differences in workflow, so let’s go over them separately.
Turntable Mode
The turntable method is labeled in JMStudio as ‘Table Scan’. It works a bit differently than turntable scanning in other 3D scanning software.
Preparation
The first step is to place your object in the center of the turntable. Then, you orient the scanner so that it is positioned in the right position and at the correct distance from the object.

So far, this is all fairly standard.
Next, however, you are prompted to remove the object from the turntable and have the software ‘initialize’. This basically is a step that captures the empty turntable so that it can be subtracted from all other frames later.

This stands in contrast with most other 3D scanner software, whose first step is typically scanning the object while it is still on the turntable.
We think this might have to do with the platform of the Mole turntable. With most other 3D scanners, this is a black platform with high-contrast tracking dots.
On the 3DMakerPro Mole, the turntable has a grayish platform with a couple of lighter metallic letters. Perhaps this is more difficult for the software to accurately detect this with an object on the turntable, hence the extra initialization step.

Scanning
In any case, once you have completed the initialization, you can put your object back on the turntable and start capturing 3D scan data. You do this by clicking on the ‘Scan’ button.

When the software has captured 320 frames (one full revolution of the turntable), the software automatically stops capturing.
We like this approach, as it prevents capturing additional unnecessary data. This doesn’t only waste disk space, but the extra data also can throw off the final results. In 3D scanning, more data isn’t always better.
Shining3D’s desktop 3D scanners have the same approach. There, the turntable is digitally controlled and stops automatically after a full rotation is captured.
In contrast, Revopoint’s software just keeps scanning forever unless you manually stop it. This can be frustrating to have to pay attention to. We prefer the more user-friendly approach of the Mole 3D scanner.
Aligning
Once you have re-oriented your object and captured different angles of your object, you are left with multiple point clouds that you need to align.

Just like most other 3D scanner software, there are two options for aligning point clouds—automatic and manual.
We found the automatic mode to work well enough on most things we scanned. Exceptions were objects with many repeating or indistinguishable features.
It’s common for stitching algorithms to have trouble with these types of surfaces, but we were hoping for a bit better from JMStudio. Because the Mole brags about markerless scanning, you expect it to do better in recognizing and aligning these types of objects.
Processing
Once you are done aligning, you are left with a single point cloud that needs to be converted to a 3D mesh.

As you can see above, the point cloud contains several purple planes. These are the detected turntable surfaces from the various scans and will be automatically removed once you create the mesh.
There are only a couple of settings for creating the mesh, but we believe it to be the right amount for the type of user that will be using the Mole 3D scanner.
In contrast, Revopoint’s mesh processing comes with a variety of ambiguously labeled sliders and settings. These can be unclear and confusing for people who are just getting into 3D scanning.
Once you convert the point cloud, you are left with a clean mesh that you can export in OBJ, STL, and PLY formats for 3D printing or other uses.

Something that is immediately clear after processing is that the 3DMakerPro Mole and JMStudio software provide clean scans. You aren’t left with many floating artifacts, the surfaces are clean, and there’s usually nothing to clean anything up in the final 3D mesh.
Another thing that stood out to us was that the meshes often had more detail than the point clouds suggested. There were a couple of instances where the mesh displayed details that we assumed were not captured based on the point clouds.
Handheld Mode
The other way to scan with the 3DMakerPro Mole is to scan by hand. Or as it is labeled in the software, ‘Easy Scan’ mode.
It’s a lot simpler than using the turntable, and aside from setting the correct brightness, scan quality, and scan mode, it’s pretty much point-and-shoot. As long as you move the scanner slowly and keep it at the right distance, that is.
This mode is most useful for objects that can’t be moved or are too large to fit on the turntable. Whenever possible, use the turntable mode. It’s faster, more accurate, and requires less physical effort.
Software
A 3D scanner is only as good as its software, so it’s worth looking at the JMStudio software in more depth.
We will address the details in separate sections below, but the general sense of the software is that it is good enough for what it needs to do.
The documentation is a bit limited, however, and both the manual and interface have several typos and unclear translations. But once you get the hang of it, it is straightforward to use.
Performance
Performance-wise, JMStudio is on-par with its system requirements. For example, the recommended 16 GB ram will be sufficient. Even our most complex scans didn’t exceed 10 GB.
On the CPU side, you’ll benefit from a powerful multi-core processor. We regularly maxed out our Ryzen 9 3900x during processing and texture mapping. The latter step required lots of patience as well.
Overall, however, you won’t need a high-end workstation to use the 3DMakerPro Mole and JMStudio software. It’s very capable of running on mid-range hardware.
For comparison, the same can’t be said for the software of the Shining3D Einstar that we recently reviewed. There, we repeatedly ran out of memory while using 32GB of RAM.
We’re glad that this isn’t the case with the 3DMakerPro Mole. This is mostly caused by the scanner not capturing full-color data. It makes the RAM usage that much less.
Stability
The biggest gripe we have with the JMStudio software is that it occasionally crashed on our system. For reference, we were running the latest version (v2.5.8) on an otherwise stable Windows 10 system.
It’s not clear to us whether this is a problem purely related to our setup, or if it is a more common problem with the software itself. Given that we run the 3D scanning software of many other manufacturers without problems, we’re inclined to believe it’s the latter.
The problem only occurred intermittently, and there were periods where it did not occur at all and we weren’t able to reproduce it. So all-in-all, it wasn’t that bad.
There’s also the option to recover your 3D scan project once you restart the software after a crash. So as long as you regularly save, you won’t be at risk of losing much data.

We hope that 3DMakerPro addresses any instabilities in the software going forward. In our opinion, it’s the biggest thing that can be improved about the whole package at the moment.
Calibration
Unlike the other 3D scanners we’ve tested, the 3DMakerPro Mole does not come with a calibration board. There’s also no calibration option present in its software.
Even though the device comes with a calibration file from the factory, we are not sure how that will hold up in the long term.
We can think of several situations where a recalibration is required. For example, exposure to extreme environmental conditions (humidity, temperature), and bumping or dropping the device can all lead to small misalignments.
Without a way to recalibrate the Mole 3D scanner, it’s possible that these misalignments lead to inaccurate 3D scans. There’s a good reason other manufacturers include calibration boards in their packages, and it’s not clear to us how 3DMakerPro plans to address this issue.
3D Scanning

Scanning with the 3DMakerPro Mole generally works well, but the 3D scanner seems to lose tracking quickly when moving too fast.
We believe this might be because of the 100 x 200 mm single capture range of the scanner. Its narrow width doesn’t give a lot of overlap between captures when you move the scanner fast horizontally.
When you scan an object with little detail, we recommend moving the Mole 3D scanner extra slowly. Especially around areas with sharp curves and little detail, as those are the areas that the system will have the most trouble keeping track of where it is.
Build Quality & Design
Ergonomics

The ergonomics of the 3DMakerPro Mole are something that stands out. Even when holding the device for long periods of time, there is little discomfort or strain.
The 3D scanner is contoured to fit your hand, with a rubberized grip. And at less than 400 grams (~1 lb) weight, it’s light enough to not cause fatigue quickly.
By comparison, the Shining 3D Einstar scored worse in both those categories. In fact, some of its users even went so far as to 3D print a handle to make the device more comfortable to use. There’s no such need with the Mole.
I/O & User Interface
What we do miss on the Mole 3D scanner is a button that lets us start or stop scanning. Especially when handheld scanning, it’s a hassle to have to constantly reach for the mouse to start and stop scans.
Most other 3D scanners in this class come with a physical button that allows users to interrupt the scanning process. We’d love to see the same on 3DMakerPro’s future devices.
As for the connector, the Mole features a similar self-latching connector as the aforementioned Einstar. It’s durable and unlikely to wear out in the 3D scanner’s lifetime, even if you handle the device with little care.

A notable difference is that the connector on the Mole 3D scanner has a thin cable loop that you can use to unplug the connector from the scanner. It’s a welcome addition, as these types of connectors can be hard to grip with just your fingers.
Accessories
Carrying Case

The 3DMakerPro Mole 3D scanner comes with a sturdy hard-shell case that looks like it can take some wear and tear. Its foam padding has cutouts for all the components and accessories of the device.
The case has a rugged handle and two latches that keep it securely closed, making sure that it does not accidentally open during transport.

It’s a (literally) solid addition, even though it significantly increases the storage space you need. Compared to the more traditional soft-shell cases, there is a lot more bulk that you need to find space for.

Turntable

The USB-powered turntable that comes with the Mole 3D scanner is a barebones accessory. It does what it is supposed to do, but that’s it.
For example, the turntable has no speed control, no power adapter included, no rubber feet, and misses a sticker with specifications.
It did its job well in our testing, but the lingering question remains of how long it lasts. A replacement is fairly cheap, however, so it’s not that big of a deal if it happens to break down.
As mentioned above, the gray platform of the turntable is different from the more common black platform with tracking dots found on other 3D scanner turntables. This gray-surfaced turntable is the same one that comes with the CR-Scan Lizard.

We suspect that Creality collaborated with 3DMakerPro’s parent company Jimumeta for the Lizard 3D scanner. This would explain the similarities between the two devices and accessories.
Something that we would have liked to see is a rubber or silicone interface layer between the platform and the rotating surface of the turntable. Manufacturers typically include this to help prevent slipping and accidental movement of the object during scanning.

In practice, we haven’t found its omission to be a major issue. As long as you don’t disturb the object while you are capturing scan data in the turntable mode, there’s little risk of anything going wrong.
Tripod

The tripod that comes with the Mole 3D scanner is decent. It’s a lightweight tripod with a Z-shaped head that lets you adjust the height and angle of the 3D scanner.
Its adjustment options are enough for capturing all angles of commonly-sized objects on the turntable.
One thing that we noted is that the cable of the Mole interferes with the Z-shaped plate on the tripod. The connector is just a bit too wide, causing the need to mount the 3D scanner at a slight angle (when viewed from above).

It doesn’t cause any issues when using the 3D scanner, but a more compatible tripod head would be easier to work with than this run-of-the-mill solution.
Similarly, you have to make sure to orient the scanner facing the right direction on the tripod head. If you don’t, then the cable will interfere with the locking tabs of the head.

Both are minor issues. As long as you are aware of them, they are easy to work around.
3DMakerPro Mole 3D Scanning Examples
Funko Pop – Jerry Seinfeld with Puffy Shirt
This is an object that we always scan with 3D scanners to test their capabilities. The 3DMakerPro Mole is no exception, and you can clearly see how it compares to the other popular scanners at the moment.
Overall, the Mole captured similar detail as the Revopoint POP 2. There’s a bit less detail in the fingers, but the legs are a lot cleaner. All-in-all, it’s about even.
The blue light Revopoint MINI and the more expensive Einscan-SP both capture more details, but that shouldn’t come as a surprise. Neither of those two are valid options for 3D scanning medium-sized objects under $1000, but they are good to compare to.
3DMakerPro Mole
Revopoint POP 2
Revopoint MINI
Einscan SP
Croc Shoe
This Croc came out surprisingly well. The small rubber bumps on the surface are clearly visible, and the black inner part of the shoe was captured nicely too. There was no need to spray the inside with AESUB scanning spray or coat it with something like baby powder to get a good result.
We could have spent some more time capturing details on the front to prevent some of the holes from closing up. But overall, we are happy with the result.
Pile Of Agendas
The same goes for this pile of agendas. The 3DMakerPro Mole was able to capture the relatively fine embossing on the top cover and only took a couple of minutes for the whole scan.
We didn’t manage to get underneath the agendas with the 3D scanner, so the undersides look a bit wonky. Next time, we’ll place the them on the edge of the table to get the bottom as well.
Verdict: Should You Buy the Mole 3D Scanner?
In conclusion, we believe the 3DMakerPro Mole is a decent 3D scanner for the price. In its sub-$750 price category, we recommend it over the Revopoint POP 2 right now.
The main reason for this is the superior aligning and processing algorithms of the accompanying JMStudio software. With Revopoint’s software, there’s more frequent misalignments during 3D scanning, and more manual cleanup to do after scanning.
Keep in mind that if you want to capture color 3D scans with the Mole, you will have to purchase a separate accessory and have access to a DSLR camera. But the result will be superior quality textures than any 3D scanner at this price point can deliver on its own.
The thing we’d like to see improved most about the Mole is the stability of the software. Its occasional crashes on our system are not something we have experienced with other modern 3D scanner companion software.
While the crashes didn’t occur frequently enough to be a major nuisance, it still gave us the feeling of the software being a bit rushed and unoptimized.
Nevertheless, the Mole 3D scanner is a good 3D scanning solution for its price range and gets our recommendation. For basic 3D scanning of medium-sized physical objects, we think it’s the most affordable solution out there right now.
If your budget is under $1000 and your priority is 3D scanning for jewelry making purposes, we recommend you go with the Revopoint MINI instead. Its ability to capture small details is just that much better.
On the other end of the spectrum, the Shining3D Einstar will serve you better if your goal is scanning people. Its increased FOV and ability to capture color without extra accessories make it the better choice for this purpose.

A good review of the scanner.
I note that the intro price for the Mole was $379 or $329 with a $50 voucher (that cost $5).
This makes it significantly cheaper than the competition.
I hope the software improves over the coming months and these issues are resolved.