

- Compatible with practically any metal
- Clean engravings on opaque acrylics and plastics
- Can be used for rust removal
- Good value for the price
- Tricky to set correct focus height
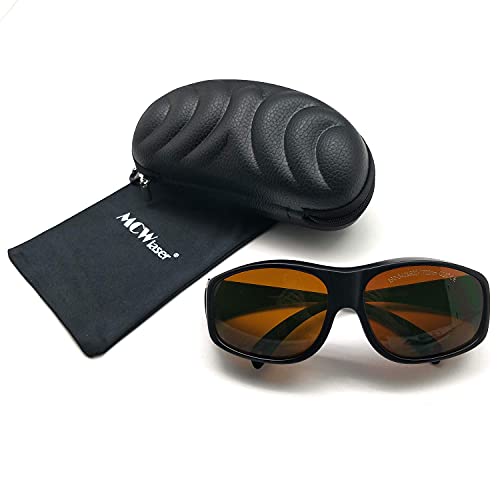
- No IR goggles included
- Slow engraving compared to fiber machine
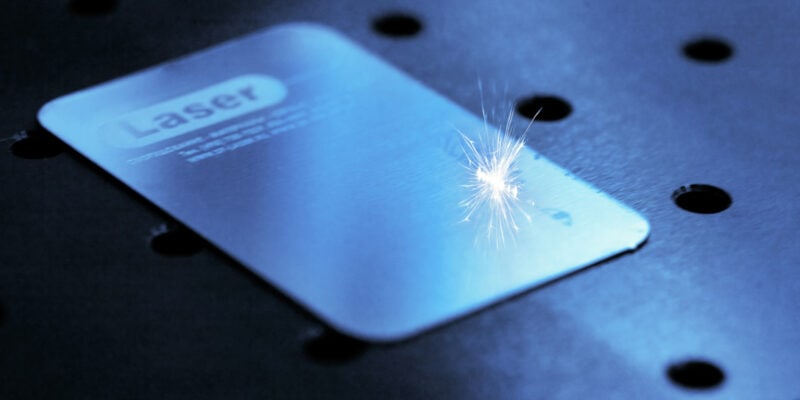
Engraving metals can be a tricky endeavor on a budget. Blue lasers barely leave a mark, whereas fiber lasers are costly. xTool’s new infrared laser module is here to fill the gap between those two extremes.
This 1064nm IR module offers practically the same wavelength as fiber lasers and can be installed on desktop engraving machines like the xTool D1 Pro and D1.
In this review, we will test the xTool infrared laser module, check whether it is as easy to use as advertised, and see how it compares to fiber laser machines.
Specifications
| xTool 1064nm Infrared Laser Module Specs | |
|---|---|
| Price | xTool |
| Laser Electric Power | 84 W |
| Laser Optical Power | 2 W |
| Spot Size | 0.03 mm x 0.03 mm |
| Wavelength | 1064 nm |
| Peak Power | 15 KW |
What Can You Use the xTool Infrared Laser Module For?
The 1064nm wavelength that is emitted by the xTool infrared laser module works best for engraving materials like metal, acrylic, and plastic.
Metals
You can use the module to quickly and accurately engrave metals such as stainless steel, (anodized) aluminum, titanium, copper, brass, gold, and silver.
In contrast, a powerful blue light laser would only be able to mark stainless steel and titanium.
This makes the infrared module ideal if you are into low-volume jewelry making or other small-batch metal engravings. For these types of things, it can be difficult to justify the cost of a dedicated fiber laser.
The affordability of this IR laser module and the fact that you can simply swap it out with the blue light module on the D1 or D1 Pro makes it an appealing choice for occasional engraving metal.
Acrylics and Plastics
The 1064nm infrared laser module works well on acrylic, plastic, and leather too. Even though you can use blue laser modules for those materials, the IR module produces fewer burn marks in the process.
Because the IR module has a smaller 0.03 x 0.03 mm spot size, you also have the ability to etch finer details that would be impossible with blue lasers.
There are a couple of other materials you can use this module for as well. Namely dark-colored non-transparent acrylic, stone, and circuit board. In combination with laser engraver marking paper, you can also use it on glass and ceramic.
Rust Removal
The 1064nm infrared beam also gets absorbed by rust and other metal oxides. This makes it a good option for rust removal tasks.
If you’re looking to clean rust from dirty coins, tools, or other items made of metal, the infrared laser module is a valid alternative to sandblasting or chemical methods.
What Should You Not Use It For?
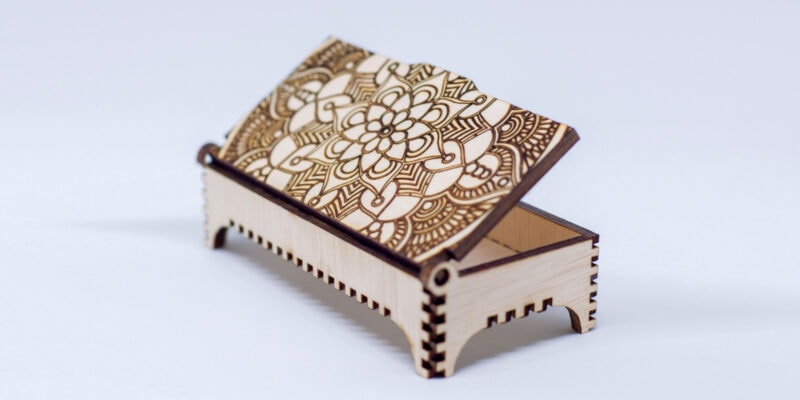
The infrared laser module does not work well with most organic materials. So if you’re looking to engrave wood, it’s better to stick with a blue laser module.
You also won’t be able to laser cut with this IR module. With only a 2W average output at a 1064nm wavelength, the module just does not have enough power for laser cutting.
In theory, you can cut stainless steel, copper, and aluminum sheets of thicknesses up to 0.5 mm. But you are advised not to do this.
The module creates a lot of heat during operation. Running it at full power for long periods of time is likely to damage the module.
This is also why the module comes with built-in over-temperature protection. It automatically shuts off the module when it gets too hot. In our engraving tests, we never had this happen.
You also won’t be able to create colored engravings on metals like stainless steel and titanium. For that, a powerful (20W+) blue light laser module is the better option.
Unboxing
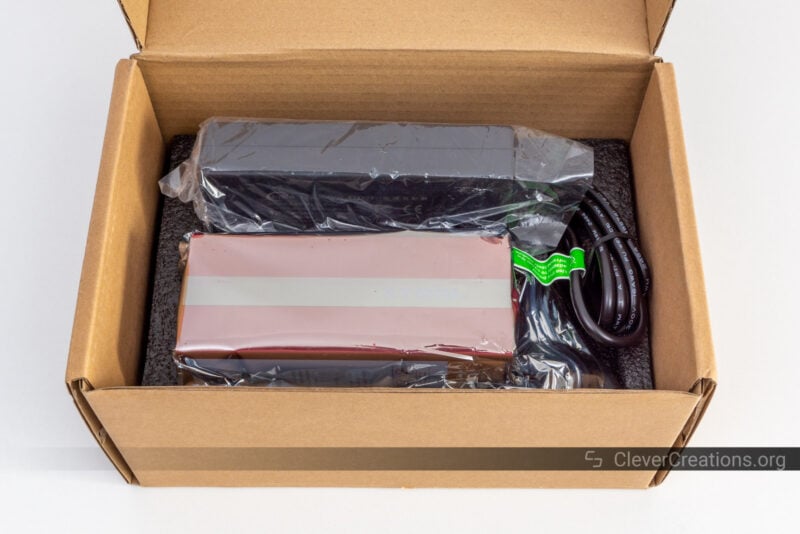
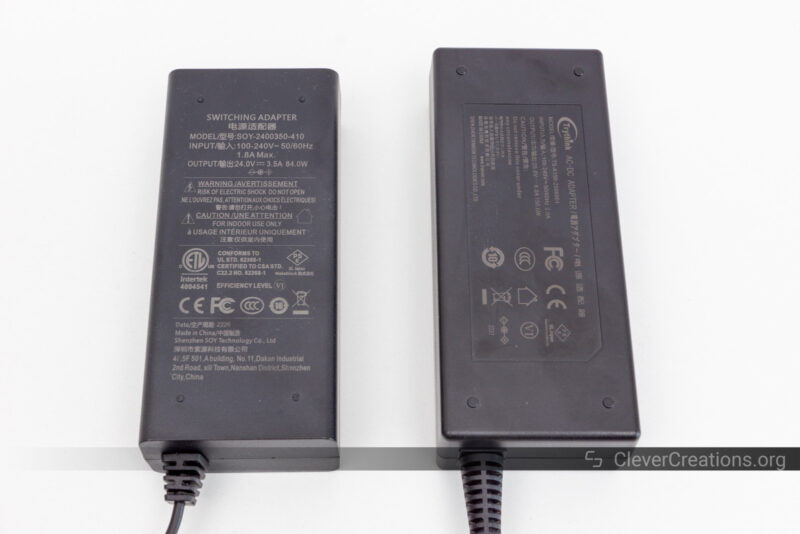
The xTool infrared laser module is packaged in a small carton box. Inside, you’ll find the 1064nm module itself, the manual, and a large 25V 150W power brick.
There’s no power cord included, but since you are expected to swap out the existing power brick of the 10W D1 (Pro), you should already have one.
We prefer this over seeing an additional power cord that remains unused. It reduces the product price and the costs and carbon footprint associated with shipping.
Infrared Module vs Blue Light Module

Aside from the differences in laser light wavelength and laser power, there are a couple of noticeable dissimilarities between the infrared and blue light modules for the xTool D1 and D1 Pro.
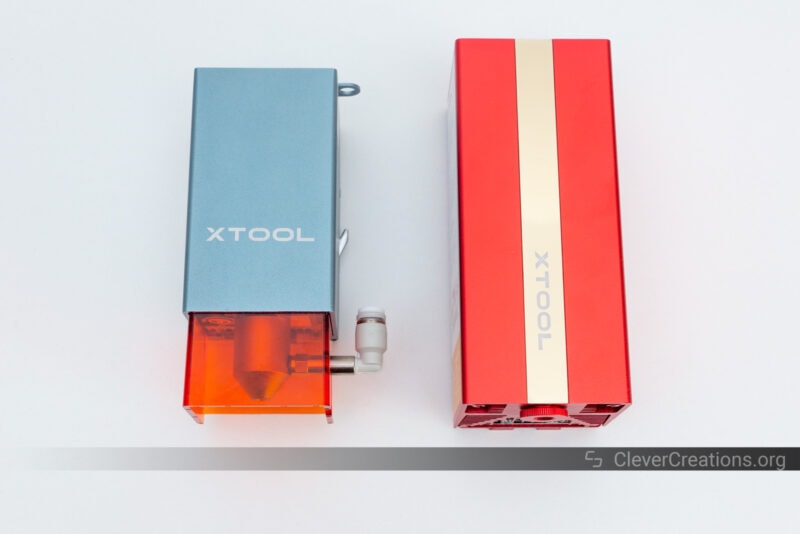
Size
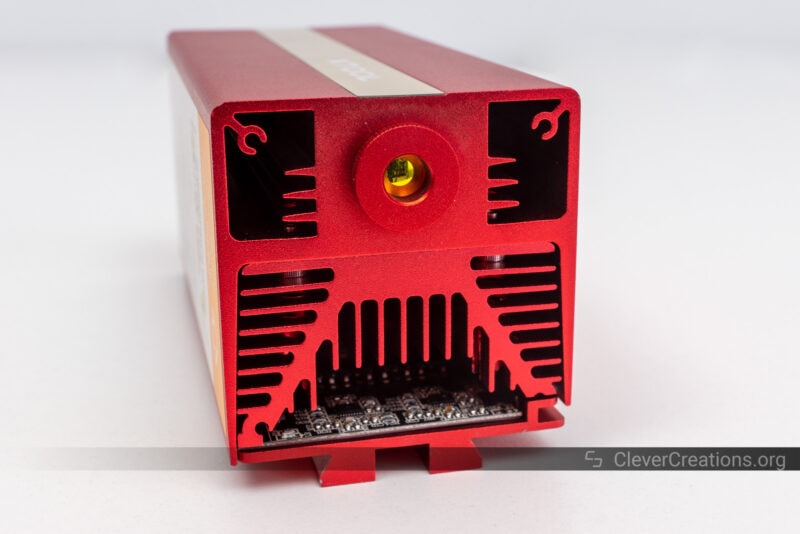
The first is the massive size of the infrared laser head. Compared to the blue light version, it’s larger in every aspect.
The main reason for this is that the 1064nm infrared laser module is less efficient in converting electricity to light. As a result, a lot of the electricity is converted to heat.
That heat needs to go somewhere, otherwise the laser module would overheat. To account for this, the laser head is equipped with a much larger aluminum heat sink and fan.
This larger size of the laser head affects the usable work area of the xTool D1 and D1 Pro somewhat. But since almost no one uses the entire work area when engraving metals, it doesn’t matter much in practice.
Light Shield
The other noticeable difference is that the infrared laser module has no light shield. This will make it easier for you to align the laser with your workpiece. After all, lots of metal laser engraving is done on smaller objects that are fully obscured by a light shield.
xTool’s documentation also seems to suggest that a laser shield is not necessary because the infrared light is harmless. The reasoning for this is that it is not visible to the eye.
From what we can find, that is not the case. You’ll want to make sure to wear adequate protection in the form of CE-certified IR laser goggles.
Red Dot
Another difference between the two modules is the alignment method. Whereas the blue light laser module has a red laser cross for alignment, the infrared module has a small red dot.
We like this decision on xTool’s part. The cross is too big to work with on things like jewelry and it would make it harder to precisely align the laser. The red dot works better in that regard.
In addition, the infrared module’s dot originates from the same lens as the laser beam itself. This means that the dot is always in the same location as the infrared spot will be.
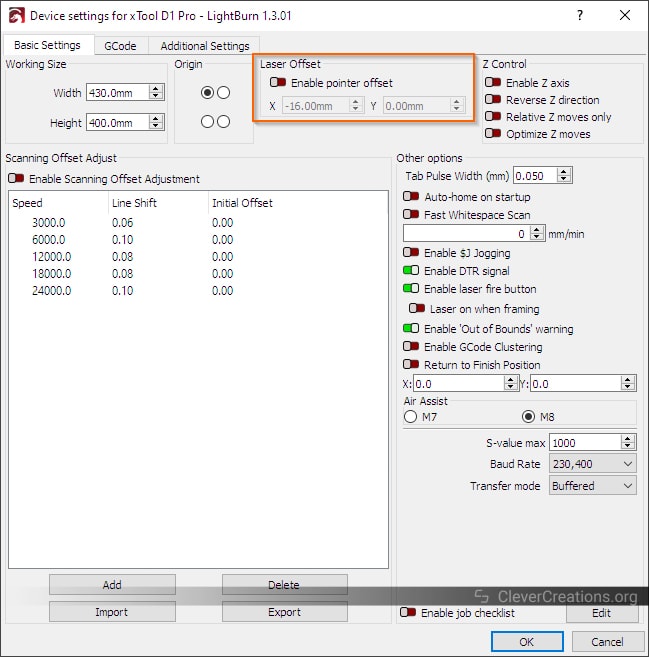
In contrast, on the blue laser module, the red cross and laser spot have an offset of 16 mm.
For that reason, you’ll want to make sure to disable the pointer offset in Lightburn when you have the IR module installed. If you don’t, your engravings will be off by 16 mm.
Lack of Air Assist
Lastly, the IR module doesn’t come with air assist. The blue light module does have this feature.
It’s a logical decision to not include this. The materials that the 1064nm infrared light module is compatible with don’t emit nearly as much smoke and particulates as wood does.
You’ll still want to use a laser engraver enclosure with an extraction fan if you are engraving dark acrylics, plastic, or leather. Their smell can be pretty strong and some of their fumes can be harmful. Plus it’s better to be safe than sorry.
Getting Started
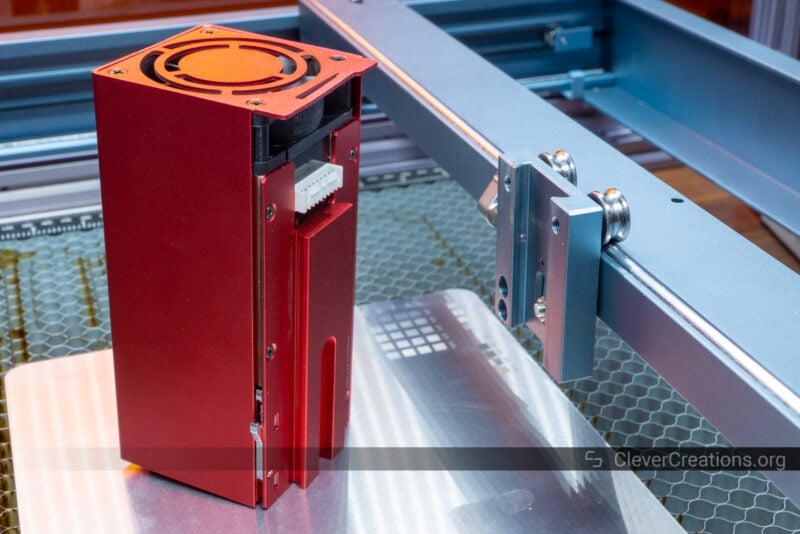
You won’t have to do much to install the infrared laser module. It’s as simple as detaching the connector from the blue laser module, removing that module from the X-axis carriage, and attaching the 1064nm module to it instead. Then you attach the cable to the new module and you’re ready to go.
Depending on the tolerances on the laser head clamp of your D1 or D1 Pro, you might have to adjust the clamping thumbscrew. This process is well documented in the manual, so you shouldn’t face any issues.
If you are using the 10W version of the D1 Pro, you’ll have to replace its 24V 84W power brick with the 150W version that comes included with the IR module.
The 20W version already has a sufficiently powerful power brick that can support the infrared laser module’s needs without problems.
You’ll also want to check that you have the latest version of the laser cutter’s firmware installed. It’s important to execute the firmware upgrading process correctly, so make sure to follow xTool’s instructions.
Tips and Important Considerations
To get the best results from xTool’s infrared laser module, it’s important that you keep a couple of things in mind. It isn’t as easy to use as the blue laser module, but with the proper approach, you can produce great results.
Safety Precautions
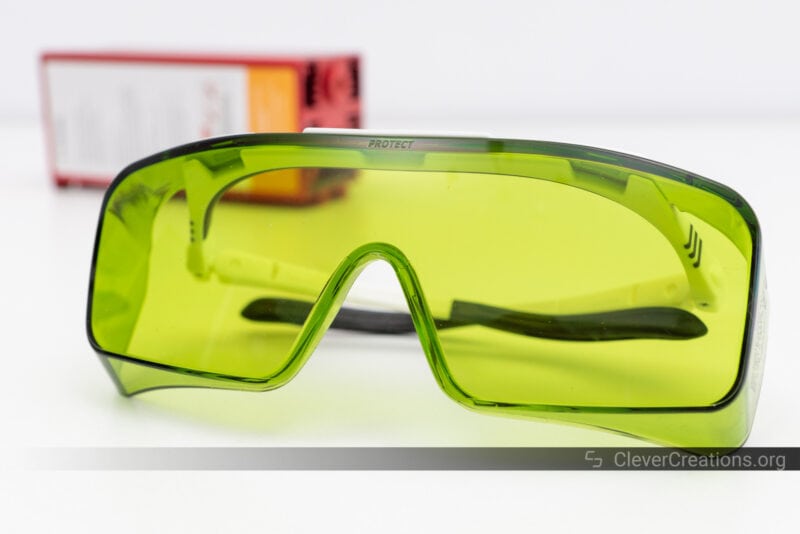
We’ve mentioned it earlier, but we’ll say it once again. Use quality infrared laser goggles when working with the 1064nm module. You won’t be able to see the laser light, but that doesn’t mean that it isn’t dangerous. You only have one set of eyes.
Laser Spot Size
With its 0.03×0.03 mm spot size, the infrared module is able to engrave very small details. For comparison, the 10W D1 Pro blue light module has a 0.08×0.06 mm laser spot—over five times the area.
The 0.08×0.10 mm spot size of the 20W version is almost nine times larger, so you can see why it often makes sense to switch to the 1064nm module for intricate detail work on materials that can be engraved with both infrared and blue laser modules.
The smaller spot size is also one of the reasons why the IR laser module works great with metals. Not only is the 1064nm wavelength the right one for engraving metals, but the small dot also focuses all the energy into a smaller area.
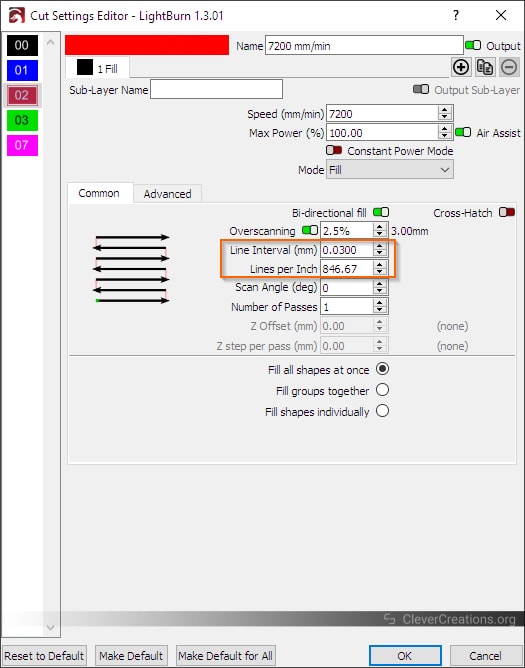
Because of the smaller spot size, however, you’ll want to increase the lines per inch setting in Lightburn or xTool Creative Space accordingly.
Temperature Sensitivity
When using the infrared light module, you’ll want to keep its environment temperature in mind. It is quite sensitive to the temperature you use it at.
When the temperature is between 10-20°C (50-68°F), it is key to preheat the laser module for 5 to 10 seconds. You don’t want to do this on your actual workpiece, so it’s a good idea to have a separate piece of scrap material at hand.
On the other end of the spectrum, the 1064nm IR laser module should not be used when the temperature is above 35°C (95°F). Even at 30-35°C (86-95°F) you’ll need to keep an eye on the yellow over-temperature indicator light.
For ideal operation, the recommended temperature lies between 20-30°C (68-86°F).
Because of the heat that the module generates, this can be a challenge if you run the laser in an enclosure without an exhaust fan. So even if you are using the xTool infrared laser module for engraving metals, which doesn’t create large amounts of smoke, it can still be a good idea to use the exhaust fan for extra airflow during long jobs.
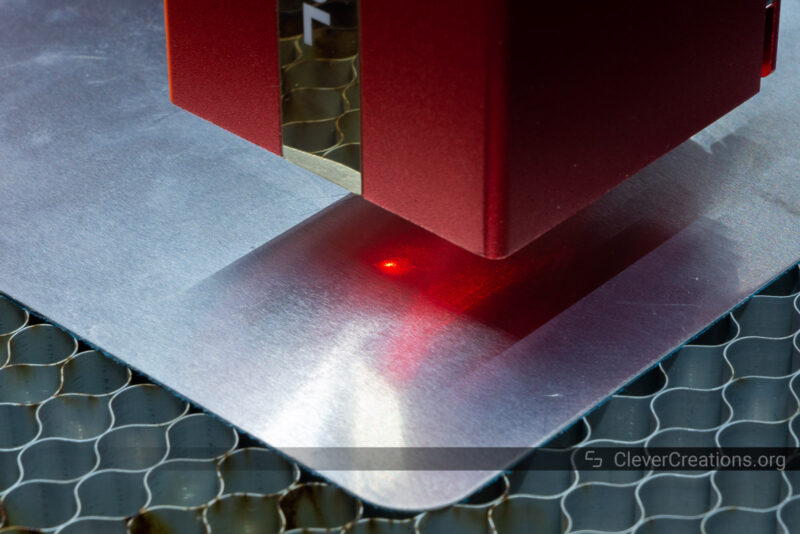
Focus Setting
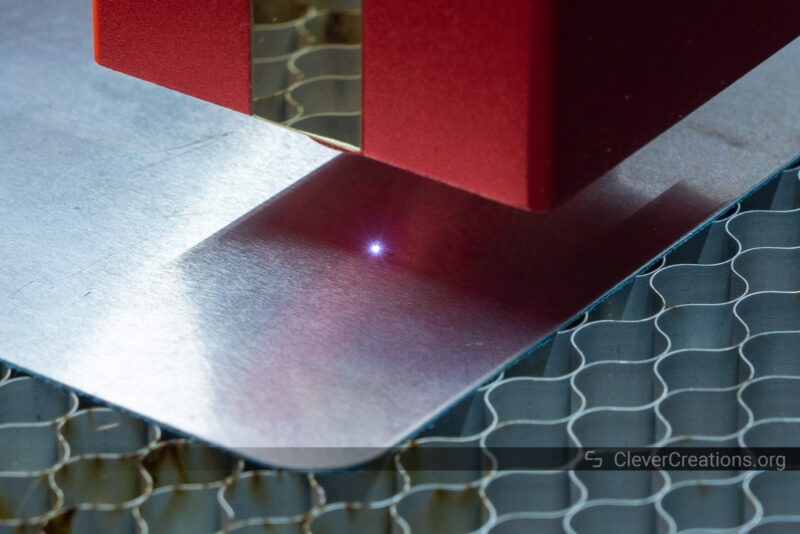
When using the xTool infrared laser module, you’ll need to be very accurate in setting the focus distance. You’ll only have a 1 mm window in which the laser performs optimally.
Outside this window, the laser will only produce a dim white spot when marking metal.
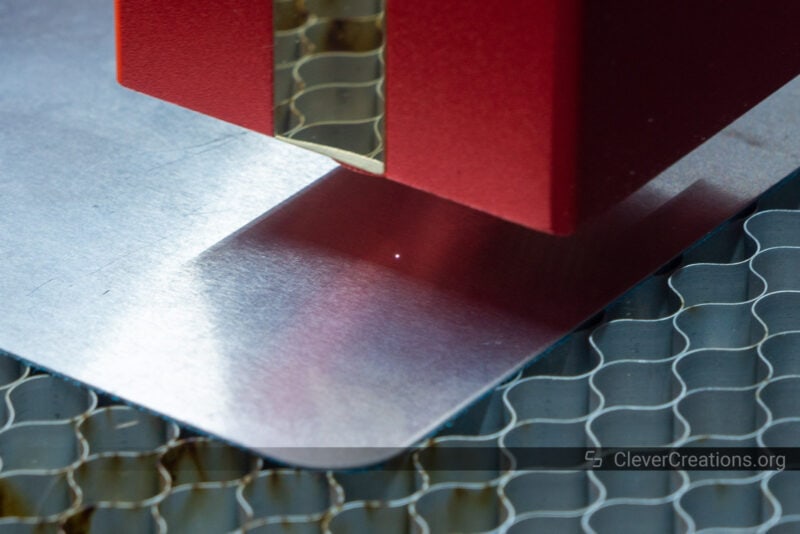
When the focus distance is set correctly, the white spot reflecting from the metal surface is bright. It also goes accompanied by a sound from the metal being marked, even though the module’s cooling fan is likely to drown that out.
Getting the focus distance wrong is the most common reason why people struggle with getting the 1064nm module to work.
While the laser head has a focus bar that sets a 20 mm distance between the lens and the workpiece, it doesn’t work that well in practice. Several users have reported the laser to be out of focus when using the focus bar.

We ran into the same issue. The optimal height setting for our specific IR module was about 1 mm closer to the workpiece than what the focus bar indicated.
For that reason, we recommend you do a ramp test to determine the optimal focus distance. This video by Bearded Builds explains it well:
After that, you can laser cut a spacer with that height (using the stock blue laser) to ensure you can set the correct focal length every time you use the infrared laser.
We would have preferred to see the same focus bar adjustment mechanism as on the 20W D1 Pro blue laser module. For some reason, xTool chose to omit it. On an infrared laser module with such a small depth of field, it would have been very useful.
xTool 1064nm Infrared Laser Module Test Results
In all tests below, we engraved on the bare material without laser marking tape or coatings. None of the engravings have been post-processed.
Some of the images are slightly blurry in the corners, as we had to break out the macro lens to capture the small details.
Overall, we are very impressed with the engraving capabilities of the 1064nm infrared laser module. Even though the markings aren’t too deep because of the limited power, they are permanent. Every metal we tried showed a clear marking without signs of fading.
Anodized Aluminum
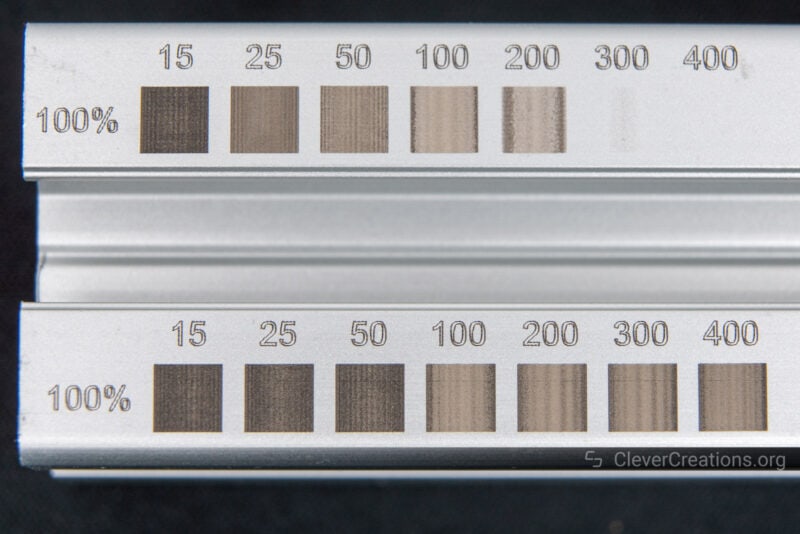
Testing the 1064nm infrared laser module on a section of anodized aluminum extrusion shows how well the xTool module can engrave on aluminum.
The top gradients were done with Lightburn’s ‘Constant Power Mode’ set to off (recommended for bitmap files), whereas the bottom was done with Constant Power Mode on (recommended for vector files).
It’s clear that a disabled constant power mode setting lets you produce better gradients. That setting does result in fully faded engravings at higher speeds.
In contrast, enabling Constant Power Mode gives you less of a gradient but allows you to engrave at higher speeds.
The lines of the text engraving are somewhat wobbly. They were performed at full power at a high speed, resulting in ‘ringing’ on the X- and Y-axes.
It’s a consequence of the higher mass of the infrared module and the higher inertia that comes along with it. Because the acceleration on the xTool D1 Pro is hard coded, you can only reduce this ringing by engraving at a lower speed and power.
Stainless Steel
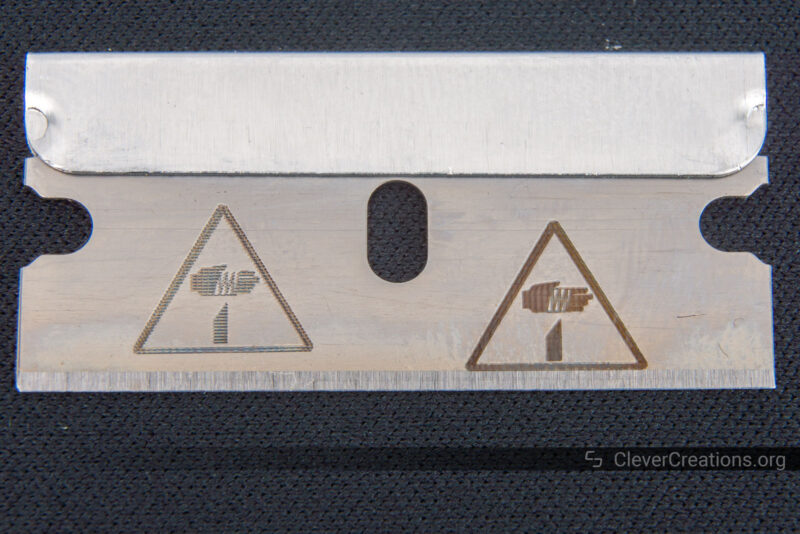
On this stainless steel razor, the 1064nm infrared module performed great. The settings we used are 100% power and 20 mm/s.
The left symbol was done with Lightburn’s default 0.1 mm line interval (254 lines per inch) setting. As you can see, this doesn’t produce very high detail and sharpness. The IR module’s spot size is small, and you’ll need to adjust the line interval to fill in the gaps.
The right symbol was engraved with a line interval of 0.03 mm/line (850 lines per inch). You can see that it results in a much sharper engraving.
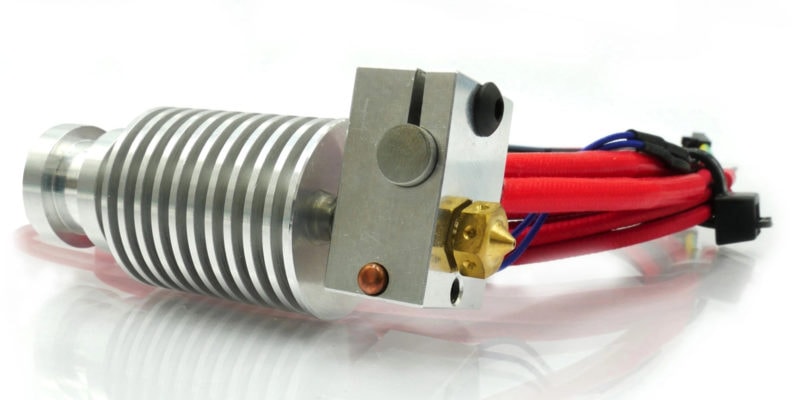
Brass
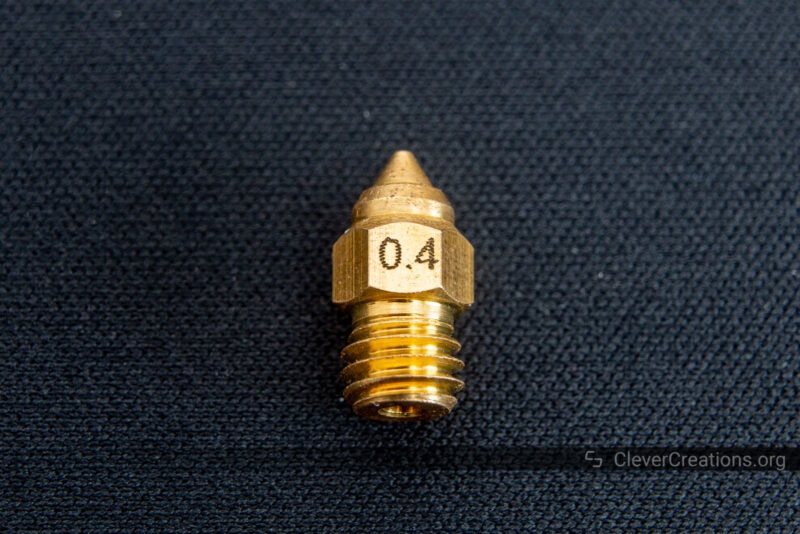
Permanently marking brass was just as easy. As it turns out, the 1064nm infrared laser is a great solution for labeling 3D printer nozzles with their size. We’ve got a plethora of differently-sized nozzles that are hard to distinguish from each other.
Because of the small sizes involved, it is a bit difficult to align the nozzle under the laser head. But by 3D printing a jig that holds the nozzle in the exact same position every time, that can be easily solved.
Rust Removal
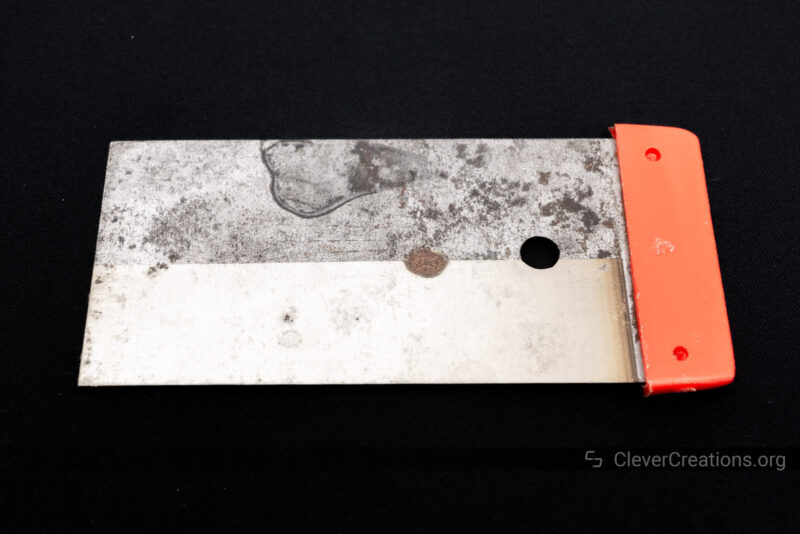
A quick rust removal test at 400 mm/s speed at 100% power shows that the 1064nm laser module can do that as well. Afterward, we noticed that we had the line interval set to the default settings. We could have gotten better results by adjusting it to fill in the gaps.
On the right side of the cleaned area, you can see vertical darker lines where the laser head reversed position. We think this is because the ‘Constant Power Mode’ was enabled and the power was not reduced for the slower movements during deceleration and acceleration.
We could have removed the big rust stain in the center with more passes or a slower speed on that specific spot. If we would have done that on the entire area, we would have inadvertently engraved the already clean section.
Black Acrylic
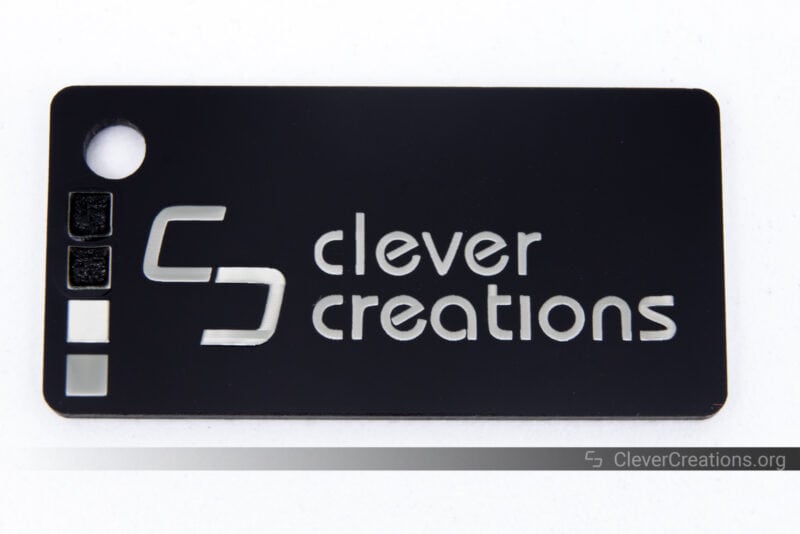
Engraving the black acrylic keychain that comes in the material pack of the xTool D1 Pro gave nice results too.
On the left-hand side, you can see our test sections. From top to bottom, 100% power at 60, 80, 100, and 120 mm/s.
It’s surprising how narrow the speed setting window is for engraving this black acrylic. At 80 mm/s, the lines were bright and clear. At 100 mm/s, however, the acrylic already started melting.
With the right settings, however, you can expect very clean fills and lines.
Our branding was done with a combination of 100 and 120 mm/s settings to try to get a bit of a color difference. There’s a bit of color difference visible on the logo, but barely any on the text.
Conclusion: Who Should Buy the xTool 1064nm Infrared Laser Module?
The xTool 1064nm Infrared Laser Module is an excellent solution for people who already have or will purchase an xTool D1 or xTool D1 Pro laser cutter and want to engrave metals without having to buy a standalone fiber laser engraver.
At an approximate $549 cost, it’s a relatively affordable way to get into engraving stainless steel, aluminum, titanium, bronze, gold, and silver.
We think the IR module is not worth getting if you are only interested in the cleaner plastic and leather engraving results. But those aspects are still nice to have as a bonus.
In combination with a powerful blue laser module, the IR laser head makes for a well-rounded engraving and cutting setup. It’s no surprise that xTool sells a 2-in-1 kit that includes both.
It’s important to keep in mind that metal engraving with only 2W of average power will be slow. A galvo fiber engraver is both more powerful and faster. If you don’t expect to do a lot of metal engraving, however, the low speed won’t be an issue.
As long as you’re realistic about what can be achieved with this module and take your time to set the focus properly, it is a great accessory for the occasional metal marking, jewelry engraving, or rust removal job.
Question not a comment
Can you use the same power brick that the IR has with the 10w
I have the D1 non-pro 10w
Hi Robert,
Yes, that is possible. Both power bricks have the same output voltage and the IR brick has more than enough power for the 10w laser.
How deep on copper or brass can this laser engrave ? Is there a way to change the depth of the engraving?