


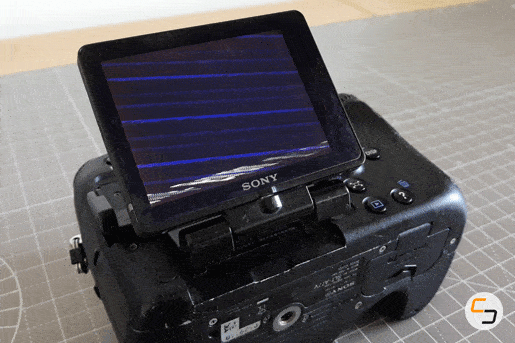
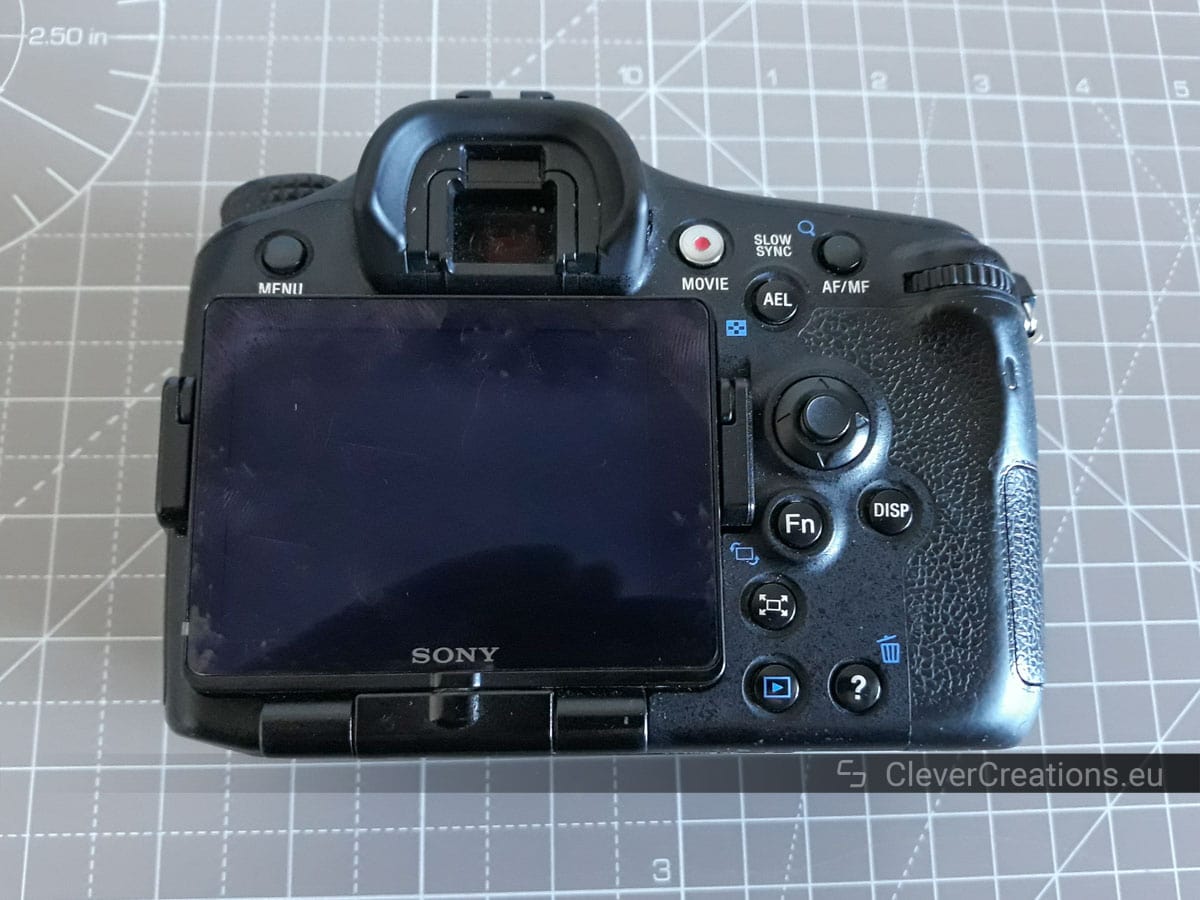
The articulating LCD screen on my Sony A77 camera recently stopped working properly. The screen still functioned when it was placed up against the camera body, but when I extended and rotated it away from the body, it only displayed artifacts.
After some research, I found out that the flex cable of the LCD screen was likely damaged. By buying a new flex cable and studying the parts diagrams that I found online, I managed to repair the camera.
In this article I will explain what causes problems with the LCD screen on the Sony A77, what you can do to prevent them, and show how you can fix the screen yourself at home.
Before showing you how to repair the Sony A77 screen, I will give some more information on the problem and answer some frequently asked questions:
What Causes Sony A77 LCD Screen Problems?
There are several reasons why the Sony A77 LCD screen can develop problems. One of the most common reasons is a fracture in the LCD flex cable. Other less common causes are damage to the screen itself or its electronics, or a problem on the printed circuit board of the camera.
A Fracture in the LCD Flex Cable
The most common reason for problems with the LCD screen is that the flex cable that connects from the camera circuit board to the LCD wears out. When this happens, the cable develops one or more hairline cracks in the wires. The screen is then not able to receive the correct signals anymore, and it displays artifacts instead.
In the case of my Sony A77, when the screen was positioned against the body the traces in the flex cable managed to make contact well, but when the screen was moved further from the body the connection broke.
A broken flex cable seems to be the most common cause of the artifacts, so when attempting to fix the screen, this is what I recommend to try to fix first.
Damage to the LCD Screen and/or Its Electronics
An other cause for problems is a defect LCD screen. This can either be the LCD screen itself or its control electronics.
Some possible causes for this are:
- Liquids making their way into the LCD casing.
- A sudden impact.
- The LCD screen is at the end of its life.
The last reason does not happen too often, as the flex cable is usually first to go.
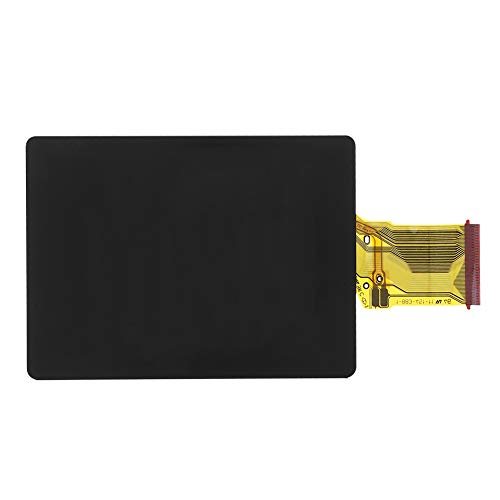
If replacing the flex cable does not work, then the LCD screen itself is likely the culprit and needs to be replaced.

A Problem With the Camera Motherboard
Other (non-LCD) camera components can cause problems with the LCD as well. For example, the motherboard of the camera can develop issues due to old age, or due to the camera being dropped.
This usually shows up as a green screen on the LCD. Or to be more specific, a repeating green pattern on the screen. An example of this can be seen here.
In this case, the viewfinder of the A77 also stops working and shows the exact same pattern as on the LCD. This is an important difference with when the flex cable or LCD screen is damaged. In that situation the viewfinder still shows the sensor image.
Solving the green screen problem involves replacing the camera motherboard and is beyond the scope of this article.
Is It Difficult to Repair the LCD Screen?
You will need to disassemble the camera, replace either the flex cable or the LCD screen, and then reassemble everything.
This may sound like a daunting task, but it is relatively straightforward. All the steps you need to take are listed further down the page. With enough patience and care there is not much that can go wrong.
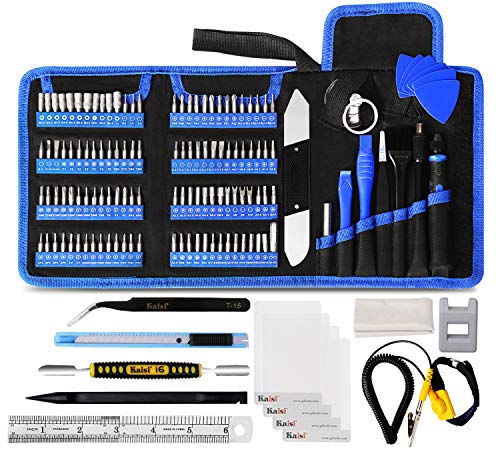
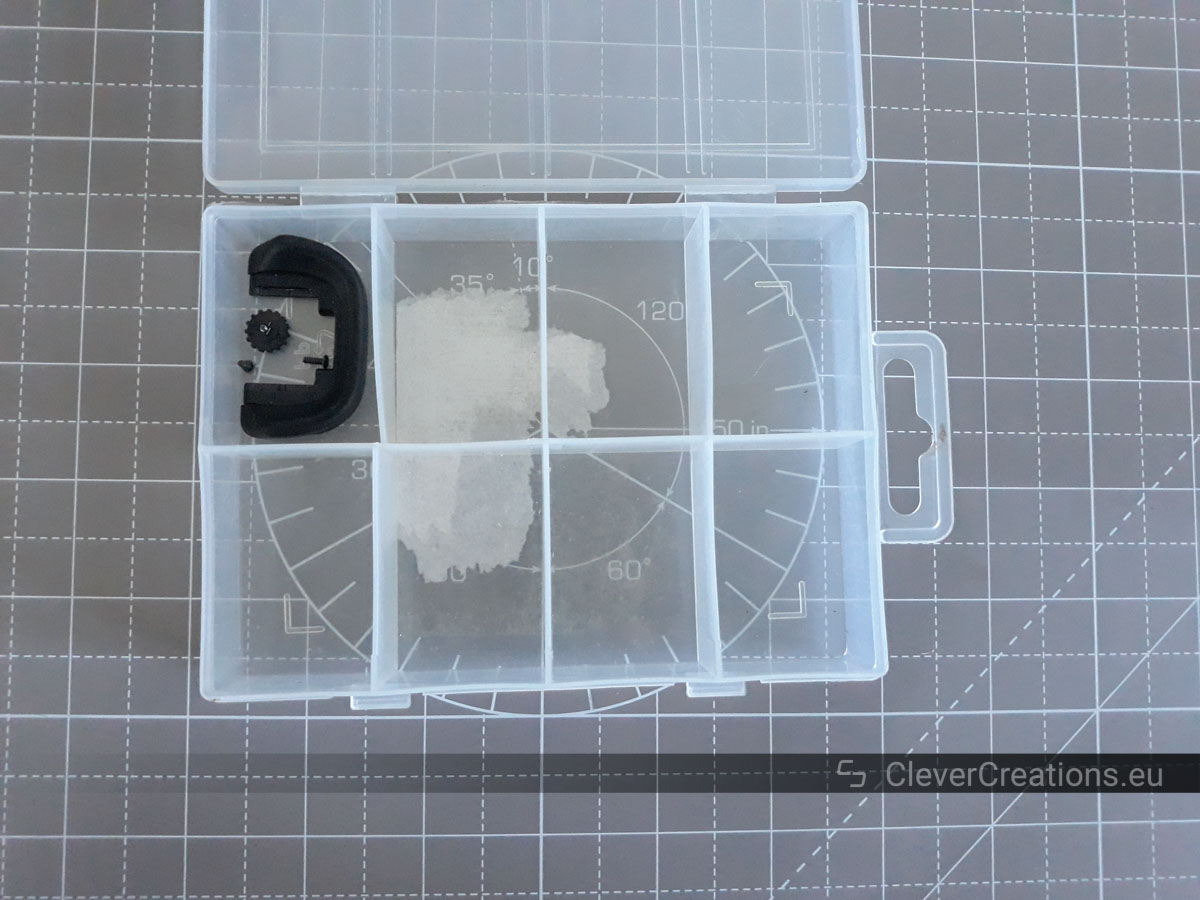
What Do You Need to Repair the LCD Screen?
Some common tools and a replacement LCD flex cable (or replacement LCD screen). Everything is listed further down the page.
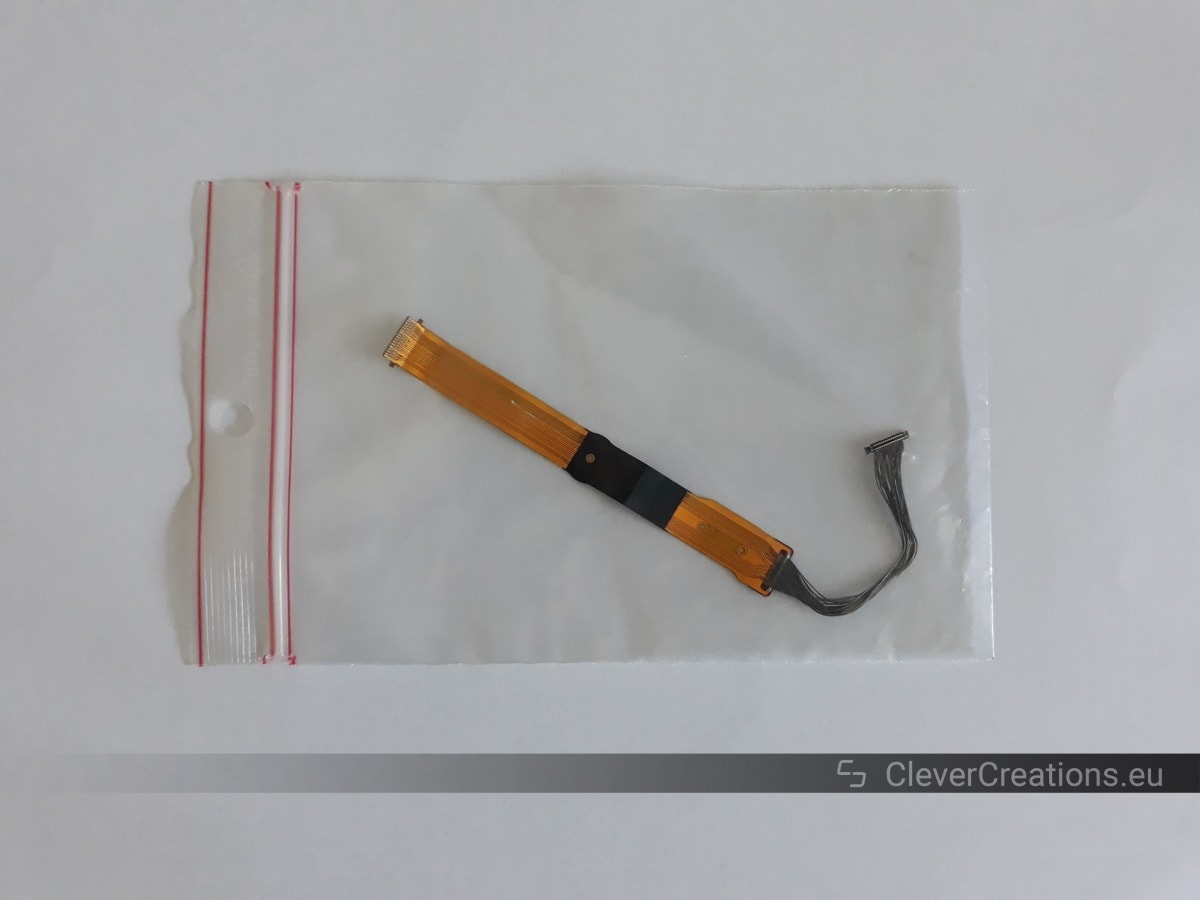
I managed to find my replacement LCD flex cable on eBay for about €50. You can also find them on Amazon. Replacement LCD screens can be found there as well.
Repairing vs Replacing the Camera
From what I found online, having the camera repaired at the Sony service center would have cost somewhere between $200 and $400 total for the assessment, shipping, components and labor.
Buying a replacement body (a Sony A77 Mark II) would have set me back about $1200.
Repairing the camera myself cost me ~$60 for the replacement flex cable. Obviously this option came with a bit more risk, but I was confident that I correctly identified the issue and that I was able to repair it.
Can You Also Use This Guide to Repair the Screen on the Sony A77 II?
Yes! The A77 Mark II is not very different from the A77. The same exact procedure can be followed to repair the LCD screen on both cameras.
I have not repaired any A77II’s myself, but I have had people contact me and telling me they successfully followed these steps for their A77II. So I am certain that this works.
Can You Do Anything to Prevent the A77 LCD Screen From Breaking?
Only if you never move the articulating screen. The primary reason for the artifacts is the flex cable that develops fractures. Limiting the strain on the flex cable will extend its life.
Aside from that, handling the camera carefully and storing it safely helps too.
How to Repair a Sony A77 LCD Screen
What You’ll Need
|
|
Parts | ||
|---|---|---|---|
| Check Price | |||
|
For when the the LCD display (and not the flex cable) is broken
|
Check Price | |
Preparation

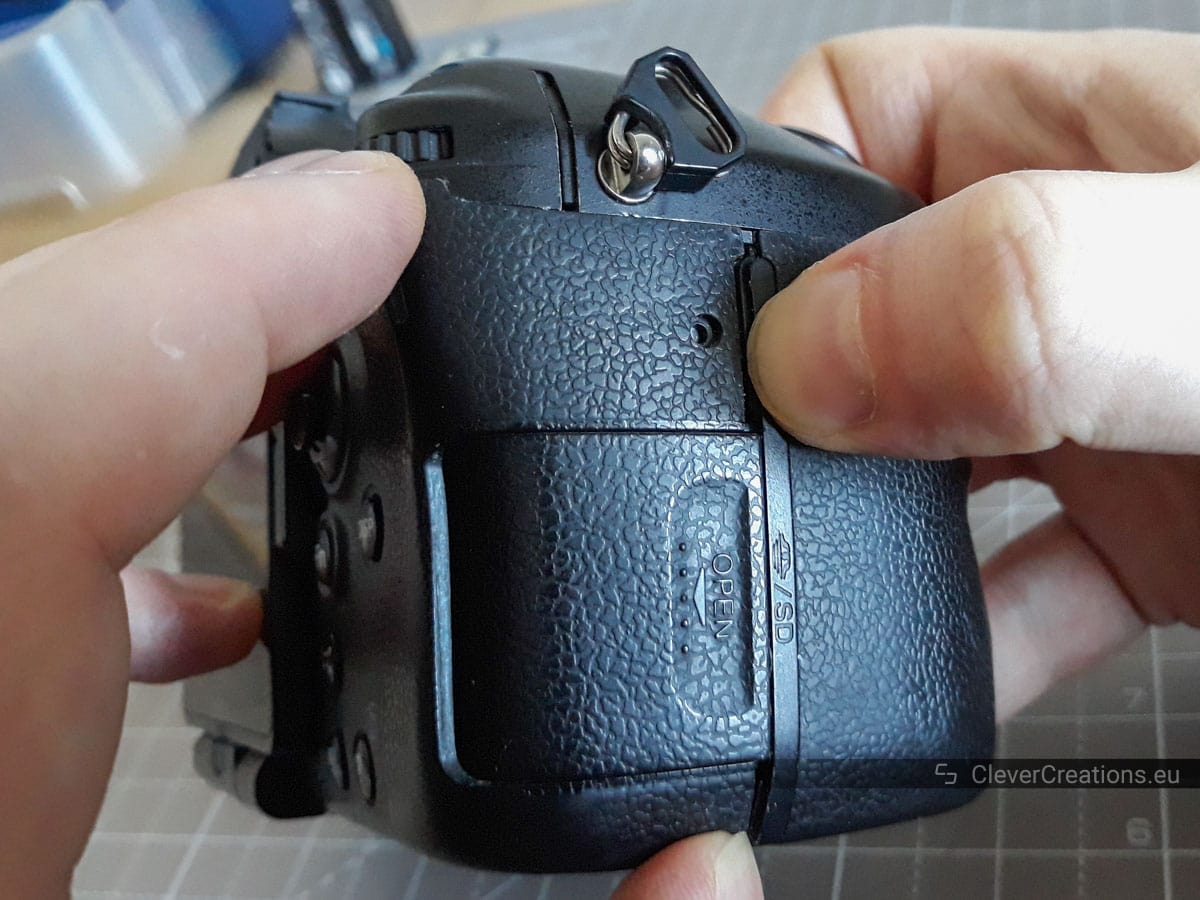
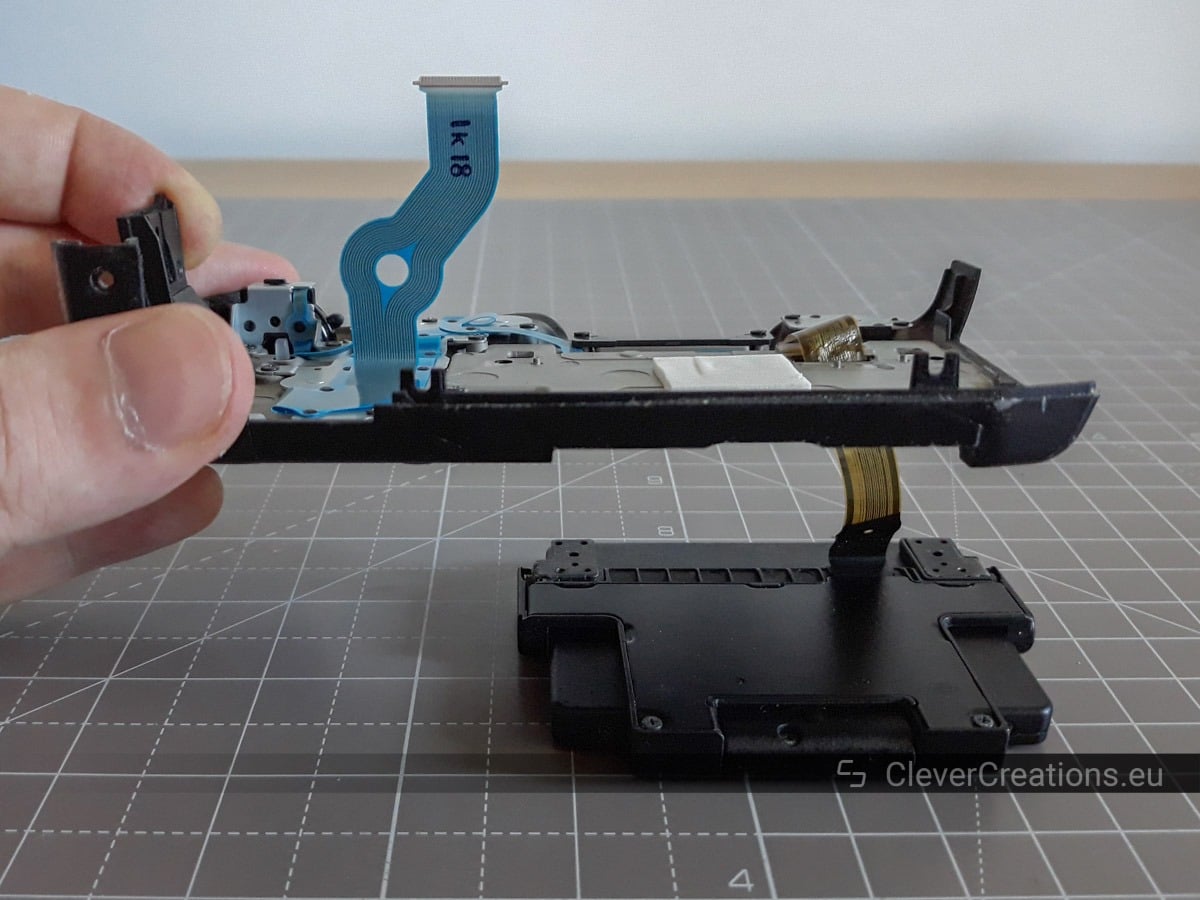
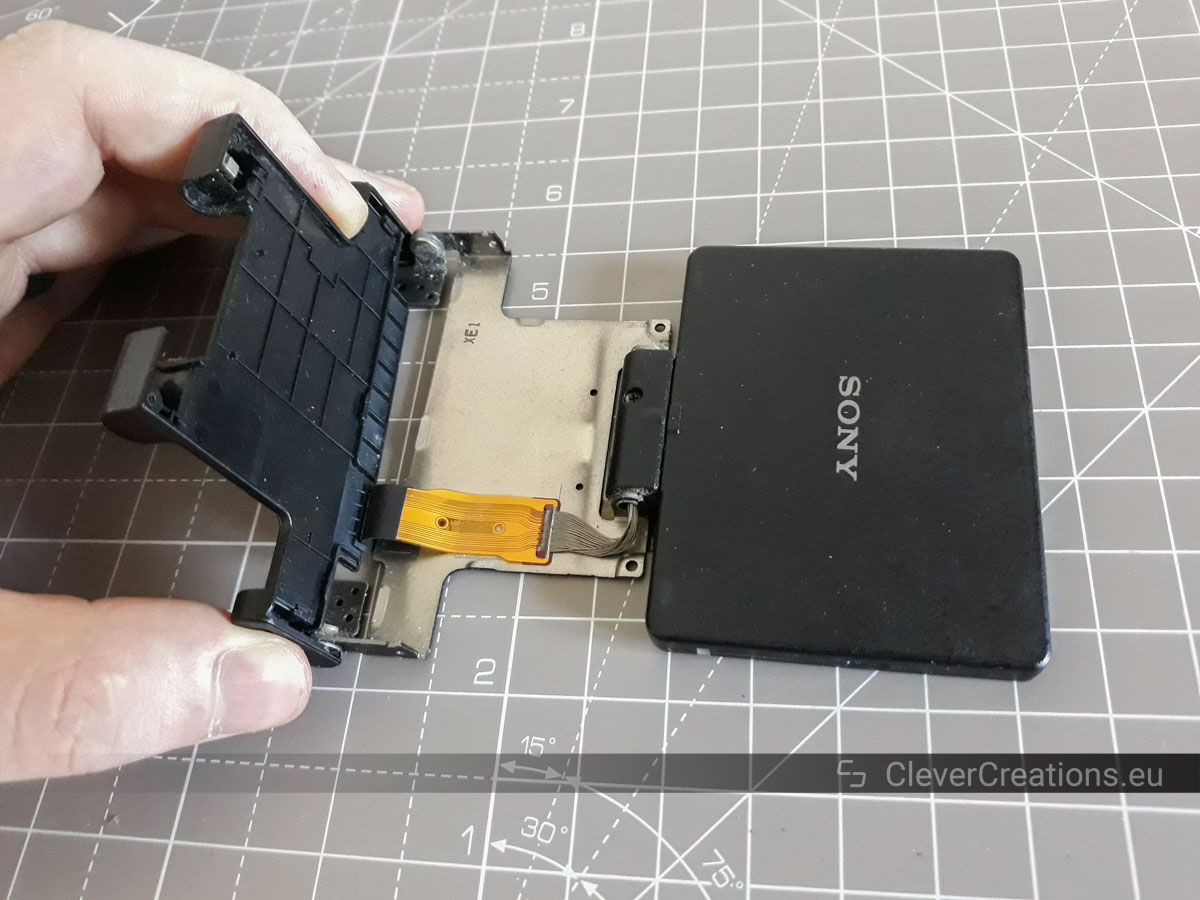
Sony A77 Body Disassembly


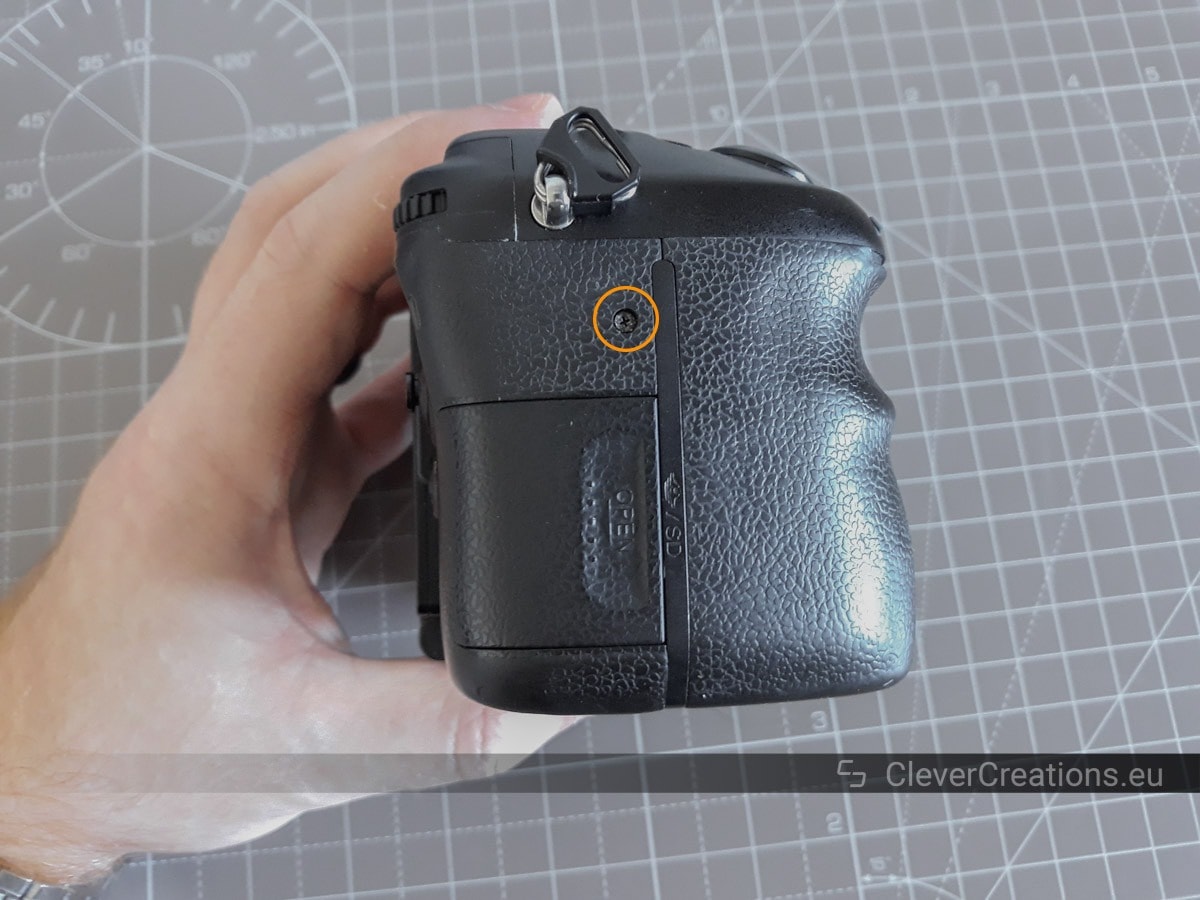
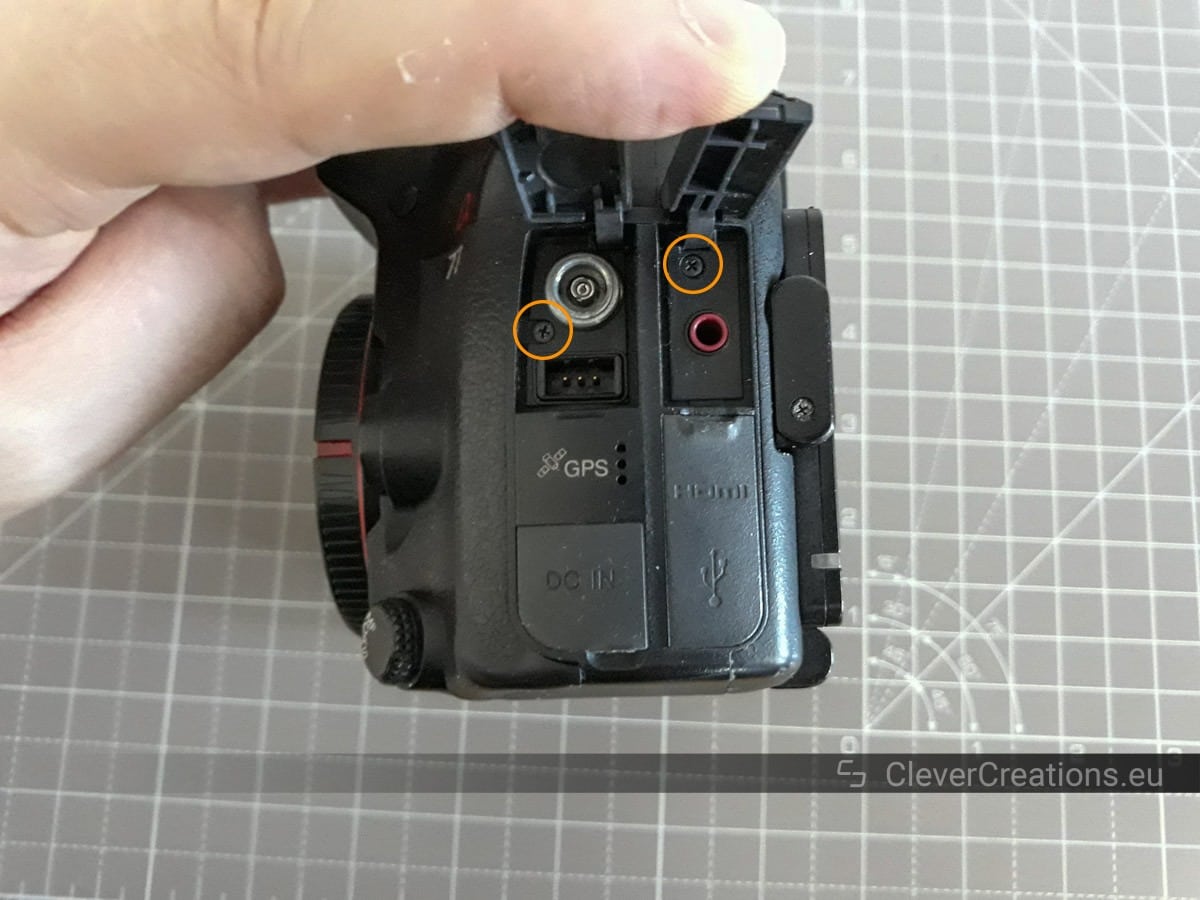
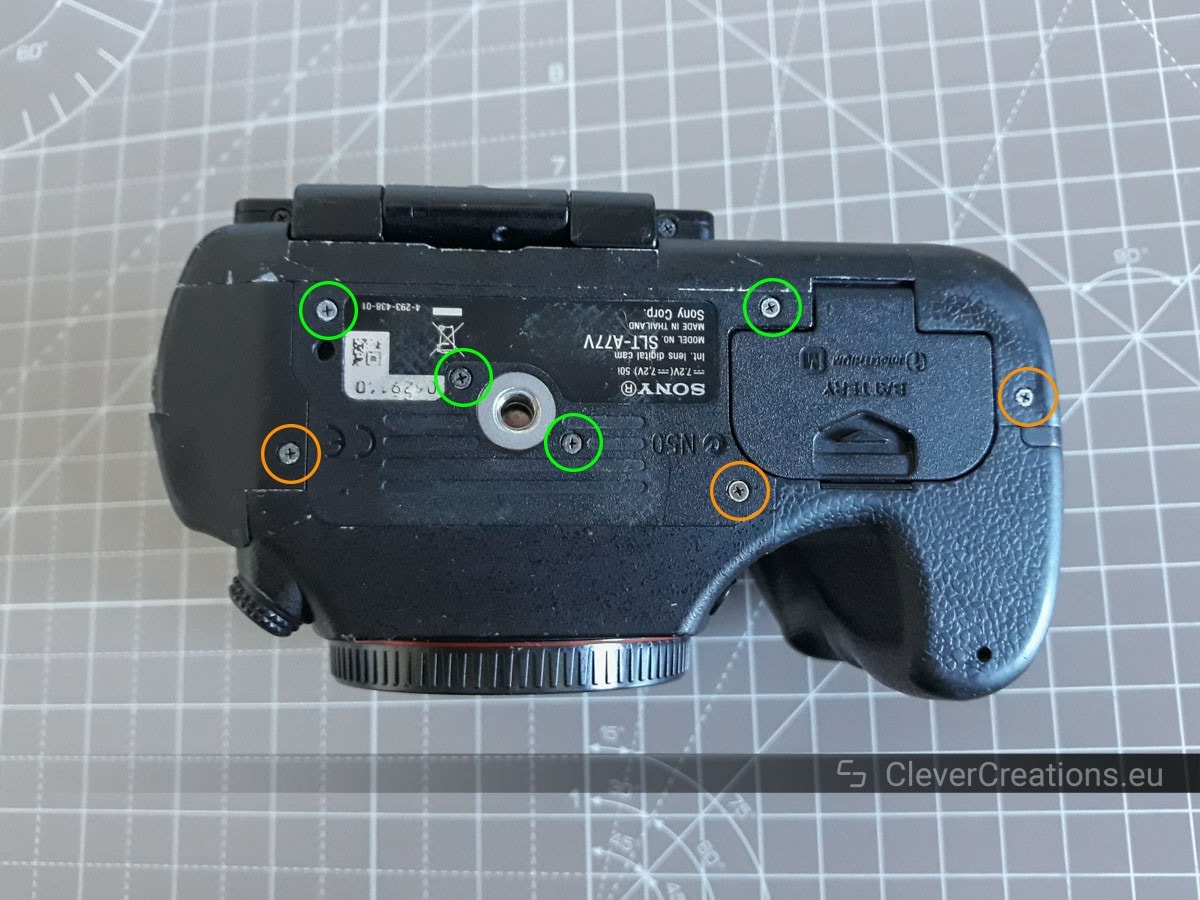

Removing the Rear Cover


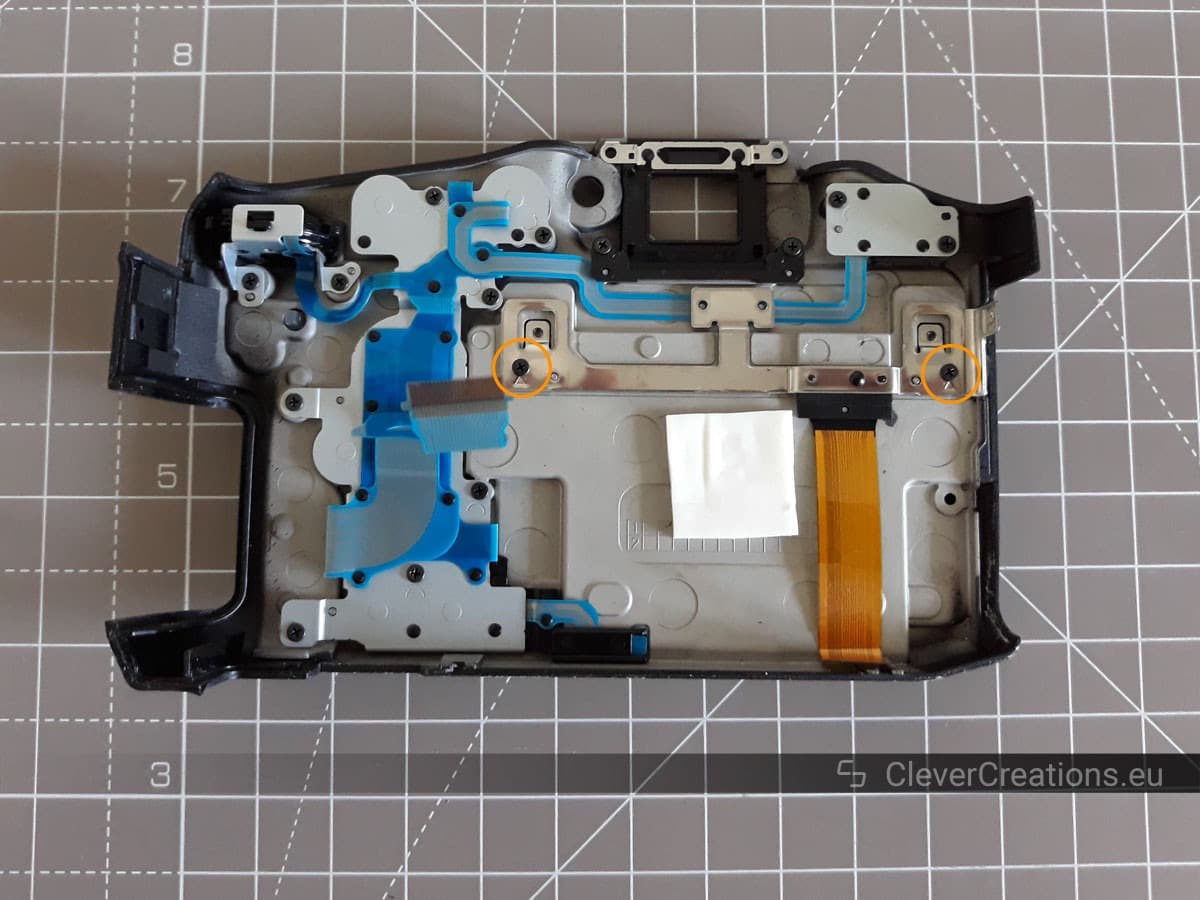
Disassembling the LCD Screen Assembly


If you wanted to replace the LCD screen itself, this would be where you would do it. Simply disassemble the LCD assembly a bit further, until you are able to remove and replace the LCD panel itself.
Unfortunately I do not have picture of these steps, as I only replaced the flex cable.
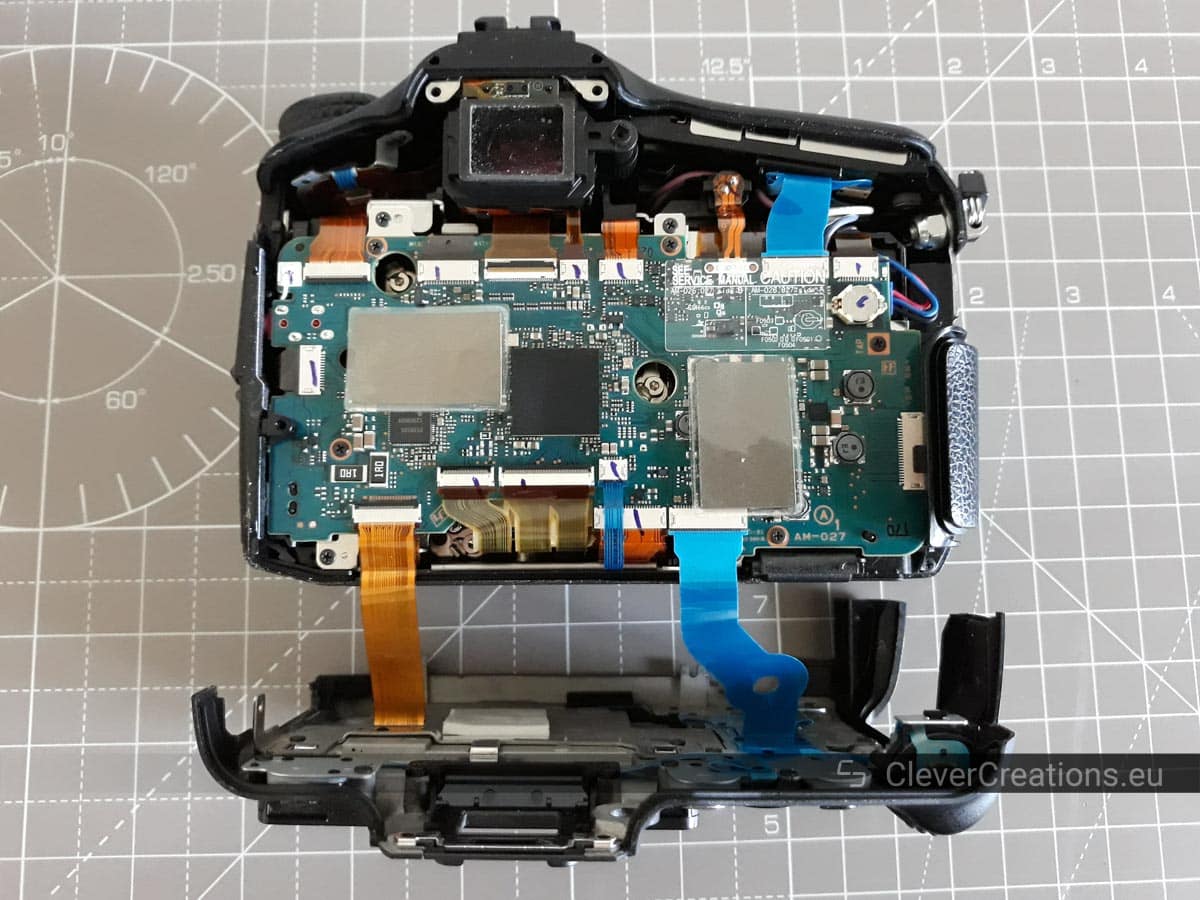
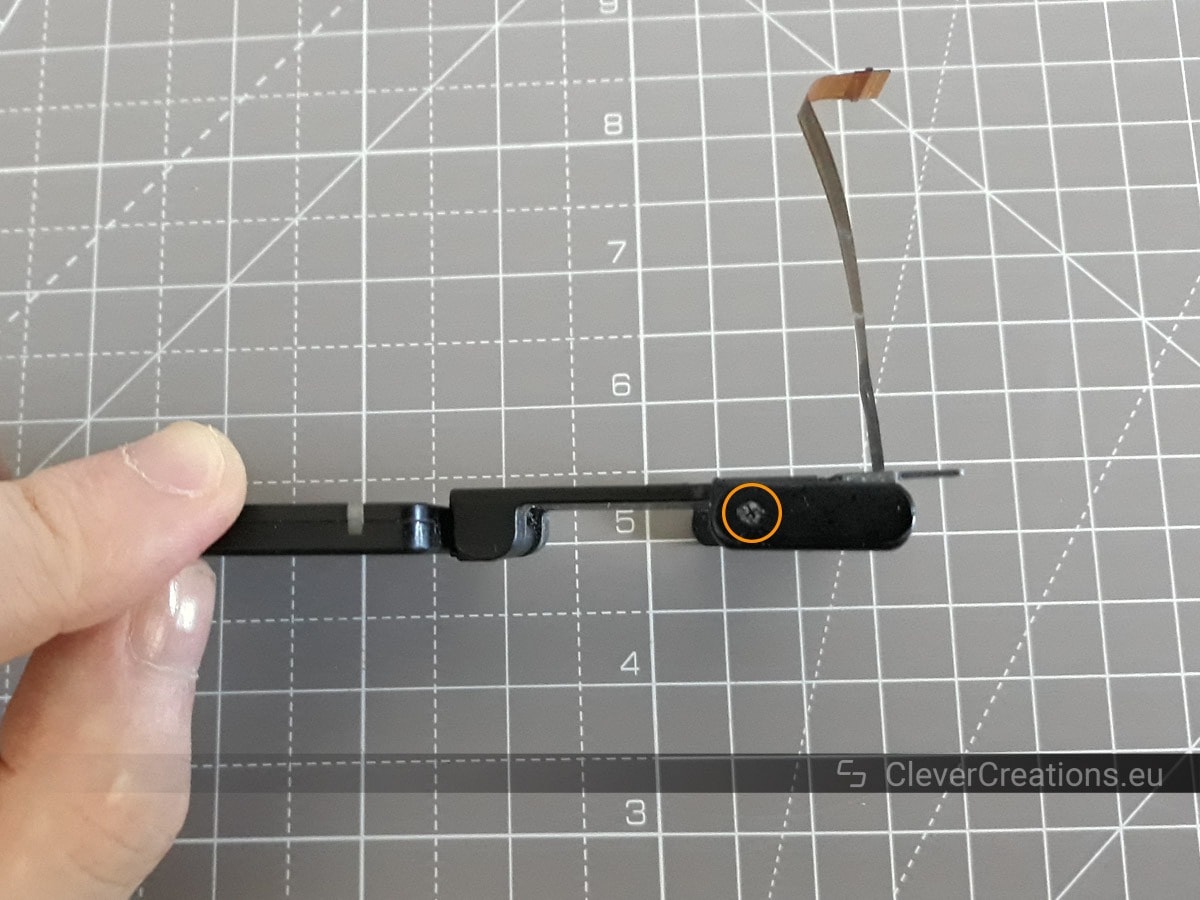
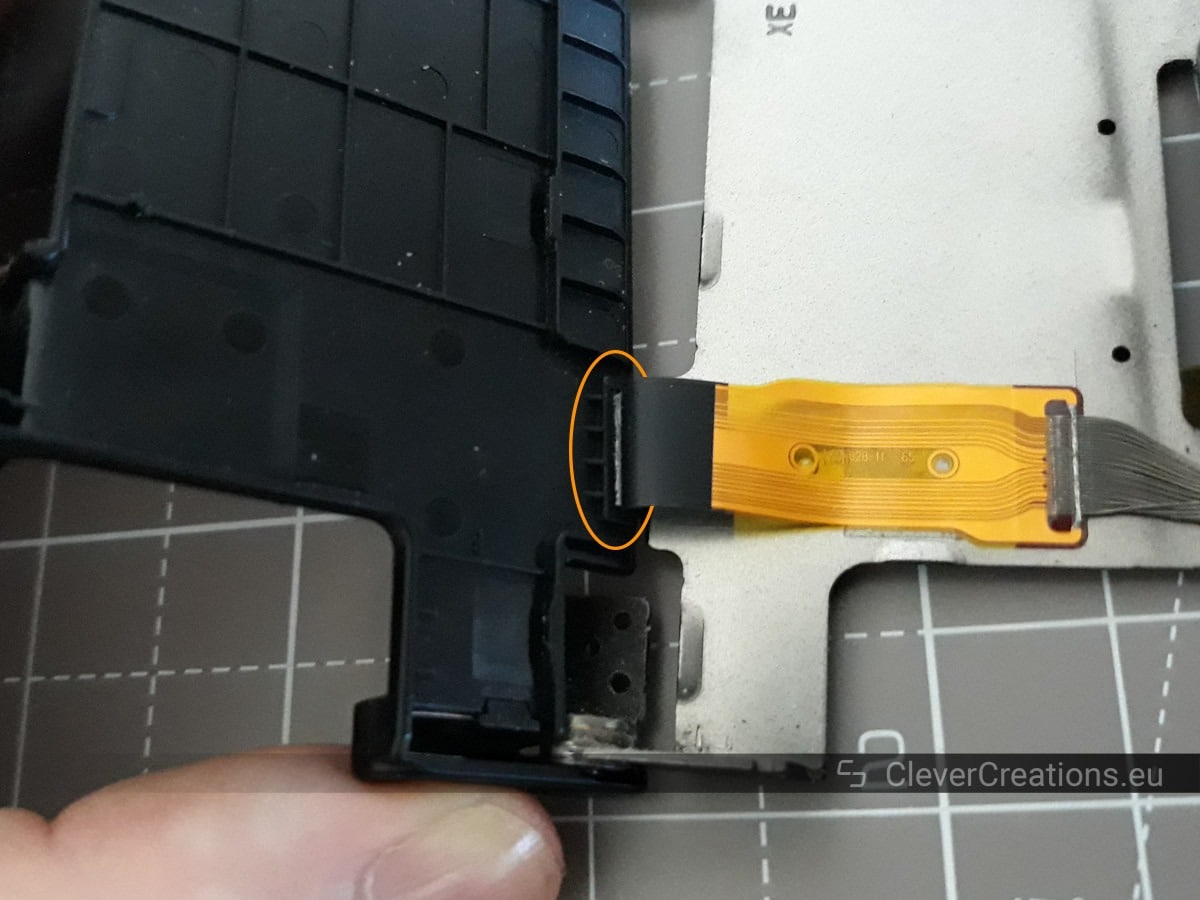
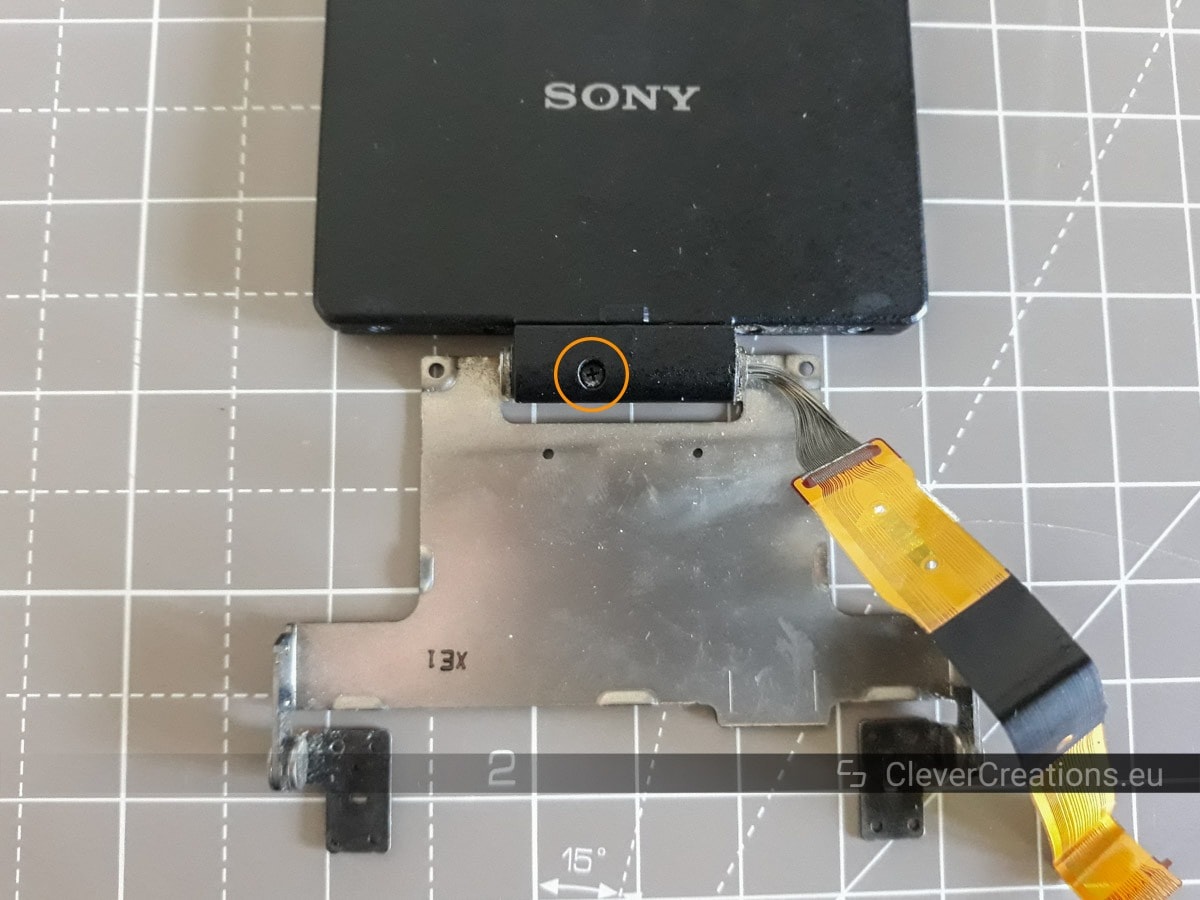
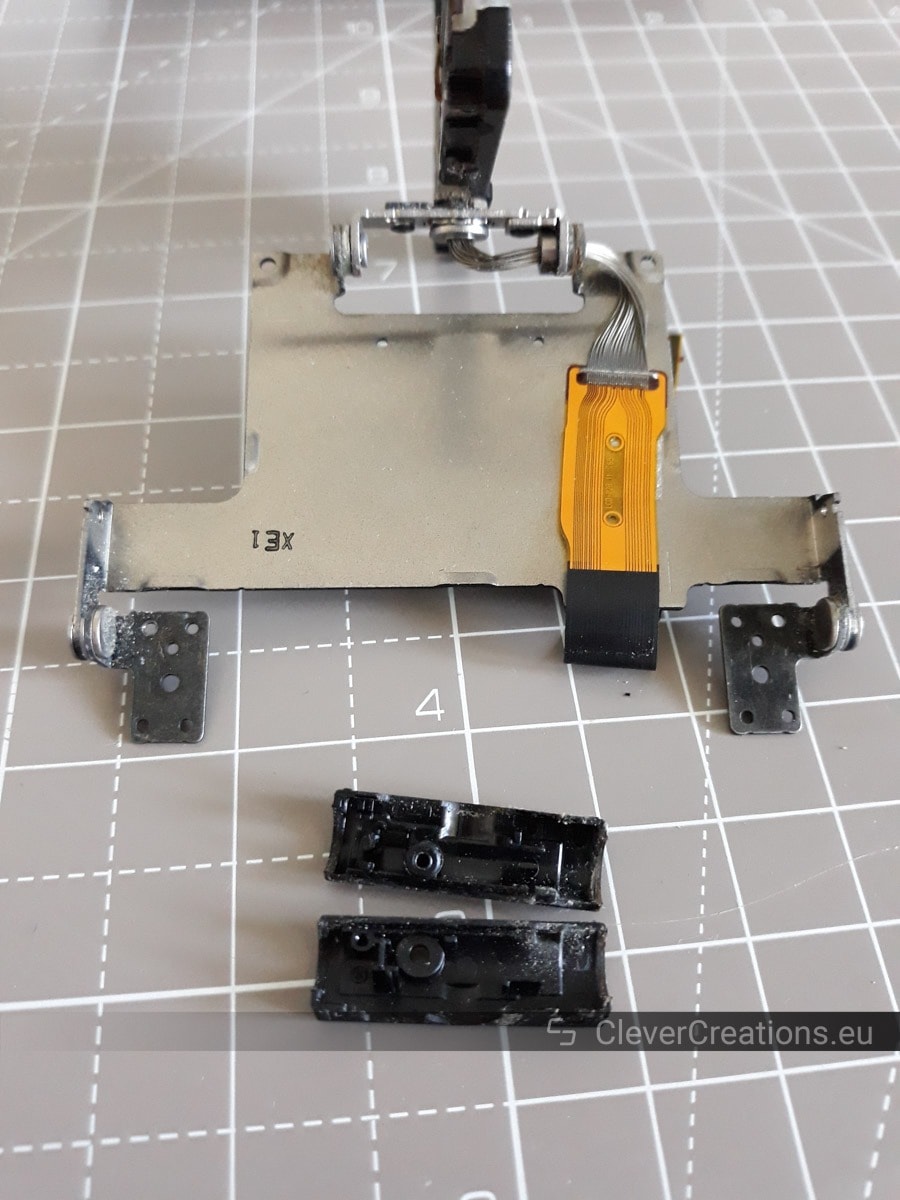
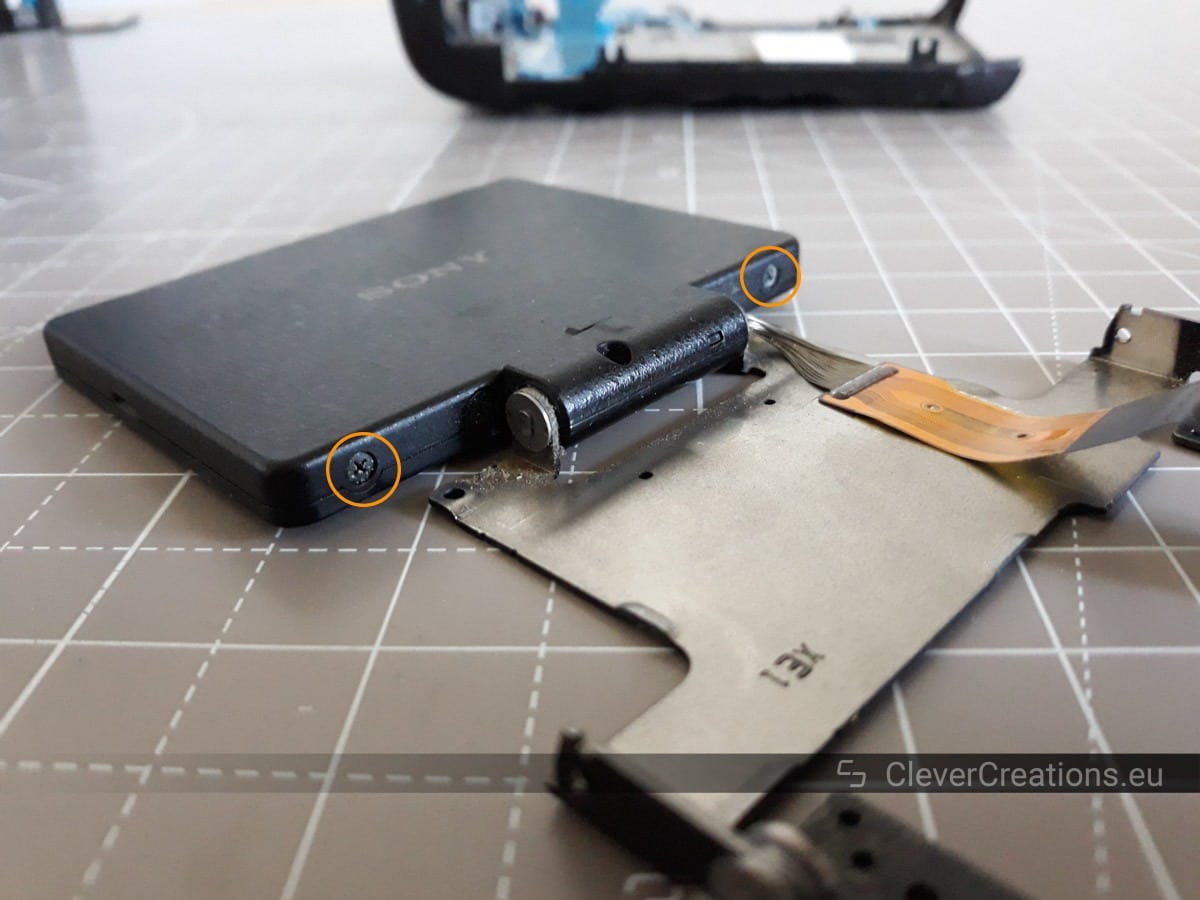
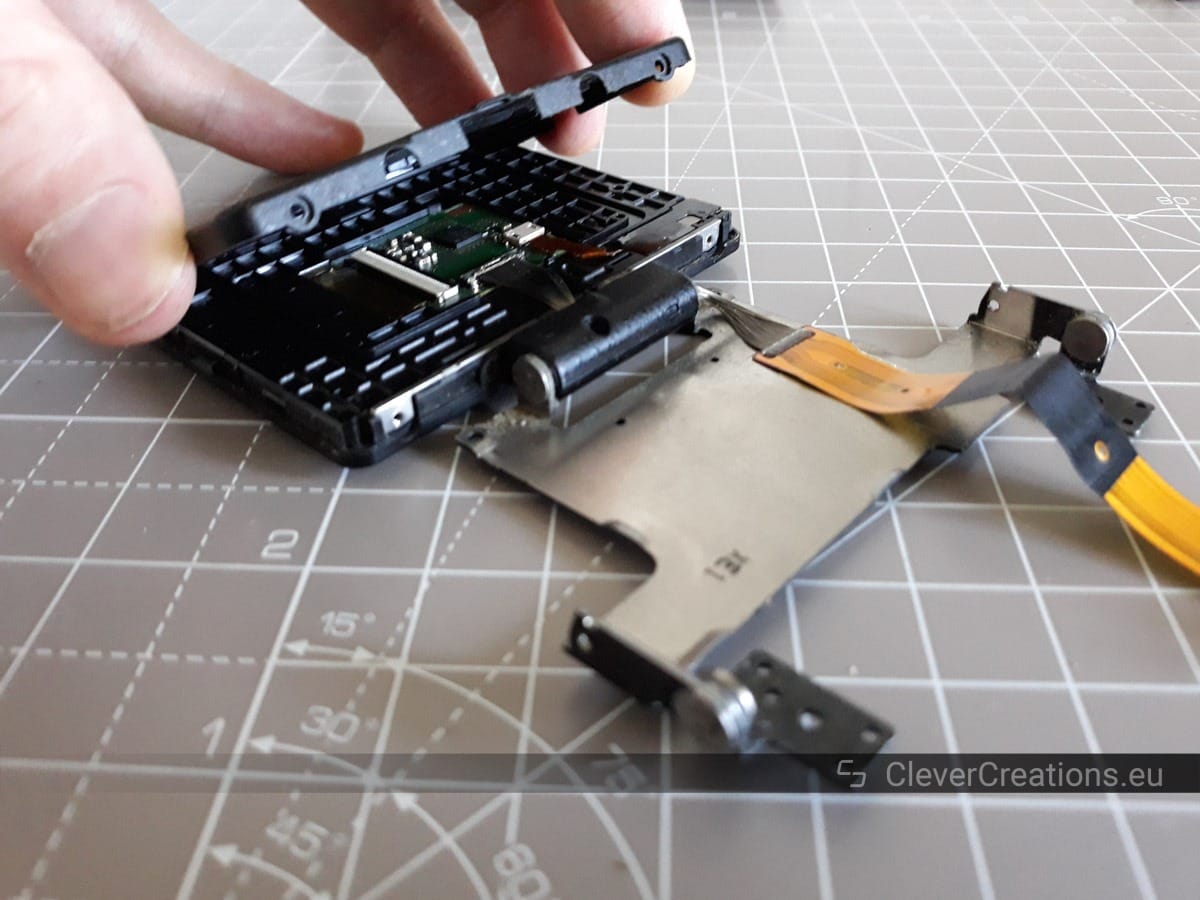
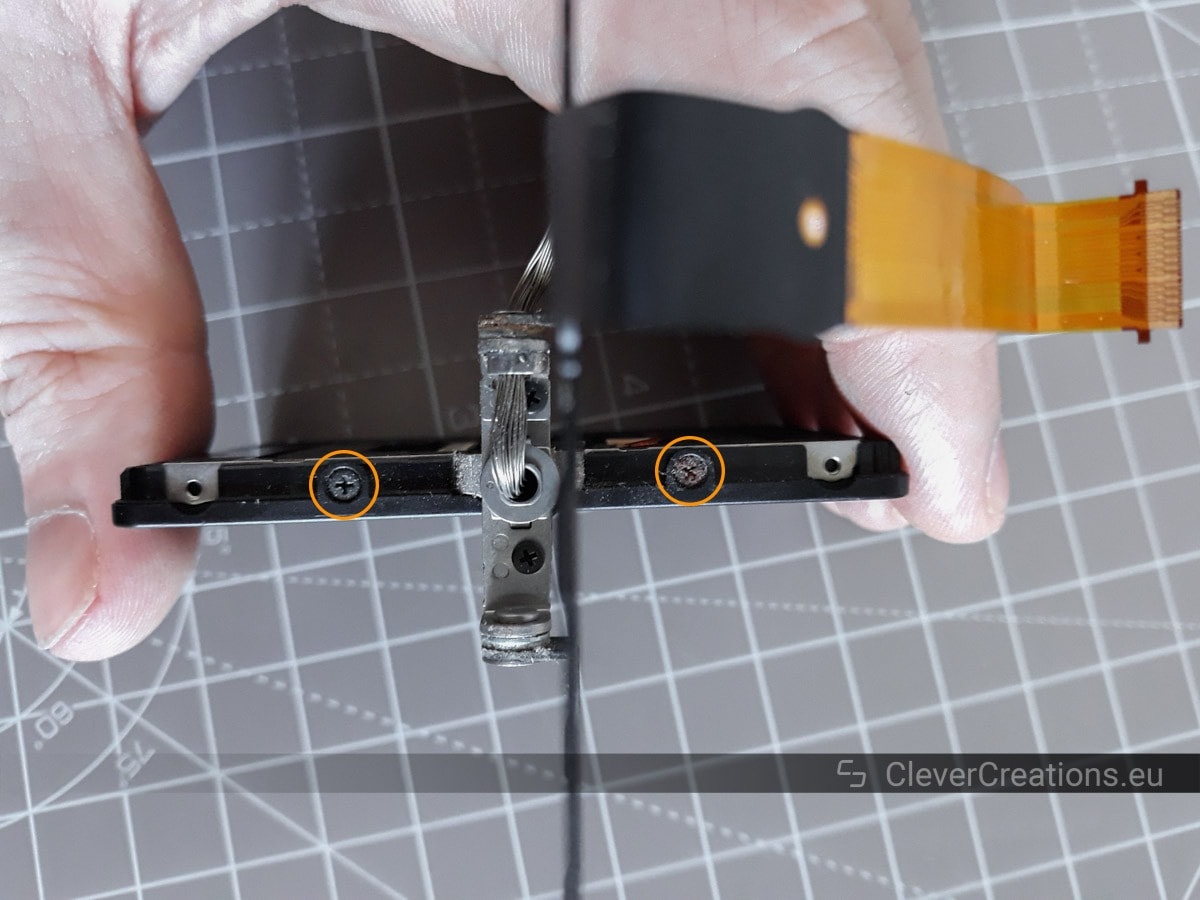
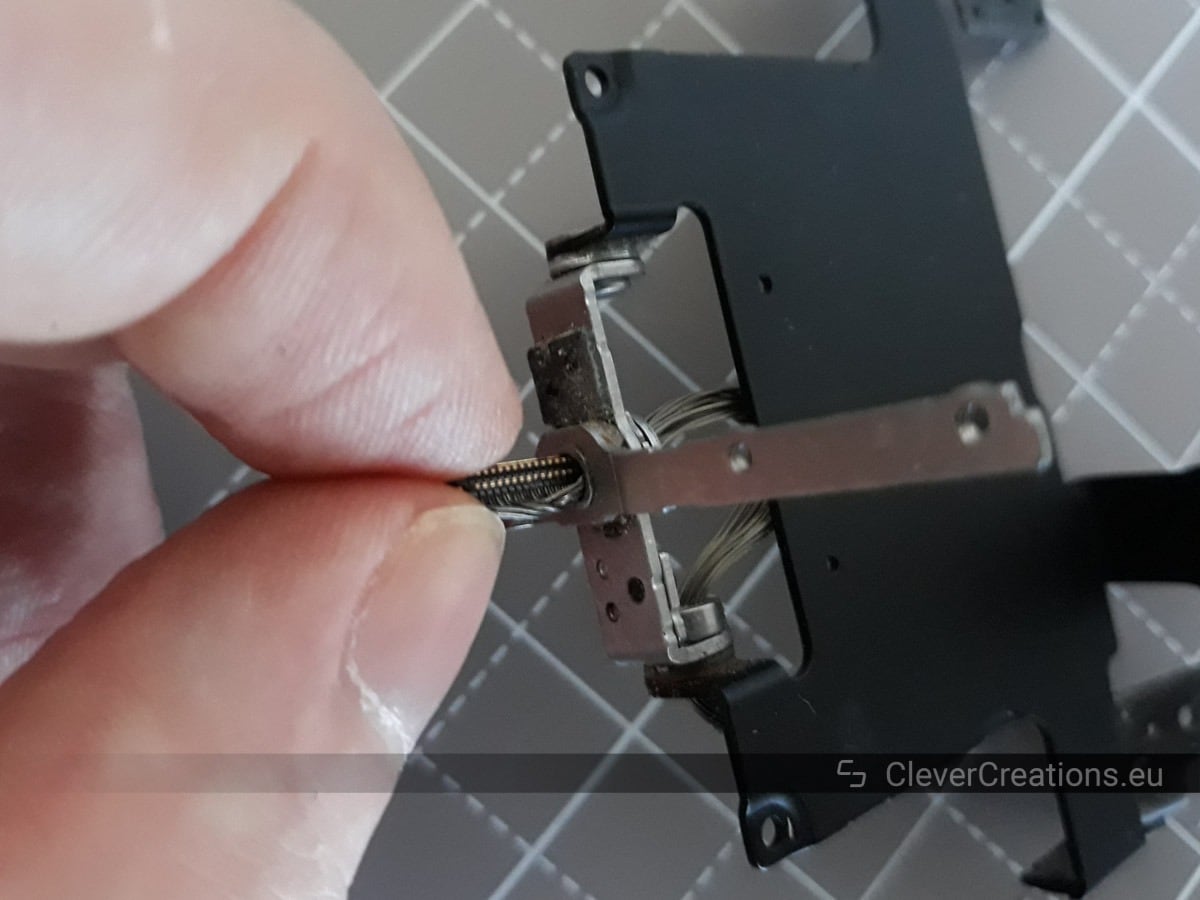
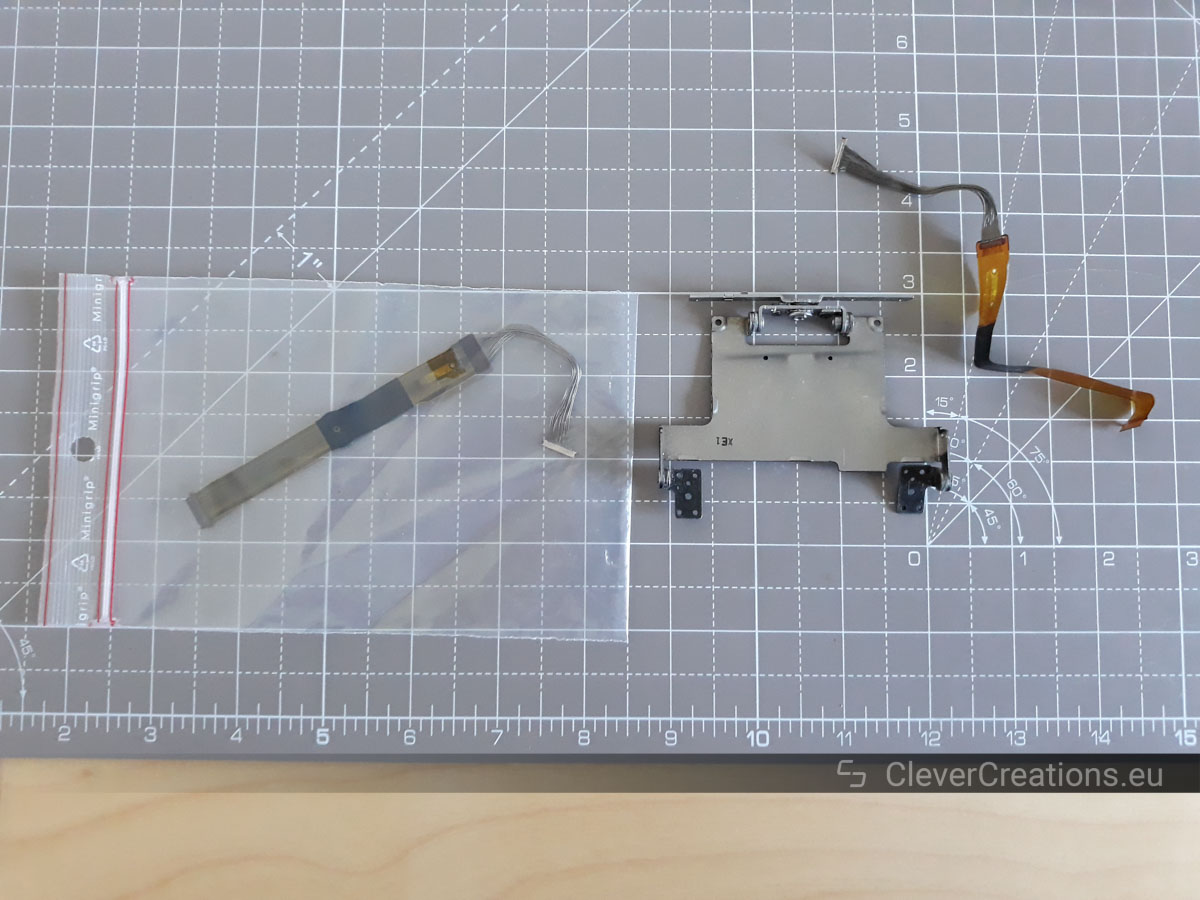
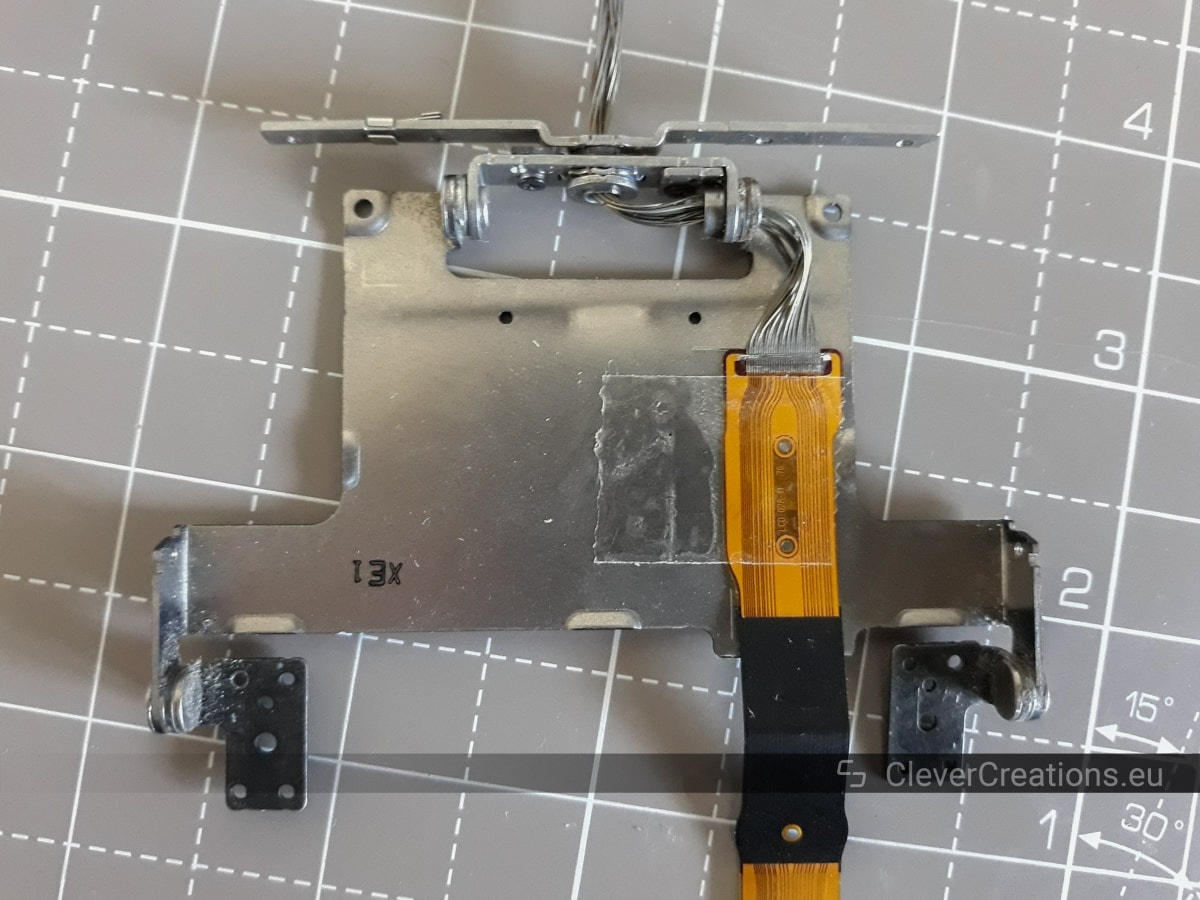
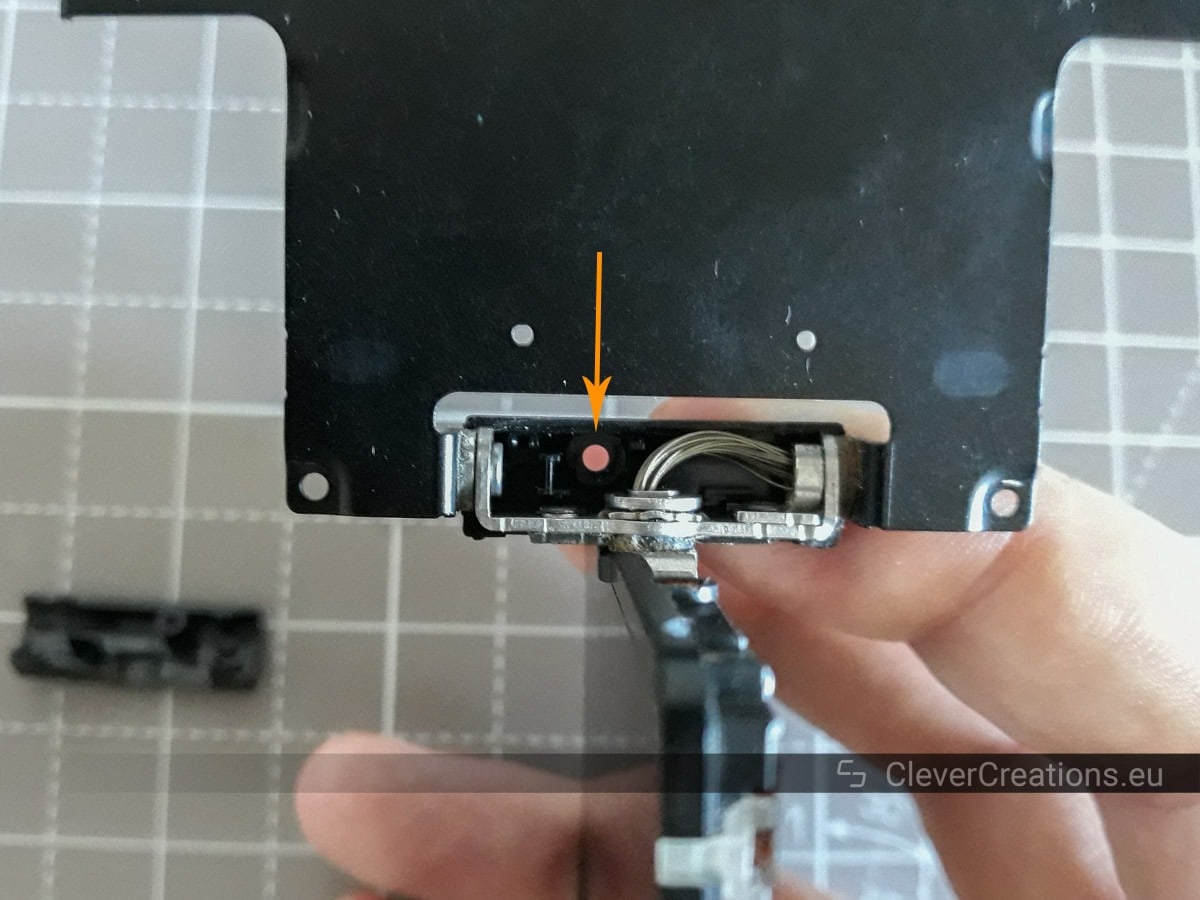
Flex Cable Removal


Tips for Reassembly
A Summary of the Repair Process
- Remove the lens and the battery from the camera body.
- Slide off the rubber eye cap.
- Unscrew all rear cover screws.
- Take off the rear cover.
- Detach the orange and blue flex cables.
- Unscrew the LCD screen assembly screws.
- Disassemble the LCD assembly.
- Replace the broken flex cable (or broken LCD).
- Reassemble the camera by following the above steps in reverse.


Conclusion
This was a great project for me to do, as I always enjoy extending the lifespan of products. Especially when the alternative is spending a lot of money.
The repair was not as difficult as I thought it would be. The Sony A77 is a complicated piece of technology, but it seems to be designed so that it is relatively easy to repair.


Thanks so much for this easy to follow fix. Sorted out my A77ii nicely 🙂
Glad to hear that! Happy shooting!
Thanks a lot, my Sony A77 works great again! It took me an hour to follow the process, and I cannot even imagine how much time it would take without this guide.
Awesome, Andrew! Thank you for leaving a comment and letting me know.
I was sure it is the flex band, but after switching it with a new one the display is still grey. Anyone experinced the same, what could it be beside the flex cable? Thanks for the good instruction, it helped a lot though.
Hi!
If it is not the cable, then the problem is probably with the LCD screen itself. Or there might be something on the LCD printed circuit board that is defective. Replacing the LCD screen itself will probably fix it.
Another possibility is that the camera body PCB is malfunctioning, but that is a lot less likely. Especially if the A77 is otherwise fully functional.
Did you double-check whether the orange end of the flex cable is fully inserted into the connector (on the camera side)? It needs to be pushed all the way in to ensure proper contact. There might be a small chance that it is not seated correctly and that is why it is not working. It’s good to rule that out before replacing other components.
Please let me know.
Thanks for the reply. It was strange that the shoulder display was dead too with the new cable. Right as i removed the flex band it was working again. Maybe i send the camera in, instead of buying a new display and it was the cable all the time….thanks for the help, and maybe i can tell you what the problem was in the future
Hmm, that is strange. Perhaps something was being shorted out somewhere while the new cable was installed. I can’t think of any other reason why the shoulder display would also stop working. I would love to hear what the actual problem was if you manage to have the camera repaired.
Hey Tim,
Just wanted to tell you that my display is working great again since today. Bought an original cable from official sony service partner and it had the right length. Thanks again for your help, and happy holidays,
Jens
Hey Jens,
I am happy to hear that! Thanks for letting me know.
Happy holidays!
Your instructions and insights could not have been better! I just replaced the flex cable and am back in business. Clear, insightful, well-illustrated…these instructions were excellent all the way around. Thank you for posting them.
This was sooo helpful!!
Thank you so much!! I got my Screen back again working 100%
awesome!!! Thanx a lot!!
Thank you for letting me know, Dilantha! I am glad you were able to fix it.
Thanks for your helpful tutorial. Wondering if you can advise me on this: I tried to replace my Sony a77 LCD display because the finish on the screen was grossly defective. Bought a replacement LCD and in the process of hooking up the three little ribbon cables to the small PCB pasted inside the LCD assembly, the smallest of the three ribbon cables— the one which plugs into the small,white, non-locking socket on the PCB—separated from the LCD assembly completely. The connector is intact and still plugged in, but the other end of the ribbon is simply free and not attached to any weld or conductive connection that I can see. And not surprisingly, now my LCD is totally dead. What does that little ribbon attach to, and can it be fixed? TIA—
Hi Kerry,
let’s see if we can fix this. Based on your description and on what I could find in the service manual, I think that this is the ribbon that belongs to the SHD-003 (870) FLEXIBLE BOARD. This is a flexible circuit board that contains an ambient light sensor and a sensor that detects if the LCD panel is closed. It is possible that if the camera incorrectly thinks that the LCD is facing the camera body, it keeps the LCD off.
On the right side of page 6-43 of the service manual you can see what the flexible board is supposed to look like. From your description it sounds like the ribbon part might be detached from the rest of the flexible board. In that case you can buy a replacement SHD-003 board for about $15 and install it. If the ribbon part is still attached to the rest of the flexible board it must also be installed correctly for it to not cause issues.
On this diagram you can see how and where it should be installed. It is part #103, and it gets mounted in place with a small screw (part #140).
Hi Tim, and thanks for that great explanation. Very grateful for that. Now I realize that what I mistakenly called a “ribbon” in my previous note actually is the entire part known as SHD-003. It is all in one piece, nothing broke off of it that I can see. However it literally fell out of the camera during my initial disassembly of the LCD display— when I pulled it’s tiny, stubby ribbon out of its socket, the whole board simply dropped onto the work table. Thinking this was a ribbon rather than a circuit board, and since one end (the actual ribbon connector end) was plugged into a socket, I just assumed that the other “end” of the part must have been electrically connected to something else. Obviously I was wrong about that. FYI I did not see any screw holding it in place. Thinking I must have severed something or dislodged some little connecting piece, I searched the tabletop carefully and found two objects—a tiny magnet, which I believe is part #106 or #116, and a strange, very tiny Y-shaped plastic part that I’m thinking might be part #104. I’m at work so I won’t see the camera again until I get home tonight. I’ll let you know what I discover. Does the magnet participate in telling the camera the LCD is open or closed? If so, I would think dislodging the magnet like I did would falsely signal the camera that the LCD is open, not closed. If that’s true, then I guess I can’t blame my non-functioning display on the magnet.
Hi Kerry,
the sensor that detects whether the LCD is open or closed is indeed magnetic, so it is definitely possible (or even likely) that the issues with the LCD are due to the magnet missing.
I understand your logic with regards to the LCD behavior with a missing magnet, and initially I thought the same. However, after thinking about it some more I think it could also work like this:
– If the sensor detects the ‘default’ magnetic field from the magnet near the sensor, the camera turns the LCD on.
– If the sensor returns a different value (when the magnetic field changes a lot because of the magnet interacting with the magnet on the camera body, or in your case because the magnet in the LCD assembly is missing), the camera turns the LCD off.
I have no idea if it truly works like this, but we can’t exclude the option. I do think it’s safe to say that reassembling the LCD assembly with all the parts in the right place is going to tell us more.
Hey Tim— success! Well, almost. I put everything together and powered up… the LCD backlight went on, but nothing else appeared on the screen. I read in another forum that one source of this problem is not pushing the ribbon cables into their respective sockets as completely as possible. So I pushed them all in as far as they could possibly go, powered back up, and bingo— working LCD with all the usual data on display. Yay!
Now there’s just one problem: the replacement LCD assembly that I purchased doesn’t seem to fit the Sony housing properly; it’s as though the entire LCD assembly is 0.5mm too thick. I’ve snapped it into the LCD housing as firmly as possible and put the four retaining screws in the bottom of the assembly, but the LCD assembly still protrudes from its housing as if it could simply fall out of there without warning. Any ideas why I’m not getting closure on this?
Hey Kerry,
glad to hear the LCD is working now. Well done!
With regards to the LCD assembly thickness: if I were you, I would check the thickness of the replacement assembly using something like a digital caliper, and compare it with the thickness of the original.
-If they are the same thickness, then something must be mounted incorrectly. Find what it is, fix it, and it should fit in the Sony housing again.
-If the replacement assembly is actually 0.5mm thicker (not sure how, unless it is an off-brand Chinese copy maybe), then I am not sure how to fix it. My best guess would be to hot glue the back of the LCD assembly to the Sony housing, so at least you can be sure that it won’t fall out.
Thanks Tim. I currently don’t own a measurement caliper but you’ve given me an excuse to buy one. The replacement screen was from a US seller on eBay, supposedly genuine, paid $28 for it. I had actually tried a cheapo replacement LCD from China a few weeks ago, couldn’t get it work at all (maybe my fault, not pushing cables in far enough again) but I noticed the same “too fat to fit” thickness issue with that one. Hmmm. I’ll get that caliper and do one more disassembly and see what’s what. Ironically I’m doing all this just to get the camera ready to sell. The old LCD had an ugly problem with the anti-glare coating on the display wearing off, looked like hell. Not an uncommon problem I understand.
If you don’t have a digital caliper you might be able to just lay the LCD assemblies side by side and check by eye whether there is a difference in thickness.
It’s less likely that both replacement LCD assemblies are thicker than the original, so that makes me err towards a mounting issue (something in the LCD assembly not clipping in correctly, a screw head sticking out, a misaligned component, etc.).
The anti-glare coating is indeed pretty bad on these LCDs. I’ve got the same problem on my A77. It seems like the coating just dissolves and stains over time after comes into contact with skin oils. Not very pretty.
Hi,
Really nice “manual”. Mine has something like this issue, but I can still see the figures and numbers at the screen, so I wonder if this also is the Ribbon or might be the motherboard. Do you have any idea??
Thank you..
/Pia
Do you have a picture or video of the screen you could share?
Tim
First of all, THANK YOU! Not only is the the most informative step-by-step guide, it is by far the easiest to follow on the net.
Here is my issue (and predicament), Tim:
The A77 articulated screen just went blank on me out of the blue. Everything else works fine except with the screen out, cannot see anything in the viewfinder. How may I troubleshoot whether it’s the ribbon or the screen? I am based in Kenya and shipping fees are an abomination to here and I’m truly anxious of purchasing one part and finding it’s the other one faulty (and sadly, I can’t afford to purchase both).
Thanks again for this immense DIY follow along.
Best,
S
Hi Samir,
thank you for your feedback!
That sounds like a tricky situation. I will do my best to help you.
What I understand from your comment is that the viewfinder only stops working when you articulate the screen away from the camera body (“with the screen out”), is that correct? That would make me think that the problem lies with the flex cable. Perhaps it shorts something out in the electronics when it is moved in certain positions, causing the electronic viewfinder to stop working as well.
If the viewfinder doesn’t work at all, then it might be something else. Let me know if that is the case, and we will go from there.
Tim
Thanks for the speedy response, Tim.
My excitement overcame my clarity.
The screen doesn’t work at all, totally blank, no signal. However, when it is articulated out, the viewfinder doesn’t work and remains blank.
I did a reset and initialised it too and zilch.
TIA, Tim.
S
Happy to help, Samir. 🙂
It definitely sounds like the viewfinder problem is caused by a damaged flex cable. My guess is that when you articulate the screen out, the damaged cable shorts out some of the screen-related electronics, causing the electronic viewfinder to stop working.
If this was caused by a broken LCD screen, I would expect the viewfinder to also not work with the screen against the body.
It’s a bit concerning that the LCD screen never works though. There’s no reason why it shouldn’t work when the viewfinder does work, unless the flex cable suddenly developed multiple issues, or if the LCD screen broke due to the damaged flex cable. I think the last option might be the more likely of the two. 🙁
Did you do a reset through the menu or a hard reset using the hardware buttons? The hard reset is the best choice, on the off-chance that this is somehow a software issue.
Tim
Thanks for this guide, it’s really excellent. Two things I’ll add from my experience replacing the cable (my cable had a tear about 1/3 of the way through it at the point it bends coming out of the camera body).
1. There’s a sneaky rectangular magnet in the plastic back cover of the extension mechanism, just beside the screen hinge. I only noticed it because it somehow jumped out of its little hole and stuck itself to the hinge while I was reassembling – I had no idea where it came from and it cause me all kinds of problems. It took me ages to find where it was supposed to go. Note that this is a different magnet to the one behind the LCD screen itself, although both of them are rectangular, and both seem to be involved in telling the camera whether the LCD is facing into the body or not, and so are involved in turning the LCD on (or switching to the viewfinder).
2. Unfortunately, the very thin white plastic cover over the connector for the orange flex cable on the main board broke off when I was disconnecting the cable. It seemed to be weakened (maybe from heat), So now the cable doesn’t make a proper connection to the connector, and the LCD still doesn’t work despite replacing the broken cable, I did manage to get it to work intermittently, but I couldn’t find a way to keep the connection sound once the back to the body was reattached (insulation tape didn’t work). So I’m still stuck with just the viewfinder now. Maybe its the camera gods’ way of telling me to upgrade to a A7iii 😉
Hey Peter,
that is great info, thank you for sharing!
2. You can probably get a proper connection by securing the orange flex cable with hot glue. Ideally by gluing the very thin white plastic cover in place while the flex cable is inserted. Alternatively, you could hot glue the cable itself in the connector without the white cover.
The first option is preferred because it is fully reversible. The second option might not be, because it is possible that the flex cable is temperature-sensitive (i.e. deforms when exposed to hot glue), or is at the very least prone to tear if you were to remove the hot glue in the future.
Low-temperature hot glue is the way to go here (instead of high-temperature), because it is less likely to cause heat damage to the flex cable but still has a high enough melting temperature for the connection to remain secure over time.
Please let me know how it goes if you choose to attempt this. 🙂
Tim
Awesome! Fixed it!
The cable i got (the website said compatible with A66, A77, A99) was about 1/2″ longer than the original in my A77. (the packaging said A99V)
It all fits, it all works. Thanks a lot!
Hello there
I followed your guide to the letter, and I replaced the damaged cable without issues. When the camera was all put together, I turned the power button, but nothing happened. I swear I didn’t touch anything else than the was needed to exchange the flex cable, so I don’t understand what is wrong now :/
Cheers
Hi Márcio. If I were in your situation I would first double-check that the battery has been reinserted and that it is still sufficiently charged. If there are no issues with the battery, I would follow the guide again to make sure that none of the steps have been skipped by accident.
Ok, lucky for me, the delivery of the cable was delayed, so the vendor sent me another one free of charge. I thought I had damaged the first cable that arrived, but now I tried with the second cable, the monitor doesn’t light up either. If I remove the cable and assemble the camera without it, it works fine! I just use the viewfinder as I am used to do in the past months.
I guess I will order a new screen then. If the cable is ok, but there is no way to light the screen up.
Cheers
Hi,
my LCD went kinda grey. So i bought the LCD panel and replaced. Still its the same. Then I thought its flex cable. Ordered and replaced. Still its grey. I can see the LCD being powered but no display appears. I can see clearly see the pics in the view finder if i want to review it. What could have gone wrong?
Hi Mohamed,
if the LCD is still broken after replacing the flex cable and the LCD panel, then the problem is with the camera motherboard. Most likely something is wrong with the circuitry that drives the LCD.
Replacing the entire motherboard is the easiest way to fix that problem. A new one can be bought here, but I don’t have any instructions you can follow for that.
Note: when I connect the orange cable to the connector on the mainboard, without connecting the other end on the monitor, the camera doesn’t boot up. If I connect the other end to the monitor, doesn’t turn on either. BUT if I unplug the new cable, it turns on normaly. It seems the fault is not quite on the monitor itself, or can it be?
Interesting, that does suggest that something else than the monitor is the cause. A problem with the cable can be excluded too if this happens with two new cables (and the original one). Some thoughts:
– Did you check the orange cable connector on the camera motherboard for damage or debris inside? It is possible that some pins gets shorted out when a cable is inserted.
– Are there other components on the camera motherboard that look damaged/abnormal?
– I suppose it is possible that the camera has some system that can detect when the cable is plugged in but not on the other end, and then refuses to boot. But I am not sure why Sony would implement that, it seems unlikely.
Well, since my camera screen is quite old and has a few scratches, I ordered a new one to help clear that out. Maybe the camera has some self-check mechanism that prevents it to boot up when some component is faulty? Removing the cable alone will prevent the detection of the screen’s problem since there is no screen in use, and pluging the cable alone may cause some kind of “missing component here” internal error, and so it doesn’t boot; hence the only solution would be removing the cable itself. I don’t know if they set up the camera this way but doesn’t seem completely out of logic to me… About the orange cable connector, I didn’t saw anything inside, but I can have a closer look. I even looked with a macro lens adapter that acts as a magnifying glass for my eyes when placed at the right distance, and I could see some detail of the connector; no garbage, nothing that seemed broken. But I will try to look again with a strong light pointing at it.
Cheers!
Is the a77 and the a77ii cable the same and interchangeable? I ordered one off eBay from a Chinese company. It was longer by about an inch. My original flex cable was torn and I replaced it following the instructions. The screen is now coming on but it’s black. I also can’t see anything on the top display anymore.
Hi Rishi,
after looking into this, it does seem like the A77M2 uses a slightly different flex cable (and LCD display). I have updated the article to make this clear. Sorry for any inconvenience. 🙂
Tim
Hi
I cannot find better words to express my gratitude for your kind information to change this flex. Did the job including cleaning in under 2 hours at the comfort of my study at home!
Kind regards
Ivan
Hi Tim!
This is a great Instructorial (sic), thank you, but it is missing the info I am specifically looking for and I wonder if you could PLEASE HELP ME to repair/fix the LCD Display on my Sony SLT-A99? Specifically, could you please put together, or give me advice on, how to repair the ‘EM Ground Plate’? (perhaps using adhesive copper foil or similar?) My issue is that when I removed the old LCD from my SLT-A99, I managed to damage/remove the EM Ground screen round the edge and so now the LCD will not display anything… Finding a replacement part has proved almost impossible. This part is identified as ’06 4-440-662-01 EM LCD GROUNDSHEET (875)’ from the SLT-A99 Service Manual.
The Camera is still entirely useable through the EVF, but I can’t get the Menu etc. to display on the LCD. The Magnet is fine and in the back of the plastic case, but the seal/EM-Ground needs to be fixed. In particular, the sensor connections seem problematic. Is this something that you could advise on as I can find nothing on the internet about this, but loads of info on replacing LCD’s. Any help/advice on this would be simply awesome!
Thanks in advance and here’s hoping you are up for this challenge!
Jim.
Hi Jim,
I think you are right on the money with the idea of using adhesive copper foil. I have used it for things like shielding guitars and it works perfectly for grounding purposes. Make sure to connect it to a known ground on the LCD.
Thanks a lot, 120€ saved! a99 cable tape is little bit larger tham a77, and no problem
Glad to be of help, Leonardo!
Hi Tim,
Today I successfully repaired my A77 because of your clear and detailed tutorial. Thanks a lot ! Hopefully I did everything good and it will last for a long time !
Just faced a little difficulty to replace the two flex cables (blue and orange) as I didn’t want to force anything and was afraid to break them but with patience everything went good.
Thanks again for your generous and helpful post,
Have a great end of 2022 and wishing you the best for 2023,
Max
Many thanks, great tutorial. I suffered the issue of getting the wrong cable, as the one I got was at least an inch longer in the wire bundle end, which made it really challenging to fit. I wrapped the extra cable around a twist tie, and stick it altogether and success!
Hello. Thanks for your detailed guide! I have a Sony Alpha 65, similar to a77 It had a broken LCD. I replaced the LCD with one from eBay and now the image is upside down. How could it be fixed?