

- Good 3D print / laser / CNC performance
- Does not require much fine tuning
- Generous work volume
- Built like a tank
- Integrated Wi-Fi connectivity
- Fantastic touch screen
- Great community and support
- Time-consuming to switch between functions
- Slow compared to dedicated machines
- Weak laser
- Slow bed heating (on A350T)
Snapmaker originally made its way onto the market with its Snapmaker Original, the first commercially available 3-in-1 3D printer. A couple of years later, it released the Snapmaker 2.0, an updated and improved version of the original.
With 3-in-1 3D printers you can 3D print, laser engrave, and CNC machine all in a single machine. For those who want to get started in multiple areas of fabrication, they provide an excellent solution without having to purchase multiple devices.
The Snapmaker 2.0 line of products has been around for a while now, and all of its bugs and kinks have been ironed out.
Today, we will look at the flagship A350T model of the Snapmaker 2.0 line-up. You will see what areas it excels at, but also find out when it might not be the best solution for you.
There’s literally a lot to unpack, so let’s get started!
Available Versions
As mentioned above, Snapmaker has generously provided us with the A350T to review, which is the largest and most expensive model in the 2.0 series. If you are looking for something more modest, there’s also the A250T version.
The number in the model name corresponds to the build volume of that particular device. The A350T offers a build volume of 320×350×330 mm, whereas the A250T offers a build volume of 230×250×235 mm. All other specs and capabilities are identical between the two models.
For a $300 difference in price, that’s a lot of extra build volume for 3D printing, CNC machining, and laser engraving. However, if you are short on space or budget, or simply don’t need to make any big things, the A250T might be the better option for you.
The ‘T’ in the model name indicates that these are the upgraded versions of the previous Snapmaker 2.0 models (A150, A250, and A350). The newer ‘T’ versions come with a number of improvements that make the Snapmaker 2.0 a lot more enjoyable to work with.
For example, the stepper motor driver outputs and the power supply are more silent. Snapmaker also made improvements to the overall 3D printing experience and added a larger 20 mm pitch (up from 8 mm) on the X- and Y-axis lead screws.
Overall, this makes the upgraded T models of the Snapmaker 2.0 a more refined product when compared to the older versions. The non-T models aren’t sold by Snapmaker anymore, but if you find them anywhere else, you are well-off choosing an A350T or A250T instead.
Snapmaker 2.0 Specs
| Snapmaker 2.0 Specifications | |
|---|---|
| Price | A350T: Snapmaker | Amazon | MatterHackers | AliExpress A250T: Snapmaker | Amazon | MatterHackers | AliExpress |
| Frame | Aluminum alloys |
| Connectivity | Wi-Fi, USB |
| Touchscreen | 5-inch TFT LCD |
| Software | Snapmaker Luban + Third-party alternatives |
| Operating System | Windows, MacOS, Linux |
| Power | 320 Watts |
| 3D Printing | |
| Print Volume | A350T: 320 x 350 x 330 mm A250T: 230 x 250 x 235 mm |
| Max. nozzle temperature | 275°C |
| Max. bed temperature | A350T: 80°C A250T: 100°C |
| Layer resolution | 0.05mm – 0.3mm |
| Materials | PLA, ABS, PETG, TPU |
| Laser Engraving/Cutting | |
| Work Area | A350: 320 x 350 mm A250: 230 x 250 mm |
| Laser | 1600 mW diode laser (450nm) |
| Laser materials | Wood, leather, plastic, fabric, paper, non-transparent acrylic, and more |
| CNC | |
| Work Area | A350: 320 x 350 x 275 mm A250: 230 x 250 x 180 mm |
| Shank Diameter | 0.5mm-6.35 mm (0.02-0.25 inches) |
| Spindle Speed | 6000-12,000 RPM |
| Supported Materials | Wood, acrylic, PCB, carbon fiber sheet, jade, etc. |
Unboxing the Snapmaker 2.0

Unboxing the Snapmaker 2.0 is one of the most hardcore unboxing experiences we have had so far. The A350T itself weighs over 25 kg (60 lbs), so the box it comes in is quite large and heavy.
If you get the Snapmaker 2.0 enclosure as well, that weight is doubled. The enclosure’s aluminum frame and panels are equally hefty.
Altogether, this leads to a lot of lifting before you even get around to assembling the Snapmaker 2.0. We recommend having someone else available to help you with the process as it can be quite a workout on your own.
The Snapmaker 2.0 also does not come partially pre-assembled, so inside of the main box you’ll find many smaller boxes and bags containing all of the necessary parts, 3D printing tools, and even materials.
This is not a bad thing by any means. It allows you to unbox everything and get a good overview of all the components you’ll be working with. Instead of a chore, it will probably feel more like you are a kid at Christmas. That’s how it felt to us at least.

Getting Started with the Snapmaker 2.0

As you can imagine, the Snapmaker 2.0 assembly is something that takes some time. Be ready to set aside a long afternoon or evening to get it all done. There are no easy shortcuts and you will have to put in the work.
The process is not complicated, but it is quite involved. You’ll be attaching a lot of parts to the frame with bolts, and there are plenty of cables to route as well.
Luckily, the included instructions are of exceptional quality. We’re talking LEGO or IKEA-level. They have clear steps with easy-to-understand diagrams, and if you follow them you’ll have no issues whatsoever.

All parts are clearly labeled as well. The bigger components can be found by the inscription on their box, whereas the bolts and such are all sorted in small plastic bags, each clearly labeled with their type or size.

It all makes for an enjoyable and straightforward assembly process. With a machine like this, that is especially important. You don’t want to encounter frustrating problems that force you to spend even more time on the build.
Just like for handling the large box, you might also want to have someone else at your disposal for the assembly process. Some steps require a good bit of strength, and might not be possible for everyone to do this by themselves.
For example, you’ll need to move the heavy base on its side and back a couple of times to access different areas. Moving the lead screws by hand is something that’s much easier with two people as well.

These things are a consequence of the solid, heavy-duty construction of the Snapmaker 2.0. In order to deal with the forces of CNC machining, it needs to be a lot more robust than your average 3D printer.
This does come at the cost of added weight, but it’s a price worth paying. In the end, it’s better to have a solid machine that is more difficult to handle than a lightweight one that gives you poor results.
Snapmaker 2.0 Features
Since the Snapmaker 2.0 is a 3D printer, laser engraver, and home CNC machine in one, it has a lot of features that we need to talk about. To keep things organized, we have subdivided the features of the machine into its main three disciplines.
3D Printing

The 3D printing configuration is what most people will use most on the Snapmaker 2.0. This is the only fabrication method that can make use of its 320x350x330mm (on the A350T) build volume, which classifies it as a large 3D printer.
This build volume is more than enough for most hobbyist applications, and you’ll find it is sufficient for a lot of engineering, prototyping, and architectural applications as well.
Because the Snapmaker 2.0 is leadscrew-driven, however, it is not as fast as other, belt-driven 3D printers on the market. Even with the increased 20 mm lead screw pitch of the AxxxT models, you are looking at maximum travel speeds of around 80 mm/s.
It’s not slow by any means, but if you want to fill up the entire print volume, that will take some time. For example, when creating a full-size 3D printed helmet, you are still looking at over 100 hours at the fastest print speed.

This is one of the compromises of a 3-in-1 machine. In order to sustain the forces associated with CNC carving, the Snapmaker 2.0 uses leadscrews for motion instead of timing belts. These can’t be driven as fast as belts but can transfer a lot more torque.
As a result, the Snapmaker 2.0 (or any leadscrew-driven 3-in-1 3D printer) is not going to be the fastest machine on the market. But, it will be able to handle a lot more challenging materials and applications than its belt-driven counterparts.
Print Head Module

The print head of the Snapmaker 2.0 is compactly-built, yet lightweight. It features a direct drive extruder that supports 1.75 mm diameter filaments.
In our testing, it proved to be very precise, with minimal stringing and oozing. This is generally expected for non-Bowden extruders, but it’s still good to see this confirmed.
Because the hot end can reach a maximum nozzle temperature of 275°C, you will find that the majority of filaments on the market can be used with this machine. PLA, ABS, and PETG are some of the most common ones, but you can also experiment with exotic filaments like wood composites, metal-filled PLA, and more.
Since it is a direct-drive extruder, you’ll also find that it is perfectly suited for flexible filaments, like TPU. These require a short path from the extruder to the hot end and like to be printed at low printing speeds. The Snapmaker 2.0 is able to do both of these things well.
Automatic Bed Leveling

Included in the print head is a proximity sensor that is used for automatic bed leveling. The way this works is that the Snapmaker 2.0 will probe several points on the build plate to determine its level. Then, it will make the necessary adjustments while 3D printing to adjust for the inaccuracies it found.
This will lead to a perfect first layer, without the need for you to engage in time-consuming manual bed leveling.
This is a feature that used to be reserved for high-end 3D printers but is now common in most 3D printers under $500, and even some 3D printers under $300.
Whereas those machines tend to use a probe that physically touches the heated bed, the Snapmaker 2.0 uses a magnetic sensor instead. In our experience, it works well enough, but we recommend increasing the probing grid to 4×4 or even 5×5 to get more accurate results.

The earlier A350 version had some issues with the magnetic sensor that caused it to be too sensitive. These have since been addressed in the A350T, but we still recommend increasing the probing grid for the best results.
The probing sequence does not need to run before every print, so you can get away with leveling only after switching manufacturing modules or when the first sign of inaccuracies appears in your first layers.
A limitation of the magnetic sensor is that you can only use it with magnetic bed surfaces. So if you ever want to switch to a glass bed or another non-magnetic surface, you won’t be able to do so.
Print Bed

Talking about the build plate, the one that comes with the Snapmaker 2.0 consists of two parts.
The first component is the heated bed itself. On the A350T, it is capable of reaching temperatures up to 80°C, whereas on the A250T it can reach 100°C.

This difference is caused by the power supply of the Snapmaker 2.0, which at 320W is not powerful enough to get a 320×350 mm heated bed of the A350T up to >80°C. On the smaller bed of the A250T, this is less of a problem, and temperatures of up to 100°C can be reached.
Neither is particularly fast to heat when 3D printing. Given the size of the beds and the fact that they operate on DC voltage, this is to be expected.
We would like to see this improved in the next version of Snapmaker’s 3-in-1 machines. In particular, the maximum 80°C temperature of the A350T print bed is not sufficient for 3D printing ABS and other high-temperature filaments.
The other component of the build plate is the actual print surface. On both models, this is a flexible steel plate with a coating that provides a light texture.

In practice, this light texture works well for the 3D printing of most filament materials. However, when 3D printing warpy or stubborn filaments, you might want to use a bed adhesive like Magigoo to improve adhesion. The texture is not grippy enough to handle some of these materials on its own.
Because the print surface is both removable and flexible, you can remove 3D prints easier than you could on a rigid surface, like glass. This is a feature we like, as dealing with stuck prints on the print bed can be one of the most frustrating aspects of 3D printing.

What would be improved about the design of the print bed is that the heated section is attached to the Y-axis carriage with 22 (!) bolts. This means that each time you switch fabrication methods, say from 3D printing to laser engraving, you have to remove and then re-attach all these bolts.

It’s quite a hassle and honestly something that we feel might limit creativity. If you want to do a quick laser engraving in between 3D prints, you would have to perform 74 small tasks (unscrew 22 bolts, swap beds, screw in 14 bolts, and all that in reverse for when you swap back) just for the bed aspect.

Combine that with swapping the print and laser head modules, switching between software, and other minor things, and you’ve got yourself a pretty hefty time investment for a minor laser engraving job. To us, this feels like a chore that takes away some of the enjoyment of such a versatile machine.
While we understand the need for a rigid platform for all manufacturing methods, we think there must be a simpler mechanism possible, a clamping one perhaps. We think Snapmaker should consider this for their next generation of 3-in-1 machines.
All in all, however, the 3D printing aspect of the Snapmaker 2.0 is excellent, albeit limited in speed. As you will see below, the prints that come off the machine are of good quality, and the software is easy to use.
Temperature Uniformity

The print bed of the Snapmaker 2.0 has significant temperature differences spread throughout its surface. Especially in the corners and along the edges temperatures deviate from the setpoint.
This doesn’t really come as a surprise. The print bed is large, does not have any insulation on the underside, and is bolted directly to a metal (read: conductive) frame that acts as a heat sink.
Because of these three factors, it is understandable that the temperatures are not perfectly uniform across the whole surface.
You’ll want to avoid 3D printing large objects in materials that have a tendency to warp (e.g. ABS, PC). Given the slow print speeds of the Snapmaker 2.0, printing large objects is not something most users will do anyway.
Laser Engraving/Cutting

The Snapmaker 2.0’s laser engraving and cutting functionality has several neat functions, but also a couple of shortcomings that we hope to see addressed in the next generation.
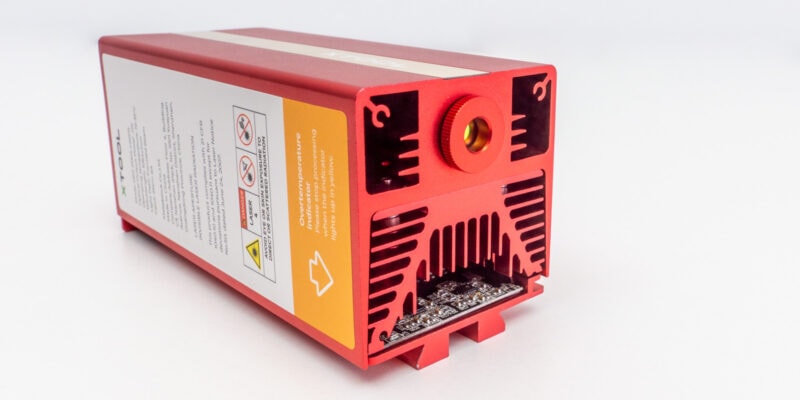
Laser Module

For the laser module, the Snapmaker 2.0 uses a 1.6W laser with a 450 nm wavelength. This wavelength is excellent for engraving materials like plywood, MDF, cork, bamboo, rubber, leather, and other non-dense materials.
What it is not suited for is metals, glass, or other transparent materials. Not only does its wavelength not interact well with these surfaces, but 1.6W laser power is also too low to make any significant impression on them.
And this is also a bit of a shortcoming when it comes to working with the aforementioned non-dense materials. While the laser works well with these, it does take quite a while to engrave or cut. Especially if you make use of the entirety of Snapmaker 2.0 A350T’s massive work area, it can take a while to complete a design.
Fortunately, there is an aftermarket 10 Watt laser module available, even though we feel like that should have been included by default for the price of this machine.
That said, the 1.6W laser power is still a significant improvement over the 0.2W module that came with the Snapmaker Original. But we hope that Snapmaker continues to increase the default laser module power in the future, as 1.6W is quite limited for laser cutting purposes.
Laser Head Focusing Camera

Something cool on the laser module is the built-in camera. The Snapmaker 2.0 uses it for two main purposes. The first is to set the optimal laser focus distance, and the second is to help you align the engraving or cutting on your workpiece.
Setting the correct laser focus distance is often a hassle when working with a laser cutter. It typically means using some kind of spacer with a known height to set the distance between the laser head and material, and manually adjusting the laser module height.
With the Snapmaker 2.0, this process is a lot simpler and more automated. It engraves several lines from different focus heights and then uses the camera to determine which focus distance gives the best result. Talk about living in the future!

Another way in which the camera is useful is in the alignment of your designs with your workpieces. Typically, this involves a lot of trial and error, as you would use the ‘frame’ function in software to see the outline of the design on the workpiece, and then manually adjust the XY position of the material or laser head until it is perfectly aligned.
Within Luban, you can use the camera to combine an image of the laser bed with your design. This lets you perfectly align your design with the material with much fewer steps, all from within the software.
Both features work well in practice and we did not run into any issues with them. It’s quite nice to have these time-saving functions included, and we hope to see more of this kind of innovation in the future.
Laser Engraving/Cutting Platform

New on the Snapmaker 2.0 is its dedicated laser table. The Snapmaker Original did not have one. On that 3-in-1 3D printer, it felt like the laser aspect was added more as an afterthought.
The laser table on the Snapmaker 2.0 is, however, purpose-built for laser engraving and cutting. It improves the results of your engravings and cuts through a couple of features.
Mainly, the laser table provides a flat and stable surface for your material to rest on. While you can use the included silicone plugs to help hold the material down, we found that they do not work that well. Using Gorilla tape or binder clips gave us better results.
The second way in which the laser table helps your laser cutter performance is that it provides channels underneath that help dissipate the smoke and heat generated by the laser. It results in a bit cleaner cuts and engravings, with less soot on the material.

Because the laser table is black, it also limits the reflection of the laser light, which can sometimes create unwanted results when it bounces back onto the underside of a workpiece.
Lastly, the laser bed protects the rest of the Snapmaker 2.0 components underneath. This is not something that affects the results of your work, but it is important to make sure the laser light does not engrave the Snapmaker itself after it passes through the material.
Overall, we think the dedicated laser table is a great addition to the Snapmaker 2.0. It is well-designed and provides good results.
What we don’t like about it is that it is also held in place with a large number of bolts. 14 to be precise.
This means that, just like with the 3D print surface, you need to remove and replace all these bolts every time you want to switch between the different manufacturing modes. This is time taken away from making cool stuff, and we don’t like that.
This is the only thing we found that we don’t like about it, however. The rest of the design is great. Because it separates into four different sections, it is also easy to store when not in use.

CNC Machining

The CNC functionality of the Snapmaker 2.0 has improved as well. Both the CNC module and the machining bed have considerable upgrades.
CNC Tool Head

The 50 Watt CNC module of the Snapmaker 2.0 now comes with a practical ER11 collet that can hold end mills that range from 0.5 mm (0.02″) to 6.35 mm (0.25″) in diameter.
There are only two router bits included (3.175 mm Flat end and Ball end), as well as a single collet. However, you have the option to use it with hundreds of different third-party bits and collets, giving you a lot of versatility.

Snapmaker provides an additional 5-bit set that we feel should have been included given the price of the machine. SainSmart also has their 40-piece MC40A set, which we feel provides better value if you are going for a set of aftermarket bits.
With the included two spanners, it is straightforward to change end mills. You won’t need to apply a lot of force, and there is little risk of cutting yourself on anything sharp.

The CNC carving performance is best for woods and other soft materials. With only 50W of power and a 6000-12000 RPM spindle speed range, the machine is not as powerful as a dedicated desktop CNC router.
As a result, you won’t be able to use the Snapmaker 2.0 CNC functionality for metals. An exception might be if you mill aluminum with conservative settings in the more stable center of the table.
If you expect CNC machining to be a big part of your workflow, you might want to look at the ZMorph Fab instead. It comes with a 300W spindle and can machine a wider range of materials. It does not come with a laser module by default, however, so out-of-the-box it is not as versatile as the Snapmaker 2.0.
Wasteboard

To help you secure materials onto the machining bed, the Snapmaker 2.0 comes with a wasteboard with threaded inserts. With the included aluminum clamps, you can quickly and easily secure materials of up to about 50 mm / 2” in thickness.
There are 49 threaded inserts in total, spaced 5 cm apart in a 7×7 grid. It’s enough to give you plenty of options to secure a variety of things. We haven’t found ourselves being unable to hold things in place due to insufficient threads or them being spaced too far apart.

The clamps themselves are solidly built, yet lightweight. Their two-part construction with rounded inserts is something that we haven’t seen before.
We were a bit worried about the play between the separate elements of the clamp, but with the limited power of the Snapmaker 2.0 spindle, this didn’t prove to be an issue.

The grid on the wasteboard is a nice touch as well. Since the construction of the Snapmaker 2.0 guarantees that the axes of the machine are perfectly aligned, the grid guarantees that your material will be as well. This is a level of precision that you won’t find on many other desktop CNC machines.

We should point out that we did relatively little testing of the CNC functionality. Like every CNC router, it is very loud during operation. In our office environment, this made it impractical to do any serious work.
If you are planning on doing a lot of CNC machining at home or in an office, that might be something to keep in mind as well.

Another thing to note is that the wasteboard is also secured with 14 bolts and is time-consuming to swap out. But at this point in the Snapmaker 2.0 review, that probably does not come as a surprise to you.
Ease of Use
User Interface

You will mostly control the Snapmaker 2.0 through its 5″ touch screen. It is responsive, with vibrant colors and a clear user interface.
Because the machine uses an Arm Cortex-M4 processor that runs Android, the whole experience of using the Snapmaker 2.0 feels like using a high-end smartphone. It’s easy, snappy, and a breath of fresh air compared to the dated interfaces of most other 3D printers.
Through the touch screen, you can select the 3D print / laser / CNC files you want to execute, control the machine, go through calibration, or adjust settings.

The machine has built-in Wi-Fi, so you can connect to it from the Luban software on Windows, Mac, or Linux and directly control it from there as well. So instead of fiddling around with SD cards or USB sticks, you are able to directly send the jobs from your computer. A big time-saver.
Updating the firmware is also done wirelessly. Whenever a new version is available (for the main firmware or the tool head modules), you will see a prompt appear on the touch screen. Accept the update and everything is taken care of for you.

The whole user experience of the Snapmaker 2.0 is really as good as it gets at the moment. While the firmware had a number of issues at and after launch, those seem to be mostly ironed out by now.
What’s more, the company behind Snapmaker is very responsive to user feedback and continues to improve the software on a regular basis. It’s not a company that cranks out new products every year, so they can focus on making the existing products as good as possible.
Software
As mentioned above, the Snapmaker 2.0 uses the Luban software package to prepare and execute jobs. It is available for Windows/Mac/Linux, and we tested it on a Windows 10 machine.
Luban is open-source software that is derived from the cncjs codebase. Snapmaker improved it to better support its own hardware and to make sure that it has the 3D printer, laser engraver, and CNC router functionalities required to make use of the 3-in-1 capabilities of their machines.
It is quite nice to have all functionality in a single software package. Especially for beginners who do not have the experience of knowing what software to get for which task, it is a perfect solution.
Because it is designed more for convenience and ease of use than it is for functionality, the Snapmaker Luban software isn’t as advanced as some of the other more specialized software packages out there. But it gets the job done and is perfectly adequate for the majority of users.
Since the Snapmaker 2.0 is compatible with many other programs, you are not limited to using Luban. If you need something more powerful and configurable, there are several options for preparing your 3D printing, laser engraver/laser cutter, and CNC carving jobs.
For 3D printing, Cura and PrusaSlicer are great. For laser engraving and cutting, Lightburn (paid) is the way to go. For CNC carving, the personal version of Fusion 360 is what we recommend.
Again, Luban is just fine if you don’t have any special requirements. But if you do, you have the freedom to use other software packages.
Since we assume most users will use Snapmaker Luban software, this is what we have tested with throughout this Snapmaker 2.0 review.
Build Quality and Construction
Simply put, the build quality of the Snapmaker 2.0 is nothing but exceptional. From the construction to the finish, it’s clear that a lot of attention to detail has gone into this machine.
Because the machine needs to support the forces that come with CNC routing, it is built like a tank. The aluminum frame is thick, heavy, and very sturdy. At over 25 kg (60 lbs) for the A350T, you’re not going to be moving this machine around very often.
The finish is also top-notch, with a powder coating that won’t come off any time soon. We did not encounter any blemishes, finishing defects, or any other manufacturing issues either, which is great to see.
Linear Modules

The linear modules of the Snapmaker 2.0 3D printer are the components that are responsible for moving the X-, Y-, and Z-axes. Just like the frame, they are beefy units that are built to last.
Whereas on other 3D printers you would find exposed stepper motors, pulleys, timing belts, and other components, the Snapmaker 2.0 has everything hidden away inside these linear modules.
This results in a much cleaner look and also protects the components from dust and debris. When CNC machining is involved, this is exactly what you need.
The modules use precision ground rods and 20 mm lead screws, which results in precise and repeatable movements. The older A350 and A250 (non-T) used 8 mm lead screws, which were unpleasantly slow. We are happy to see that Snapmaker improved on this.

A downside of the lead screw setup is that the Snapmaker 2.0 cannot move as fast as a typical 3D printer. Most regular cartesian 3D printers and laser cutters use timing belts and are capable of exceeding the feed rates of the Snapmaker 2.0. Delta and CoreXY 3D printers are even faster.
We assume that this is a sacrifice that Snapmaker decided to make to get better CNC machining results. And we think it’s a worthwhile one.
For reference, the maximum print speed you can achieve with the Snapmaker 2.0 is about 60 mm/s. You can push it further, but the 3D printing quality will start to suffer too much.
To keep swarf (CNC machining debris) and other contaminants out of the linear modules, they come with a thin metal strip that covers the opening.

It works pretty well, but it does not provide a hermetic seal. So it is possible that over time, some dust and debris will accumulate inside the modules.
Fortunately, the linear modules can be disassembled fairly easily for cleaning. And because of their modular design, they are simple to swap out if you ever need to.
Electronics

The ARM Cortex-M4 Quad Core 1.1 GHz CPU that the Snapmaker 2.0 3D printer uses is significantly more powerful than what is found on practically every consumer-level 3D printer currently available.
In combination with the new TMC2209 stepper drivers found in the A250T and A350T, you get a silent 3D printer and laser cutter/engraver experience with little to no vibration. With the previous A250 and A350, the noise was a big issue. We are happy to see Snapmaker has addressed this.
CNC machining is going to be loud regardless of the electronics, however, but that is simply the nature of the beast.
Unlike other 3D printers, laser cutters, or CNC machines, there is very little tinkering you can do with the electronics without disassembling the controller and modules.
This is not something that we feel is an issue. Since everything is well-designed and working perfectly out of the box, there is simply no need to go in and change things around.
And just like with the linear modules (and most other components), the electronics modules can also simply be swapped out if an issue arises.

As pointed out above, the 320 Watt power supply is underpowered for the 3D print bed of the A350T. Because of this, the maximum temperature of the bed is only 80°C, and the heating is slow.
This is the only negative we can find about the electronics of the Snapmaker 2.0. The power supply does light up from the inside with a cool pulsing effect, which gives the machine a futuristic feel.

Cable Management

In the cable management department, the Snapmaker 2.0 3D printer scores alright. All cables are kept out of the way of the tool head and 3D print/laser/CNC bed, which is the most important thing. This ensures the safe operation of the machine.
Looking at the machine as a whole, the wiring looks a bit messy. There are a variety of wires that lead from the control box to the various components. They travel in all directions and don’t give a clean look.
It’s more of an aesthetic issue than anything else. As long as the machine is functioning safely, we don’t consider it to be a big deal.
Snapmaker 2.0 3D Print / Laser / CNC Test Results
Voronoi Egg
We tested a couple of 3D prints on the Snapmaker 2.0 and this one summarizes the machine’s performance perfectly.
Details come out great, with a smooth surface finish and no visible Z-wobble. There’s no stringing either, mainly due to the snappy retraction of the direct drive extruder.
Some of the steep overhangs at the bottom, however, clearly show the Snapmaker 2.0’s underpowered print cooling. It’s one of its main shortcomings when 3D printing.
If you want to overcome this, we recommend either slowing down prints or adding an extra fan (or both).
We should also point out that we did all tests in the official Snapmaker 2.0 enclosure with the doors closed. With the doors open and cooler air getting to the extruder you can get better overhangs as well.
Another downside is that even at its maximum print speeds, which we used here, the Snapmaker 2.0 is still quite slow compared to belt-driven 3D printers. So if you’re looking for rapid turnaround on your 3D printed parts, this machine is not the best choice.


Dot-filled Engraving
Moving on to laser engraving, this image of Bruce Lee on plywood came out nicely. The dots-filled engraving mode works well and makes for a very crisp image.
The contrast between the wood and engraving is excellent too. On the outline cut, there is some charring visible. This is to be expected when laser cutting without air assist.


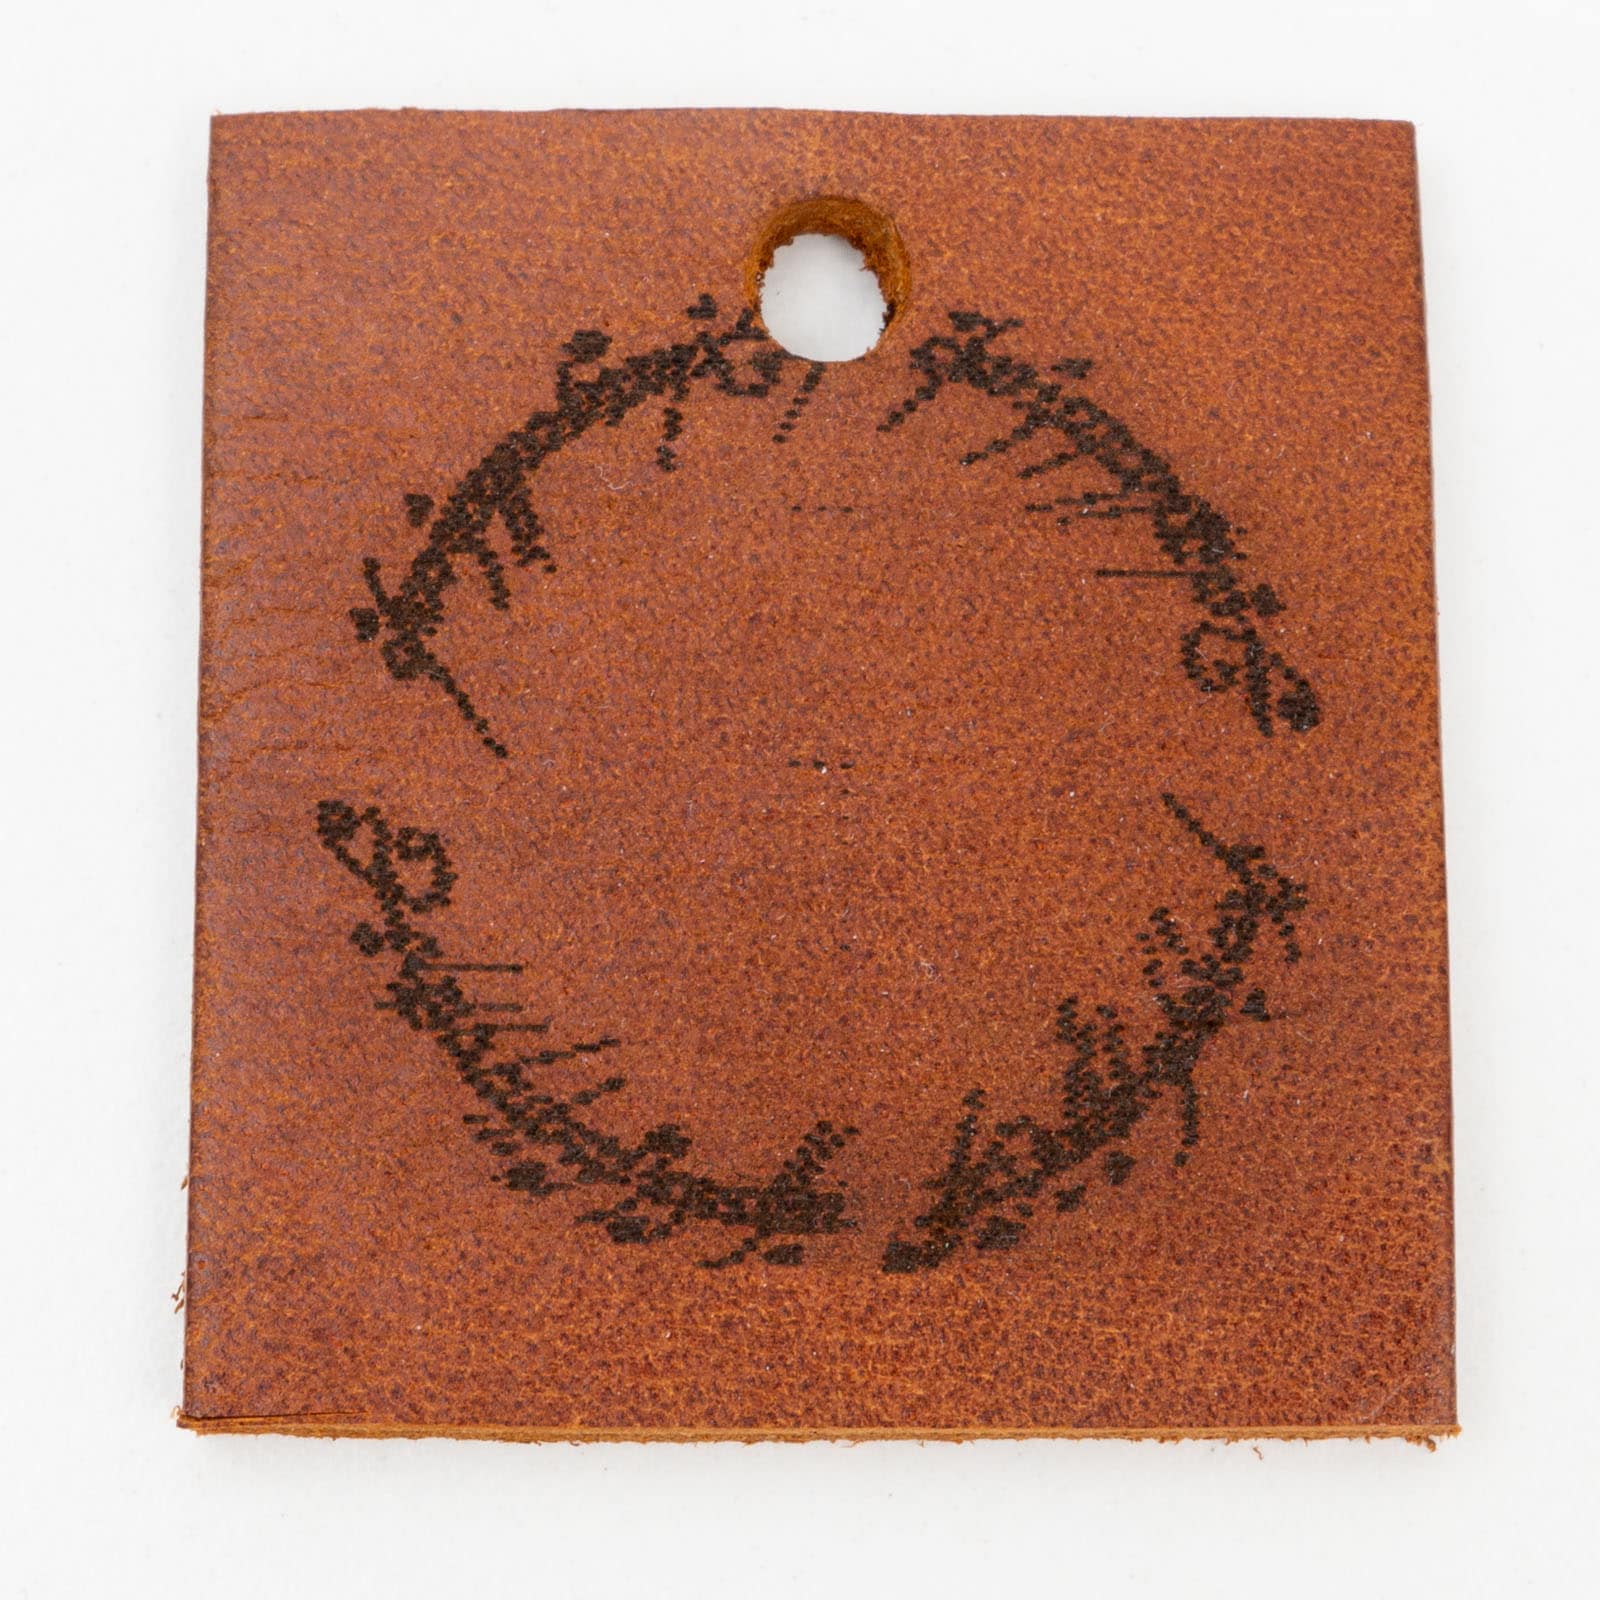
Line-filled Engraving
With this engraving on an old piece of leather, we used the line-filled engraving mode. The contrast is again good, but it’s clear that the line-filled mode isn’t great for producing fine details.
Laser Cut Earrings
Curious about how the Snapmaker 2.0 would do with laser cutting fine details, we decided to test it by laser cutting a pair of earrings. The result was impressive.
Even the smallest details are cut out perfectly, which is not something we expected. Again, there is a good amount of burn marks and charring present because of the lack of air assist (left). Once sanded, the earrings look fantastic (right).
Just like when 3D printing, the process of laser cutting on the Snapmaker 2.0 is slow. In our case, this was mostly caused by the 1600mW laser module. Upgrading to the 10 Watt version would make a considerable difference.


Phone Holder
To test the CNC performance, we only machined the included phone holder design out of the included acrylic panel. We did not have too high expectations because of the CNC module’s low power and speeds, but the results were surprisingly good.
All cuts are clean, with no jagged edges or visible tool marks. The dimensional accuracy is also good, with all parts fitting together nicely.
The main limitation is the 50W power of the CNC module, but as long as you stick to a small step-down and soft materials (i.e. no metals) you can get excellent results. It will take longer than with a dedicated home CNC machine.


Accessories
The Snapmaker 2.0 comes with a variety of included accessories but also has many optional accessories that you can use to further enhance your experience with this 3-in-1 3D printer.
Default Tools & Accessories
With the stock Snapmaker 2.0, you receive a collection of accessories that help you with 3D printing, laser engraving, and CNC machining.
For example, for 3D printing, you receive a print removal tool, tweezers for cleaning the nozzle, and a 1 kg spool of filament. It’s a nice little starter kit that helps you get going with the machine right away.
To help you laser engrave, you get a pair of safety glasses and a couple of pieces of wood. Also included are a couple of smaller things, like the silicone plugs that help the material stay attached to the laser bed.
On the CNC machining side, you get a set of bits, wrenches, protection goggles, and a set of clamps. Again, exactly what you need to get started.
All accessories are of excellent quality, with no noticeable areas where corners were cut. To keep everything organized, you get a neat toolbox with extra dividers to arrange things to your liking.
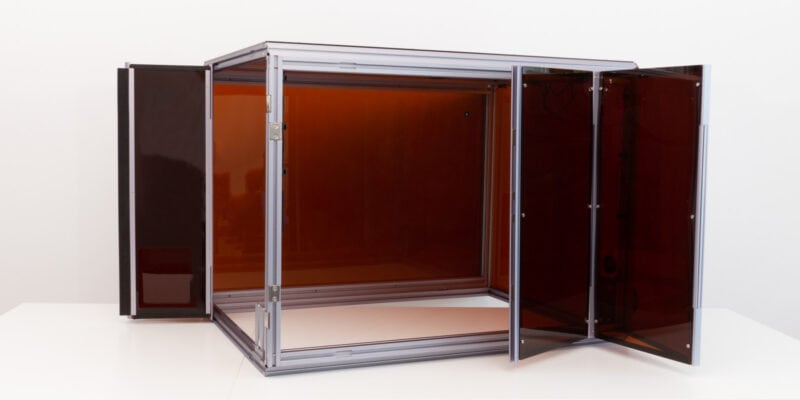
Enclosure
One of the biggest, most useful, but also most expensive optional accessories that you can get for the Snapmaker 2.0 3D printer is the enclosure.
The main function of the enclosure is to help facilitate laser engraving and cutting. Not only does it contain laser cutting smoke, but it also removes them with its fan and exhaust port.
In addition, its acrylic panels help protect you further from accidental exposure to laser light, which is always a good thing.
The enclosure also reduces the noise of any 3D printing, laser cutting, or CNC machining. If you live in an apartment or have thin walls, this can be a big selling point.
Other cool features are its built-in LED lighting and magnetic door sensors. The LED lighting is bright enough to light up the machine through the partially transparent panels. It’s a nice touch that helps you see what’s going on inside without needing to open the door.
The magnetic sensors are used to detect when the door is opened. If the door is opened while the machine is running, the machine will stop what it’s doing. You can turn off this feature in the Snapmaker settings if you want.
Overall, the enclosure is a great accessory that significantly expands the capabilities of the Snapmaker 2.0 3D printer. If you can afford its demanding $600 price tag (or $500 for the A250T version) and have the space, we highly recommend it.
On a side note, if you have a resin 3D printer and want to keep the resin fumes contained, the enclosure works great for that as well.
10W Laser Module
While the 1.6 Watt laser module is a big improvement over the 0.2 Watt version of the Snapmaker Original, it is still better suited for laser engraving than it is for laser cutter purposes. Because of its limited power, any laser cutting you do will need to be done slowly and with thin materials.
This is where the optional 10W laser module comes in. It is a significant upgrade that lets you laser-cut thicker materials and everything at much higher speeds.
If you plan on laser cutting a lot, it is worth the investment. But at approximately $450, it’s a fairly steep ask for what is essentially a single feature upgrade.
Rotary Module
If you want to CNC or laser cut/engrave cylindrical objects, you need the optional rotary module. It’s a simple attachment that allows the object to rotate while the CNC module works on it.
It effectively turns the Snapmaker 2.0 into somewhat of a lathe, which is a very handy feature to have. The module itself is very well built and easy to attach and detach as needed.
Again, for about $600, it is only something that is worth buying if you know for sure that you will need it. If you’re on the fence, we recommend waiting until you have a specific project in mind before making the purchase.
Emergency Button
Another thing you can add to the Snapmaker 2.0 3D printer is the emergency button. If you need to urgently cut the power to the machine, for example during CNC carving operations, this lets you do so.
It’s honestly something that we would have liked to see included with the machine by default. While its built quality is undoubtedly good, it is essentially just a button and shouldn’t require paying $60 extra.
Conclusion
The Snapmaker 2.0 is hands-down the best 3-in-1 3D printer on the market at the moment. Its build quality and features are unparalleled in its price range, and it is very easy to use.
While you should be ready to set aside an afternoon or evening to put it together, afterward you’ll be rewarded with a machine that is built to last and will provide you with hundreds of hours of creative endeavors.
If you are someone who wants the functionality of a 3D printer, laser engraver, and CNC machine without buying separate machines, the Snapmaker 2.0 is the machine for you.
That said, if you only want to 3D print, there are better machines available in the 3D printers under $1000 and 3D printers under $500 categories.
Despite being an all-around powerhouse of a machine, the Snapmaker 2.0 3D printer does have several areas in which it could still improve.
For example, its use is often time-consuming. Not only are the 3D printing and laser operation features slower than on dedicated machines, but the swapping of beds and modules is also a bit of a hassle.
At the same time, its accessories are expensive. If you want to make full use of the machine’s capabilities, you’re looking at a significant investment.
For that investment, however, you do get the best that is available right now, with build quality, features, and support that are worth the money for most.
No matter if you are a passionate hobbyist, designer, prosumer, engineer, or educational institution, we think that the Snapmaker 2.0 3D printer is unlikely to let you down.

Super review! I hope you do the Snapmaker Artisan too. It appears to be a good upgrade.