

Using a nozzle cleaning kit and a cleaning filament is the most effective way to clean your 3D printer nozzle. You can remove the nozzle and soak it in acetone to remove any traces of filament impurities. A brass wire brush with soft bristles will help eliminate any leftover filament residue.
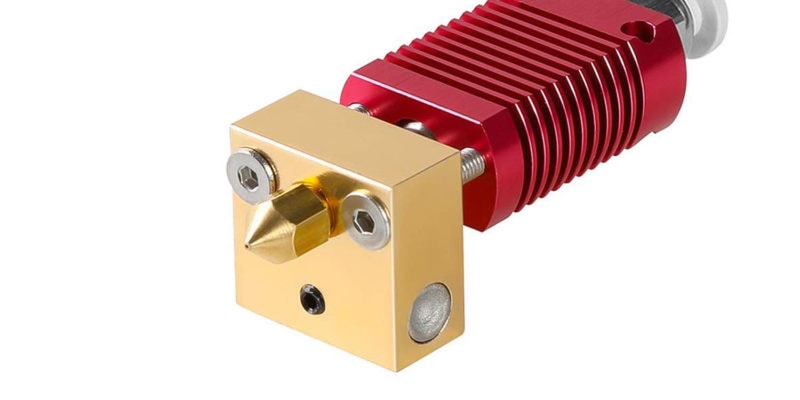
A 3D printer nozzle is a crucial element in the 3D printing process, and it is responsible for the smooth extrusion of your filament. Any clogs or blockages in the nozzles will directly affect your print quality. Clogged nozzles will lead to under extrusion, inconsistent filament flow, and uneven layers.
Even though cleaning a blocked nozzle is easy, it can be challenging to identify the clog in the first place. In this article, we’ll explain how to recognize a nozzle clog, go over the various cleaning methods and what you can do to prevent nozzle clogging in the future.
Read on to learn how to clean a 3D printer nozzle and get a smooth 3D printing experience!
How Can You Tell If a Printer Nozzle is Clogged?

It can be tricky to attribute print defects to clogged nozzles. However, a few notable indicators will quickly tell you whether you are dealing with nozzle clogging.
The easiest way to detect a nozzle clog is if you notice a decrease in the overall print quality. Inconsistent extrusion, missing layers, and under extrusion are a few of the side-effects of a blocked nozzle. A partial blockage in the nozzle can cause all of these problems. Similarly, a complete jam can occur due to clogged material stuck in the nozzle.
An improper first layer is another sign of nozzle clogging. If the nozzle does not extrude filament during the first layer or there’s an uneven filament flow, you might have a clog in your nozzle. However, it is helpful to eliminate any bed leveling and Z-offset issues before you check for a nozzle clog.
Additionally, filament curling right after extrusion and thinner print lines are also signs of a clogged nozzle. Recognizing these signs will help you quickly clean your nozzle and prevent further degradation of your 3D prints.
How Do You Clean a 3D Printer Nozzle?

If you start to see filament deposits on the outer surface of your nozzle, it is time to clean it. 3D printer nozzle cleaning is easy, and all you need is a brass wire brush and a wiping cloth.
The brass brush prevents damage to your brass nozzles and lets you scrub any stuck printed material from your dirty nozzle.
Before starting the cleaning process, it is helpful to first heat your 3D printer nozzle. Heating the nozzle softens any stuck filament bits and lets you wipe them off more quickly.
Once you’ve scrubbed the nozzle thoroughly, you can wipe away any leftover material from its surface. A soft microfiber cloth is our go-to equipment for this.
3D printer nozzle cleaning is now complete, and you can start printing again. Remember to always keep an eye on the state of your nozzle and clean it regularly to maintain optimal print quality.

How Do You Unclog a Clogged 3D Printer Nozzle?
If your nozzle is already clogged, don’t worry! Cleaning a nozzle is an easy process that can be done through a couple of different methods.
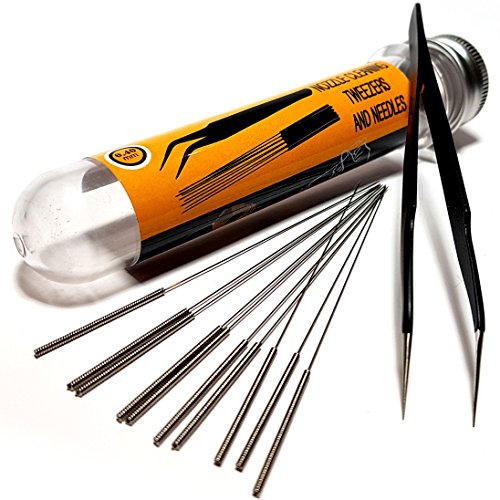
Nozzle Cleaning Kit

A standard nozzle cleaning kit consists of thin metal needles, tweezers, and a brush. You can use this method to clean out your nozzle by following these steps:
- Start by heating up your nozzle to right under its maximum temperature. This will help to soften any filament that is stuck inside the nozzle.
- Next, use the metal needles to pick out any larger pieces of filament that may be blocking the nozzle.
- Once the larger pieces have been removed, use the nozzle brush to clean out any smaller bits of filament.
- Finally, use the tweezers to remove any final pieces of filament or debris.
Cold Pull
A cold pull or an atomic pull is often used to unclog the nozzle and remove any debris inside it. It is an easy technique and requires no disassembly or cleaning tools to remove the clog.
Using Nylon filament will give the best results. However, you can also use PLA, ABS, or a dedicated cleaning filament (more on this later) if Nylon is not available.
First, you need to heat the nozzle to the printing temperature of your filament. After that, you will have to manually push the filament until it extrudes out of the nozzle. You can now let your hot end cool down while pushing the filament into the nozzle.
In the final step, you need to first remove the extruded material from the nozzle tip. Then set the printer temperature to 85-90 °C. Once it reaches this temperature, slowly pull the filament out of the nozzle completely.
You might have to perform this procedure several times to remove any dirt and filament bits from the inside of your nozzle. You can stop once you notice the cold pulled filament is free from debris.
Soaking the Nozzle in Acetone

A nozzle cleaning kit and cold pull might not always be practical with filaments like ABS, and your nozzle might still be clogged. When it comes to ABS, removing the nozzle and soaking it in acetone is a good way to clear clogs.
Start by heating the nozzle before removing it from the hot end. Heating the nozzle frees it up slightly from the heater block and makes it easy to unscrew. You can use a spanner or a nozzle removal tool to remove the nozzle safely and efficiently.
After you’ve removed the nozzle, soak it in a cup with a layer of acetone for around 30 minutes. The acetone will help to dissolve any ABS filament that is stuck inside the nozzle.

Once the soaking is complete, you can use a wire brush to remove any final bits of filament. Be sure to also clean the nozzle tip as this is where most of the clogs occur.
You can now reassemble your 3D printer and start printing again. Make sure to properly dry the nozzle first. A paper towel or soft cloth is just fine for this.
Remember to always keep an eye on your nozzle and clean it regularly to maintain optimal print quality.
Using a Heat Gun
While an acetone soak is helpful for ABS filament, it is not as effective on other filament materials. Especially PETG and Nylon are fairly non-reactive to acetone.
When dealing with these filaments, a heat gun will help clear your nozzle clog.
The first step is to remove the nozzle from the 3D printer hot end or extruder assembly. This is the same as what you would do for ABS soaking.
Next, you will need to heat the nozzle with the heat gun until the filament inside melts.
Once the filament has melted, you can use a thin needle or a wire brush to remove any debris from the nozzle. Be careful, the nozzle is hot at this point.
After cleaning the nozzle, you can now reattach it to the hot end assembly and start printing again. Make sure that the nozzle is properly cooled down before reattaching it.

How Often Should You Clean a 3D Printer Nozzle?
At a minimum, you should clean your 3D printer nozzle when you change filament materials. It is easy for nozzles to clog from leftover material after a filament change.
For example, when you switch from ABS filament to PLA, some ABS material might be left in the nozzle. As PLA prints at a lower temperature than ABS, the leftover ABS will not melt and result in a nozzle clog.
Another reason for nozzle clogs is dirt and dust particles that enter along with the filament. If you continuously print with dirty filament, the debris can accumulate in the nozzle over time and clog the nozzle.
Because it can be a challenge to keep your filament free from dust and dirt, you can clean the nozzle after every 100-200 printing hours as prevention.
Generally, if you notice a decrease in print quality, that is usually a sign that your nozzle is starting to get clogged and needs cleaning. You can do this regardless of how long or with which materials you have been 3D printing.
How to Prevent 3D Printer Nozzle Clogs
Regularly Use 3D Printer Cleaning Filament
3D printing cleaning filament is the easiest way to clean your nozzles from the inside. It is made up of a material specifically used to clean and purge plastic out of injection molding machines. You need to extrude it at the printing temperature of your filament until you notice a clean white strand of material coming out of the nozzle, free of any debris or filament color.
Even though cleaning filament may seem slightly expensive, it does work effectively and clears out any partial clogs. And you only need a small amount. You can use it after every 100-200 hours of printing for effective cleaning of your nozzles and to prevent nozzle clogs.

Replace Worn-Out Nozzles


Brass nozzles undergo a lot of wear due to the constant friction of the filament. This wear accelerates when you use abrasive filaments like glow-in-the-dark, carbon fiber, and metal-filled filaments.
Not only do abrasive filaments wear out the nozzle opening, but the tiny metal particles of the nozzle material can start accumulating. This can block filament flow and lead to filament jams.
If you regularly use abrasive filaments or notice a lot of nozzle wear, it’s a good idea to replace your brass nozzle more often.
Alternatively, you can use stainless steel or other hardened nozzles. These are more resistant to abrasive filaments and have a higher lifespan than your typical plain brass nozzles.
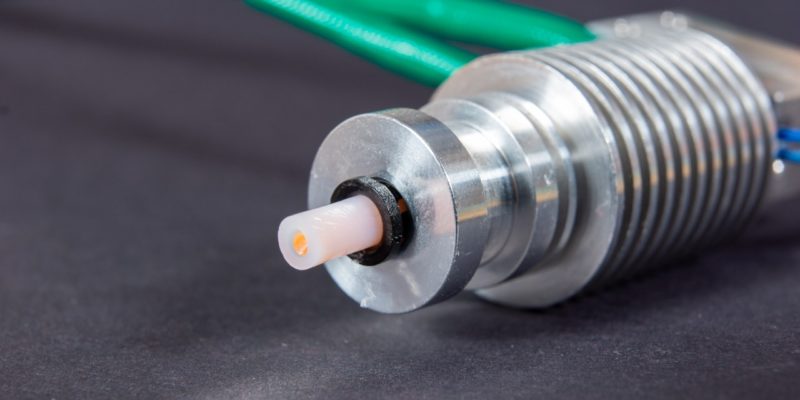
Fix the PTFE Tube Hot End Gap

In a PTFE-lined 3D printer hot end, the tube goes all the way inside and sits right on top of the nozzle. If the gap is not flush between the PTFE tube and the nozzle, the melted filament will ooze out of it. Eventually, there will be a build-up of plastic filament within the hot end, leading to filament jamming.
The gap is caused due to faulty PTFE tube couplings. As the couplings wear out, the PTFE tube starts sliding in and out of the hot end, creating a gap between itself and the nozzle. Extruder skipping and under extrusion are signs of a filament jam in the hot end.
You should immediately rectify the PTFE tube gap within the hot end if you notice these issues.
The first thing here is to make sure that the PTFE tube has been cut flush at a 90° angle. If it has a slope to it, it will never perfectly align with the hot end.
Secondly, it helps to use replace worn-out pneumatic couplings with new ones on both the extruder assembly and the hot end assembly. This ensures that the PTFE tube stays in place over time.

Use High-Quality Filament
A high-quality filament will reduce nozzle clogs while also giving you high print quality. Manufacturers of high-quality filament ensure that their product contains little to no impurities, is produced in a dust-free environment, has a consistent diameter, and is properly vacuum packed to reduce as many imperfections in the material as possible.
We have created an overview of the highest quality filament in our Best PLA, Best ABS, and Best PETG articles. We recommend you check these brands out if you suspect your clogged nozzles are caused by low-quality filament.
While these filaments may be more expensive than budget materials, they are often worth the extra money.
They don’t only save time, but their results are better too. If you are looking to sell your 3D prints and make money with your 3D printer, quality filaments can be a worthwhile investment.
Keep Filament Clean and Dust-Free

A clean 3D printing space contributes significantly to preventing nozzle clogs. If your plastic filament is exposed to the outside environment while printing, it will pick up dust particles that clog your nozzle. After printing with it, you need to store it away from sunlight and in a storage box to prevent the accumulation of dust on it.
Another way you can protect your 3D printing setup from dust and dirt is by using a 3D printer enclosure. These don’t only keep the current filament in the printer clean, but also the 3D printer itself.
How Do You Clean a Clogged Nozzle With Pla?
In order to clean a clogged nozzle with PLA, you will need to disassemble the printer and remove the nozzle. Once the nozzle is removed, you can use a small wire, needle, or other small pointed tool to clear any debris that may be blocking the opening. You might need to heat the nozzle up with a lighter to melt the plastic filament.
Be careful not to damage the nozzle while cleaning it.
How Do You Clean an Ender 3 Nozzle After Printing?
It’s important to clean your Ender 3 nozzle regularly to prevent clogs and ensure quality prints. After every print, it is advisable to clean the nozzle with a brass wire brush. This will remove any debris or build-up that may have occurred during the printing process.
A clean nozzle will ensure that your prints are of the highest quality and avoid any potential issues such as clogging or poor adhesion.
Conclusion
A clean 3D printer nozzle gives you the best print results and helps prevent damage to the 3D printer caused by clogs. Periodic cleaning of your 3D printer nozzle ensures fewer chances of sudden breakdown and prevents downtimes.
Degradation in the print quality, coupled with under extrusion and inconsistent filament extrusion are some of the indicators of a blocked nozzle. You can quickly unclog the nozzle using a nozzle cleaning kit and a wire brush and periodically use a cleaning filament. Especially the cleaning filament is useful for keeping nozzles clean.
When dealing with ABS filament, you can soak the nozzle in an acetone bath to soften the filament. This makes it a lot easier to remove.
Let us know your experience with 3D printer nozzle cleaning. If you find this article helpful, share it with your peers to help them prevent nozzle clogs and keep their 3D printers running smoothly.

Thank you for Nozzle cleaning tips. It might helpful. I use method for clean Soaking the Nozzle in Acetone in PLA Filament.
I think it should be noted that microfiber melts, therefore you should be sure your nozzle has cooled before wiping with a microfiber cloth.