

- Generous build volume
- All-metal hot end (up to 300°C)
- Good print quality
- Convenient automatic bed leveling
- Reliable direct drive extruder
- Wide range of connectivity options
- Included HD monitoring camera
- Bright LED light strip
- No large nozzles included
- Underpowered power supply
- Demanding price tag
With its CR-10 series, Creality has managed to create 3D printers that are both affordable and have a large build volume. The CR-10 Smart Pro is the latest addition to the line-up. Based on its specifications, it promises to deliver an improved experience with more technical features than its predecessors.
Today we will take an in-depth hands-on look at this machine and show you what you can expect from it. We will also explain how it stacks up against its predecessors, the CR-10 and CR-10 Smart, as well as how it compares to the other options for buying a large 3D printer.
Let’s see what the Creality CR-10 Smart Pro is all about!
Creality CR-10 Smart Pro Specs
| Creality CR-10 Smart Pro Specifications | |
|---|---|
| Price | Creality | Amazon | Creality3DOfficial | AliExpress |
| Technology | FDM 3D Printer |
| Build volume | 300x300x400 mm |
| Extruder | “Sprite Pro” direct drive extruder |
| Print head | Single nozzle |
| Stock nozzle size | 0.4 mm |
| Max. hot end temperature | 300°C |
| Max. heated bed temperature | 100°C |
| Max print speed | 180 mm/s |
| Slicer compatibility | Cura, PrusaSlicer, Creality Cloud Slicer, Simplify3D, etc. |
| Print bed material | PEI-coated spring steel |
| Interface | 4.3″ Touch screen |
| Frame | Aluminum |
| Bed leveling | Auto leveling |
| Connectivity | SD card, USB, Wi-Fi, Bluetooth |
| Print recovery | Yes |
| Filament sensor | Yes |
| Camera | Yes |
| Filament support | PLA, ABS, PETG, Flexibles, PA, carbon fiber, wood-filled, metal-filled, gradient |
| Language support | 9 languages |
| Power supply | 350W |
| Voltage | 110-220V |
Printing Technology
The Creality CR-10 Smart Pro is a large 3D printer that uses Fused Deposition Modeling (FDM) technology. As such, it uses filament to build up layers of plastic to create your desired object. This stands in contrast to resin 3D printers, which use a liquid resin that is hardened layer by layer with UV light.
The advantage of the FDM printing process is that it is generally more affordable and easier to use than resin printing. The downside is that the objects you can print with FDM are generally not as detailed as those you can make with resin.
You can typically 3D print a lot larger objects with FDM 3D printers as well. If you are reading this Creality CR10 Smart Pro review, that might be exactly what you are looking for.
The CR-10 Smart Pro’s large build volume makes it most suited for printing large objects, such as 3D printed helmets, 3D printed cosplay armor, large architectural models, and other similar items. Alternatively, you can use it to print many smaller items at once.
Still considering the CR-10 Smart Pro as your next 3D printer? Let’s see what it is like to use it!
Unboxing

As we have gotten used to from Creality’s latest releases, the CR-10 Smart Pro comes partially assembled in a flat-pack foam-padded box. Where the previous generation 3D printers came as a pile of parts that had to be assembled from scratch, the CR-10 Smart Pro only requires you to attach a couple of components to get started.
Inside the box, you will find the following:
- Base
- Z-axis gantry
- Sprite Pro extruder assembly
- Touch screen
- Pull rods
- HD camera
- Various cables
- Power cord
- Spool holder
- Small spool of white PLA filament
- Multiple 3D printing tools (print removal tool, wire snippers, etc.)
- Nozzle cleaner
- Spare nozzles
- SD Card
- All screws for assembly

The smaller accessories that you will use in your day-to-day use of the Creality CR-10 Smart Pro are already stored inside the small drawer inside the 3D printer. The drawer has a foam insert with cutouts that hold everything in place. A nice touch and a definite improvement over the pile of tools that usually ends up in these drawers.

Getting Started
As mentioned above, the Creality CR-10 Smart Pro Review comes partially assembled. You only have to attach a few components to get started.
Because the 3D printer comes with reinforcing pull rods, the assembly is a bit more elaborate than on other, smaller 3D printers. But you can still expect to have the machine up and running in about 15 minutes or so.
Here are the steps you have to go through to assemble the CR-10 Smart Pro.
Assembly
As is common with flat-packed 3D printers, the first step is to attach the Z-axis gantry to the base of the 3D printer. You can do this by screwing in four of the included M5X45 bolts through the underside of the machine.

Next is to attach the two reinforcing pull-rods. Start by attaching them at the top of the frame.

Then adjust the amount that the eyebolts extend so that the total length of the pull-rods matches the mounting hole spacing on the 3D printer. You can then attach the other ends to the bottom of the frame.

It isn’t mentioned in the manual, but make sure to also tighten the nuts against the pull-rods on both ends. This secures the pull-rods and helps prevent them from vibrating loose while the 3D printer is in use.

After that, place the Sprite Pro print head onto the X-axis carriage and secure it in place with the bolts. Unlike on other Creality 3D printers, the bolts come pre-installed on the print head. So you’ll need to unscrew them before re-attaching them again.

Follow this up by attaching the spool holder. It uses a clip-on mechanism, so there is no need to attach any bolts during this step.

Next is to attach the touch screen cable to the screen itself.

Then hook the touch screen onto the preinstalled studs. This is a bit of a tricky process to get right. It took us a couple of tries. You want the final gap to appear as in this picture.

After this, it is a matter of attaching all the loose cables. They are all pre-installed, clearly labeled, and the manual has fairly decent instructions on how to attach them.

One thing we want to recommend is to keep aside one of the pieces of tape that is used to hold the cables during shipping, and reuse it to tape the cables of the right Z-axis stepper motor down. As you can see in the image below, if you don’t do this there is a chance that they get snagged on the print bed carriage.

Setup
While the Creality CR-10 Smart Pro is now fully assembled, there is still some basic setup that needs to be done to make sure that the machine produces accurate results. Just like we ran into in some of our other Creality 3D printer reviews, like the Ender 3 S1 and Ender 3 S1 Pro, several components are loose out of the box.
This is not a problem exclusively tied to Creality 3D printers. Many other companies have the same issue to some degree or another. The easy steps to fix them are rarely included in the manual, so we like to point them out in our reviews so that beginners don’t end up with disappointing results.
The main thing you need to do is to adjust the hexagonal eccentric nuts on the X-, Y-, and Z-axes with the included wrench. These are used to make sure that the V-wheels make proper contact with the aluminum extrusion. If they don’t, it will lead to a wobbly journey for the print head or print bed, which in turn leads to inaccurate prints.
On our Creality CR-10 Smart Pro, only the Y-axis carriage (the one for the print bed) was loose out of the box. We lightly tightened all four of its eccentric nuts without forcing them.

The other thing to do is to tighten the timing belts on the X- and Y-axes. Given that the CR-10 Smart Pro comes with built-in belt tensioners, this is a straightforward process. Just tighten the red wheel on each tensioner clockwise until the belts are reasonably tight.

Lastly, you need to level the print bed. This is a step that is well-documented in the manual, so we are not going to bore you with it. Simply follow the included instructions and you are ready to start 3D printing!

Creality CR-10 Smart Pro Features
Sprite Pro Direct Drive Extruder

Just like on Creality’s other recent releases, like the aforementioned S1 and S1 Pro, but also the Sermoon V1 Pro, one of the standout features is the “Sprite” direct drive extruder.
There are currently two variants of this extruder available: the regular Sprite, and the Sprite Pro. The Creality CR-10 Smart Pro 3D printer comes with the Sprite Pro variant, which has an all-metal 3D printer hotend that lets the nozzle reach high temperatures up to 300°C.
This is a great option if you want to 3D print with high-temperature materials, like ABS, Nylon, or Polycarbonate. Of course, you can print with regular PLA and PETG as well.
The cold end side of the Sprite (Pro) extruder is more impressive, however. It features a grippy dual-gear setup, which makes sure that the filament is properly pushed into the hotend. This should, in theory, lead to fewer failed prints and clogged extruders.
After our testing of Creality’s recent line-up, we can confirm that is indeed the case. It seems like the days of dealing with unreliable extruders and their accompanying extrusion issues are finally behind us.
With its 3.5:1 gear ratio and 80N extrusion force, the Sprite extruder is both precise and powerful. Quick, snappy retractions and pushing large amounts of filament through the hotend is no problem for this extruder.
Given that it is a direct extruder, and not a Bowden, it also works better for flexible filaments, like TPU. In Bowden setups, the long filament path often leads to issues with these types of filaments. No such problems here.
The only downside of such a direct extruder compared to a Bowden setup is its increased weight. This can lead to decreased maximum print speeds, as a lot more mass has to be moved back and forth. The Sprite Pro is still fairly light for a direct extruder, however, and in our testing the Creality CR-10 Smart Pro has proven rigid enough to handle the Sprite’s weight being thrown around.

Automatic Bed Leveling

A feature that will increase your enjoyment of 3D printing and decrease the amount of time you spend preparing prints, is automatic bed leveling. The Creality CR-10 Smart Pro comes with a CR-touch sensor (similar to a BLTouch, but designed for Creality printers) that does just that.
While the CR-10 Smart Pro’s predecessor, the CR-10 Smart, already featured this, the older CR-10 did not. As far as we are concerned, there is no reason to buy any 3D printer without auto bed leveling anymore, it really is that useful.
The way it works is that the CR-touch probe measures a variety of points on the flexible magnetic spring steel build plate, and uses that information to automatically adjust the Z-height during 3D printing. This is a very precise way of leveling, and it practically guarantees a perfect first layer each time.
Despite the auto-leveling option, there is still an assisted manual leveling option available that you can use. The only reason for using it would be to remove very large slopes in the print bed. After you have done that, you can rely on the auto bed leveling from there on out.
Just like with the Sprite extruder, we have only had positive experiences with the CR-Touch setup. It is precise, it is quick, and it just works. Even if you decide on a different 3D printer than the Creality CR-10 Smart Pro, we highly recommend you pick one that saves you the hassle of manual leveling.

PEI Coated Flexible Print Bed

Something we haven’t seen before on the CR-10 series is a removable magnetic PEI-coated print bed. The previous Creality CR-10 Smart came with a Carborundum glass bed. While this worked well in terms of adhesion, it could sometimes be difficult to remove prints from.
The new PEI-coated print bed is an excellent upgrade. Not only is it easier to remove prints from, it also has much better adhesion. You won’t need to use Magigoo or other 3D printing adhesives, and flexing the print bed simply pops your 3D prints off.
As for downsides, you will need to pay attention to avoid scratching the PEI coating. On the off-chance that you need to remove a 3D print with a print removal tool, make sure to not poke its sharp edge into the coating.
Another thing to note is that the bottom of your 3D prints will have a slight texture to them from the PEI coating. We haven’t found this to be an issue in any of our applications. However, if you need a completely smooth bottom surface it is a good idea to have a spare 300×300 mm glass surface at hand.
Overall, the flexible magnetic PEI coated bed is an improvement over a Carborundum glass bed. There are good reasons why we keep seeing it pop up in ‘Pro’ models in Creality’s line-up, like the Ender 3 S1 Pro. It is another feature that helps improve your 3D printing experience.

Temperature Uniformity
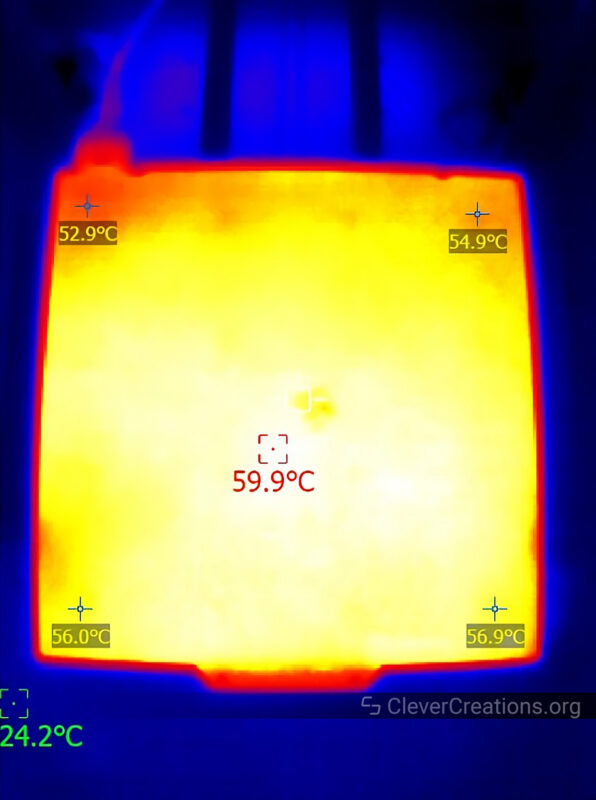
For a 3D printer this size, the Creality CR-10 Smart Pro print bed has excellent temperature uniformity. Over 90% of the print surface lies within a couple of degrees Celsius of the setpoint.
This means that for larger 3D prints, the likelihood of warping is greatly reduced. Combined with the grippy PEI-coated print surface, we can confidently recommend the Creality CR-10 Smart Pro for bigger prints in ABS and other materials with higher thermal requirements.
Heating Times
The Creality CR-10 Smart Pro does not heat up fast. While the Sprite Pro extruder does, the large build plate does not.
This is mostly caused by the 350W power supply. For a 3D printer this size, it is lacking in power. This causes the heated print bed to take long to get up to temperature.
For the bed to reach 60 °C, you’ll have to wait about 3 minutes. If you want to print high-temperature filaments and need the bed to reach 100 °C, you can expect to wait between 10 and 11 minutes. It’s significantly more time than is desired.
Large Print Volume

The 300x300x400 mm print volume of the Creality CR-10 Smart Pro is identical to that of the CR-10 Smart. We think this is a great size for a desktop 3D printer, so we are happy to see it carried over.
It is the same print volume that you can find in the Artillery Sidewinder X2, and similar to that of the Kobra Plus (300x300x350 mm). However, the Creality CR-10 Smart Pro is significantly more feature-packed than either of those two, and that does make it more expensive.
As far as 3D printing options go, the 300x300x400 mm print volume gives you a lot of freedom. You can 3D print many small objects in one go, use it to create a multi-day large print, or anything in between.
For a 3D printer with an even larger print volume, you could take a look at the Kobra Max (400x400x450 mm). However, with a PTFE-lined hotend and Bowden extruder, it does not give you the flexibility the Creality CR-10 Smart Pro has.
LED Light Strip

A feature of the Creality CR-10 Smart Pro that we also came across on the Ender 3 S1 Pro is the LED light strip that is mounted at the top of the frame. It is a bright LED strip with warm light that does a good job of illuminating the print bed and 3D prints.
If your hobby/workspace is dimly lit, this is a great way to add extra light. It gives you a great view of what the first layer looks like, and it makes checking on your 3D prints during a long print much easier.
You can also use this LED light for time-lapses of your 3D prints. The machine comes with an HD camera for this purpose (more on this later), so everything you need is included. There is no need for an external LED light or a Raspberry Pi with Octoprint.
Unlike what we have seen on the Ender 3 S1 Pro, on the CR-10 Smart Pro, the light strip can be controlled through software. So after the 3D print and your time-lapse are done, the 3D printer can simply switch off the light itself. A useful way to save some energy.
Another option is to remotely send a GCode command to turn the lights on and to use the Creality CR-10 Smart Pro to light up your workbench. The 3D printer is a bit too expensive to just use as a desk light, but the LED light is bright enough to do the trick.

Camera

The Creality CR-10 Smart Pro comes with a separate camera that you can use to monitor your 3D prints and make time-lapses. In combination with the LED light bar, this is a great way to document your 3D printing process.
Because the camera is not fixed to the frame, you can position it so that you have the best possible view of the 3D printing progress. With the included tripod, there is plenty of flexibility in terms of placement and orientation. Do keep in mind that you can’t automatically adjust the camera during the printing process, you’ll have to pick a proper viewing angle beforehand.
The camera has a 1080p (1920×1080) resolution. In terms of image quality it is good enough, but nothing special. But you can’t expect any better from a $30 accessory.
To connect the camera to the CR-10 Smart Pro, you can use the USB port on the I/O panel of the 3D printer. You can also connect it to any other Creality 3D printer that uses a Creality Wi-Fi box for wireless connectivity, so you are not limited to exclusively using it with the CR-10 Smart Pro.
In combination with the Creality Cloud app, this camera can be used to monitor and print remotely. So if you want to keep an eye on your 3D printer from afar, this is a great way to do so.

Filament Compatibility
With its 300°C maximum nozzle temperature and 100°C maximum print bed temperature, the Creality CR-10 Smart Pro is an excellent option for 3D printing with high-temperature filaments, like ABS and Nylon.
Aside from those filaments, you can 3D print with PLA, PETG, TPU, and other flexible filaments.
Because the CR-10 Smart Pro comes with durable stainless steel nozzles instead of the more common brass ones, it can also handle abrasive filaments like carbon fiber reinforced, glow-in-the-dark, and metal-filled filaments without issue.
The two additional spare 0.4 mm nozzles are nice, but we would have liked to see a selection of larger nozzles included as well. Printing thin layers takes forever on large 3D prints, and having the option out of the box to use a larger 0.6, 0.8, or even 1.0 mm nozzle would have been appreciated.
Given that the CR-10 Smart Pro has no 3D printer enclosure, you can expect some warping on large 3D prints with ABS or PETG. So make sure to use a raft or brim on these types of 3D prints to keep this in check.
Build Quality and Construction
As a large 3D printer with a direct extruder, the Creality CR-10 Smart Pro needs to be built well in order to deliver quality prints without excessive vibrations, ringing, or Z-banding. Let’s go over the main build quality aspects of the 3D printer and see how it holds up against today’s standards.
Reinforcing Pull rods

The Creality CR-10 Smart Pro uses pull rods (also referred to as crossbars or cross bracing) to reinforce the 3D printer’s frame. This was something that was previously introduced on the CR-10 Smart and it makes total sense that Creality has decided to keep it on the Pro version as well. The tall frame would be too wobbly without it.
This feature works very well, as the pull rods create a rigid triangular shape that significantly improves the overall stiffness of the 3D printer. It still isn’t as stiff as a cuboid enclosed 3D printer frame, but in terms of cost vs value, this is a great way to reinforce the frame without breaking the bank.
Dual Z-axis

Another feature that is designed to deal with the large size of the Creality CR-10 Smart Pro is the double Z-axis configuration. This means that the machine uses two sets of stepper motors and lead screws to move the X-axis gantry up and down.
A configuration like this provides more stability than a single lead screw setup and it further reduces the risk of Z-wobble, a common issue on large format 3D printers.
In order to prevent issues with both stepper motors going out of sync, Creality has added pulleys and a timing belt at the top of the lead screws to keep them perfectly aligned.
A dual Z-axis setup is fairly standard in 300x300x400 mm 3D printers. For example, the Kobra Plus and Artillery Sidewinder X2 have one as well.
It is still worth pointing out that Creality has done this well, as it is an important part of ensuring that a large 3D printer like the CR-10 Smart Pro delivers good results. There have been examples of other manufacturers that attempted a single lead screw set up on a large 3D printer with questionable results.
Electronics
The electronics of a 3D printer are equally important as the hardware. After all, it is the electronics that control everything and make sure that the machine is running smoothly. Without good electronics, even the best hardware in the world won’t make a difference.
Let’s see how the electronics of the Creality CR-10 Smart Pro fare.
Controller Board

The Creality CR-10 Smart Pro has a 32-bit CR-FDM-v2.5.S1 3D printer controller board. This is a newer version board than the one we found in the S1 Pro, even though it comes with a slightly less powerful STM32F103 processor. In the S1 Pro, we found the improved STM32F401 processor.
There is a good chance that we can blame the current chip shortage for this apparent downgrade. But either way, the processor has more than enough power for what it needs to do. In combination with the TMC2208 silent stepper drivers on the board, you have a 3D printer that is capable of printing quickly and quietly.
Wireless Board

Just like we saw with the Sermoon V1 Pro, the Creality CR-10 Smart Pro comes with a stripped-down Creality Wi-fi box to provide the 3D printer with its Wi-Fi and Bluetooth functionality. This is the component that lets you control and remote the 3D printer remotely through the Creality Cloud app.
This setup works very well and it is nice to have this functionality separated on a different board. If the circuit board ever develops an issue or needs to be disconnected for troubleshooting, it is fairly easy to do.
Solid State Relay

Something that we encountered in the CR-10 Smart Pro that we haven’t seen before in Creality’s 3D printers is the addition of a small circuit board with a solid state relay. Relays are commonly used to control high-voltage or high-current circuits with a low-voltage signal.
In this case of the Creality CR-10 Smart Pro, you can use the relay to control the power to the entire 3D printer. So you can use GCode to automatically power down the 3D printer after it is done printing. In fact, there is a setting in the user interface that lets you configure this exact thing.
There is still an on/off switch on the back of the 3D printer near the power supply, so you essentially get the best of both worlds. You can manually turn the 3D printer completely off with the switch on the back or you can use GCode to turn it off automatically.
Wiring

Disappointingly, we found that on the CR-10 Smart Pro, Creality has decided to tin the wires instead of crimping them. It seems like the company flip-flops back-and-forth on this, as the wires on their machines are sometimes crimped and sometimes tinned.
Tinning the wires is an acceptable way of terminating wires, but we prefer crimped wires because they are safer and less likely to develop problems over time. This is not the biggest issue out there, but it is something that we hope Creality will address in the future.
On the image above, you can see by the two crimped wires on the right (with yellow ferrules) that we were in the middle of addressing this issue on our machine.
Power Supply

The Creality CR-10 Smart Pro uses a 350W power supply, which is underpowered for a machine this size. We would have liked to see a 400W or even a 500W power supply in the 3D printer, but Creality decided not to do that.
This power limitation shows up most when preheating the print bed. As you will see later, it takes a very long time for the bed to reach high temperatures, despite the fact that the print bed is insulated at the bottom.
If you are printing with PLA filament, this likely won’t be too big of an issue for you. But if you want to print with ABS or another material that requires a higher bed temperature, you might get annoyed with waiting.
The power supply itself is a typical rebranded power supply with Creality label slapped on. In our testing, these have always worked well and we didn’t have any issues with them.
However, it is possible that the 350W version in the Creality CR-10 Smart Pro will undergo too much stress from the power demand over time (it runs at 100% capacity during preheating) and fail prematurely. Only time will tell.
Strain Relief

What Creality has done well with the CR-10 Smart Pro, and something that we are seeing more and more often on current generation 3D printers is strain relief.
Not only are the important high-current wires, like those on the print head, properly secured, but all connectors that are prone to coming loose from vibrations are kept in place with a dab of hot glue.
This is important in any kind of electronics, but it is especially important in something like a 3D printer where there is a lot of vibration. This kind of attention to detail goes a long way in ensuring that your 3D printer will have a long lifespan.
Previous generation 3D printers have had plenty of issues with print bed wiring wearing out over time, causing hazardous situations and sometimes even fires.
Another improvement on the Creality CR-10 Smart Pro that we haven’t seen before on the company’s 3D printers is the addition of a strain relief clip on the print head that is bolted into place. On the Ender S1 series, the print head only has a couple of tabs that secure the ribbon cable. It is good to see that Creality is continuously making progress in this area.

So despite the tinned wires, the Creality CR-10 Smart Pro scores high in terms of build quality. There are some small things that could be improved, but overall the 3D printer is very well put together.
Noise Levels
The CR-10 Smart Pro is listed as having a 45dB output. It is definitely louder than that, but it’s nothing bothersome.
To put the noise level in human-understandable terms, you can compare it with the noise level of a background music, which is around 60dB. It is audible when you focus on it, but it is also easy to tune it out if you happen to be in the same room.
The loudest component is the print cooling fan on the extruder. Since you might not always be running it at a 100% (for example, when 3D printing ABS), your experience could be more silent depending on your use case.
Ease of Use
Hardware aside, how easy is it to use the Creality CR-10 Smart Pro? Does it have the required interface to easily turn your designs into 3D printed physical models? Let’s take a look.
4.3″ Touch Screen

The main interface you will be using on the Creality CR-10 Smart Pro is its 4.3″ touch screen. Unlike typical 3D printer LCD screens, this one is oriented in a landscape/horizontal position.
Compared to a vertically oriented screen, we find this to be easier to work with. The main reason for this is that the menus are displayed in a list format on the left side, instead of in a traditional grid.
This means that the right side of the screen remains free for all the settings and other things you will be accessing the most. It’s a nice way of organizing the information and we hope more 3D printers will come with this layout.
One thing we did notice is that the touch screen on our CR-10 Smart Pro needs to be pressed quite hard to register inputs. It is not clear whether this is a natural variation between touch screens, or if all Creality CR-10 Smart Pro 3D printers come with a touch screen that needs to be pressed hard.
This is not a deal-breaker, but more something that drew our attention after having worked with a variety of 3D printers with 4.3″ touch screens.
User Interface and Firmware

As mentioned above, the user interface is pleasant to work with on the landscape-oriented 4.3″ touch screen. The main menu is displayed on the left side, while all the settings and information you need are displayed on the right.
All settings are organized and laid out intuitively, so you won’t have any trouble finding what you’re looking for. Because of the integrated relay, you are able to turn the 3D printer on and off through the user interface itself, instead of having to use the physical power switch.

Another thing that we were happy to find, and that we were missing on the S1 Pro, is the option to toggle the LED light bar on and off from the user interface.
Other welcome additions are the configuration of more in-depth settings, such as the PID parameters, maximum acceleration and jerk values, and a language-selection menu with support for nine languages.

Long story short, the stock firmware on the Creality CR-10 Smart Pro is feature-packed, easy to use, and probably enough for the vast majority of users without having to resort to custom firmware.

Connectivity

In terms of connectivity, the CR-10 Smart Pro is also a step ahead of its competitors. Aside from the built-in Wi-Fi and Bluetooth options, the device also comes with a variety of I/O ports not found on most other 3D printers.
For example, the CR-10 Smart Pro comes with an Ethernet port that you can use to hardwire the machine to your network. If Wi-Fi is not an option, this provides an excellent alternative that is just as fast, if not faster.
The 3D printer also comes with a USB-C port (no more flipping the connector two times before it fits in), a USB-A port for the camera, as well as a full-size SD card slot on the front of the device.
It is also worth pointing out that all ports for the cables are conveniently located at the side of the CR-10 Smart Pro, so you won’t have any awkward cables sticking out of the front of your 3D printer that get in the way.
Filament Runout Sensor

To prevent failed 3D prints caused by broken filament, a tangled spool, or a completely empty spool, the Creality CR-10 Smart Pro is equipped with a filament runout sensor.
The way it works is that the 3D printer pauses the print job automatically as soon as it detects that the filament has run out or broken. Once you have replaced the filament, you can simply resume the print job from the user interface and pick up where you left off.
This is an extremely useful feature that can save you a lot of time, filament, and frustration, especially if you are 3D printing a large model overnight that you are unable to check up on continuously.
Repairability & Maintenance

The Creality CR-10 Smart Pro is easy to work with if you want to upgrade or repair its components. Nearly everything is easily accessible and capable of being swapped out when necessary.
As we have covered in our other reviews, direct extruders are a bit more difficult to work on than Bowden extruders. But compared to most others, the Sprite Pro is not hard to unclog or fix by any means. Not that we ever had to do so.
The only issue we can come up with in terms of repairability is that it is a bit of a chore to get access to the electronics compartment. Its panel is secured by 14 long bolts, so removing those will take you a while if you don’t use a power tool.
These extra bolts are a logical consequence of dealing with a larger format 3D printer. It’s better to have things properly secured, even if it means a few extra minutes during maintenance, than it is to have the plate rattling around during 3D printing.
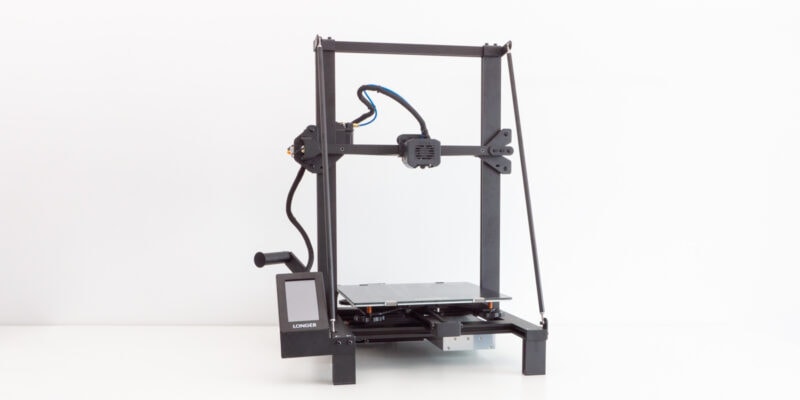
Once you do get access, however, nearly everything on the Creality CR-10 Smart Pro is easily accessible and can be taken out if necessary. The wiring is also very well organized, which makes troubleshooting a lot easier. Especially compared to the Longer LK5 Pro wiring, working on that of the CR-10 is a breeze.
Slicer Support
Creality is not restrictive when it comes to what slicing software you can use with its 3D printers, and the CR-10 Smart Pro is no exception. You can use it with PrusaSlicer, Cura, Simplify3D, and others.
The easiest way to convert 3D models to GCode for the 3D printer would be to use the Creality Cloud app slicer. It lets you prepare 3D models for printing without having to install any additional software in just a few clicks.
However, if you are a serious 3D printer user, you will quickly realize that the settings and options you have in the Creality slicer are limited. This is where using a more advanced slicing program like PrusaSlicer or Cura comes in handy.
Alternative 3D printers to the CR-10 Smart Pro
Anycubic Kobra Plus
The Anycubic Kobra Plus is Anycubic’s counterpart to the Creality CR-10 Smart Pro. It has a slightly less tall 300x300x350 mm print volume and features a number of similarities and differences when compared to the CR-10 Smart Pro.
Most notable, the Kobra Plus also sports auto leveling, a runout sensor, a dual Z-axis setup, and a 4.3″ touch screen. The similarities mostly stop there, however.
The biggest differences are in the extruder, with the Kobra Plus featuring only a PTFE-lined Bowden extruder. Compared to the all-metal Sprite Pro direct drive extruder of the Creality CR-10 Smart Pro, this is a massive downgrade that has an impact on both print quality (more retraction issues) and filament compatibility (no ABS or TPU).
Furthermore, the Kobra Plus uses a Carborundum glass print bed. While this is not a problem, it is more difficult to work with than the PEI-coated flexible print bed of the CR-10 Smart Pro.
Other differences on the Kobra Plus are its worse connectivity options, having to work with a small micro SD card, and it comes with none of the quality-of-life features that make the Creality CR-10 Smart Pro stand out.
The Kobra Plus is not a bad 3D printer at all, especially for its price. But compared to the CR-10 Smart Pro, it is clear that the latter is the better machine.


Creality CR-10 Smart vs CR-10 Smart Pro
It is needless to say that compared to its CR-10 Smart predecessor, the Creality CR-10 Smart Pro has a number of advantages. The most notable is the Sprite direct drive extruder, which outperforms the PTFE-lined Bowden extruder of the CR-10 smart in nearly every way.
Other improvements include the PEI-coated print bed, which is easier to work with than the Carborundum glass bed of the CR-10 Smart, and smaller improvements like the USB-C port.
The build volume, construction, touch screen, and auto bed leveling are all similar, however. Given that the CR-10 Smart costs about $300 less at the moment, it is worth considering if you only expect to 3D print with low-temperature filaments.
Artillery Sidewinder X2
The Artillery Sidewinder X2 is the successor of the Sidewinder X1 that comes with a number of smart features that you can also find on the Creality CR-10 Smart Pro.
For starters, the Sidewinder X2 also comes with automatic bed leveling, a 32-bit motherboard, filament sensor, resume print function, and a touch screen. At 300x300x400 mm, the print volume is identical as well.
As for the differences, the Sidewinder X2 can reach a lower maximum print temperature (240°C), has a textured glass bed instead of a PEI-coated print bed, and has a less reliable 3D printer extruder. The X2 is also reported to come with quite some quality control issues, so it might not be the best 3D printer to buy if you’re looking for a reliable machine.
In many aspects, the Sidewinder X2 is not that different from the CR-10 Smart and Anycubic Plus. Just like the others, it is also quite a bit cheaper than the Creality CR-10 Smart Pro. But with its quality control issues, it is not the best 3D printer in this price range or category.


Verdict: Should You Buy the CR-10 Smart Pro?
There is no denying that the Creality CR-10 Smart Pro is the best 3D printer in the 300x300x400 mm print volume category right now. Its wide feature set, connectivity options, great print quality, and ease of use make it stand head and shoulders above the competition.
At the moment, there simply is no other 3D printer with the same print volume that offers the combination of a direct drive extruder, magnetic spring steel build plate, Wi-Fi, double Z-axis, dual mode leveling, a touch display, an LED light strip, silent stepper drivers, and stable operation.
The main drawback of all these features is the cost. Its current $799 price tag is a big ask. You can get an Artillery Sidewinder X2 or Anycubic Kobra Plus for close to half that price. Both of those alternatives fall short on features compared to the CR-10 Smart Pro, and you do get significant extras on the CR-10 Smart Pro for the additional money you spend.
If you are set on this build volume and you can afford it, the Creality CR-10 Smart Pro is definitely the 3D printer to go for. The same goes if you actually need most of the features that this machine offers.
For everyone else, we would recommend waiting for the price to come down a bit or opting for one of the less feature-rich but more affordable alternatives.

Hello,
I really enjoyed this review. I am also looking at the CR-M4 and was wondering if you could do a review on that as well.
Thank you for your time