

- Solid print quality
- Reliable auto bed leveling
- Direct drive extruder
- Sensorless homing
- Flexible magnetic PEI coated bed
- 32-bit electronics
- Print bed is uneven in temperature
- Plasticky feel
- Loud fans
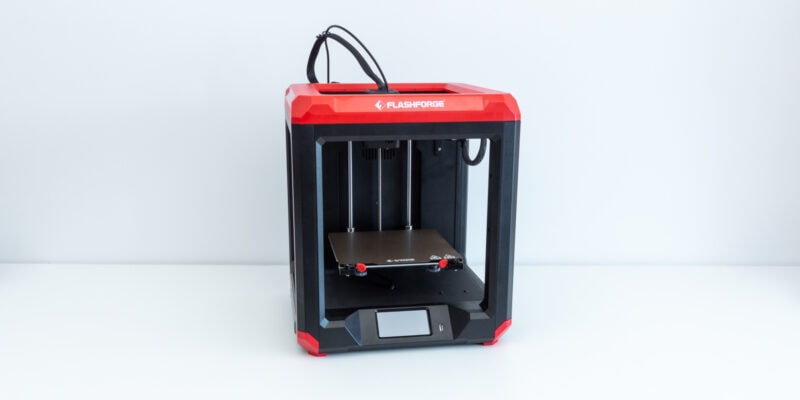
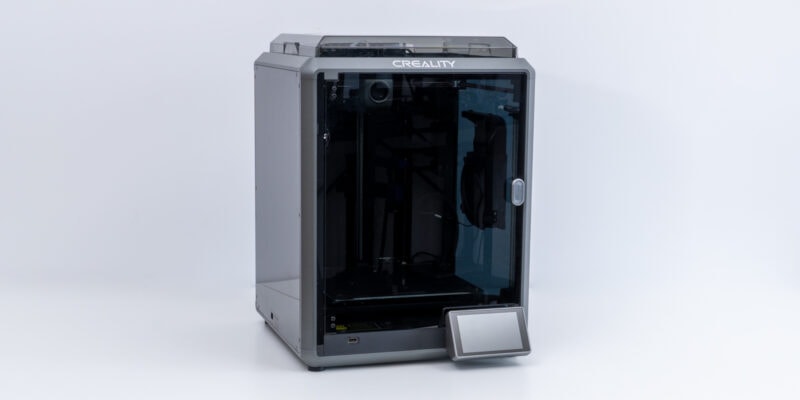
It is no secret that Anycubic makes some of the most popular 3D printers on the market. The Kobra is one of their newest models, and it has quickly become a favorite among budget-conscious buyers. So, what makes it so special?
For starters, the Kobra comes with a long list of features, including automatic bed leveling, a removable PEI coated print bed, sensorless homing, and a 220x220x250 mm print volume. But does it perform as well as it promises?
In this Anycubic Kobra 3D printer review, we will test whether it lives up to its specifications and see how it compares to similar 3D printers on the market today.
Anycubic Kobra Specifications
| Anycubic Kobra Specs | |
|---|---|
| Price | Anycubic | Amazon | AliExpress |
| Leveling | 25-point automatic leveling |
| Panel area | 7.95 in² / 51.3 cm² |
| Filament run-out detection | Optional |
| Printing material | PLA / ABS / PETG & TPU |
| Nozzle size | ø 0.4 mm (replaceable) |
| Nozzle temperature | ≤ 500 °F / 260 °C |
| Hot bed temperature | ≤ 230 °F / 110 °C |
| Average speed | 50-80 mm/s 2.0 – 3.1 in./s |
| Control panel | 4.3 inch LCD touch screen |
| Z-axis | Single threaded rod |
| Print size (DWH) | 9.8 x 8.7 x 8.7 inch 220 x 220 x 250 mm |
| Printing volume | 3.20 gal. / 12.10 L |
| Machine dimensions | 48.6 x 43 x 48.6 cm |
Printing Technology
The Anycubic Kobra is a fused deposition modeling (FDM) 3D printer. This technology uses a filament, which is melted and extruded through a nozzle onto a build platform.
FDM 3D printers are popular because they are relatively inexpensive, and the prints produced are strong, accurate, and affordable.
This 3D printer is no exception. As you will see in this Anycubic Kobra review, the machine is capable of producing excellent results with a variety of 1.75mm filaments, including PLA, ABS, and PETG.
Anycubic Kobra Unboxing

Like many other hobbyist 3D printers, the Anycubic Kobra is shipped flat-pack style. This helps save shipping costs but does require you to do some assembly before you can use the 3D printer.
The first thing you’ll notice when opening the Anycubic Kobra’s packaging is the 3D printer’s surrounding foam protection. All parts are well-protected and it is unlikely that you will encounter damage from the shipping process.
Remove the contents from the box and you will find the components of the Anycubic Kobra along with its accessories.
The included 3D printer accessories are similar to what comes with other FDM 3D printers nowadays. You get all the tools for assembly, like Allen keys and wrenches, but also includes several accessories for the actual use of the 3D printer.

Here you can think of a small pair of snippets to cut filament, a plastic scraper for print removal, and a nozzle cleaning tool for unclogging the nozzle when necessary.
For maintenance purposes, you get a small tube of grease, an extra PTFE tube, and a spare nozzle. These are both quite generic in terms of quality, but you can’t really expect more for a 3D printer under $300.
Also included is a small spool of PLA filament. While it is generic white PLA, this is a nice little extra from Anycubic.
Do keep in mind that it is only 35 grams of filament. This allows you to start printing right away, but it will run out quickly. It was enough for a couple of test prints for this Anycubic Kobra review, but that was about it.
That said, the Anycubic Kobra box contents are more than sufficient for a 3D printer at this price point. And if this is your first 3D printer, you will have everything you need to get started 3D printing right away.
Getting Started
While the Anycubic Kobra 3D printer comes mostly pre-assembled, there is still some assembly required.
If you have any experience with 3D printers or any other electronic device that requires some level of assembly, the Anycubic Kobra will be a breeze to put together.
Even if this is your first time assembling a 3D printer, the manual does a good job of walking you through the process step-by-step.
In fact, the manual is quite clear and a step above that of several other popular 3D printers that we have assembled.

Overall, you can expect this process to take about 15-20 minutes of your time.
Assembly
Once you’ve removed the Anycubic Kobra’s components from their packaging, the next task is to assemble the Kobra’s frame by attaching the gantry to the base. This process is fairly simple and only requires the tightening of four screws.

There really is not much that can go wrong here. The aluminum extrusion even comes with milled grooves that tell you exactly where to attach the gantry to the base.

With the frame assembled, the next step is to attach the Anycubic Kobra’s control panel and spool holder.

After that, you need to plug in all the wire connectors and attach the cable clamp that keeps the cables in the right place during 3D printing.
While the Kobra is technically ready to 3D print at this point, you still want to make a couple of adjustments to the 3D printer.
The first one is to remove any play from the D-wheels by adjusting their eccentric nuts. Depending on how Anycubic set up the Kobra 3D printer from the factory, this might or might not be necessary.

On our Anycubic Kobra, only the Z-axis D-wheels needed adjustment to remove a bit of play from the gantry.
Similarly, you need to make sure that the X-axis and Y-axis belts do not have any slack. This is a straightforward process by adjusting the pre-installed belt tensioners.

Lastly, make sure that the voltage on the Anycubic Kobra is set correctly. Ours was set to 230V by default, but if you live in a place where 115V is standard, like the USA or Japan, this can cause the power supply and connected electronics to blow up. So always double-check the input voltage setting before powering on the printer for the first time.

Anycubic Kobra Features
Auto Bed Leveling

Unlike other budget 3D printers, like the Ender 3 v2, the print bed of the Anycubic Kobra does not offer adjustment nuts for bed leveling. This is because the Kobra comes with an inductive probe that is able to detect the exact position and slope of the bed and adjust for it in software.
Inductive probes are a nice feature to have as they make the bed leveling process much simpler and more accurate. They work by creating a magnetic field and detecting changes in it caused by nearby metals.
Because the Anycubic Kobra uses a spring steel bed, the inductive probe can detect its position with ease and accuracy. However, if you will ever switch to a glass print bed, this sensor will not be able to detect it.

Non-contact inductive probing is a different process than with the BLTouch and CRTouch sensors that physically probe the bed. We have found either probe type to be accurate enough for getting that perfect first layer, but with the inductive probe undergoing less wear and tear over time as it has no moving parts.
While adding a bed leveling sensor is a popular aftermarket Ender 3 upgrade, having a stock bed leveling sensor included from the factory is a most-welcome luxury on a sub-$300 3D printer.
Anycubic LeviQ
Anycubic LeviQ is the name of the Kobra’s auto bed leveling system. The 3D printer’s software probes the bed at 25 points and then uses the results to create a mesh for adjusting the Z-axis position during 3D printing.
Leveling the bed with this feature is as simple as it gets. On the touch screen, select Prepare -> Leveling -> Auto-Leveling and the Kobra takes care of the rest for you.

First, it will home the X-, Y-, and Z-axes before measuring the Z-axis position of 25 spots (a 5×5 grid) on the bed surface.
The Anycubic Kobra now knows the precise slope and bumps in the print bed surface, but it does not yet know the exact position of the bed relative to the nozzle.
This is why the next step is to set the Z offset of the nozzle. The process may sound more difficult than it is in reality.
Just slide a piece of paper under the nozzle and adjust the Z-offset position through the Kobra’s touchscreen interface until the nozzle just about touches the piece of paper.

At this point, the Anycubic Kobra can tell the position of the nozzle relative to the auto-leveling sensor and is able to do the rest of the magic on its own.
For reference, the Z offset on our Anycubic Kobra was -1.85 mm.
If at some point during the first layer you notice that the Z height is still a bit off, you can always adjust it through the touch screen during the print itself.
To avoid having to adjust the Z height for your next 3D prints, Anycubic has made sure that the Kobra stores this adjustment for future use.
In practice, we have found the Anycubic LeviQ system to work well. While inductive probes can be affected by temperature fluctuations, we haven’t noticed any accuracy issues testing with print bed temperatures up to 100°C.
We were also happy to see that the Anycubic Kobra gets the print bed up to temperature before measuring the auto bed leveling grid. This is important because changes in print bed temperature can cause the bed to expand in unpredictable ways. Running the grid measurement with the bed at the target temperature makes sure that the measurements correspond with the position of the bed during actual 3D printing.
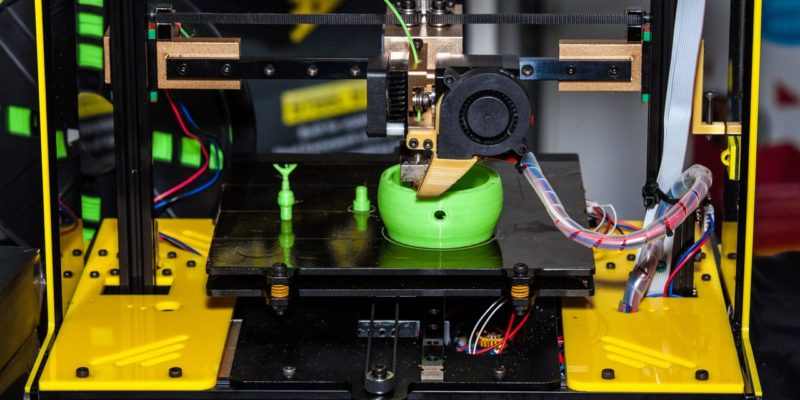
Direct Drive Extruder

The Anycubic Kobra uses a direct drive extruder. This means that, in contrast to a Bowden extruder, all print head components are located in the same space as where the filament exits the nozzle. This is an improvement over Anycubic’s last year’s release, the Anycubic Vyper, which uses a Bowden extruder.
Direct drive extruders are often found in more expensive 3D printers due to their superior printing performance. They make filament loading easier as well, which is especially useful for those less experienced with 3D printers.
Other benefits of a direct drive extruder are the ability to print with flexible filaments like TPU and the need for less retraction in general.
The extruder on the Anycubic Kobra does look rather bulky, especially when compared to direct drive extruders of similar 3D printers, like the Ender 3 S1. However, the extruder’s boxy plastic cover does come with an interesting futuristic look.
After removing the plastic cover, the Kobra’s extruder is reminiscent of E3D’s Titan Aero. In fact, it is similar enough that we can simply call it a Titan Aero clone.

Filament loading is straightforward but can be tricky if the end of your filament is not cut at an angle. In order for the drive gear to grab onto the filament properly, it is a good idea to give the filament a 45° cut with the included wire snippers before inserting it.

In our testing, we found the extruder to work reliably with PLA, PETG, and ABS filaments. We can’t speak for TPU, but given that this is a direct drive extruder with a well-constrained filament path, we assume it works just as well, provided that you use the right TPU print settings.
Hot End

The Anycubic Kobra uses a PTFE-lined hotend. Contrary to an all-metal hotend, a PTFE-lined hotend has a section of PTFE tubing that reaches into its heat break.
Advantages of a PTFE-lined hotend are that it’s less prone to clogging and needs less retraction, but the disadvantages are that it’s less temperature resistant than an all-metal hotend. A high nozzle temperature can cause the PTFE tubing to degrade over time.
To avoid degradation, you don’t want to exceed a nozzle temperature of 250ºC with it. To be safe, it is best to stick to extrusion temperatures of 230-240ºC and below.
As a result, you can use the Anycubic Kobra to 3D print with standard filaments such as PLA, ABS, PETG, and TPU, but won’t be able to use more exotic filaments like Polycarbonate, Nylon, and PEEK. For an entry-level 3D printer, this is fairly standard.
If the Kobra will be popular (we think it will be!), then it is likely that at some point there will be a third-party all-metal hotend that you can upgrade with.
The hotend only comes with a nozzle size of 0.4 mm, but given that it is a standard V6-type nozzle it will be easy to get your hands on differently sized or even different material nozzles for extra print quality, print speed, or durability.
Heated Bed

The print bed of the Anycubic Kobra measures 220×220 mm. This is identical to what you find on comparable 3D printers, like the Ender 3 V2, Ender 3 S1, and Artillery Genius Pro.
As a bed surface, Anycubic has chosen a PEI spring steel plate for the Kobra. An excellent choice in our opinion.
Flexible build plates make it easier to remove your 3D prints as the plate will deform slightly when you bend it, allowing your 3D printed parts to pop right off.

Having a print bed with PEI coating also means that you can print directly onto the surface with any filament, always getting great bed adhesion without the need for glue or other adhesives.
In combination with automatic bed leveling, this removes a lot of the hassles that are commonly associated with other 3D printers in this price range.
Temperature Uniformity
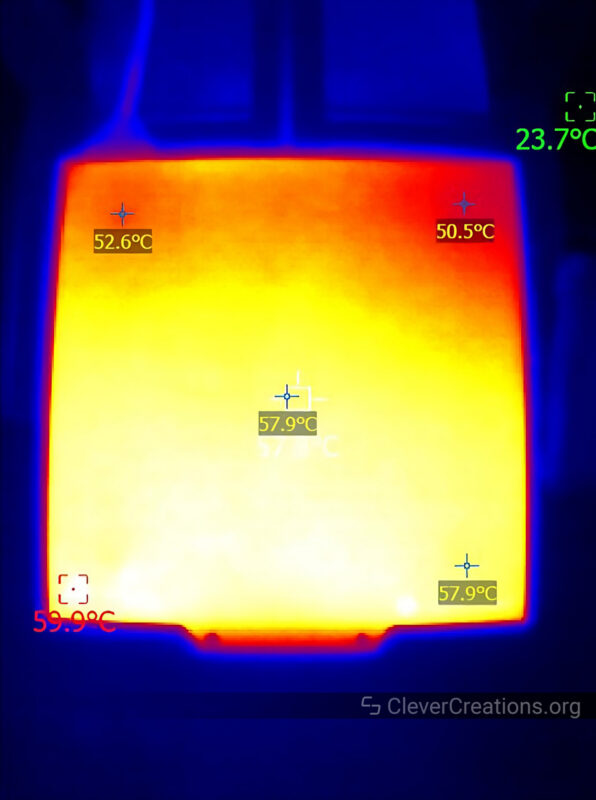
The temperature uniformity of the Anycubic Kobra print bed is suboptimal. The temperature near the top of the bed (when viewed from above) is substantially cooler than the bottom of the bed, with almost a 10 °C difference between the extremes.
This uneven heating of the print plate can result in the warping of large prints. The PEI-coated surface offers good adhesion, however, which mitigates this somewhat.
We have seen worse on budget 3D printers, and as long as you position large prints horizontally near the bottom of the print plate, this is not a major issue.
If you want to improve the temperature uniformity, you can add a layer of insulation material to the underside of the bed. The Kobra bed does not have insulation material by default, which is part of why the temperature is so uneven.

Heating Times
The heating times of the Anycubic Kobra are excellent and you won’t waste a lot of time for the 3D printer to get up to temperature. We found that the 3D printer reaches a nozzle temperature of 240 °C in 1.5 minutes.
Reaching a bed temperature of 60 °C takes the Kobra approximately 2 minutes, whereas getting up to the recommended 100 °C for ABS filament takes 7 minutes total.
Sensorless Homing
When writing this review, Anycubic did not advertise this feature anywhere, and we were pleasantly surprised to find out that the Kobra comes with sensorless homing on the X- and Y-axes.
Typical 3D printers use endstops to home the print head and bed. Endstops are mechanical switches that are triggered when the print head or bed reaches a certain point.
These switches are used to establish a known starting point for the print head and bed, which is important as it allows the printer firmware to know where the print head and bed are in space.
With a sensorless homing system, any mechanical components for homing are eliminated. Instead, the Anycubic Kobra’s firmware uses a feature of the stepper motor drivers to detect when the motors have reached the end of their travel.
The advantage of this is that it reduces the number of potential points of failure and makes the printer more reliable. Less mechanical components, less wiring, and simply fewer things that can go wrong.
Generally speaking, 3D printers that have sensorless homing tend to be more expensive than those without it, so the feature is certainly a plus on a budget 3D printer like the Anycubic Kobra.
We haven’t done any in-depth tests in terms of positioning accuracy (X- and Y-axis homing does not need to be that precise), but we found the sensorless homing on the Kobra to work just as well as mechanical endstops typically do.
Electronics
Controller Board

The Anycubic Kobra is controlled by a TriGorilla Pro A V1.0.4 motherboard. It comes with an HC32F460 ARM Cortex-M4 32-bit processor and silent TMC2209 stepper motor drivers.
TriGorilla boards are also used on a number of other Anycubic 3D printers, and it is unlikely that you will run into issues that won’t get resolved with a firmware update.
The 32-bit processor means that the Anycubic Kobra is capable of faster print speeds than other budget 3D printers (with 8-bit motherboards). At the same time, the processor will have enough power to support new and exciting firmware features that might be released in the coming years.
Stepper Motor Drivers

As for the stepper motor drivers, Anycubic has chosen to use TMC2209 drivers from Trinamic. The TMC2209 is a very popular choice for 3D printer builders as it is reliable, drives stepper motors silently, has thermal protection, and offers sensorless homing capabilities.
These silent stepper motors are a welcome upgrade from any previous machines we have used, as they tend to be much quieter and make fewer vibrations when you home your printer or do any 3D printing.
All of these features help to ensure that the Anycubic Kobra 3D printer will likely work reliably for many hours at a time without problems.
Do keep in mind that the stepper drivers are soldered directly to the board. This is not a problem in itself, but if any of the drivers ever need to be replaced, it will require some soldering skills to do so.
This is not something that you ever need to do in normal circumstances, but if you happen to unplug one of the stepper motors while the 3D printer is powered on, there is a good chance of burning its connected driver and causing the need for its replacement.
Touchscreen

The Anycubic Kobra 3D printer sports the same 4.3″ (~11 cm) touchscreen that is included on the Anycubic Vyper.
The touchscreen display is responsive, and we found it easy to access the printer settings or STL files that needed to be printed.
There are no knobs or buttons in front of the screen that can be used as an alternative input method instead of the touchscreen.
However, this is not necessarily a bad thing as the touchscreen allows for a more modern, user-friendly design.
We’ll have a bit more to add on the user interface of the touchscreen later, but for now, we’ll just say that the screen is a welcome addition to the Anycubic Kobra.
Power Supply

The 400W 24V power supply used in the Anycubic Kobra does not have any identifiable branding, so we can assume that it is a generic unit.
We have no complaints about the power supply. It has worked flawlessly during our testing and has been able to provide enough power to the Kobra no matter what we asked from it.
For longevity and reliability, we would have liked to see a MeanWell branded power supply, but we understand that this would have driven up the cost of the 3D printer.
Wiring
The wiring on the Anycubic Kobra is mostly okay. We were unable to detect any issues with the use of wrong wire gauges or lack of strain relief.
However, we did find that the power input and bed heater wires (the ones that carry the most power) did not have wire ferrules. Instead, they were tinned with solder.

For those who are not familiar, wire ferrules are small metal sleeves that go over the end of a wire to help prevent it from fraying and potentially causing safety issues further down the road.
While tinned wires on a 3D printer are not a dealbreaker by any means, having correctly terminated wires in high-current applications is a good way to avoid worst-case scenarios.
Regardless of whether you decide to buy the Anycubic Kobra or go with a different 3D printer, we recommend always checking for this and, if necessary, adding wire ferrules yourself.
You can do this with a ferrule crimping kit and only takes a couple of minutes. Simply cut the tinned sections off, strip the insulation from the end of the wires, and crimp ferrules on.

Build Volume

Like many other 3D printers in this market segment, like the Artillery Genius Pro and Creality Ender 3 V2, the Anycubic Kobra has a 220x220x250 mm print volume.
This is ample space for most 3D printing needs, and we expect most users to not run into any issues when it comes to printing larger models or multiple smaller ones.
If you are looking for a similar but slightly larger 3D printer, you can take a look at the Ender 3 S1. It has a higher cost but comes with an increased print volume of 220x220x270 mm and several additional nifty features.
Alternatively, if you are sure that you need to print significantly larger 3D models, you might be interested in another 3D printer from the Kobra series, the Kobra Max.
The Kobra Max is not that different from the regular Kobra in its feature set, but it comes with a significantly increased 400x400x450 mm build volume.
To accommodate its larger build volume, the Kobra Max also has a dual Z-axis and filament run-out detection. These are both functions that a little printer like the regular Kobra does not benefit as much from, and so they were not included on the Kobra to save on cost.
Build Quality and Construction
Materials
The overall build quality of the Anycubic Kobra 3D printer is solid. It uses metal parts for the most important components, adding up to a sturdy machine that does not feel flimsy.
There are some parts that could have been made from metal to improve its rigidity further, for example, the horizontal brace on top of the vertical arms of the frame.

Along with its other prominent injection-molded components, like the extruder cover and belt tensioners, this does cause the machine to have a bit of a plasticky feel to it.
In that sense, the Anycubic Kobra is comparable to the Artillery Genius Pro, which takes a similar approach with its parts.
In the end, however, cost wins over form and we would rather have a machine that is a little less rigid but also significantly cheaper.
Single Z-Axis Lead Screw

We would have also liked to have seen a second stepper motor and lead screw on the Z-axis. The direct drive extruder weighs in at about one pound (half a kilo) and throws a lot of mass around at maximum printing speed.
A second Z-axis lead screw would have helped to mitigate any Z-banding and ringing that might occur due to the weight of the extruder, resulting in better print quality.
The design team at Anycubic might agree with us on this one, but they probably decided to forego a second Z-axis motor in favor of keeping the machine as affordable as possible. This is a reasonable decision and one that we can respect.
While we did not notice any issues from the 3D printer only having one Z stepper motor and lead screw right now, we can’t help wonder whether this will still be the case after the machine’s components start to develop more wear and tear from regular use.
Ease of Use
Software
The stock firmware on the Anycubic Kobra 3D printer is fairly limited. If you are looking for in-depth control of print settings, stepper motor parameters (current, micro-steps), or other advanced functionality like setting the maximum acceleration, you will need to do it through G-code.
However, all required basic print settings are there. Configuring the settings for the nozzle temperature, bed temperature, or bed leveling are all available where you’d expect them to be.

The Anycubic Kobra ships with a copy of Cura slicer on its SD card, but we should point out that our included Cura version was outdated (4.2.1). It also did not come with a preconfigured profile for the Anycubic Kobra.
This might be changed in the future, and you should make sure to update to the latest version of Cura (or your preferred slicer) regardless. If the slicer does not come with a profile for the Kobra, you will have to set up your own profile to get the best out of the 3D printer.
User Interface
While the firmware on the Anycubic Kobra is basic, Anycubic has developed a pretty intuitive interface on the 3D printer that makes it easy to navigate and use.
The menu gives you logical access to the major functions of the Kobra and each menu item can be expanded into more sub-menu items if need be.
We found this very useful, as it meant we didn’t have to remember any complicated key combinations or mumblings in order to do things like heat up the extruder or adjust the nozzle height.
What we do think Anycubic can improve in the UI is having the firmware register long presses on the touch screen and automatically increasing or decreasing the value the user tries to change. At the moment, this requires repeated tapping of the screen.
Print Bed

The magnetic, flexible PEI-coated print bed on the Anycubic Kobra 3D printer is a nice touch. It’s easy to remove prints from, and it doesn’t require any tape or adhesives to make the first layer of your prints stick.
You’ll also find that the print bed is heated, which is necessary for printing with ABS and other high-temperature filaments.
The maximum temperature you can reach with the print bed is about 110°C (230 °F), even though you might be able to push it a bit further by adding custom firmware and adding insulation to the bottom of the bed. There’s not much reason to do so, however, unless you plan on working with very high-temperature filaments.
Repairability and Maintenance
In terms of repairability, this 3D printer scores well. For example, you can create easy access to the electronics compartment area by removing two screws and removing its plastic cover.
This lets you get in there and make any necessary repairs or maintenance without having to completely disassemble the entire machine.
The same goes for the extruder. While direct drive extruders are not the easiest to service, the fact that the entire extruder assembly is mounted with four bolts means that you can simply remove the entire print head at once and work on it outside of the printer when you need to.

We should also mention that there are few proprietary parts on the Anycubic Kobra 3D printer. Almost everything is standard, off-the-shelf hardware that you can find at any 3D printer parts store.
This is always a good thing, as it makes repairs and maintenance much easier (and less expensive) to carry out. You don’t want to find yourself without a working 3D printer in a couple of years because the manufacturer used some weird, non-standard components.
Noise Levels

Compared to other 3D printers, the Anycubic Kobra is rather loud. Both the electronics compartment fan and power supply fan have been selected for their high airflow to cost ratio, and as a result they aren’t shy of letting themselves be heard.
Silent fans that push plenty of air are expensive, which is why they are almost never included in 3D printers. Let alone 3D printers at such a low price point.
If you do want to enjoy more silence when your (Anycubic Kobra or other) 3D printer is printing in the same room as you are, we have guides on both replacing a loud power supply fan and on making a 3D printer quieter in general.
Slicer
Anycubic recommends Cura as the slicer to use with the Kobra, but as we mentioned earlier, the version that was included on our SD card was outdated.
Cura also did not come with a preconfigured profile for the Kobra, so we had to set one up ourselves. This is not a big deal, but it would have been nice to have a working profile right out of the box.
Aside from using Cura, you can also use any other slicer you want. PrusaSlicer, Simplify3D, Slic3r, or any other third-party slicing software will work just fine.
Anycubic Kobra Print Quality
It wouldn’t be an Anycubic Kobra review if we didn’t cover the print quality. The Kobra does not disappoint in this area and provides excellent results for its price. We were able to get some very nice-looking prints out of it, with smooth surfaces and well-defined details.
All test prints below were made with the Cura filament setting profiles that came with the Kobra, aside from the PETG print. No PETG profile was included, so we used our stock PETG settings.
All images are clickable to see more details.
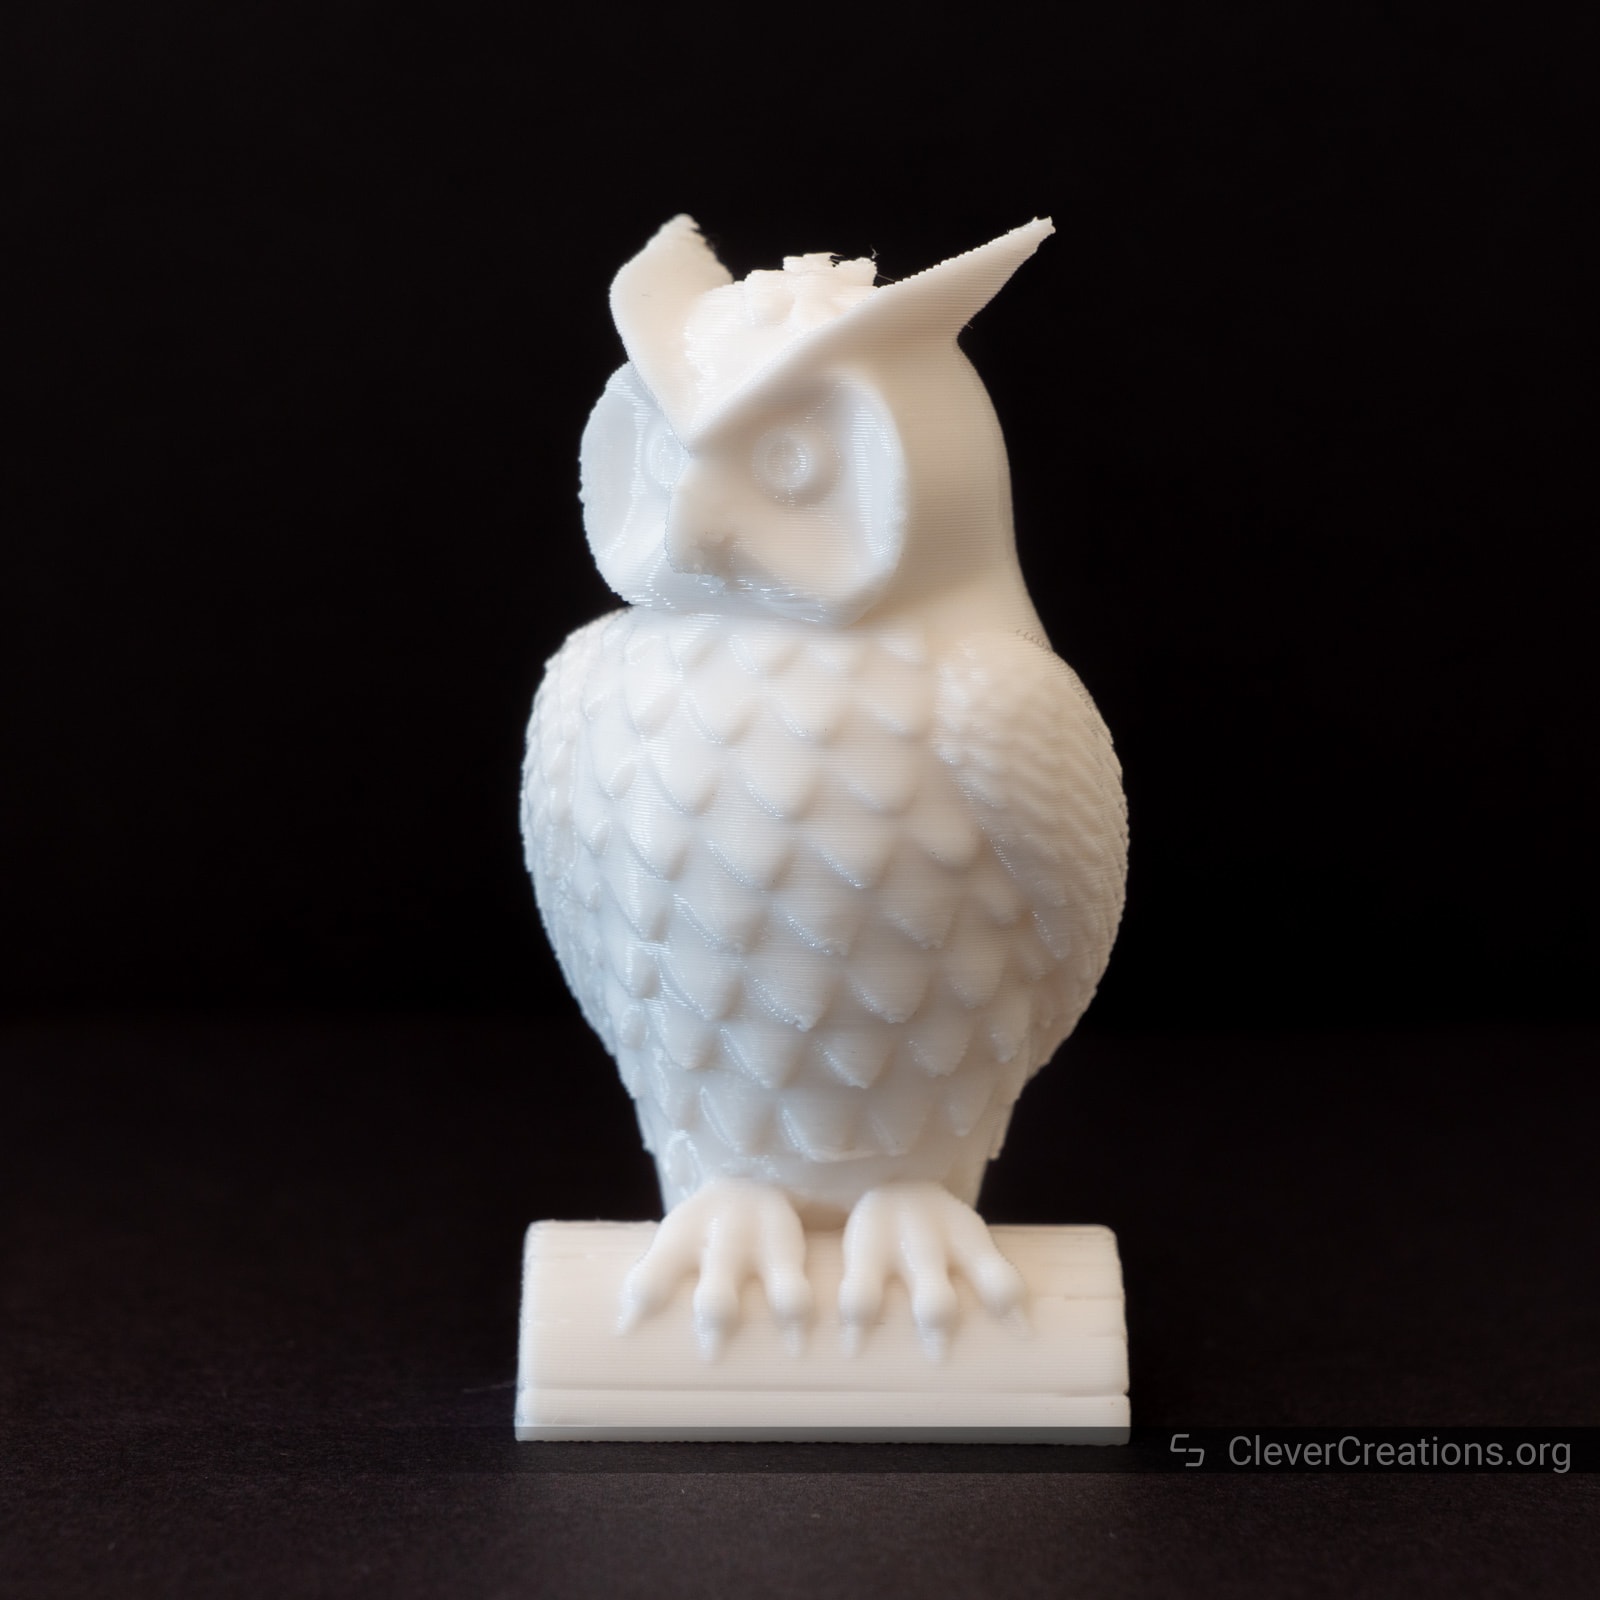
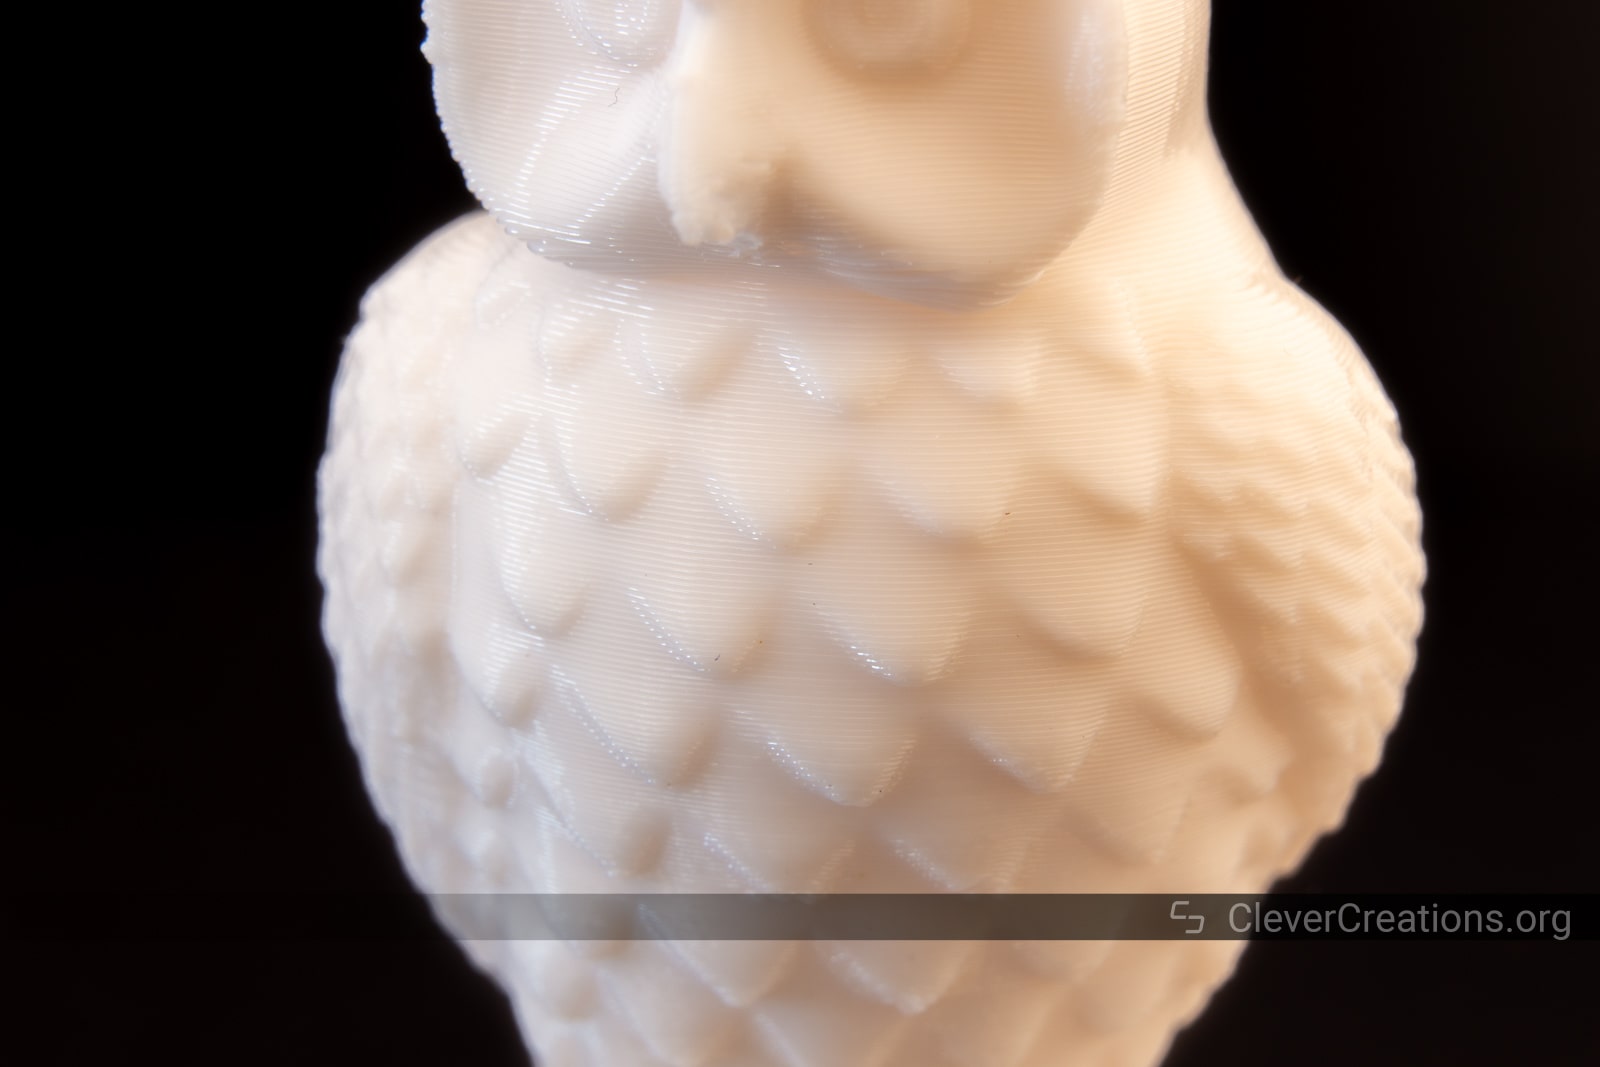
Owl
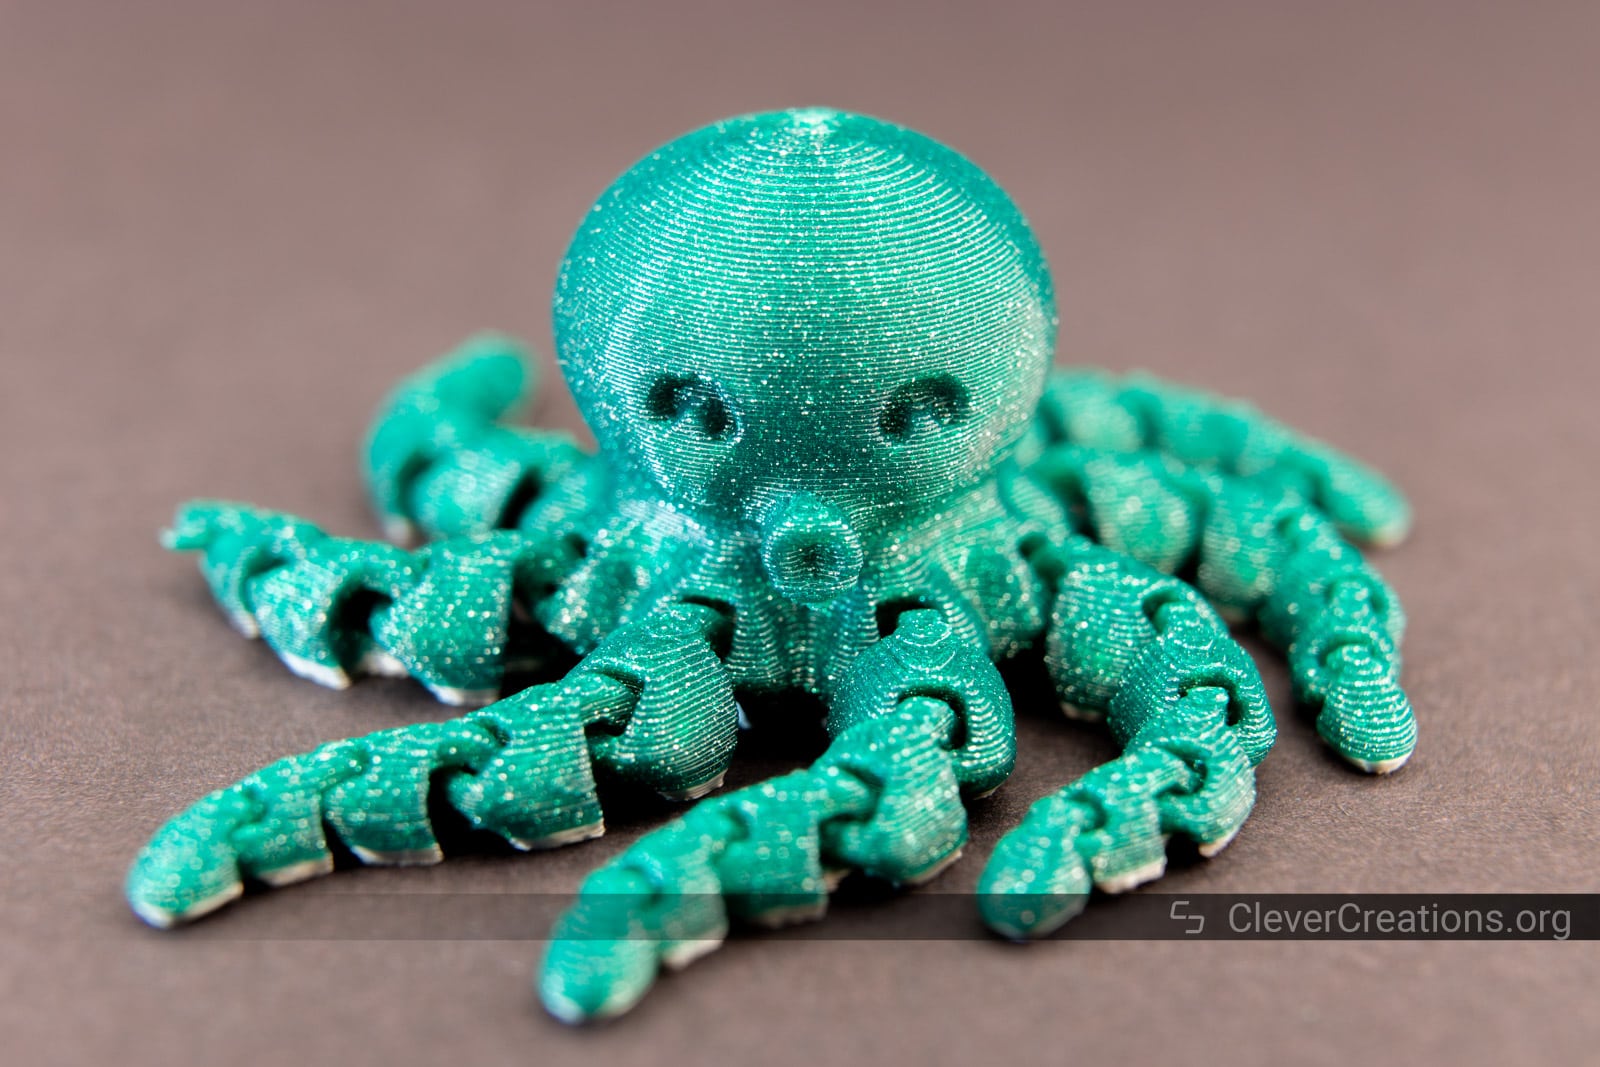
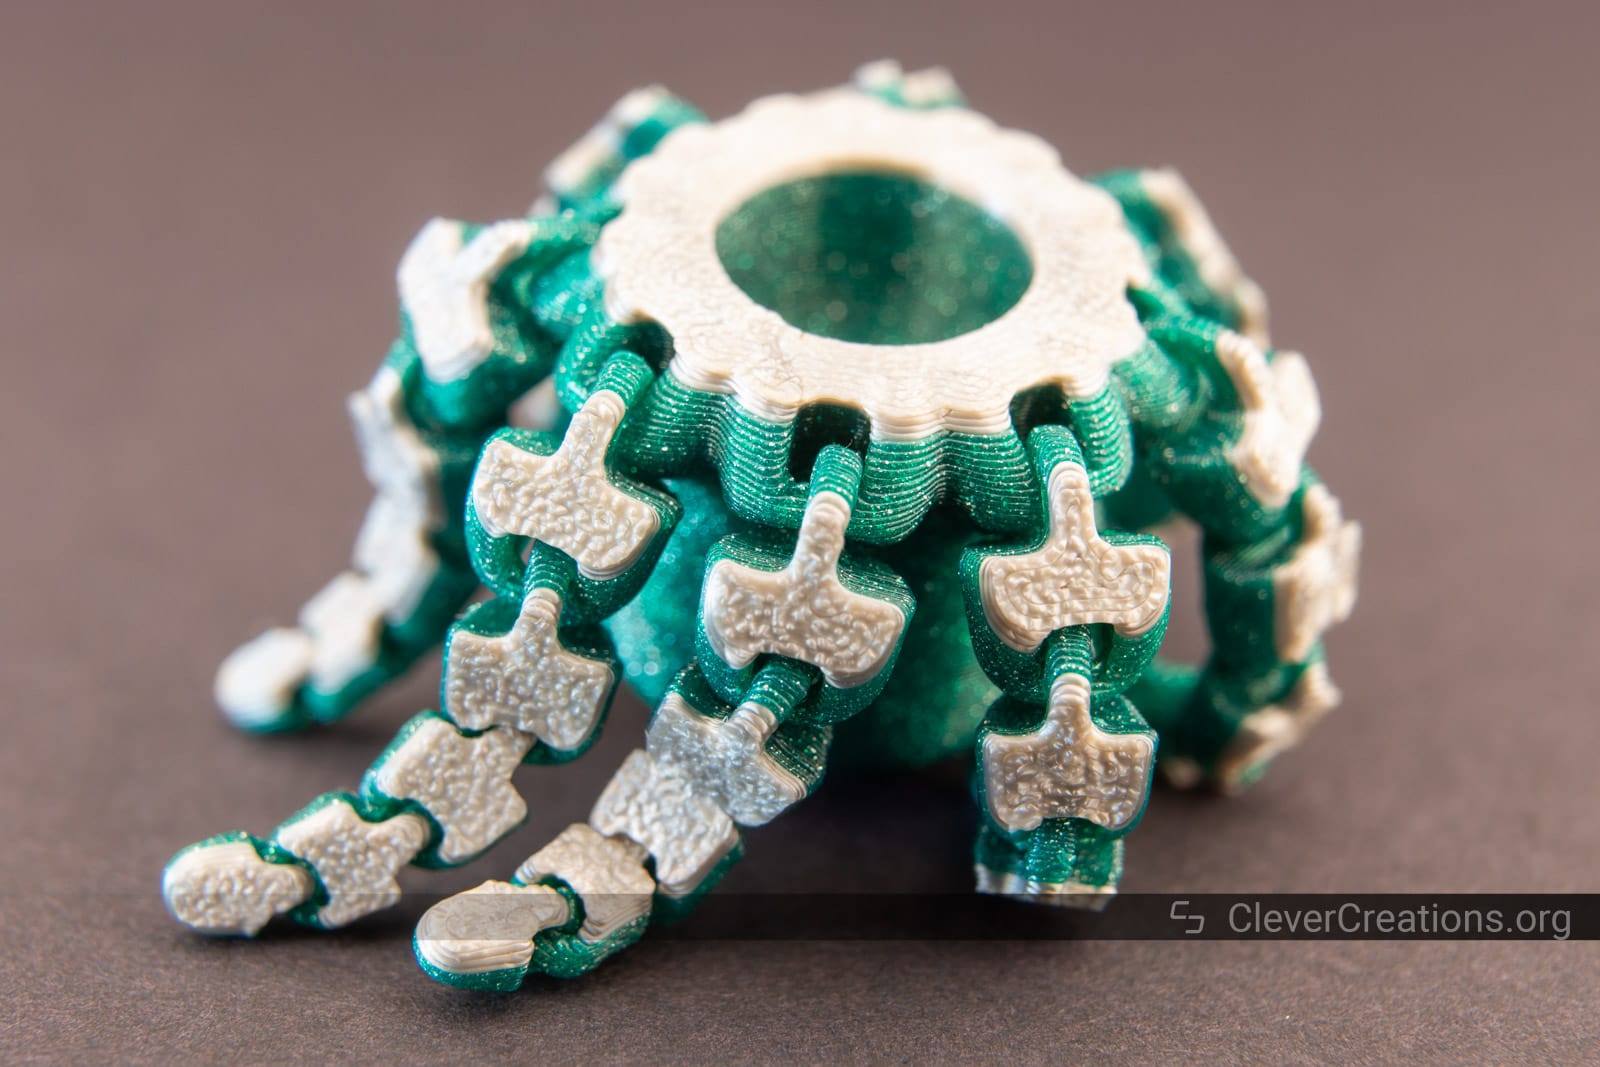
Cute Mini Octopus

Voronoi Vase
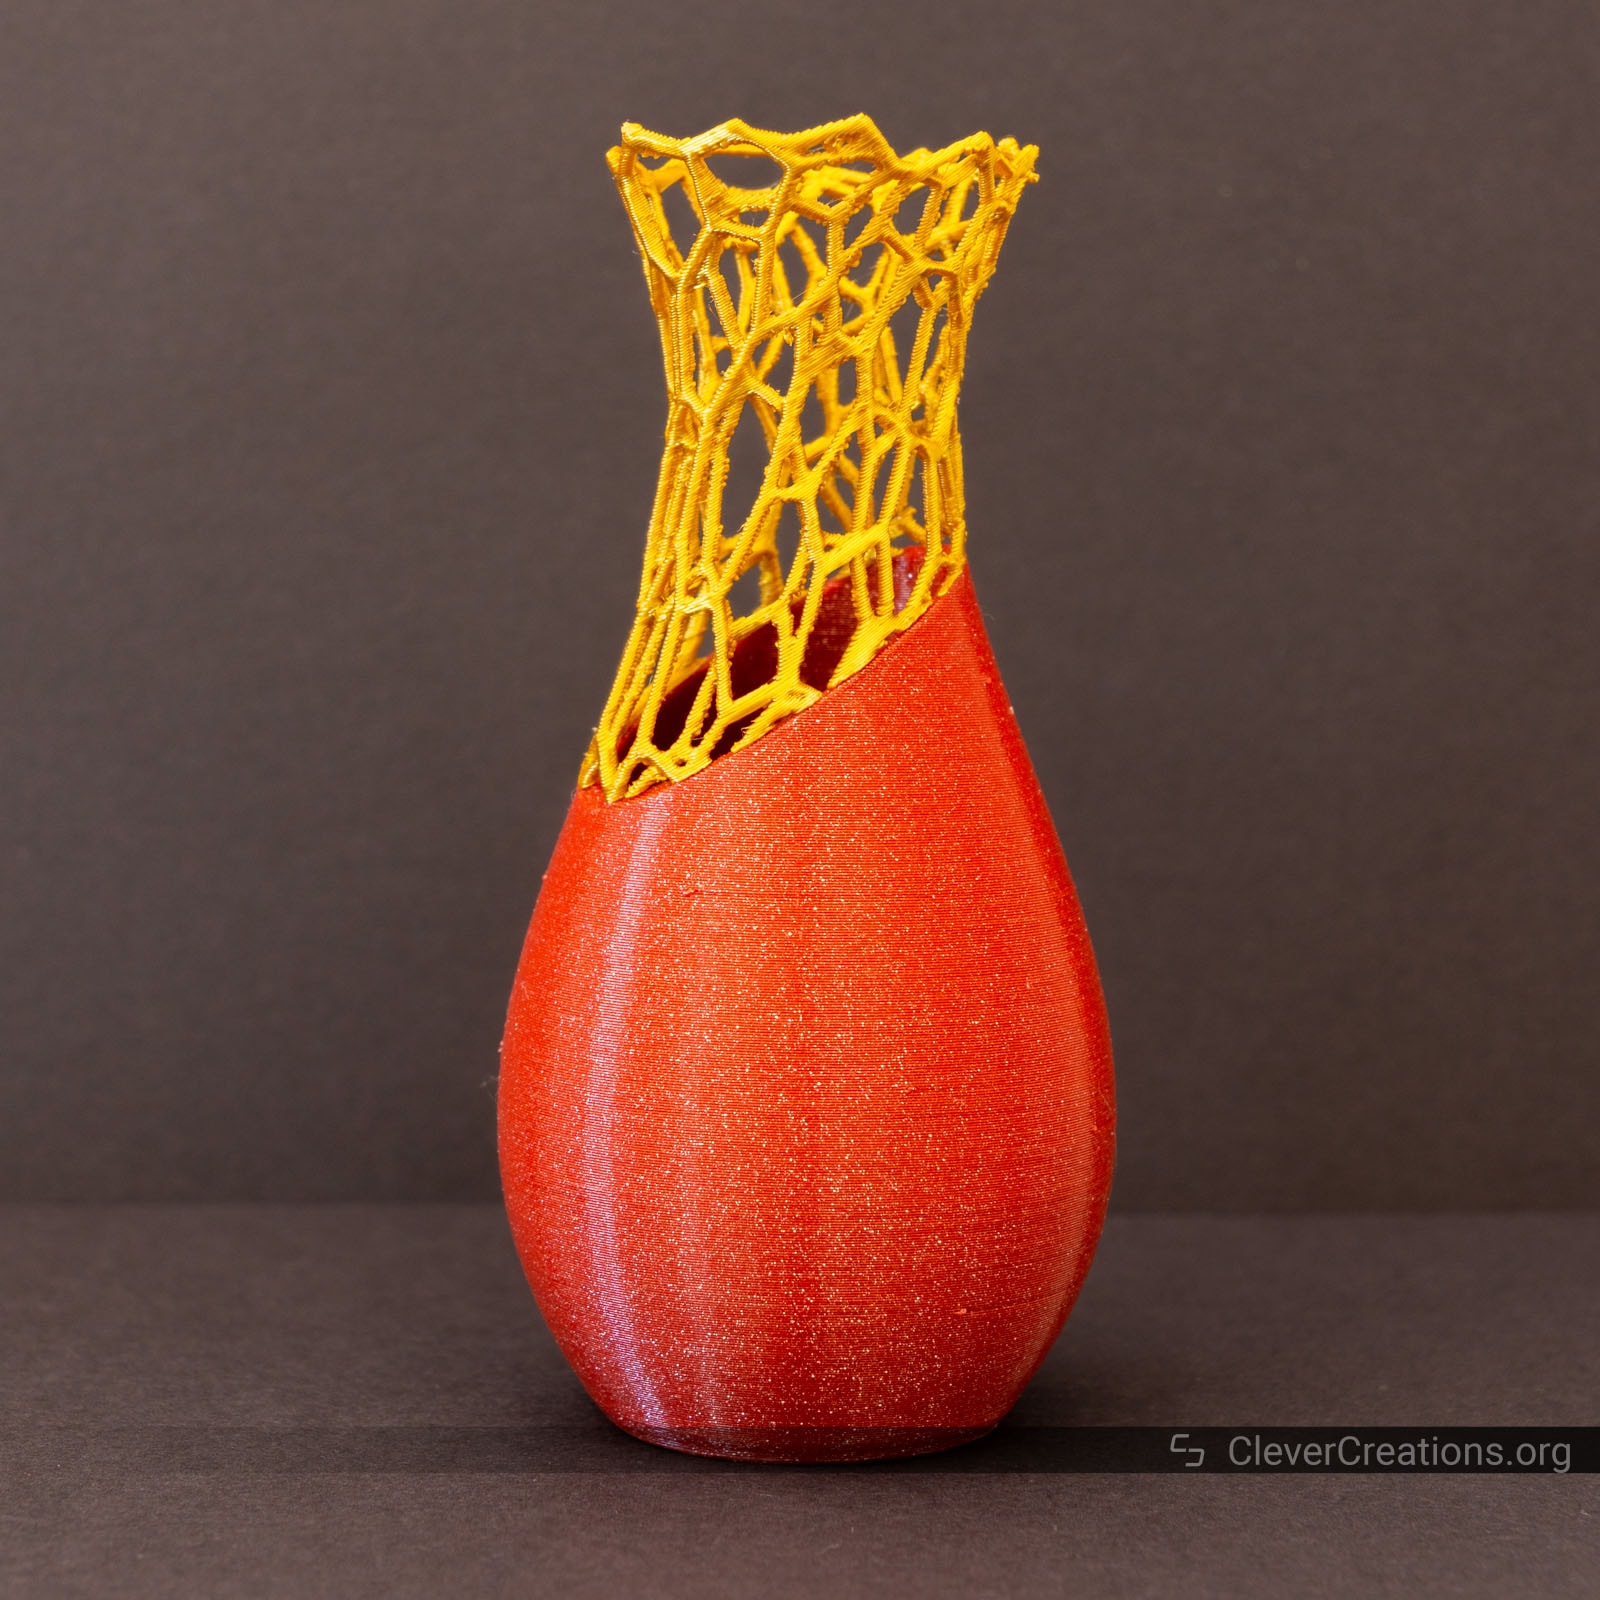

There is some drooping of filament in several areas, however, likely due to the underpowered print cooling fan. This can be prevented by increasing the minimum layer time or decreasing print speed.
3DBenchy

Anycubic Kobra Alternatives
Anycubic Kobra vs Vyper
Anycubic released the Vyper in 2021, one year before the Kobra. Both printers share a number of similarities, but Anycubic has made a couple of (in our opinion) improvements to the Kobra that make it a better 3D printer.
In terms of differences, the Anycubic Kobra comes with a direct drive extruder instead of the Vyper’s Bowden extruder. This means that the extruder of the Kobra can offer better print quality but at a cost of a decreased maximum print speed.
At the same time, the build volume of the Kobra is smaller than that of the Vyper. The Kobra has a print volume of 220x220x250 mm, whereas the Vyper offers you 245x245x260 mm.
Both 3D printers support auto bed leveling, but where the Vyper uses a strain gauge, the Kobra uses are more reliable inductive sensor.
Most other major features are the same. Hot end temperature and print bed temperature are identical, so the range of supported filament is that as well. Both the Kobra and the Vyper have a PEI coated spring steel bed, and they offer the same bed adhesion.
Electronics and the touchscreen are practically identical too, even though the Kobra has a newer Cortex-M4 processor instead of the Vyper’s Cortex-M3. In practice, you are unlikely to notice the difference.
After making our Anycubic Kobra review, the only reason we can come up with to choose the Vyper over the Kobra (discount offers aside) is to take advantage of its increased build volume. However, if that is what you are looking for, you might be better off with the Anycubic Kobra Max instead.

Anycubic Kobra vs Kobra Max
The Anycubic Kobra Max was released around the same time as the Kobra and can be seen as its bigger brother in the Kobra series. At almost double the cost, it offers 6 times the build volume. With a staggering 400x400x450 mm, the Max’s print volume dwarfs that of the Kobra.
To accommodate its larger build volume, the Max has a lightweight Bowden extruder that can quickly make its way across the print area.
Instead of a PEI-coated bed, the Max comes with a carborundum glass bed. Its print bed can only reach up to 90°C, however. Because of its vast size, the power it would require to reach even higher temperatures would exceed that of what most 24V power supplies can supply.
If you are looking to 3D print with high-temperature filaments that require a high print bed temperature, or if your focus is on producing high print quality, the Anycubic Kobra is the better option. If print volume is your thing, the Kobra Max is superior over both the Kobra and the Vyper.

Anycubic Kobra vs Creality Ender 3 S1
At $399 more at the time of writing, the Creality Ender 3 S1 is a similar 3D printer to the Anycubic Kobra, but at a $100 higher cost.
For that extra money, you get a filament runout sensor, dual Z axis, and an extra 20 mm of build height.
Aside from that, both the Kobra and the S1 are fairly identical. They both come with a spring steel print bed, a 4.3″ touch screen, auto-leveling, a direct drive extruder, similar hot end and print bed temperatures, and the same filament and slicer support.
Previous Ender 3 3D printers were (and still are) very popular. As a result, there are many purchasable and printable upgrades available that you can upgrade them with. It is likely that that trend will continue with the Ender S1, but is it the question of whether that will be the same for the Anycubic Kobra.
Whether the extra features and potentially better modding options are worth the extra $100 is not something we can say and is completely up to you to decide.

Verdict: Should You Buy the Anycubic Kobra?
After testing and comparing the Anycubic Kobra and ultimately creating this Anycubic Kobra review, we can confidently say that it is the best 3D printer under $300 at the moment.
The Kobra offers good print quality and premium features like sensorless homing and auto bed leveling to get a perfect first layer each time. Its PEI print surface gives excellent bed adhesion to any filament, and because it is flexible, you can bend it to pop your 3D prints off.
As potential downsides, the Kobra comes with a loud electronics cooling fan, sometimes finicky filament loading, and it is not very configurable in terms of the firmware.
However, at its current $299 cost it stands out above similar printers in its price range, like the Artillery Genius Pro and Creality Ender 3 V2.
The Kobra even can even match up against the Creality Ender 3 S1, even though the latter has several quality-of-life features that can be worth the extra $100 for some.
In short, if you are looking to get into 3D printing or you already are a 3D print aficionado on a budget, the Anycubic Kobra is going to give you a printing experience worthy of your money.

Is the MEAN WELL LRS-350 enough for the Anycubic Kobra, which has a 400W supplier?
I changed it with MEAN WELL LRS-350 and it is working fine.